Episode Categories
Create Photo Inception By Using Step And Repeat
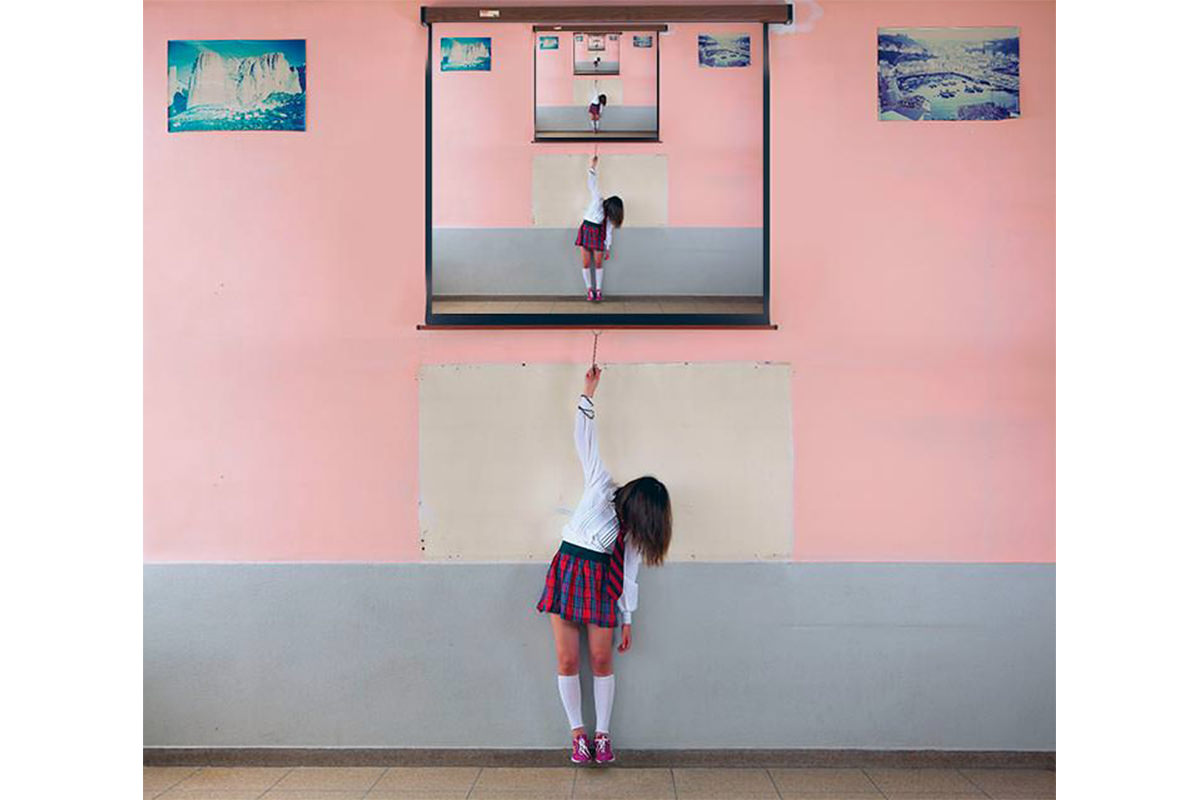
Creating More of An Image To Work With
For the effect we want to execute on this amazing image by Imadina, it would be nice if there was a bit more space on the top of this image. By duplicating the layer and using a layer mask, we extend the wall up, but the projector still needs some work. Using the rectangular tool along with the brush tool lets us paint in a new projection screen from scratch, giving us the space we need for this effect.
Step & Repeat
Step and repeat is a great way to save lots of time in Photoshop when repeating the same action. By adding alt/option to the command for transform (command/ctrl+T), the transformation is repeated. That’s the hard part. Now, by pressing shift+command/ctrl+T, the exact transformation is repeated on a new layer. You can use this command again and again, and it will go on for infinity.
Final Image

Photo by Imadina
-
http://www.facebook.com/kristofferson.brice Kristofferson Brice
-
http://twitter.com/MrRedHead5396 Chase Showen
-
Tjeerd Doosje
-
http://www.facebook.com/profile.php?id=562601136 Richard Martinez
-
http://twitter.com/dracorubio Dracorubio
-
Rafael Leandro Jacomini
-
disqus_bsFHKtV1IB
-
Carrie Tucci
-
Todd Wiseman
Episode Transcript
Today I’m going to show you an awesome effect creating a picture in a picture, in a picture, in a picture, in a picture, in a picture, in a picture, in a picture … (music plays)
Welcome to Phlearn. My name’s Aaron Nace. You could find me on Twitter at aknacer. I’m super excited about this tutorial. We’re doing something that I’ve never even done before. We just figured out how to do it (laughs) and we had to put a picture inside of a picture over and over and over again and it’s going to be awesome. This is an image from Ima and this is from Brussels so Ima, awesome image and hey, we’re going to give you a Phlearn Pro just because we’re working on your image.
Let’s get into it. We’re going to start off. We were looking at this image and Zach had the idea to put her into the projector screen and I thought that was a really cool idea, but there’s one thing we need to do to start off with. We need to get a little bit more real estate in the projector screen because ideally, we would want it to be about the same aspect ratio, about the same size as the actual boundary of the entire image.
How do we do that? That’s a good question. What we’re going to do, first of all, I’m going to hit C for the crop tool and we’re going to just click the top arrow and just drag that up just a bit, something like that just to give us some more room at the top. I’m going to hit enter.
Now we’ve got a little bit more room on the top. What we need to do now is actually extend all this up. Because we have a blank wall in this image, it’s pretty easy to do. If you, guys, (laughs) are going to work on something where there’s like a forest in the background or a lot of detail, a city, it’s going to be a little bit harder. If you do need to extend borders, it’s best to do it when you have blank walls.
Let’s hit command J on our … there we go. Let’s just enter that in. We’re going to hit command J on our background and I’m just going to drag that all the way up to the top. There we go, right up there.
Now our goal is to make it look as though this blends in and it’s just one picture. It probably won't be that hard. Let’s see. (Laughs) It might be extremely hard. What we’re going to do is use a [inaudible 00:02:05 black writer mask] and I’m just going to layer mask away the bottom of this image and the goal here is to get it to just look like it’s connecting.
Layer masking away the bottom of that image and so far looking pretty good, not that hard. We’re just getting to this area where it’s just going to get a little bit funky here with our projector because the projector doesn’t go that far, but now the paintings are just taller so not a big deal.
What we’re going to do is I’m just going to make a new projector because it’s just flat and not really that hard. We’re just going to make a new projector. We’re going to make a new layer and you can use a couple different tools here. Now I’m actually going to be … I want this to be square, a little bit more square. What we’re going to do is I’m going to use the [inaudible 00:02:52 marquee] tool. If you want to stick with, you can see the slide angle, you can use the lasso tool here, but it would just be a little bit easier to use the rectangular marquee tool here.
I’m going to just make a rectangular marquee and we’re just going to go all the way down to the bottom here. There we go. That looks pretty good, and make that into a selection. Now what we’re going to do is on the inside of this, I’m just going to grab a brush tool and we’re going to paint with dark color. I’m going to hold the ALT or option with my brush tool to drag that color. That’s the color of our border now. We can see it looks really good so far.
Next (laughs) thing we’re going to do, I’m going to go to select and then down here to inverse and I was going to paint outside of that selection. Now again, what we’re going to do is grab our brush tool, then I’m going to hold ALT or option, grab that color from the outside there and now I’m just painting the wall from the outside, I’m just painting that color. There we go. I’m going to hit command H to hide the selection so you can see what we’re doing here. Looking pretty neat, right.
Let’s go ahead and hit select and then down to inverse again. There we go. Looking pretty good so we got a square there. Then you can just right click in here. Make sure you’re on a selection tool, right click and go to transform selection. We’re just going to make a new one, but I just felt like transforming this one. There we go. We’ll just bring in our edges and hit enter.
Now because we’re inside of this selection, we’re just going to paint with this nice light white color, very cool. Making a projector screen, not that hard. There are harder things to make in life than a projector screen (laughs) for instance. If you wanted to make this perfect, you can go down to the very edge. You could use like a pen tool and stuff like that. I’m just going to use a hard edge and just paint that up like that and then paint our edge here.
This is something that you could spend a bit of time on and make it perfect. If this was an image you were going to be posting online, I’d spend a little bit more time in this, but this is a tutorial so that’s pretty good for a tutorial.
What we’ve got now is a extended image and (laughs) we’ve got a larger projector up there, which is very cool. Now what we’re going to do with the projector is we’re going to take the whole image and then stick it in the projector.
To do that, we’re going to make a new layer. Shift, option, command N is going to make a new layer. Now we’re going to hold down shift, option, command, these three buttons, if you’re on a PC, it’s going to be shift, alt and control and you’re going to hit E as in ears, yes, ears. We’re going to hit E and what that’s going to do is it’s going to make a stamp visible layer. Basically, it takes everything you see and sticks it on a layer. We can see, I can move this around. It’s its own layer now.
With this stamp visible, now comes the cool and tricky part. We’re going to do something called a step and repeat. What it a step and repeat does is it makes a transformation and then if you hit a different keyboard shortcut, it’s going to repeat that transformation over and over and over and over again until it can't repeat it anymore.
Here is our step. To get to the steps, you want hold down ALT and command or ALT and control, and hit T as in transform. There is our step. Now what we’re going to do is I’m just going to make this a little bit smaller. I’m holding shift and ALT, there we go. Let’s just make it a bit smaller and let’s go ahead and place it right there because that looks good. Now we’re going to hit enter.
What we did is we took the entire image and then we put it inside of the projector. Now because it recorded those transformations, because I held option, command T, it recorded those, now all I have to do is hold shift, option, command and hit T and it’s going to do the same movement over and over and over again effectively putting the entire image inside of a projector over and over and over again.
Let’s see if it works. Shift, option, command T, ah, and it’s in there. Let’s do it again. Command T, shift, option, command T, it’s in there and in there and in there over and over and over again. How boss is that? Quite boss, Aaron. Thank you for showing me this. (Laughs) You can see it’s just over and over and over again. It puts these on new layers as it goes as well so you don’t have to manually do anything. It’s just going to do it all for you, which is really nice.
Now if you do want to use a layer mask like here, it wasn’t perfect so it’s not a huge deal really. You can use layer masks as well. Let’s say that we want to just make this … let’s put a layer mask on there. There are so many different to do things in Photoshop. I’m just going to get this black to be visible here on the bottom. There we go and then you could do the same thing here if you wanted to. Let’s just get the black line visible there on the bottom. There we go and that’s probably all you’d be able to see as well.
There is our tutorial for the day. Pretty cool effect, right, guys? It’s like the Russian stacking dolls, right? (Laughs) We can delete this layer. We’ve got our extension going on. This is our original image. We went ahead and extended it up, and then just made a new screen, which is not that hard. See, not that hard. (Laughs) We went ahead and stacked these inside one another over and over and over again, until you can't see anything anymore, which is very cool.
Now there are a lot of different uses for this technique. I’ll just show you one other one real quick and then you guys can just be really happy today. We’ll make a new layer and … you know what, I meant to make that visible. There we go. Let’s get that out of the group. There we go. That’s what we want.
Earlier, we just made it inside of our projector and you guys can use the same technique with any kind of warp. This is not going to look as cool, but I’m just showing you guys what you can do. Hold option, command T and you could bring this down in size. You could move it over and you can even rotate it. Any of those things that you do, scaling, rotating, and transforming will go over and over again.
If I hold the shift, option, command T again, what it’s going to do is it’s now going to put it on a site rotation over and over again. If you guys have ever seen things like looking down a set of staircases and they seem to do this forever and ever again, Flicker and things like that, this is how they’re doing it. They’re just doing a step and repeat over and over and over again, and then this is what you wind up getting, just a whole bunch of fun copies of something that looks like that.
You guys can use this effect however you want and go get creative with it. Have fun. For now, this is what we’re down and (laughs) just a really cool image and a cool effect. I hope you guys enjoyed this tutorial brought to you exclusively by phlearn.com. I just wanted to say that. Have a great day, guys. I’ll phlearn you later. Bye everyone.


