Episode Categories

Transform an Image in Photoshop With the Clone Stamp, Smudge Tool, and Textures

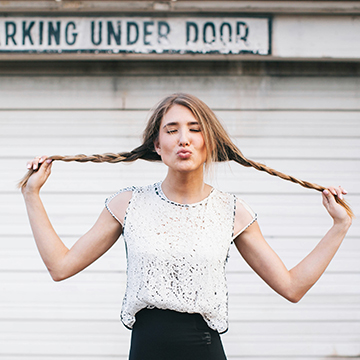
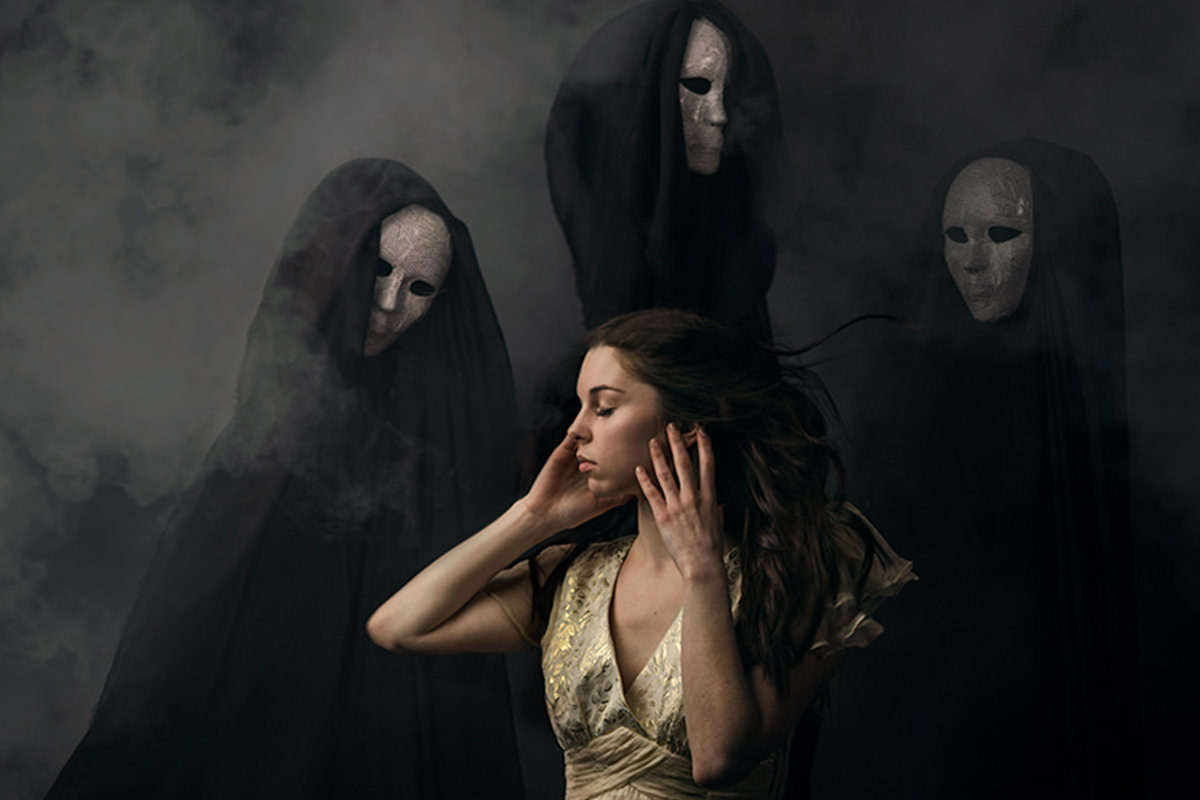
Today we’re editing an amazing self portrait by Amelia Fletcher. Make sure to check out the rest of her work, she rules!
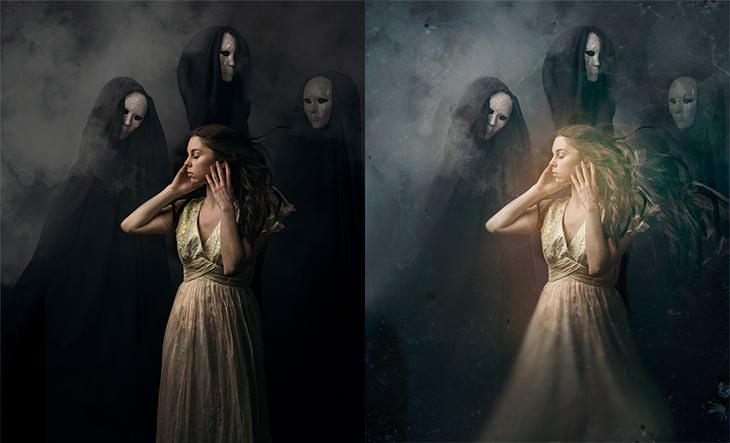
Blurring Hard Lines

The ghosts in this photo create some heard lines that become slightly distracting. By using the smudge tool to blur these lines, they look more ghostly and take away less attention from the focal points of the image. This is a destructive technique, so make sure to duplicate your layer before using the smudge tool!

Adding Atmosphere and Textures

By using parts of your original image to create special effects, you can create a unique and organic look. We take parts of the ghosts and use different layer blending modes, and even use part of the image to create the glow in the center. Using textures is also a big part of creating an effect like this. Textures can be confusing, but you just have to take the time to figure out what looks good and experiment with different blending layers.

Before & After

  • http://www.facebook.com/pezi.be Pezi Be

    Awesome tutorial!!! This must be one of my favourite ones! The photo is really good – great work!

  • Carrie Tucci

    Amazing picture Amelia! Sick edit Aaron. My mind is blown! Thank you both.

  • Joe Gunawan

    Wow, great job Aaron and love Amelia’s work, too!

    Joe Gunawan
    SLRLounge.com Editor

  • http://www.facebook.com/paul.frocchi Paul Frocchi

    awesome work!

  • http://www.photopathway.com Greg Brave

    Great tutorial as usual! I wonder when do you decide to use levels and when curves?

  • Diane Jolliffe

    Amelia is a phenomenal photographer!! :)

  • Mark Feliciano

    Smudge tool? Who’da thunk it? Thanks!!

  • http://twitter.com/renlish Renlish

    This is probably one of THE best tutorials on the site. Great work, Aaron!

  • http://www.facebook.com/kerry.loudenback Kerry Loudenback

    Incredible tut. Well done, can’t wait for my Halloween shoots!

  • Eddie Sebastian

    Fantastic Work, Guys!!!

  • http://www.facebook.com/amybe Amy Ebersole

    It is! My favorite by far.

Episode Transcript

Today, we’re going to add special effects and atmosphere to an amazing self-portrait by Amelia Fletcher.

Hey guys, welcome to Phlearn. My name is Aaron Nace. You can find me on twitter @aknacer. Today, we’re going to take an amazing image by Amelia Fletcher. She’s part of the Phlearn team and an amazing photographer. We’re going to link to her portfolio down below. We’re going to take this self-portrait that she went through about halfway and I talked with her and we were like, all right let’s go ahead and take it all the way.

We’re going to be doing some really good things with special effects, some atmosphere, and all kinds of really cool things. Stay tuned because we’re going to get into it right now.

This is our image we have to work with today. Already it’s very, very cool. I saw it and I was like, oh man this would be an awesome image to add a quite a bit of atmosphere. Let’s just zoom in a little bit and we can see everything is really sharp and in focused and just a really all around amazing image. I love the play between the characters and Amelia and what’s going on here. Now, the reason I thought we could do some with atmosphere, quite a bit with atmosphere is because we have this nice smoke and fog texture in the background. It seems like it would blend itself to give it a little bit more of a mysterious kind of feeling to the image.

We’re going to start off kind of downgrading this image a little bit. We’re going to just mess it up a little bit, but you’re going to see it’s going to get some really cool effects. When you hit Command-J on the background it’s just going to duplicate it. Then we’re going to go over here to the smudge tool. Now, I almost never use the smudge tool because it just destroys pixels, but in this case this is actually what we want. The reason I want this, let’s just zoom in so we can see what we’ve got over here. We’ve got a relatively hard line going on right over here at the edge of this ghost or whatever it is.

Now, the hardline, it’s not bad, but it definitely detracts, for me, just a little bit from the image. Sometimes when things like ghosts or smoke or fog they have the tendency to kind of blur up a little bit. You can’t see all the details in them. That’s what the smudge tool is going to do. It’s going to help me blur this in a little bit. What we’re going to do is, I’ve created stamps or just a copy of the background. Our strength is at 50 and what we’re going to do is just click over here and go back and forth on this just a little bit. This is just going to help us kind of blur that area. We can make our brush a little bit smaller and it’s just going to blur that whole transition right there.

Let’s just turn that off and on so you can see the difference that makes. Just calls a little bit less attention to this. You’ll see on portraits of painters and things like that, they’ll use these kind of techniques all the time with paintings like lines that are not necessary as important. Tend to not be as sharp. They won’t be as in focus or if they’re painting someone’s back leg might not have as much detail as the front leg. We’re kind of using some of that technique here to draw a little bit less attention to some of these lines.

We’re going to take care of those and I’m going to do some of the same thing with her dress down here, as well. It’s again, not exactly the focal point of the image and because we already kind of have that eerie type of effect, I think it definitely works here. You can take this as far as you want it to go. This is still relatively subtle what we’ve done here. You can’t see a whole lot.

Let’s go ahead and hit Command-J then. I’m going to take it a little bit further. We’re going to take this and just really start to warp things out and go crazy with it. Now, if you guys are working with a full-sized image, this image is downscaled just a little bit. If you’re working with a full-sized image, this smudge tool is going to really take up a lot [inaudible 00:03:29] and resources. That’s why I’m working with a downscaled image. If you’re doing this on your computer and it’s taking quite a bit more of your computer resources, that’ s why, because I scaled it down a little bit.

Okay, so you can see we’ve lost a lot of detail. Obviously, this is not like a commercial. This would not go in a magazine or something like that. This is much more the fine art. Losing detail in some of these cases can be okay because that’s kind of the idea. It almost looks like it’s out of focused. Just keep in mind this is definitely destructive, but that’s kind of the effect that I wanted to go for in this image. There’s really no right or wrong editing. Just make sure you’re doing something that’s appropriate to the image.

With just the smudge tool you can see, just taking this off and on, we’ve already got a really cool different effect to the image. Now, let’s go ahead and draw some attention to … I want to draw some more attention to Amelia’s hair here. She’s got really nice hair. That sounded really weird. Amelia you’ve got great hair. (Laughs) It just looks really cool and I want to brighten it up a little bit. We’re going to do that. I’m going to grab my RGB slider and just brighten it up here a little bit. It looks a little bit de-saturated. Let’s go back here in our … There we go. Just undid. Let’s go back in our layer mask. I’m going to hit Command-I and then we’re just going to use a regular brush.

I’m just going to make this paint white on my layer mask right over here. Now, what you’re going to get often times is if something is in shadow. Here we go. I can even make it a little bit lighter behind her hair because I kind of like how that looks. There we go. If something is in shadow, the saturation of that area is going to actually be relatively low. If you do bring it back into highlight, you’re going to wind up getting a de-saturated area. This is quite a bit less saturated than it should be. We need to add a little bit of color back into that. To do that, just go back into your curves. Let’s go to our red channel. Click here and just drag up just a little bit. There we go. We’ll go to our green channel and we’ll drag up just a little bit with that, as well. Okay, so you can see there’s the before and the after. If you do brighten something up, just make sure you put a little bit of color into it, as well. There we go. We have a nice bright area and I’m okay brightening this up back there just a little bit, as well. I think it’s kind of nice and it definitely helps to show some of that definition in her hair. All right and just make it black there a little bit. Cool.

We’re brightening it up. Now, we’re going to do all kinds of cool special effects with this. This is the ideal image to play around, get in there and have a lot of fun. We’re going to go ahead and start off with it. I’m going to create a new layer. I’m going to use a clone stamp tool. We’re going to grab a clone stamp tool. Sometimes my brushes disappear. If that happens with you, I find a changing program just helps. Then you can see your brush again. Just a simple little Photoshop error.

Let’s grab our clone stamp tool. Let’s grab a large brush and then we’re going to take her hair and on a new layer. Make sure your sample’s current and below here. I’m just going to sample her hair and paint it right over there. There we go. That looks pretty good. Now, what we’re going to do is change this from normal down the screen and we’re going to give her a lot more hair. Just because I think it’ll be fun. We’ve got this as screen, which is going to make the darks disappear. I’m going to hit Command-T and we’re just going to make this quite a bit bigger. Move our little control point and then bring this around there.

Okay. Now, it doesn’t look good just yet because we’ve got too much detail. It’s too light in there and it’s not the right color. We’re going to hit Command-L. That’s going to bring up our levels. We want most of this dark area to kind of disappear. To do that, just grab your dark and kind of drag that in from the left to the right. Then, you can do the same thing with your reds. If you want to put a little bit. That’s going to put a little less red in there and a little bit less blue. The opposite of blue in this case is yellow. Okay.

That looks pretty good. Let’s put a layer mask around there so it layer masks out her face and there we go. We’ve just got this kind of cool altered details. I’m going to click on our curves here. It’s got a little bit too much green so I’m going to go to my green channel and just pull down my green a little bit, which is going to give it a bit more magenta. There we go. Let’s use our layer mask. It’s not really, I don’t even know what it is but it just kind of adds to the effect that maybe there’s something back there.

I’m going to hit Command-J, which is just going to duplicate that layer and then we’re just going to move it right over there. That’s pretty cool and we’re going to change the color a little bit on that as well. I’m going to hit Command-M, which brings up our curves. It doesn’t really make sense, but Command-M is curves. I’m going to push some reds and some yellows in there, as well. All right and let’s just hit Command-U and de-saturate that. There we go. We’re just kind of adding some of these effects in there and I don’t know what this is, but I think it just kind of helps to add the overall atmosphere of maybe there’s something kind of crazy going on with her hair, which is kind of cool.

Let’s do it again. I’m going to take it a step further and we’re just going to actually duplicate her face (laughs) again with the clone stamp tool on a new layer. We’re going to change this from normal to screen and I’m going to hit Command-L. We’re just going to darken these, darken the mid-tones up a little bit. It’s really transparent except for where her face is. Okay. Now, I’m going to go ahead and give that a blur. A Gaussian Blur. There we go. Something like that. What we’re going to do with this, you can do just about anything. The reason why I’m not just grabbing a brush is because by using pixels that are already in the image, you stay with the same color pallet and you get a lot more color variation. You can see this really nice variation in there. Now, we’re going to choose this nice blur. It might happen behind her or something like that.

You can change this from screen. Go down to maybe, no I like screen. I think that was nice. Put a little bit more color in there. Let’s drop the amount of blue. There we go. Then, pull up a little bit of red in there. All right, there we go. We can kind of move that around. Then just lower the opacity. We’re just kind of adding some effects here. This is stuff that it’s not going to work on every image. This is the type of image that it will work on. A nice glow around someone’s face. This is not going to work on every single image that you guys edit. Just keep that in mind.

All right. I do want to add a couple more of these guys in here. What we’re going to do is grab our clone stamp tool and I’m just going to clone stamp over their faces. It’s going to make those quite a bit bigger. Something like that. We’re going to change those from normal down to screen, as well. Okay, and you can see basically it doesn’t look right because the dark isn’t dark enough. We can see both what is supposed to be dark and what is supposed to be light. We just need to make this area darker and then just this face is going to show up.

To do that, really easy, just hit Command-L. Just like what we did with the hair earlier. Just drag your input levels from the left to the right and your darks are going to disappear. What it’s going to leave you with is just that mask left. All right. Then, we’re just going to hit the number 2 on our keyboard and that’s going to bring our opacity to 20%.
It’s just kind of faint there. This is kind of a cool trick to add some atmosphere in there. If you studied the image you would probably see that thing there. Just upon initial looking at it for 2 seconds, you probably wouldn’t see that so that’s kind of the idea. We’re going to do the same thing here with this guy on the left. All right. Screen. Command-L. There we go. All right, there we go. We’ve got another one of those guy on the left, or the right. I don’t know my sides. I’m teaching Photoshop here not sides. All right. This is cool. It’s a little bit too big I think so we’ll just make it a little bit smaller and maybe reduce the opacity a little bit.

Cool, so we can already see all these things are definitely adding to our atmosphere. Let’s just going ahead and Shift-Click all those and hit Command-G. We have our before and the after, really quick. We can see, it’s not a huge change. We haven’t changed everything about the image, but it really does give a little bit more atmosphere. A little bit more feeling into this image that already had quite a bit of feeling there.

Let’s do some work with our colors. To do that, I’m going to go to my curves. We have this really nice gold color here in the highlights. What I want to do is push some blue and maybe a little bit of green into our shadows. There we go. That’s going to keep these guys back here from looking so kind of monotone. Just this plain white color here. I think it just look a little bit better if there are kind of fit with the rest of the image just a little bit more. If it has some color in it rather.

All right. Then, I’m just using my layer mask to kind of mask out some of the area so it’s not just blanket everything. Just like that. Just totally a random pattern. It’s just going to help it look like everything kind of fades in and out just a little bit more. All right, this is already very cool. Let’s add a curve adjustment layer to this. I want to brighten up this area here. Let’s warm this up. I’m going to brighten it up. We’re going to warm it up by pulling down our blues a little bit and pushing up our reds just a little bit. Okay. We’re going to choose a Marquee tool right over here. I’m going to hit Command-I. Then, de-select and hit Command-I again. That’s just going to create a nice circle right there. (Laughs)
We’re going blur it. Just going to filter the blur and then over here to Gaussian Blur. Sorry, that’s box blur. Filter. Blur. Gaussian Blur. I have a keyboard shortcut set for this so I don’t ever really go to it but that’s where it is if you guys want to access it. Okay. Now, that’s way too much. Obviously that looks bad. We going to click here and we’re going to click our RGB and kind of lower that down until we get something that actually works. I think we took away a little bit too much blue so we’re going to help bring that back, as well.

Okay, very nice. That just kind of helps to add a little bit of a focal point into the image. I’m going to change the crop just a little bit. Maybe bring it up. There we go. The reason I’m doing this is because there’s a lot of information here that goes really dark and I don’t know. I do like how the dress looks, though. Maybe instead of changing the crop, basically all this negative space here, I don’t mind it a whole lot. Either I want her to be a little bit not center or I want this to come up. Maybe we’ll just do a little bit of each of those. There we go. Can you see how this is, there we go, with everything just in the center here, it looks a little bit static? Then, with this crop it tends to look a little more there’s an action kind of happening this way and she’s resisting the action rather than, she’s just in the middle of these 3 figures.

That just helps out a little bit more with the crop. Now, to get rid of this negative space, we’re just going to take a color here with our paintbrush and paint with a 10% flow. Just kind of paint in a little bit of lighter color right over top of here. All right. That’s just going to help break that up. I’m just kind of clicking, holding Alt or Option, which will sample our foreground color. Sorry, click on rather. That’s just going to allow me to kind of paint around with some of these other colors here. All right. We’ll just lower the opacity.

It’s just kind of lightening this area up, which is getting rid of the dead space just a little bit. All right. That is sick. You know what? Just to finish it off because I love this image. I think it’s really cool. I’ve grabbed some textures. These are from the distressed paper texture pack, which we’ll link to below. You guys can pick that up. So many awesome textures. I just grabbed a couple and we’re going to throw these right on top of this image and see what we can do with having these textures interact with these images. They’re huge, by the way, so I’m having to re-scale them.

Okay, you can either make things darker or lighter. I’m going to make things lighter. What I’m going to do is hit Command-I, which is going to invert that. I’m going to change this from normal down here to screen. Oh, this is going to look so sick. Let’s just go ahead and here we go. Let’s hit Command-T. I’m going to Right-Click. Now I like to go in from left to the right. I’m going to hit Command-J. Sometimes when I don’t know if I want to apply this for good, I’m going to do 2 separate things to each of these layers. I’m going to apply levels to this, but just in case I don’t like that later on, I have a version that’s not messed up.

We’re going to hit Command-L. I’m just going to pull this, my mid-tones here. There we go. That looks really good. Now, we’re going to hit Command-U, which brings up our hue saturation. I can just bring my saturation down a little bit. All right. Let’s hit Command-U. I’ll just push my saturation a little bit towards the green side. It was a little bit blue before so I’m just going a little bit to the left with the hue and a little bit left with the saturation. There we go. You can see this was a piece of paper for a texture, but it looks almost like marble now, which add that really cool kind of wiry, I don’t even know, but it looks awesome. (Laughs)

All right. Let’s bring another one in. We’re going to scale this down, as well. Let’s just go ahead and rotate this around. All right. This is a completely different piece of paper. I’m going to hit Command-J on that. We’ll get a couple different copies. We’ll change this from normal down to soft light. Okay, which definitely looks cool. Getting some weird areas down on the bottom left. You can always try inverting things. Command-I will get you a completely different effect with your texture. All right. Let’s try down here to multiply, which is going to create little dark patches in your image and it does look good. I do like a little bit of those dark patches, but it’s darkening my image up as a whole too much. I’m going to hit Command-L and I’m going to bring my image lighter. We still have our dark patches here and there. We can see. Let’s just zoom in here and there and things like that. It doesn’t darken my image up as a whole. Okay. Let’s just erase away some of these areas there. Okay.

We’ll do the same thing but instead of darkening though, we’re going to go to screen and I’m going to hit Command-I. Then, we’re just going to hit Command-L to bring our levels up. Screen and then we’re inverting it and then it’s just bringing these things lighter. Okay. Then, we can hit Command-U and change our colors just like we did before to give a little bit more of that cool texture right on there. I think that really did set it off. Made it look cool in a whole new way. Very, very cool. You can see this didn’t take an incredibly long time. Using this type of image really did lend itself to giving a lot of cool special effects and atmosphere.

Let’s show you guys the before and the after. Here’s our before. Still a very good image. It’s just a little bit static and it definitely played itself into being manipulated into something with quite a bit more movement and feel into it. Awesome image. I hope you guys learned a lot and I hope you really enjoyed this tutorial. Thanks so much for watching Phlearn, guys and I’ll Phlearn you later. Bye everyone.

Free PRO Tutorial
Sign up for our newsletter and instantly receive a free PRO Tutorial!
Over 10,000 people
are already signed up.
Contest

Random Tips

When shooting outdoors with a flash, dont use a shutter speed faster than 1/200 seconds.

aaron