
How to Create an Epic Composite in Photoshop – A Dark Force
-

-
Add to
favorites
-
DifficultyAdvanced
-
Length4.25 hours
-
Videos12
-
Software
DESCRIPTION
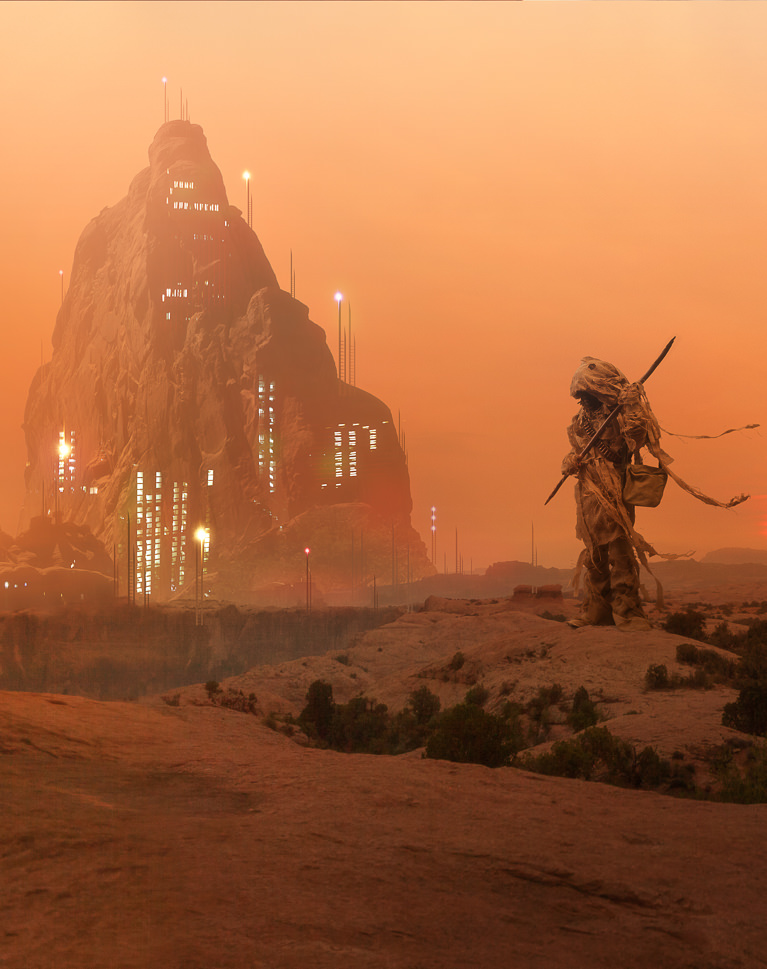
Follow along step-by-step to combine more than 20 images bringing this new world to life. Beyond adding people, animals, buildings, and plants to this scene, you will learn advanced techniques for compositing, coloring, blending, actions and brushes.
THIS COURSE INCLUDES
- 24 Sample Images
- 7 Photoshop Brushes
- 1 Photoshop Action
Share
Table of Contents
-
01 - Introduction to A Dark Force: Importing, Planning, and Building the Background15:49m
-
02 - Match Color in a Composite Background28:30m
-
03 - Blending Planets into the Sky22:12m
-
04 - Build a Unique Environment with Realistic Terrain33:14m
-
05 - Build an Alien Civilization from Scratch26:53m
-
06 - Creating Atmosphere in the Background9:57m
-
07 - Cut a Subject Out of their Background26:22m
-
08 - Match Color Between the Subject and the Background26:27m
-
09 - How to Mask Out Background Subjects25:59m
-
10 - Blend Subjects into the Background13:06m
-
11 - Finishing Color17:42m
-
12 - Lessons Learned7:25m
Course Downloads
A Dark Force
Build the Background
Learn how to combine multiple photos together, even if they were taken in different locations with different lighting on completely different days.
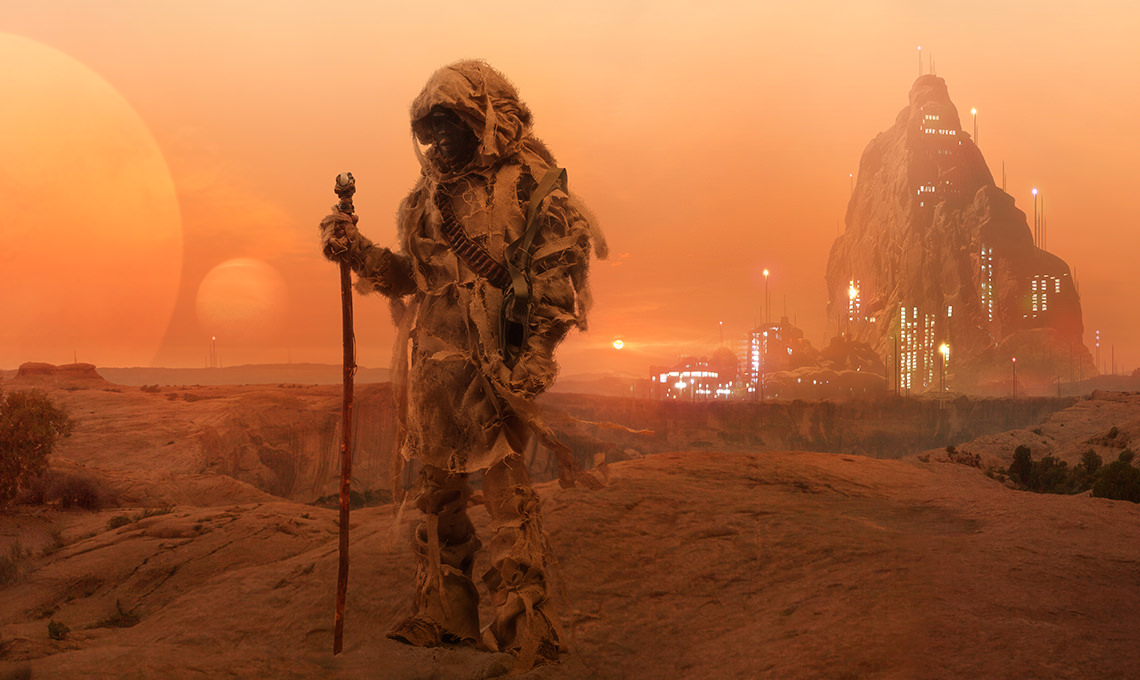
Add Planets
Learn how to blend and color additional planets into the final image. These same techniques can be applied to just about any composite image you create.
Perfect Color Match
Create the most believable composite image by matching the colors perfectly. Learn how to adjust the colors separately between shadows, mid-tones and highlights to create an accurate and realistic color match.
Increase Depth
Match color and blend the mountains into the background to make them look miles away. Learn about atmosphere and color depth, which are necessary for this look.

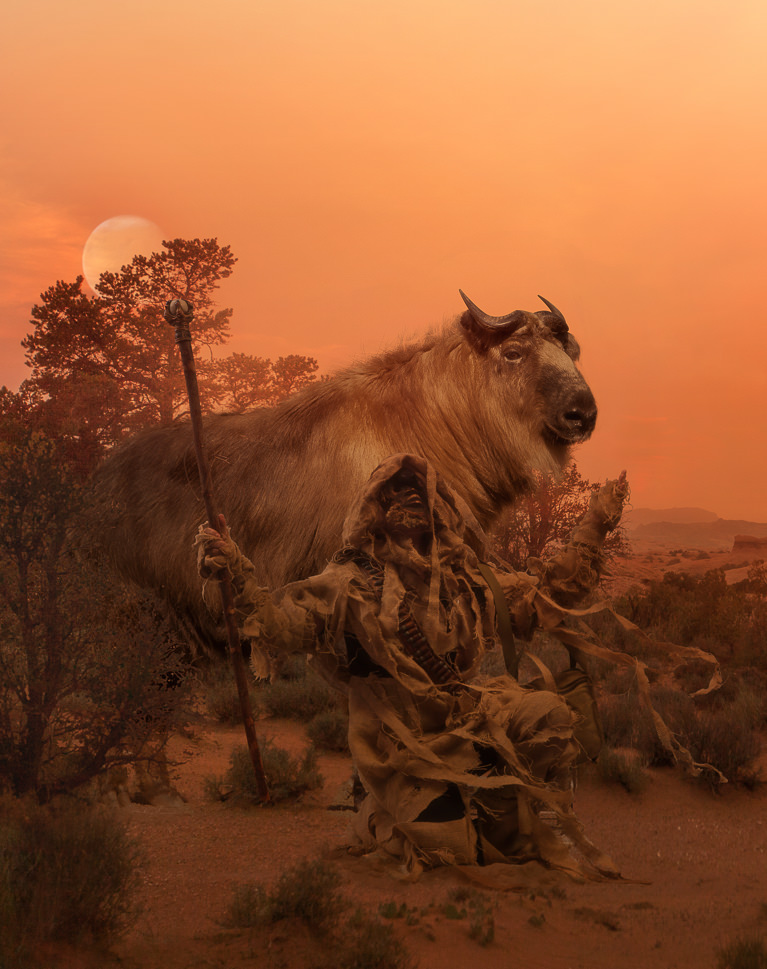
Make Perfect Cutouts
Follow along as we teach you each step required to cut out the subjects for this image. Create a custom brush that mimics hair to cut out an animal more easily. Learn the Pen Tool to cut out additional details.
Include Every Fiber
Learn how to add details to your composite images that will make a huge difference. Watch how to capture every detail perfectly, including the fibers on his clothes.
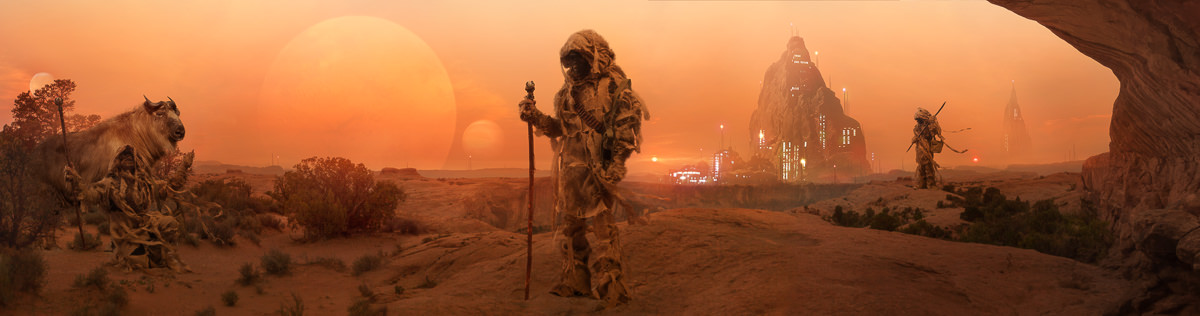
Change the Composition
Take control and change your scene while you build it. Choose the story to tell and relocate the subjects to fit however feels right. Learn best practices for keeping the scene looking natural no matter how you want to build it.
Create Multiple Variations
Give your scene the appearance of increased scale and depth by using multiple variations of the same subject. For this tutorial, we photograph the same subject in the studio making different poses that apply to different areas of the background.
Create a Fantasy World
We combine multiple images together to make one cohesive world for our subject to live in.
3D Lighting Diagram Video
Learn how to balance a room’s ambient light with strobe light to create an image with more emphases on the subject. The included 3D Lighting Diagram Video explains all of the lighting and camera angles in detail so you can recreate this look easily.
Phlearn Custom Brush
Get the job done better and faster by using the right tools. Use the included Phlearn Custom Photoshop Brush to blend layers together seamlessly and even do light retouching. Once the brush is loaded into Photoshop, it’s yours forever and can be used on any image.
Remove Distractions
Refine your images by removing unwanted distractions. Master multiple techniques that will allow you to remove literally anything leaving only the focal points you decide.


Reviews
FAQ
This tutorial includes 24 sample images, 12 video tutorials, a PS Action, and PS Brush. Download the sample images and assets at the top of the page.
Yes, every tutorial on PHLEARN is included in the PHLEARN PRO Subscription.
We suggest using the latest version of Photoshop, but our tutorials are designed to be compatible with CS4, CS5, CS6, and Photoshop CC. Get the latest version of Photoshop from Adobe.
Download the course files at the top of this page.
You’ll find answers to some of the most common questions in our Help Center. If what you need isn’t covered, you can submit a question to our all-star customer support team and they’ll get back to you right away!
New & Popular Tutorials


Training Site in
the World
Tutorials!
Ratings
and Counting
Subscribers
Love, love this. Even though this is over 10 year old I have learnt so much about lighting and colouring and making all the various images fit right in to create a compelling and realistic composite. I must admit I used a bit of Generate Fill on a bit of a background,. Plus, Select and Mask on the figures which didn’t even compare to Aarons use of the Magic Wand .lol I will PHLEARN on…
Of all tutorials this is the best one I find, it’s a pleasure and an honor to work with such an amazing project.
is there a fix for the blurry vid?? the moment i go back a few steps the video gets blurry and it stays blurry for a while, then it goes back to normal then blurry again.
Really liked the info but couldn’t follow along because the downloadable file couldn’t be extracted. Have had no other problems with any file from this site. So don’t know what’s up.
Good tutorial. Would be better if actions weren’t used and everything has done manually.
It was a great time had with this tutorial really loved that saturation blending but In this tutorial you didn’t use the thershold layer I don’t know reason why and also i seen some of the areas like animal foot and the man on right seems not blended well for my eye. And how you choose the perfect images for composites, because if you just search images in internet you have a thought of 50% of choice only it will work or not for your composite. I think I am done what i want to tell. other than that its a great tutorial. Aaron Rockz. 🙂
Great tutorial. The process and techniques are well presented and useful. I specially liked the color analysis and correction. Congratulations for another well done and presented tutorial.
This tutorial is great not only because Aaron is showing you one of the best practice techniques, but it shows you why you are doing this. The knowledge and skills from this tutorial deserves much more than a 5 star.
THIS IS JUST AMAZING LEARNED SO MUCH FROM THIS TUTORIAL.
Whew! I just finished my version and I am so grateful for the shared wisdom. Thank you all so much!
I learned so much with this Tutorial. thanks Aaron and your Team. Fantastic!!!
How I spent the holidays in 2018? I had purchased A Dark Force a while ago and I finally found the time to work through it. Wow. I learned a ton. This is my second tutorial with the Check Action in it and I think it is finally sinking in. Thanks Aaron and thanks to everyone at Phlearn for making phlearnin’ fun!!
Normally I do the work with the tutorial. This time, I did not and I am glad I didn’t. It was so entertaining and informative that had I been working with the tutorial I would have missed a lot of the nuanced aspects of this tutorial. The little noises and sound effects that Aaron makes are hilarious and stuff I do when I am alone in Photoshop. This was an absolutely great tutorial. Thank you, Aaron and Phlearn team. Now I have to re-watch it and do the work this time.
Great tutorial I really enjoyed this one but……where you high making this tutorial lol
I’m not even half way through and I’m loving it. I’ve watched other tutorials (photoshop 101-301) but this one is much more fun since there is a purpose, and it’s not just going through tools one by one. Thanks for the great tutorial!
I love this tutorial, I keep coming back to it to do something different.
I love this tutorial, compositing is my favorite thing in Photoshop, it is what i mostly use the program for. And after you learn the basics of using masks and the selection tools, this tutorial helps a lot, because it gives info about matching the colors of all the elements of the composite to fit in… it just takes compositing to the next level. My favorite part is the one about matching the luminosity and saturation of different elements so that they fit in. I admit you lost me a bit in the beginning, but luckily, as you said many times throughout your tutorials, there is the rewind button :)) I know you have some free tutorials in which the method you use for matching luminosity and saturation of different elements is a bit different than in this tutorial. But after you understand what certain blend modes mean, i guess you can use either technique. And i got a better understanding of blend modes in this tutorial.
I also like the part with creating the custom brush, and having two of my favorite things (matching objects colors and creating custom brushes) in the same tutorial is pretty cool. And also thanks for the file with the most used keyboard shortcuts for making composits, those are also the ones i use the most, and i always wanted to make a list with them, but was too lazy. Awesome tutorial, keep up the good work!
OMG the redbeck voice during the background lesson was priceless. Love you Aaron!
Nice tutorial!
GREAT TUTORIAL
I learned so much from it
It was my first attempt at compositing in Photoshop
Thanks a lot
GREAT TUTORIAL
I learned so much from it
It was ny first attempt at compositing in Photoshop
Thanks a lot
Aaron Nace sir your great tutorial thanks you i like your tutorial
I was hesitating on buying this attractive tutorial, but the last blackfriday got me (damn you, marketing !).
I am really happy I finally did buy it. It is easy to follow, well organised, detailed and learn efficient. Aaron is very good and pleasant teacher in my opinion, and we all know that the teacher does a lot when we want to learn something.
Before watching it, I had very few skills in photoshop and compositing. After watching it closely and strongly paying attention, and a bit of work on my side, I am know able to imagine and create my own composite pictures, and that’s cool (you can see 3 of them there : https://www.flickr.com/photos/135801061@N08/albums/72157663097769130) ! Still work to do but you know, you never stop learning.
Well i guess you get it : I strongly recommand it. If you are interested in compositing, you will learn a lot, so get it !
An Amazing tutorial, haven’t tackled the epic dark force but gave me the tools to produce my star wars themed poster. Again, a big Thank You to you all at Phlearn.
One of the best tutorials I have watched. It well explains (and helps you with) blending photos that are initially quite different, although when Aaron gets involved in what he is doing you have to watch the arrow key on occasion just to see exactly what he is adjusting. Have already taken these lessons and applied them elsewhere as they are, in part, basic to making better composites. But I do agree that the beast should have a saddle – see attached. The images that did not come with the tutorial were made in Poser.
I found this tutorial magnificent. I’ve worked through all the tutorial and I’ve learnt a lot of new things. Very good tutorial !!!
Just purchased.
I am rating it in advance, because I have seen quite a lot of the other Phlearn tutorials and I know it will be fantastic.
I’ve been working on leveling up my PS skills and am a big fan of Phlearn’s free tutorials on YouTube. Eventually I wandered over here and saw all the pro tutorials. As someone who is on a pretty tight budget, I hesitated to buy this, but I’m so SO incredibly glad I did. Zero regrets. This was a valuable investment in my design skills!
Aaron is the teacher you never had in design school but always wished for. He explains everything well, is funny and reassuring, and that creates an awesome environment for learning. The actual quality of the videos–high def, well edited–enhances the experience, too. All the materials for the lesson are organized well. This wasn’t something useful to me, but he did explain setting VLC up, how to use the videos, which I thought was a considerate step.
The amount you get out of this tutorial is astonishing. Aaron explains each step thoroughly so you have a fundamental understanding of techniques that will easily be usable for future designs. I found everything on color matching particularly helpful, as well as the action he provides to make sure your hue, saturation, and brightness levels are all in check. I finished the tutorial and immediately started doing my own to test the skills I learned, and was impressed with the quality of work I was doing on my own.
Bought another package of tuts already and am excited to phlearn! =)
Love this !!! Really it’s very good and some creative things are here.
What a nice tutorial !!! it’s very helpful for me. I like it. Thanks.
Nice tutorial with simple rocks , colors, background. I learned a lot and enjoyed a lot by creating something different.
@raphael.winckler
In the tutorial he doesn’t add shadows as the subject was shot with the same lighting in the background so there wasn’t really none to add. I did a rendition myself and added shadows and thought it came out better myself so if you buy which i suggest you do you won’t regret it you can add your own.
What a great tutorial, I recently discovered Phlearn on You-Tube and love Aaron’s teaching style, not to mention his vast skill level with Photoshop and photography. He is quite the phenomenon in my opinion. After watching several of his videos I decided to visit the Phlearn site, It just phloored me. I decided to go all out purchasing two of his packs. One including the one I am reviewing now “A Dark Force”. It is really great and exciting, my mind is racing now as if a whole new world has opened up before me with all the new information I have received from Aaron in this video. He really peels back the layers in photoshop and how to use it. He has me looking at everything differently. Look at how the light is affecting this object or that object. Look that area is blown out. This is how to adjust this area but, not affect the other areas. So many things I would have never known. Thank you so much!
Quick question. I noticed that while Aaron was using the tailor made brushes he was changing the angle of the brush on the fly. How do you do that?
This is the first time I’ve paid for a tutorial and I’m not disappointed. I learnt a great deal about compositing and the ‘Check’ action is fantastic! All in all a brilliant tut from the ‘Master’. The final image is absolutely stunning!! Now, I guess. I’ll have to look at some more Pro Tutorials.
HI Phlearn!
I am not quite sure about what I’m about to say: I was thinking of buying this tutorial and so I’ve had a look at some people’s pictures in the comments below and some of the preview pics you posted. And on each of them I haven’t seen any shadows undernieth these “sand people”. So I am just wondering: is it just the way the light is that makes the shadows not show up or did you guys forget to ad some shadows?
I am not criticizing, simply wondering!
I would really appreciate an answer because I am really interested in the work you do and I think it is wonderful.
Thank you guys!
Raphael (from Australia)
I learned so much from this tutorial. It was my first attempt at 2D compositing in Photoshop. I have had some compositing experience in After Effect, and this tutorial helped me to grasp some of the tricks that professionals use to blend elements together.
Thank you, Phlearn!
Monster of a Tutorial Aaron ! packed full of useful tips and insight. Thanks for sharing!
This was a fun and great tutorial, I learned so much and love compositing. Thank you for showing us how to do this.
Great tutorial! I’m about two thirds of the way through and this is what I’ve done so far. It still needs a lot of work. I’ve been using photoshop for over 10 years and haven’t found a better tutorial on compositing! I’ve learned several things with this video that really help with composites..
Should I start learning compositing with this tutorial or any other tutorials from Phlearn, like the Juicy Kicks for example? Please answer cause I really wanna get deeper and more professional with compositing..
The Dark Force tutorial is a pretty intense and advanced training. While it’s awesome, if you’ve never done any compositing, we’d recommend starting with the Beginners Guide
Well this is my first attempt at this.
Well done!!
@Qanea
i know what you mean but my point is that the action will not really help to SEE if the saturation IS at the same level or not.
same level should mean the patches lock identical…. but as you see in my example they don´t look identical.
so you SEE a difference in the patches and think the saturation is different… when in fact the saturation is at the SAME level.
I’ve only seen part 1 but I want to answer Peter B
You know I’ve actually noticed that before.
For example use some colors with the same brightness (like 90)
then create a a Black/White adjustment color. you can see they are different in brightness.
But this is how colors (Light) work.
Let me give you an example.
Let’s say you have this nice blue shoes… you put them in a really really dark room. you obviously can’t see they are blue, but it doesn’t mean that they have lost that nice blue color. if you turn on the lights you can see they are blue. in fact when there is no light… it doesn’t matter how is the saturation
I don’t know if I could make my point or not… but it’s just how colors and light work, things usually get less saturated when it’s darker and the value 100% of saturation simply means that your color is in it’s most saturation level in that brightness.
Have fun.
by now great tutorial though…
@Peter B
Interesting find, Give this video a look this is how i learned how to match Luminosity, Color and Saturation. Cant beat the color sampler and info values.
http://www.youtube.com/watch?v=VsfJF0NEn5k
great tutorial…. but i think your action is kind of wrong…. or i don´t get it… 😉
make a few color patches change hue and saturation on these patches.
now you say when you enable the LUMINOSITY and HUE layers you will only see the differences in SATURATION.
but when you look at the colored patches you will see that patches with the SAME saturation look different.
I had a blast doing this tutorial! It was my first one from phlearn after seeing Arron on Creativelive. Liked it so much I got two more. Thank you so much for the lesson.
Another great tutorial. Learning how to blend the three separate background photos into one seamless background was awesome. So many great tricks for dealing with hair, cloth etc. Definitely one of my favourites.
This was awesome. so much information and special tricks. Must have tutorial!
Out of all the Great Tutorials i find myself always coming back to this one. Everything i wanted to know about Compositing was found right here. I learned what i wanted to learn and beyond. Plus you cant beat the price compared to other material out there.