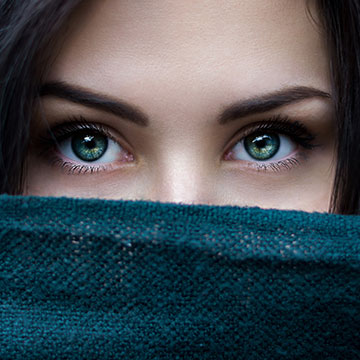
BEFORE
AFTER
Tutorial Description
You’ve seen it everywhere, but how is it done?? Today we show you how to change the color of eyes in Photoshop!
Did you know you can replace colors in Photoshop easily?
Selecting the Eye
To start off, make a New Layer and then a Curves Adjustment Layer directly above it. Create an upward Curve so that the image looks bright. This will help with visibility later on, and it allow us to alter the selection as we go.
Next, select an area just smaller than they eye using the Elliptical Marquee Tool. Invert that selection by clicking on the mask and then press CMD + I. Delete the Underlying Layer and then Invert the mask once more.
Refining the Selection
Since the Outline of the eye is very sharp and unrealistic at this point, we need a blur to make it more believable. Go to Filter —> Blur —> Gaussian Blur, and choose an amount of blur that looks right for the image.
Layer Mask on a Group
This is a big and important step! We want our Color work to only be visible directly on the eye, right? To do this, create a group by pressing CMD + G.
Then, to copy the current layer mask onto the group, hold ALT/OPT and drag it on top of the group folder. The mask will now apply to the entire group.
We can fill the old Curves Adjustment Layer mask with white because we no longer need it. To do this, hold SHIFT + DELETE and select ‘Fill with White.’
The Fun Part
Now that we have a group that will only apply to the eye, we can begin to alter the color. Select a Hue/Saturation Adjustment Layer. In this layer, the Hue slider can be adjusted to whatever Color you’d like!
Hint: Blue and green eyes will need a bit of desaturation.
At this point, it is usually quite noticeable that the Layer Mask is covering part of the eye that it shouldn’t be (pupil, eyelashes, etc.). If this needs to be fixed, go back onto the Layer Mask and paint over those areas with a white Brush.
We can also add another curves adjustment layer to add detail in the eye. By bringing up the different Color Channels and then adding a layer mask, we can go back in and paint certain areas that we would like more color in.
Infinite Possibilities
Why stop after just one Color? To continue with different types of eyes, duplicate the layer by dragging the entire group down to the New Layer icon. Then, make the underlying group invisible.
Now we can go back into the Adjustments we made previously and alter them however we’d like! Just double click on the Adjustment Layers and the dialogues will pop up.
Summary
Whew. Here’s the long story short:
- Create a selection where the eye is
- Load that selection as a mask onto a group
- Create Adjustment Layers inside of that group