Tutorial Description
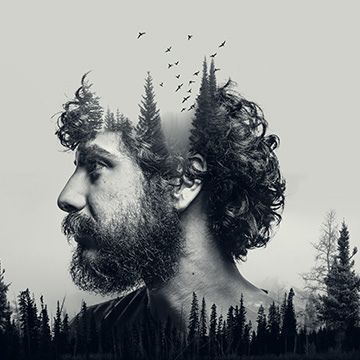
There have been so many phans who have suggest we show how to create a double exposure in photoshop. A double Exposure is traditionally done using a film camera by taking two different photos on the same Exposure of film. The images will combine in unique ways, giving you the “double exposure” effect.
Choosing images for your double exposure.
It is important to choose the right images for your double exposure. You will want to choose images that have a high Contrast between Light and dark. In this case we chose flowers that were photographed on a white Background and a subject that was photographed on gray(which we cut out using a Layer Mask in Photoshop)
Because we are completing this effect in Photoshop there are no restrictions when it comes to what images you will combine. With endless possibilities it seems appropriate to choose objects that have some relationship with one another. In this case we choose a young, well-dressed woman to pair with flowers. You can also use “opposites” or images that will tell a story when combined.
Blending Images
The real key to creating a double exposure is to combine your images together using blending modes in Photoshop. I would recommend flipping through the different blending modes in Photoshop to see which modes will work best for your image. It is also a good idea to change the layer order of the images. A few good blending modes to experiment with are Screen, Multiply, Lighten, Soft Light, and Overlay.
In this tutorial we use a Lighten blending mode on our subject over top of flowers.
Layer Masking for Added Effect
After we blend our images together using blending modes we jump into using Layer Masks for added effect. In this case I wanted to have part of the subject’s hat defined by flowers. To do so I created a selection of the subject cut out from her Background and loaded it onto a duplicate layer of flowers. Then I sized the flowers to fill up the space of the hat.
Next I used another duplicate of the flower layer to fill in an area of her Face where there were no flowers. Because we are using a Lighten blending mode on the subject, she will not show up unless there is a dark area underneath (such as the flowers).
Coloring the Image
After the double exposure is complete we add some Color to the image to make it a bit more interesting. To add some Color to the white background we use a Levels Adjustment Layer. Use the lower sliders that control the Output Levels, bringing the “white point” down on the different Color Channels. In this image we adjust the Green and Blue Channels to give the image a bit of an orange color to match the flowers.
Then we use a Hue/Saturation Adjustment Layer to add a Complimentary Color to the outer edges of the image. Using the Colorize button on the Adjustment Layer allows us to create any Color we desire. From here all you have to do is use a Layer Mask to define where you would like this color to be visible.