

Download Assets
Download Assets
This tutorial includes 3 sample images, 3 sample PSDs and 1 PDF guide. Downloads are free with a PHLEARN account.
- Download the sample images and PSDs from every free tutorial on PHLEARN
- New free tutorials published every week
- One free account — sign up once, then download anything
Free PDF Guide · 4 Pages
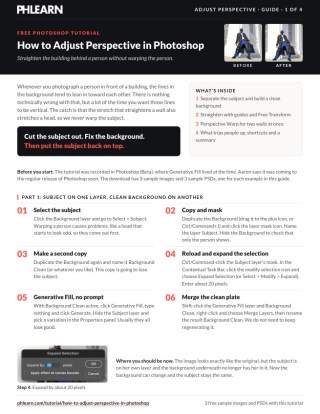
This Tutorial as a Step-by-Step PDF
Walks through putting the subject on a masked layer with Select > Subject, building a Background Clean layer with a 20-pixel expanded selection and an empty Generative Fill, straightening with rulers, guides and Ctrl/Command-drag in Free Transform, then Edit > Perspective Warp in Layout and Warp for two walls at once. Keep it next to your keyboard.
description
To adjust perspective in Photoshop you cannot just transform the whole frame: separate the subject first, correct the background behind it, then put the subject back. Master perspective and create perfectly balanced images with this easy-to-follow tutorial!
Learn how to merge layers seamlessly and use powerful tools like the Transform and Perspective Warp tools to straighten vertical lines and fix any perspective issues in your photos.
Plus, discover Photoshop’s Generative Fill tool, which can automatically recreate backgrounds without the subject, saving you time and effort and helping you create cleaner, undistorted images.
Enjoying This Free Tutorial?
We publish a new free tutorial every week, each one with sample images and PSDs you can download and follow along with. Sign up and they land straight in your inbox, along with early word on sales, events and subscriber-only offers.


How to Adjust Perspective in Photoshop
Shoot a person in front of a building and you usually end up with converging verticals — walls leaning inward, lines that should be parallel meeting somewhere above the frame. It happens whenever the camera is tilted even slightly, and it is one of the most noticeable flaws in architectural and environmental portraiture.
The obvious fix is to transform the whole image until the lines straighten. Do that with a person in the frame and you will stretch their face along with the wall. The technique below avoids that entirely by correcting the background and the subject as separate things.
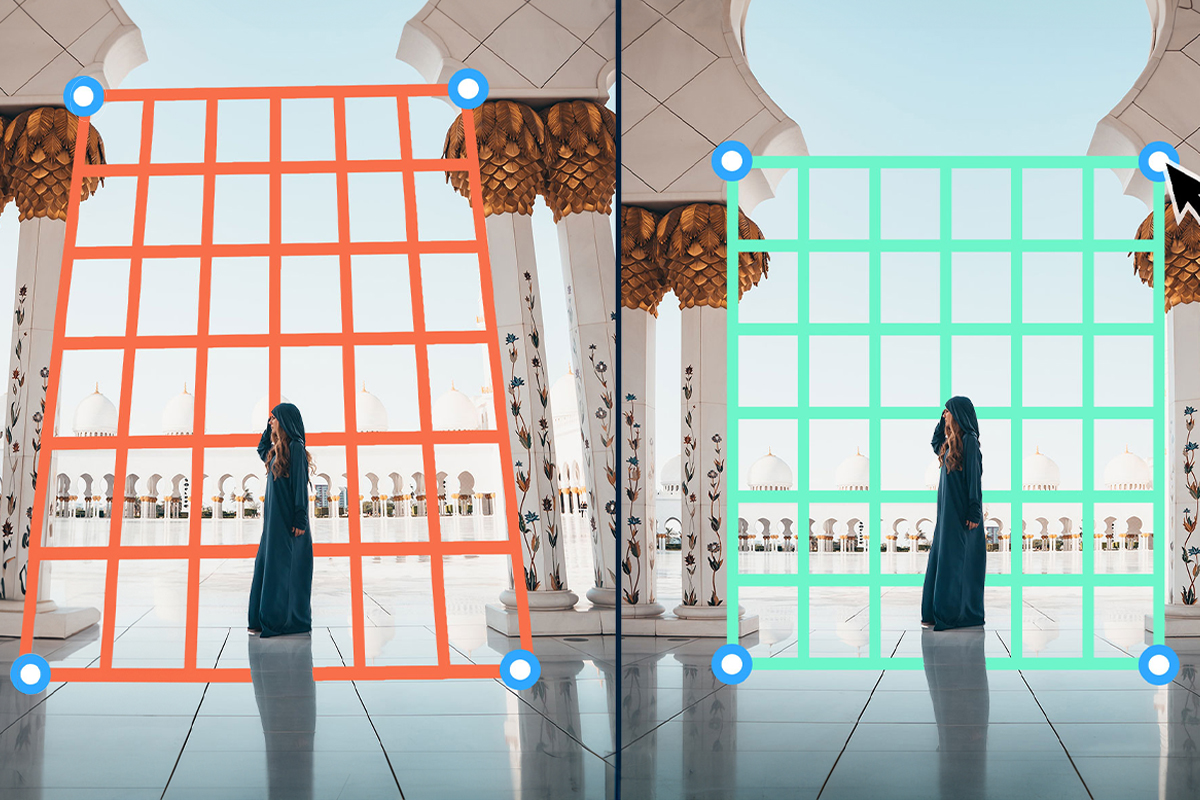
Why You Cannot Just Transform the Whole Image
Perspective correction works by stretching one part of the frame more than another — pulling the top of the image wider to bring leaning walls upright. Architecture tolerates that well, because straight lines stay straight and nobody knows exactly how wide the building should be.
Faces do not tolerate it at all. The same stretch that fixes a wall will widen a head, lengthen a nose, or make one shoulder larger than the other. The distortion is subtle enough that you may not spot it while working, and obvious enough that everyone else will.
So the subject has to come out of the picture before the correction happens, and go back in afterward.
Separate the Subject
-
Duplicate the background layer
Press Ctrl or Cmd + J.
-
Run Select, then Subject
Photoshop finds the person automatically.
-
Add a layer mask
Click the mask icon. The subject is now isolated on its own layer, with the original still intact beneath.
-
Refine the mask if needed
Press L for the Lasso and adjust anything the automatic selection got wrong — hold Shift to add, Alt or Option to subtract.
Build a Clean Background
The background layer still has the subject standing in it. Transform that and you will smear a person-shaped ghost across the corrected architecture, so they need removing first.
-
Duplicate the original background again
This copy becomes your clean plate.
-
Load the subject selection from the mask
Hold Ctrl or Cmd and click the layer mask thumbnail on your subject layer.
-
Expand the selection by around 20 pixels
Select, then Modify, then Expand. This is the step that matters — a selection sitting exactly on the subject’s outline leaves a thin fringe of them behind, and that fringe survives into the generated fill.
-
Run Generative Fill with an empty prompt
Type nothing. An empty prompt tells Photoshop to remove what is selected and continue the surroundings across the gap.
-
Merge the cleaned background layers
You now have a complete architectural background with no person in it.
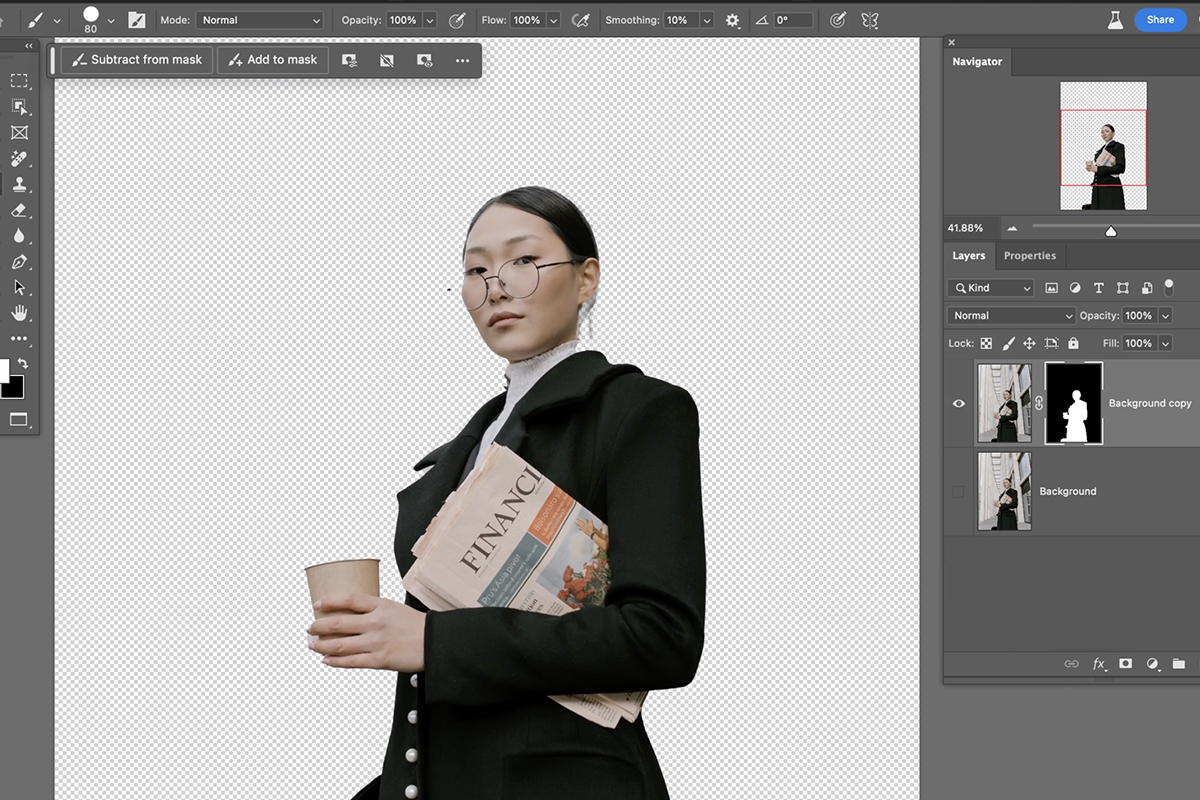
Generated results vary. If the wall behind the subject comes back with a break in a line or a section that does not match, generate again rather than accepting it — straight architectural lines are exactly where generated content is least reliable, and this background is about to be stretched, which will exaggerate any error.
Correct the Perspective
Turn on rulers with Ctrl or Cmd + R and drag out a vertical guide against an edge that should be upright. You need an objective reference — perspective looks correct to the eye long before it actually is, particularly after you have been staring at it for a while.
Then select the clean background layer and press Ctrl or Cmd + T for Free Transform. Hold Ctrl or Cmd and drag an individual corner handle to move it independently, which is how you produce a perspective correction rather than a simple stretch.
Pull the top corners outward until the vertical lines in the building run parallel to your guide.
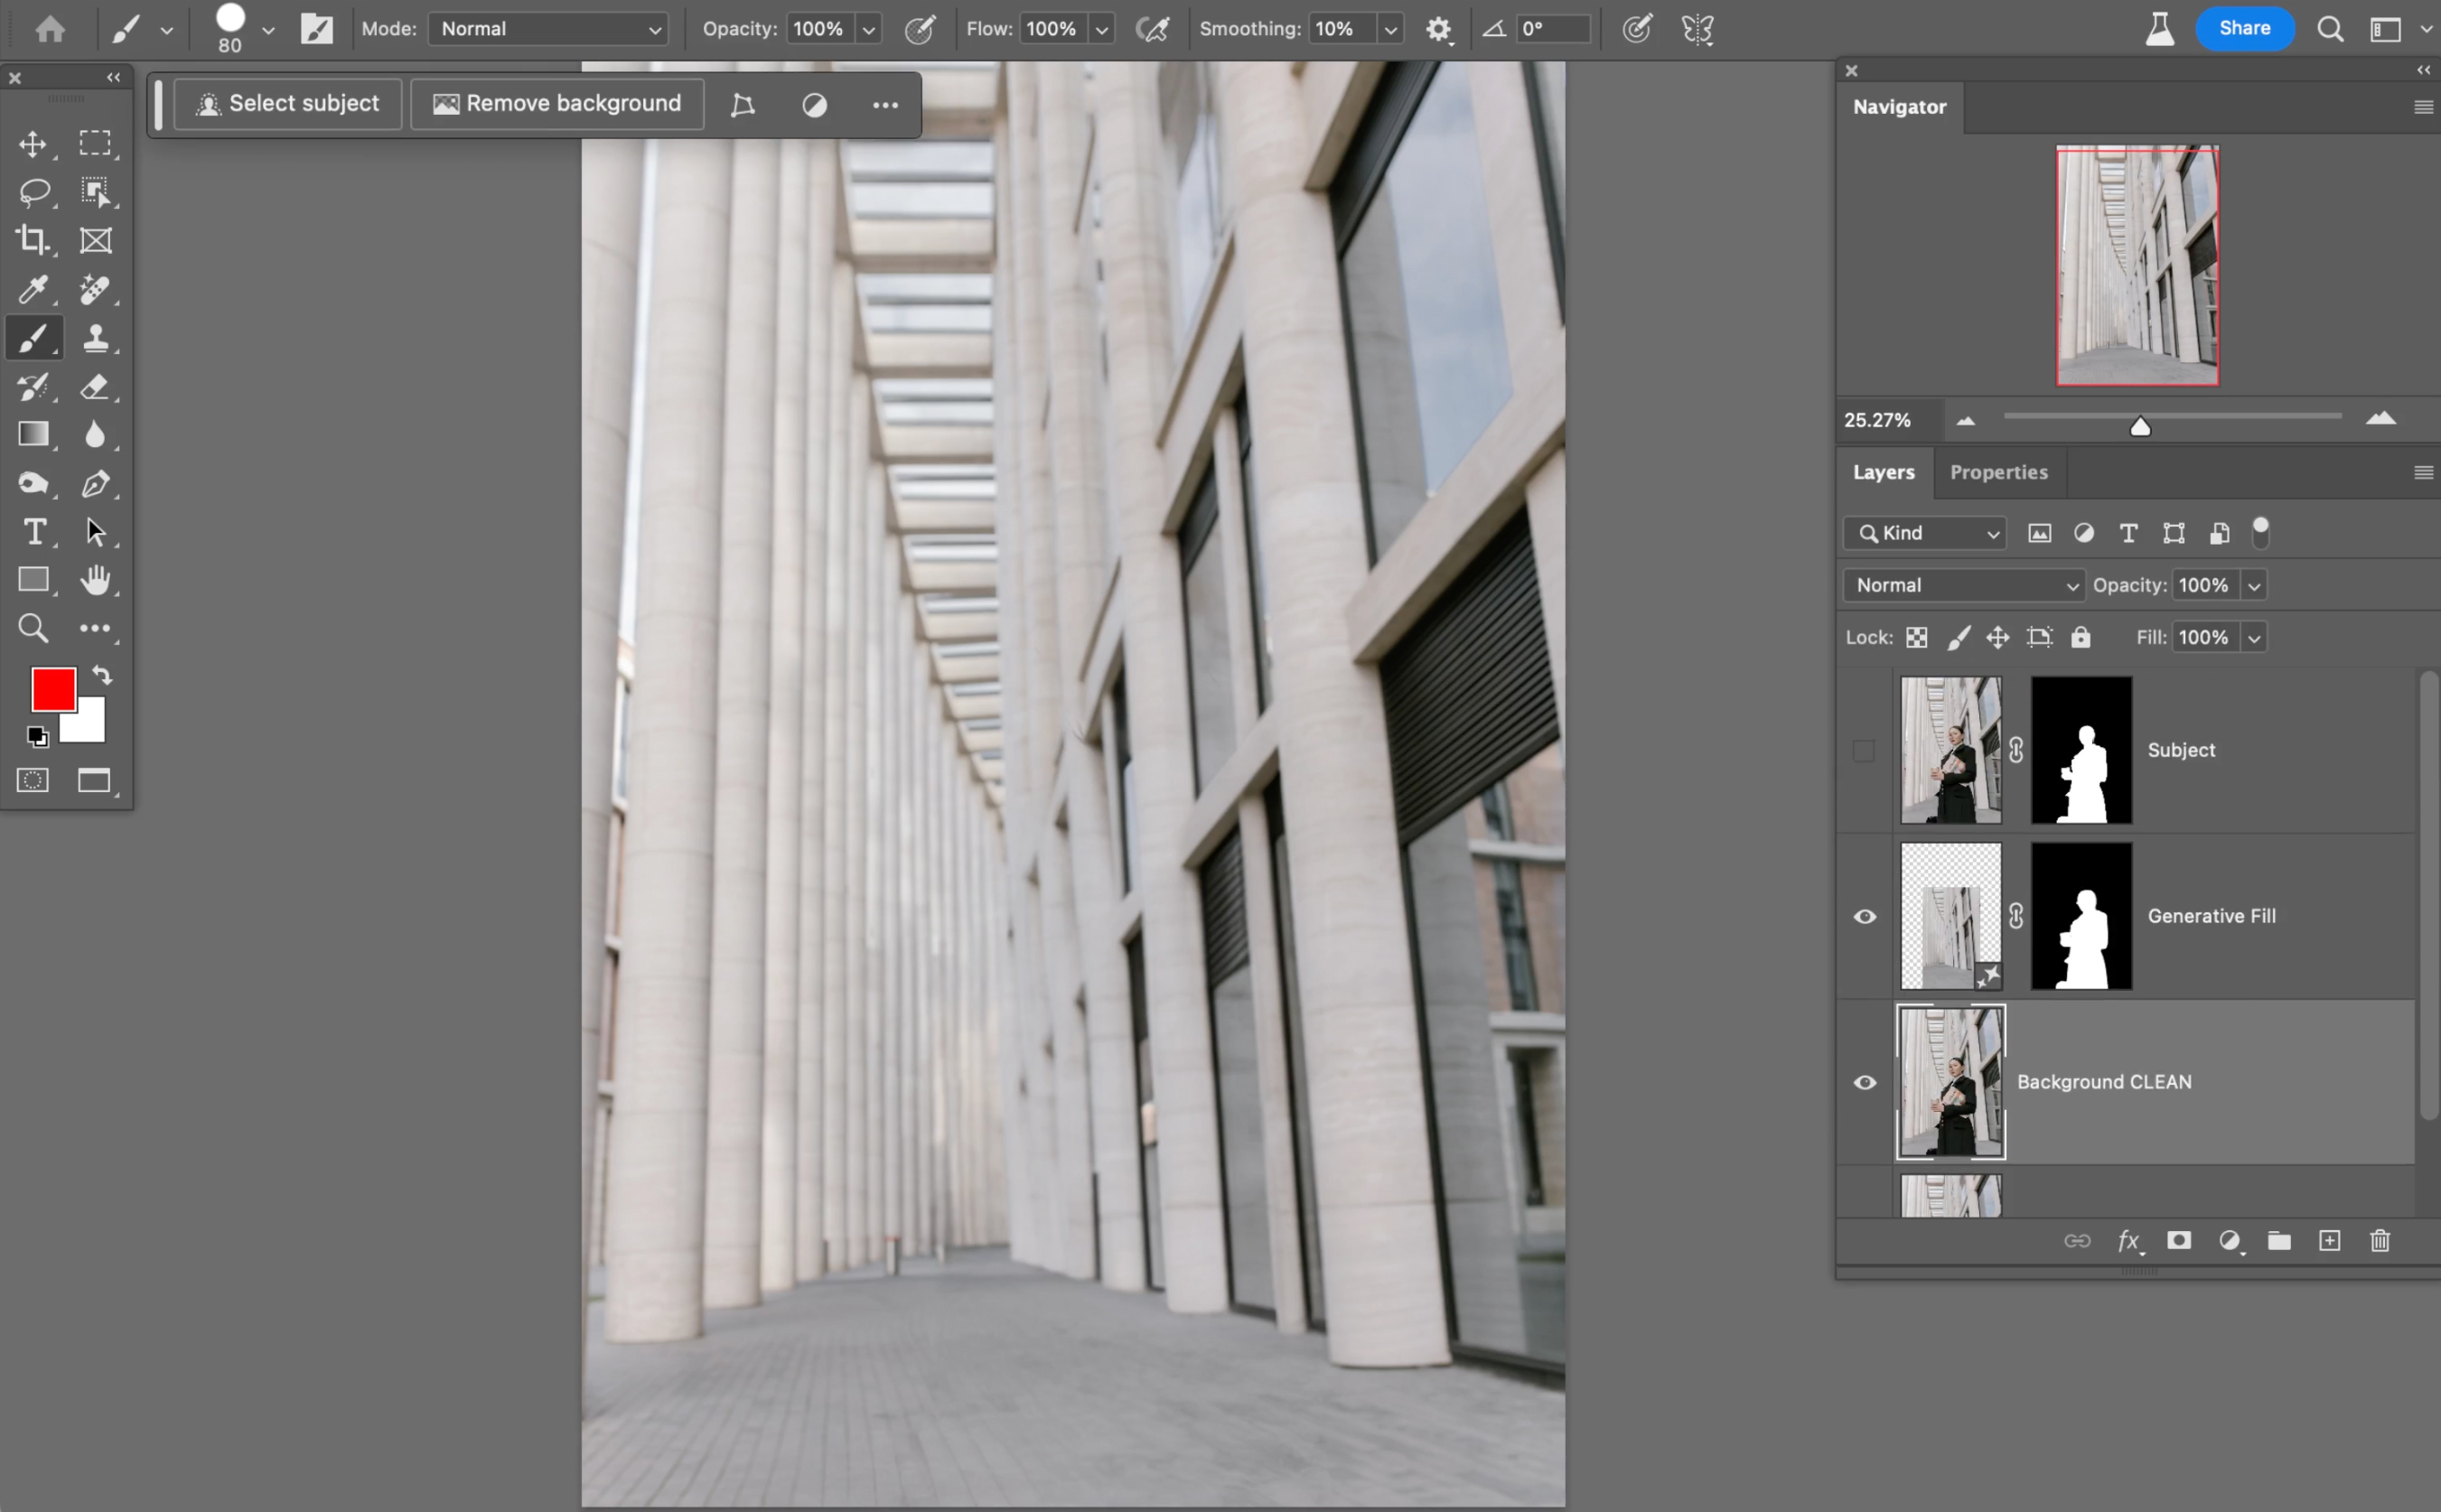
Expect to lose some frame
Stretching the top of the image wider means the bottom corners pull inward, leaving empty wedges. Either crop in slightly, or select those areas and run Generative Fill with an empty prompt to extend the scene outward. The second option keeps your composition, which is usually worth the extra step.
Put the Subject Back
The background has changed shape, so the subject will no longer sit correctly against it — most obviously, their feet will not meet the ground where they used to.
Select the subject layer and move it into position. Scale it if necessary, but do so proportionally by holding Shift, and keep the adjustment small. The point of this whole approach is that the subject is never distorted, and a large non-uniform scale here undoes that.
Check the contact point where they meet the ground and their scale relative to nearby architecture — a doorway or a window is a good reference.
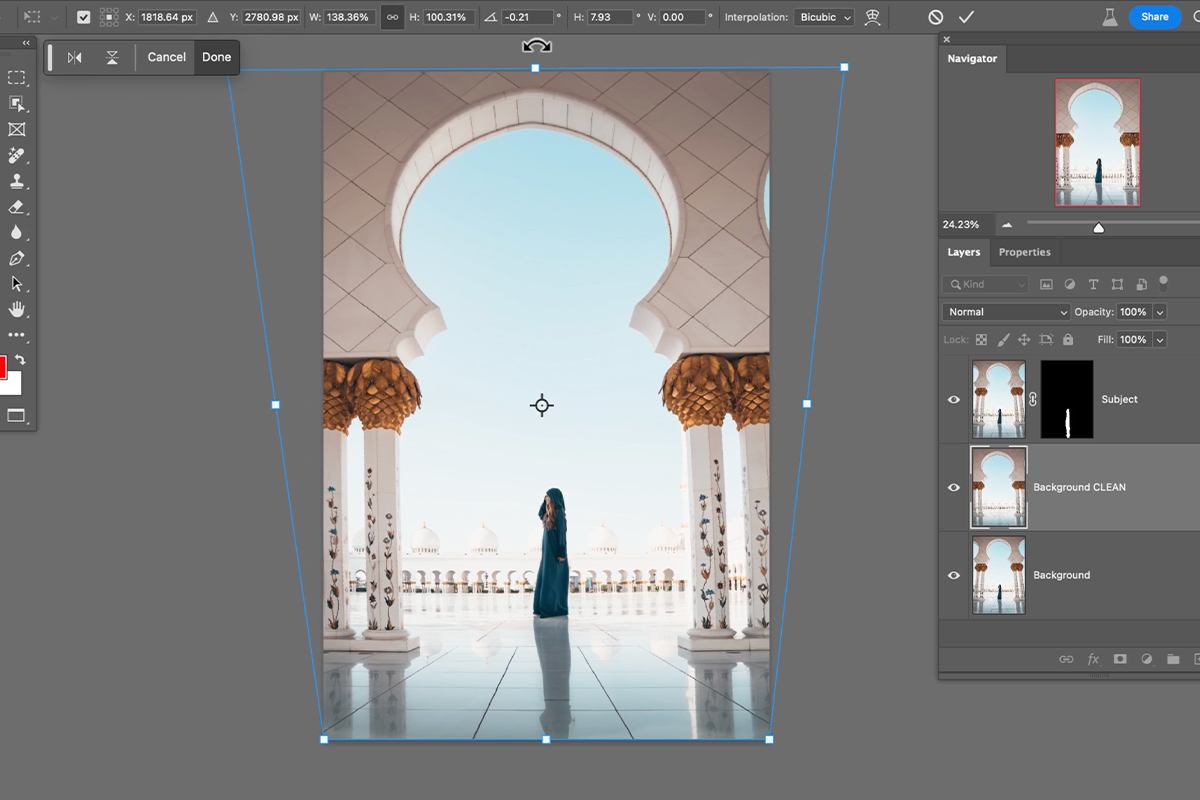
When One Correction Is Not Enough
Some scenes contain more than one perspective plane — a building corner where two walls recede in different directions, for instance. A single transform cannot fix both, because correcting one throws the other further out.
Edit, then Perspective Warp handles this. It works in two modes:
-
Layout mode
Draw a quad over each flat plane in the scene — one for each wall. Drag the quads so they snap together along the shared edge, and align each one’s edges with the real lines of the building.
-
Switch to Warp mode
Now drag the pins to straighten. Photoshop adjusts each plane according to the geometry you defined, so both walls can be corrected at once.
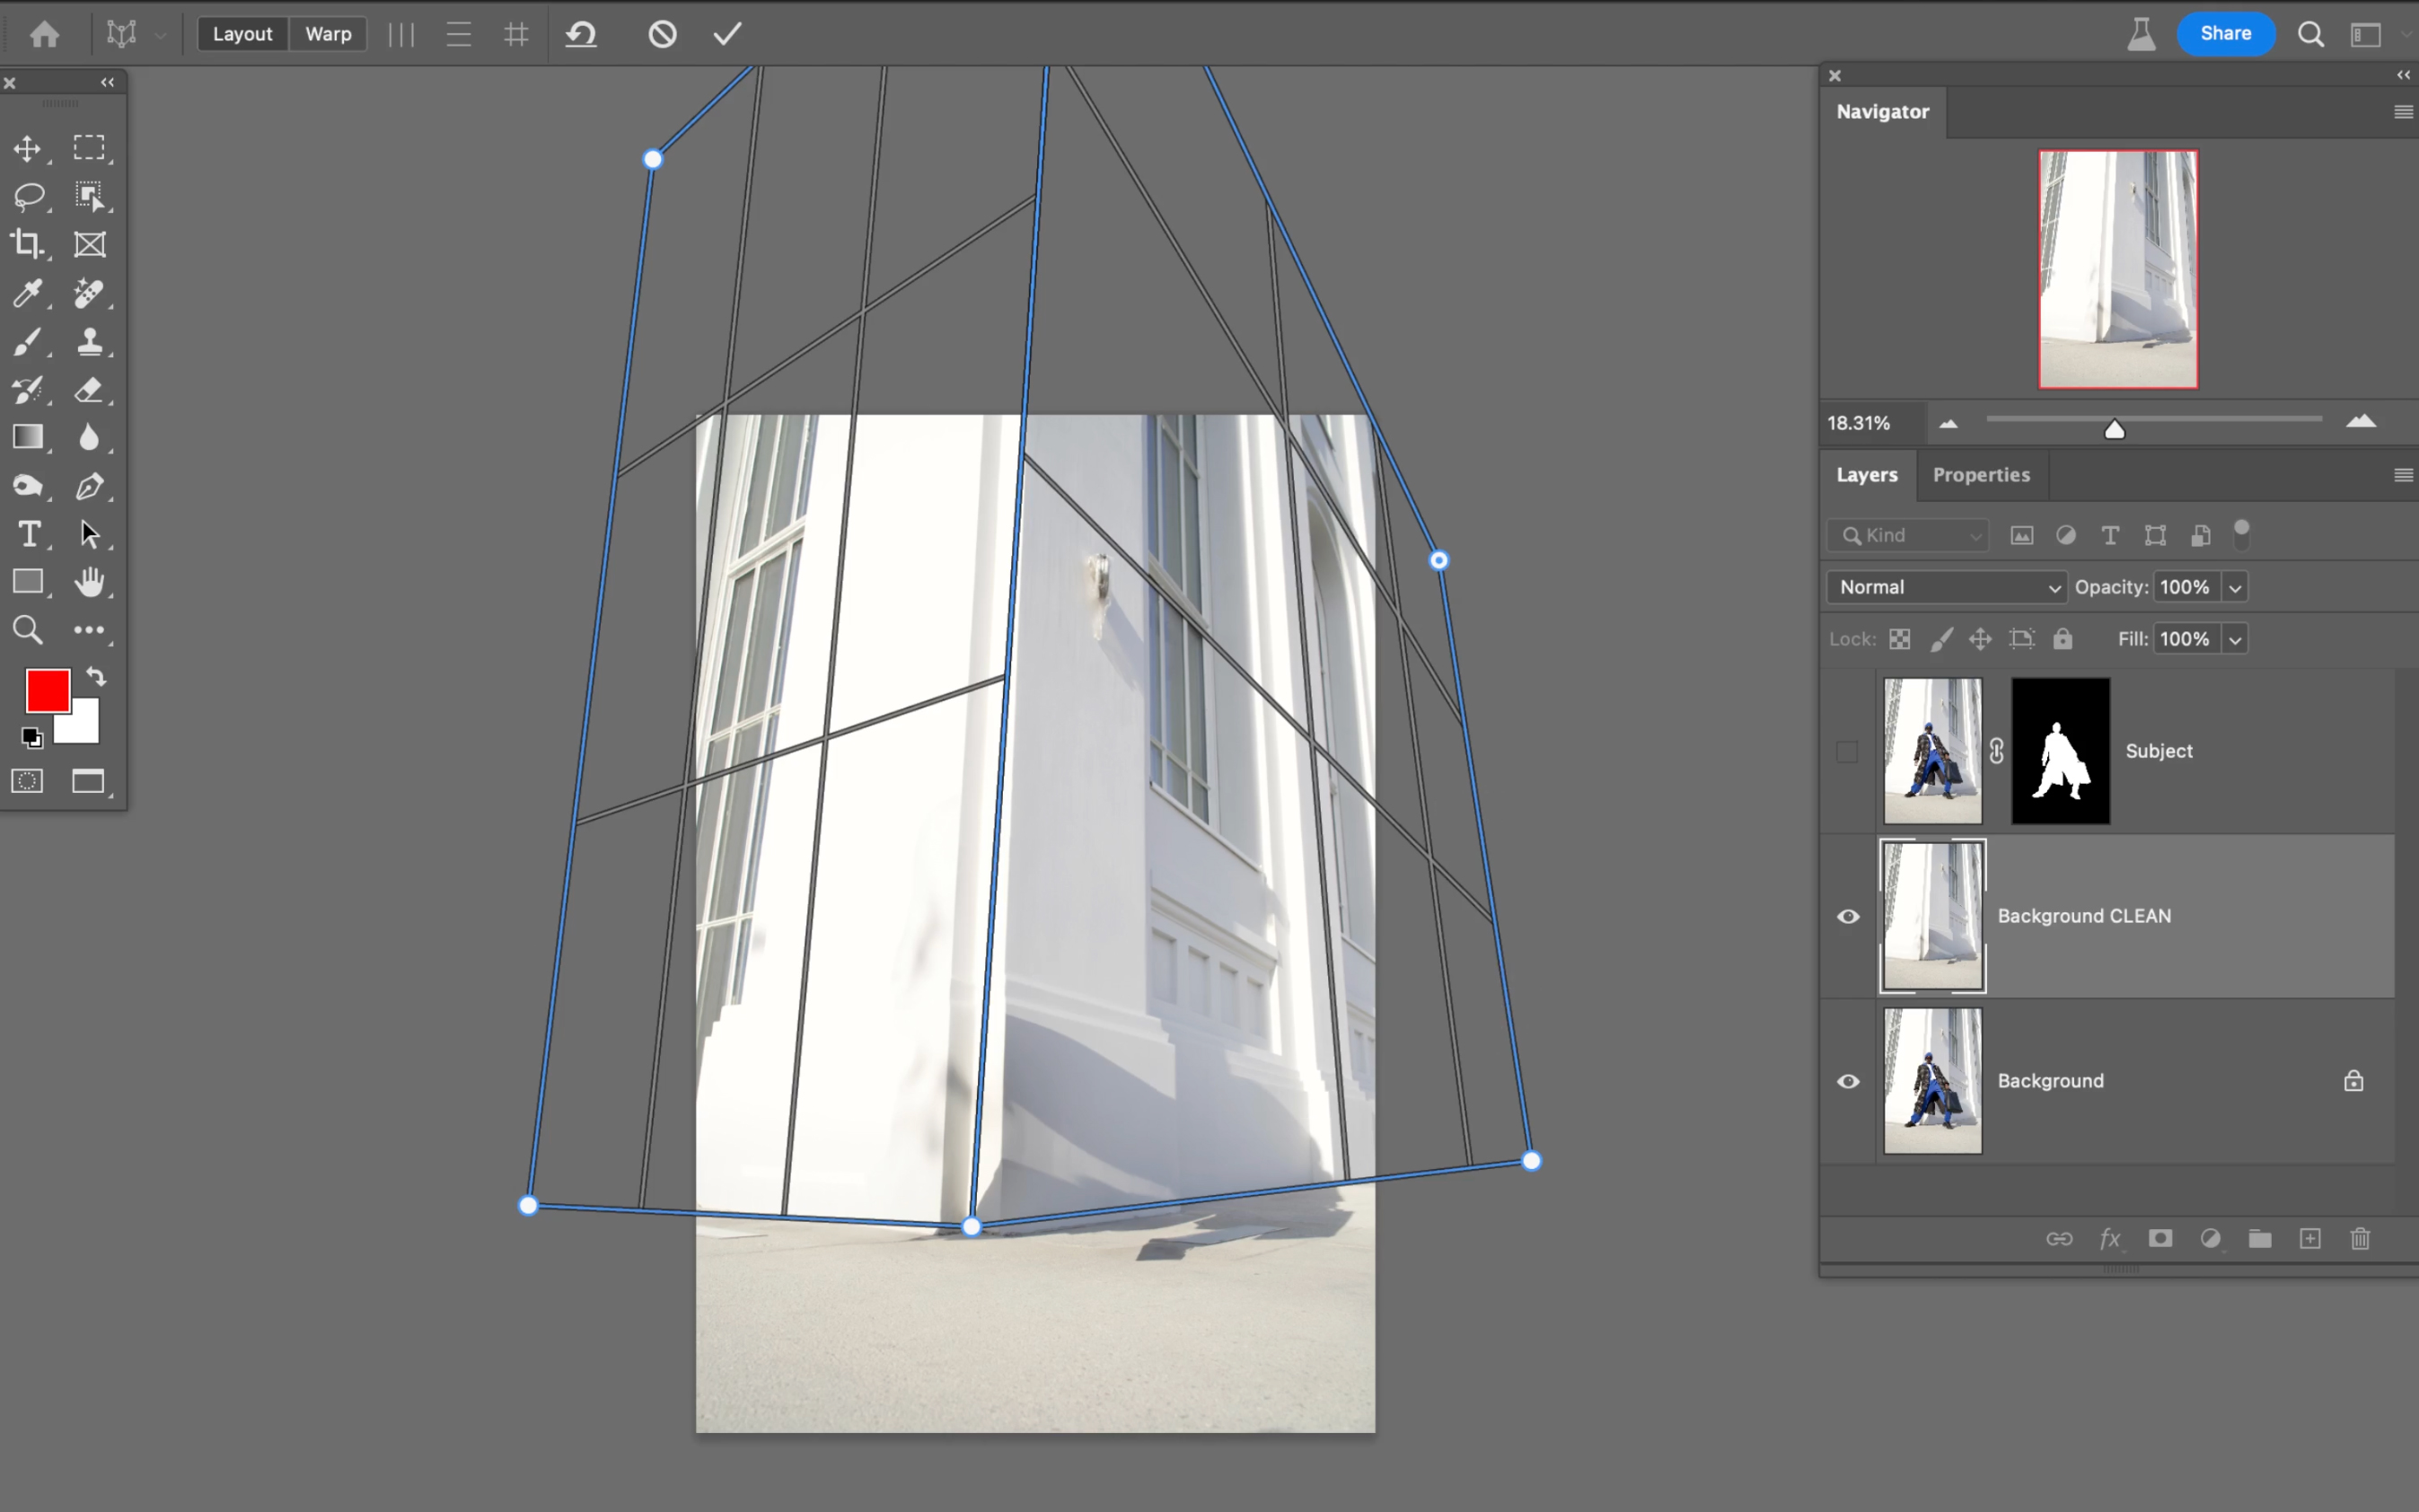
Being straightforward about it: the interface is awkward and it takes patience. Getting the quads to describe the planes accurately is most of the work, and the warp stage only behaves if that groundwork is right. Small artifacts along the seams are common — clean those up with Generative Fill afterward.
Knowing When to Stop
Perfect perspective correction is rarely achievable and usually not desirable. Fully straightened verticals can make a building look oddly flat, because some convergence is how we actually experience looking up at something tall.
Aim for lines that no longer read as a mistake rather than lines that are mathematically vertical. Correcting most of the way and leaving a little is often the more natural result, and it costs far less time than chasing the last few degrees.
The principle worth carrying forward
The useful idea here is not the transform itself — it is separating things that need different treatment before you touch either one. Architecture wants geometric correction; people do not. Once they are on separate layers you can give each what it needs, and that same reasoning applies to plenty of other edits where one global adjustment would help half the image and damage the other.
Quick Reference: Keys, Menus and Settings
- Subject on its own layerSelect > Subject, Cmd/Ctrl + J, then the layer mask icon
- Clean backgroundCmd/Ctrl-click the mask, Select > Modify > Expand 20 pixels, Generative Fill with no prompt, then Merge Layers
- Rulers and guidesView > Rulers or Cmd/Ctrl + R; drag from the ruler; V moves the guides
- StraightenCmd/Ctrl + T, hold Cmd/Ctrl and drag a corner; Enter/Return to commit
- Clear guidesView > Guides > Clear Guides
- Two wallsEdit > Perspective Warp: Layout to draw and join grids (Shift-drag to enlarge), then Warp
- Fill the gapsL for the Lasso Tool, Generative Fill with no prompt
Recorded in Photoshop (Beta), where Generative Fill lived at the time.
Free Downloads
Follow Along on the Same Photos
Get the three photos of people in front of buildings, a layered PSD for each example and the 4-page PDF guide. Free with a PHLEARN account.
Adjusting Perspective: Common Questions
Why not just transform the whole photo?
The stretch that straightens a wall stretches the person too, and their head starts to look odd. Cut the subject out first, fix the background, then put the subject back on top.
Why remove the person from the background layer?
If you transform a background that still has the person in it, you see the original subject stretched out behind the cutout. Duplicate the Background and fill the subject out of that copy first.
Why expand the selection before Generative Fill?
A selection sitting exactly on the outline leaves a thin fringe of the subject behind. Cmd/Ctrl-click the mask, then use Select > Modify > Expand (or the Contextual Task Bar) and enter about 20 pixels.
What do I type into Generative Fill?
Nothing. Click Generate and pick a variation in the Properties panel. If one looks wrong, hit Generate again; it is quicker than fixing it with the Clone Stamp.
How do I check that the lines are really vertical?
Turn on rulers with View > Rulers or Cmd/Ctrl + R, then click in the left ruler and drag out guides. Press V for the Move Tool to slide them next to a column.
How do I move one corner in Free Transform?
Press Cmd/Ctrl + T, then hold Cmd/Ctrl and drag a corner point. Each corner moves on its own, which turns a plain resize into a perspective fix. Press Enter/Return to commit.
How do I get rid of the guides afterward?
Drag each guide back into the ruler, or choose View > Guides > Clear Guides. Press Cmd/Ctrl + R to hide the rulers.
What if two walls lean in different directions?
Use Edit > Perspective Warp. In Layout, draw a grid for each wall and the ground, Shift-drag them larger than the photo and join them until the edges turn bright blue. Then click Warp and drag the points until the lines stand upright.
How do I fill the empty areas after warping?
Press L for the Lasso Tool, circle each area that did not exist in the photo, and run Generative Fill with no prompt. Then turn the Subject layer back on and move it until it fits.
Are the sample files free?
Yes, with a free PHLEARN account. You get 3 sample images, 3 sample PSDs and 1 PDF guide: a photo and a layered file for each of the three examples, plus a 4-page step-by-step guide.
New Free Tutorials View All »






Enjoying This Free Tutorial? Go Further with PRO.
200+ PRO courses. 1,000+ practice files. One membership.

Unlimited access to every PRO course
New PRO courses every month
Layered PSDs and RAW files to follow along
100+ Lightroom Presets, LUTs, Actions and Brushes
Stream in up to 4K, with captions and chapters
Watch on any device: desktop, tablet or phone
4.93 average from 3,900+ reviews · 2M+ students