

description
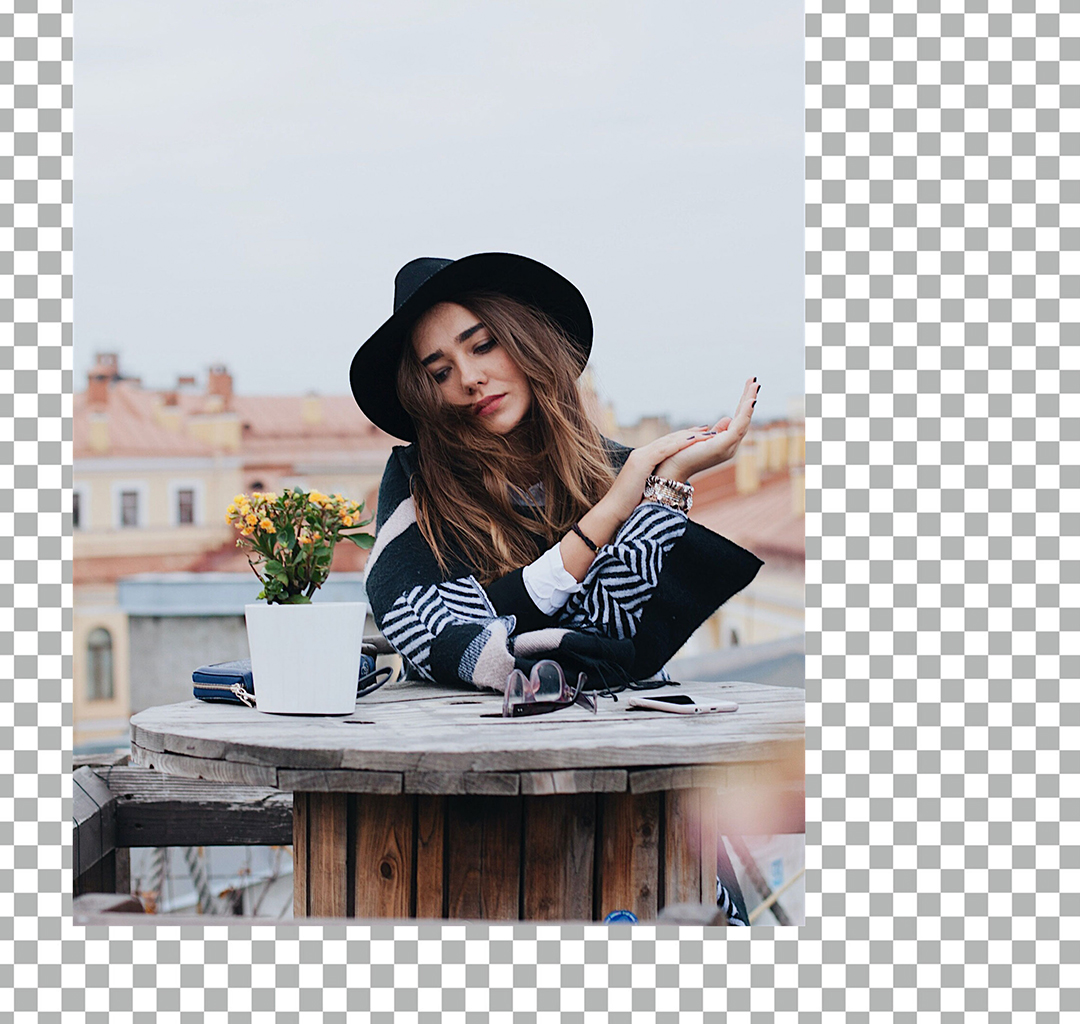
Expand your photos beyond your wildest dreams with the Generative Expand tool in Photoshop! This powerful tool uses AI to seamlessly expand your photos, adding realistic details and matching the style of your original image.
In this tutorial, you’ll learn how to use Generative Expand to create stunning panoramas, extend portraits, and even add new elements to your photos.
Enjoying This Free Tutorial?
We publish a new free tutorial every week, each one with sample images and PSDs you can download and follow along with. Sign up and they land straight in your inbox, along with early word on sales, events and subscriber-only offers.
Artist Credit
- Daria Litvinova
- Cristina Gottardi
Images sourced from Unsplash.

How to Use Generative Expand in Photoshop
Photoshop has never been able to give you image that was not photographed. If a client needed a wide banner and you shot a portrait, you either composited one by hand or you went back and reshot.
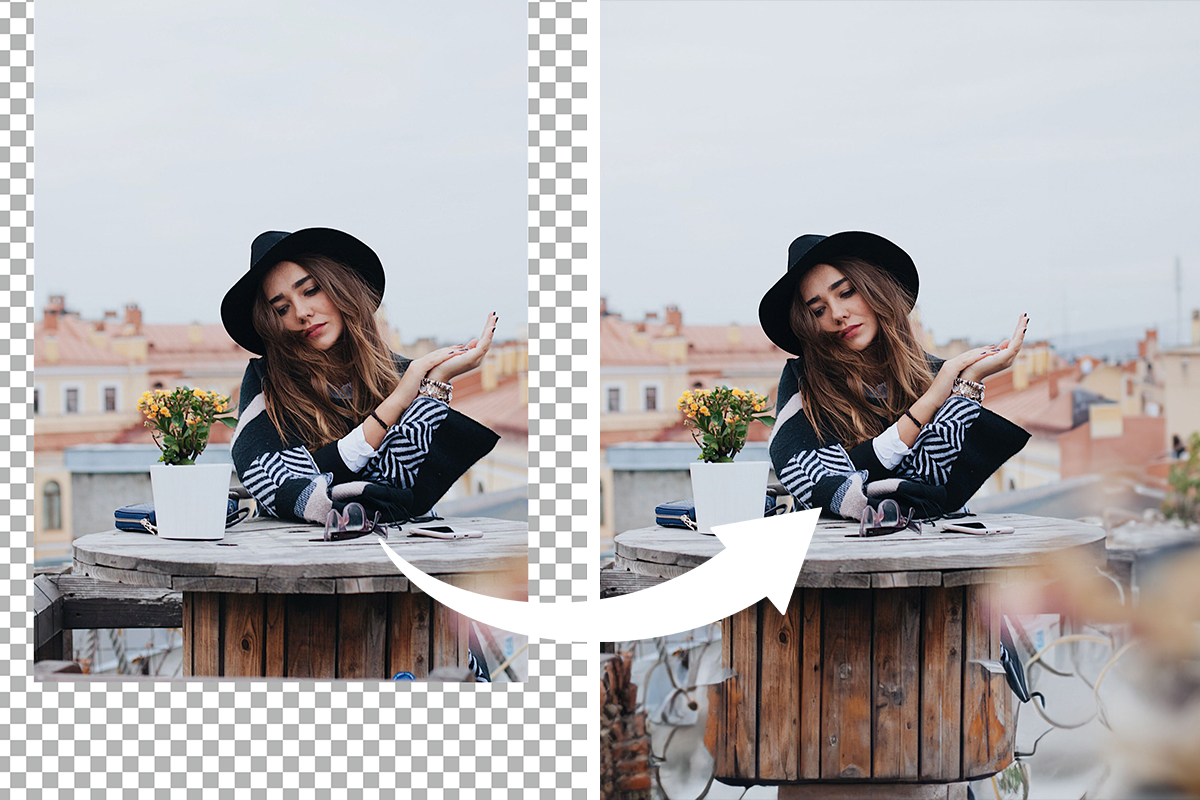
Generative Expand removes that limit. Drag the crop box past the edge of your photograph and Photoshop generates what should be there, matched to the lighting, depth of field, and content of the frame you already have. It is out of beta and in the full release — update through Creative Cloud and it is in the Crop Tool.
This tutorial covers the basic move, then the case where it earns its keep: producing wide and tall versions of the same asset from a single photograph.
The Basic Move
-
Press C for the Crop Tool
Or select it from the toolbar.
-
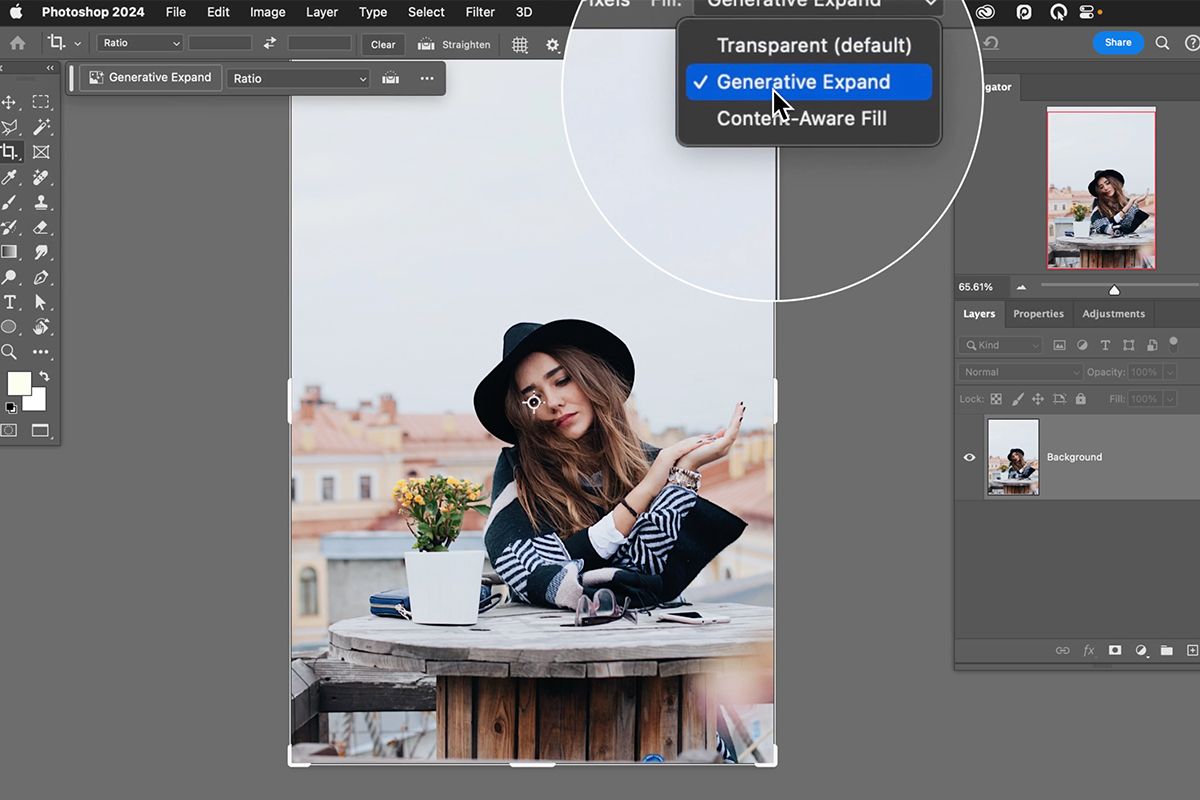
Set Fill to Generative Expand
Look at the Fill dropdown in the options bar. It defaults to Transparent, which gives you empty space rather than generated content. Change it to Generative Expand. This is the step people miss.
-
Drag the crop box outward
Past the edges of the photograph, in whichever direction you want more image. You can also drag inward on the sides you want less of — expanding and cropping happen in the same operation.
-
Generate, with or without a prompt
A prompt box appears. Leaving it empty is usually right — Photoshop extends what is already there. Type something only when you want specific content in the new area.
A tight portrait with a lot of dead sky above becomes a landscape frame with the sky cropped away and the sides filled in. It needs an internet connection, since the generation happens on Adobe’s servers.
Check the Variations Panel
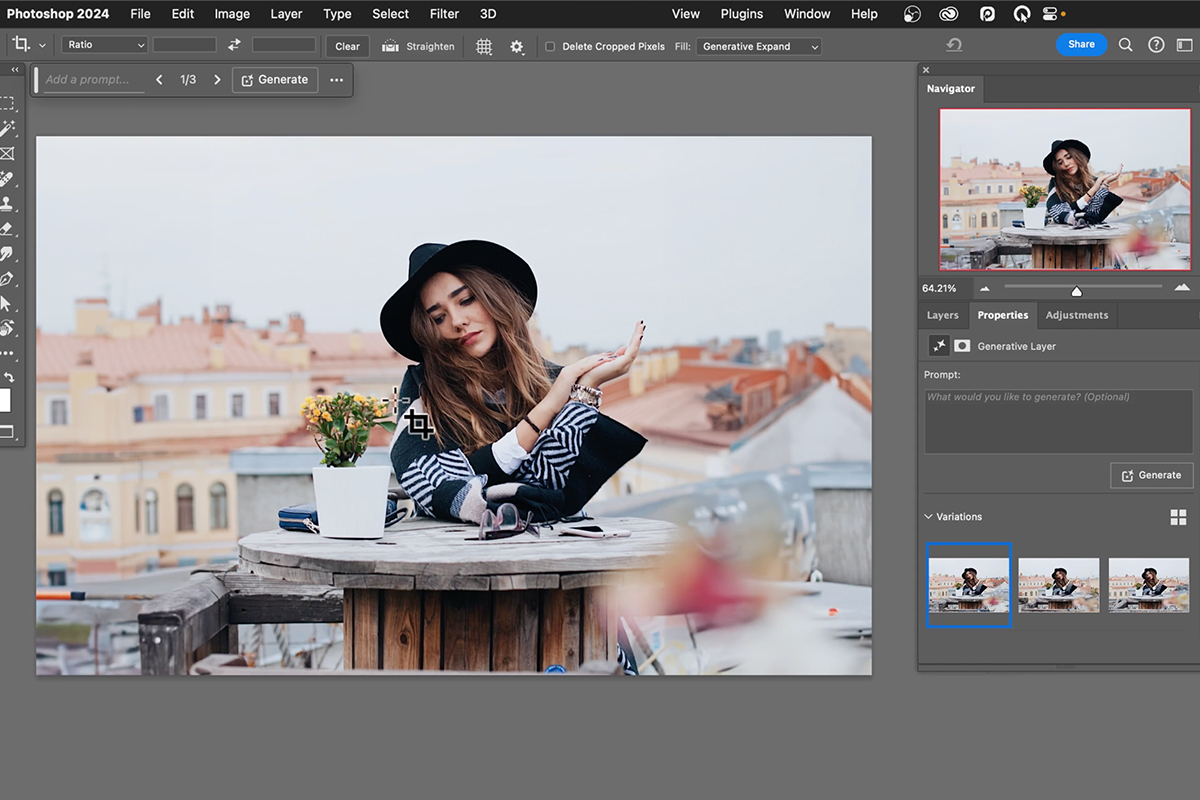
Every expansion returns several options, and they can differ a lot. They live in the Properties panel — if you cannot see it, go to Window → Properties, and scroll down within the panel to find the variation thumbnails.
It is worth looking at all of them. On a good expansion Photoshop will continue the depth of field correctly, putting out-of-focus foreground elements in front and sharper detail behind, which is the detail that sells the result as a single photograph.
Expand Repeatedly
The operation is repeatable. Press C again, drag further out, and generate again — each pass builds on the last. A portrait can become a landscape and then a wide banner in three moves.
The Real Use Case: One Photo, Every Aspect Ratio
Here is the situation this solves. A client wants a wide web banner and a tall banner from the same shot. Traditionally that meant hand-compositing extra background, matching color and light across the seam, and hoping it held up — hours of work per format.
Build the Wide Version
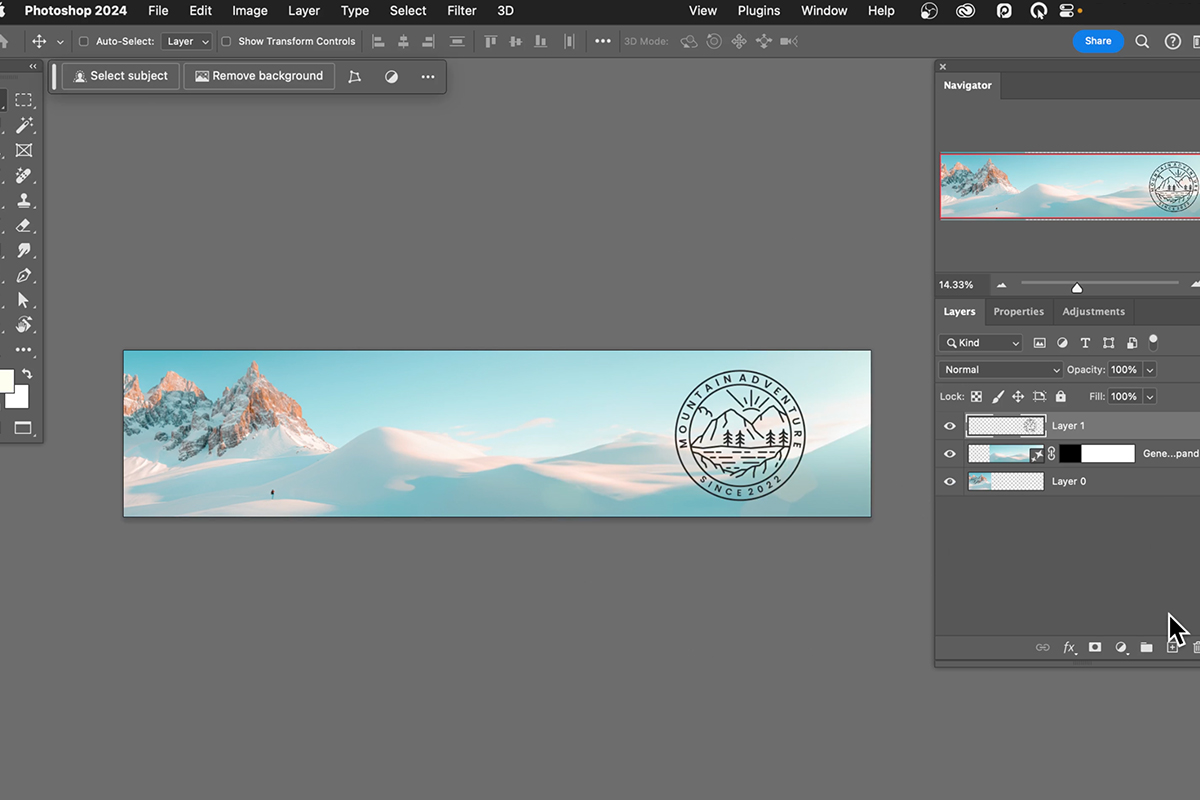
Start with your photograph and hide any logo or text layers. Press C, crop away what you do not need from the top, then drag the box out wide and short into banner proportions. With Fill set to Generative Expand, commit.
Photoshop fills the entire new width. Bring the logo layer back, position it, and add a gradient behind it for legibility: press G for the Gradient Tool, set it to Linear and Foreground to Transparent, then drag across the area under the logo. Double-click the color swatch and sample a color from the image itself — a gradient built from a color already in the photograph reads as part of it rather than a bar laid over it.
Build the Tall Version From the Same Asset
Do not start over. Duplicate what you have into a new document:
-
Select the layers you need
Hold Ctrl or Cmd and click the background, the gradient, and the logo.
-
Right-click and choose Duplicate Layers
Set Destination to New to create a fresh document containing copies of all three.
-
Crop the other way
Press C and drag into tall proportions. Generative Expand fills the new height.
-
Reposition the logo and gradient
Both came across with the document. Drag the same gradient from the top down instead of across.
Two finished assets in different orientations, from one photograph, sharing the same colors and the same treatment. That consistency is not incidental — both were generated from the same source, so they match in a way separately shot assets rarely do.
Recrop Any Time
Nothing about this is one-way. Press C again on a finished file, drag to a square, and generate — now you have the Instagram crop too. The crop tool works exactly as it always has; the only difference is that dragging outward is now allowed.
Also worth knowing: this is the fix for a composition where the subject sits too close to one edge. A few hundred pixels of generated space on that side is often all a cramped frame needs, and it is far less invasive than a heavy crop on the other side.
More Free Compositing Tutorials
If this was useful, these go further in the same direction:
- How to Create a Composite in Photoshop — building the layered file first.
- Compositing Highlights, Shadows and Reflections — making an added element sit in the scene.
- How to Use the Select and Mask Workspace — cleaner cut-outs, which compositing depends on.
- How to Create and Use Layer Masks — confining an effect to exactly where it belongs.
- How to Make Realistic Shadows in Photoshop — the shadow that anchors an object.
- How to Use Select Subject in Photoshop — the selection engine behind most cut-outs.
Where It Does Not Work
One limitation matters, and it is not a technical one.
Generative Expand invents content. If a real building stood behind your subject, Photoshop will produce a building — plausible, well-lit, correctly blurred, and not that building. For anything where the background has to be truthful — documentary work, journalism, real estate, product photography where the setting is part of the claim — this is the wrong tool regardless of how convincing the output looks.
For commercial and creative work where the background is atmosphere rather than information, it is exactly the right tool. Backgrounds that are sky, foliage, bokeh, water, or texture expand extremely well, because there is no specific truth to get wrong.
Getting Good Results
Leave the prompt empty unless you specifically want something added — continuation beats invention for filling space.
Expand in stages rather than making one enormous jump. Several moderate expansions give the model more to work from at each step than one that asks it to invent most of the frame.
Check the variations every time, and look particularly at where the original image meets the generated area. Continuous textures blend invisibly; strong lines running into the new region are where problems show.
And if you also need to level a crooked frame while you are at it, see how to straighten and extend a crop — the Straighten Tool and Generative Expand work together in a single crop operation.







Enjoying This Free Tutorial? Go Further with PRO.
Unlock Full Sample Files, PSDs, and Hundreds of Masterclasses!

Download full project assets, original PSDs, and RAW images for every lesson
Unlimited access to our complete library of PRO Photoshop & Lightroom courses
Instant 4K Ultra HD streaming on all devices, anytime, anywhere
Full access to our entire library of Photoshop Actions, Presets, and LUTs
Flexible monthly and annual membership plans
Cancel anytime with zero hassle or commitments