

Download Assets
This tutorial includes 4 sample images, 1 sample PSD and 1 PDF guide. Downloads are free with a PHLEARN account.
- Download the sample images and PSDs from every free tutorial on PHLEARN
- New free tutorials published every week
- One free account — sign up once, then download anything
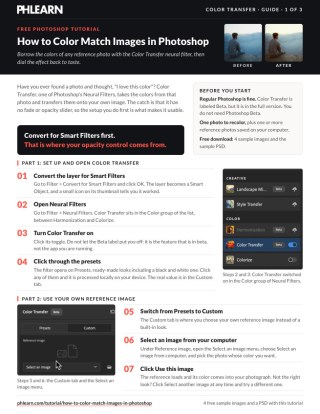
Free PDF Guide · 3 Pages
This Tutorial as a Step-by-Step PDF
Walks through Filter > Convert for Smart Filters, then Filter > Neural Filters > Color Transfer, the Presets and Custom tabs, Select an image from computer and Use this image, then fading the result in the Smart Filter’s Blending Options to 60%, changing the Mode and swapping the reference. Keep it next to your keyboard.
description
To color match images in Photoshop, Color Transfer reads the palette of a reference photograph and applies it to yours. On a Smart Object the whole thing stays adjustable.
Found a photo whose coloring you love? Photoshop’s Color Transfer neural filter maps that palette straight onto an image of your own, either from a built-in preset or from any reference photo on your computer.
The catch is that Neural Filters gives you no way to fade the result. This free tutorial shows the setup that fixes it: convert for smart filters first, then control blend mode and opacity from the smart filter’s own blending options, and swap the reference image as often as you like.
Enjoying This Free Tutorial?
We publish a new free tutorial every week, each one with sample images and PSDs you can download and follow along with. Sign up and they land straight in your inbox, along with early word on sales, events and subscriber-only offers.
Image Source
Photography by Elijah Hiett, Jeffery Erhunse, Brett Sayles and Josh Hild, sourced from Pexels and Unsplash.


How to Color Match Images in Photoshop
You find a photograph and you love the coloring. Color Transfer, one of Photoshop’s Neural Filters, takes that palette and maps it onto an image of your own.
The filter itself takes about four clicks. The reason this tutorial is longer than four clicks is that Color Transfer gives you no way to fade its result — and the fix for that has to be set up before you run it.
Convert for Smart Filters Before You Start
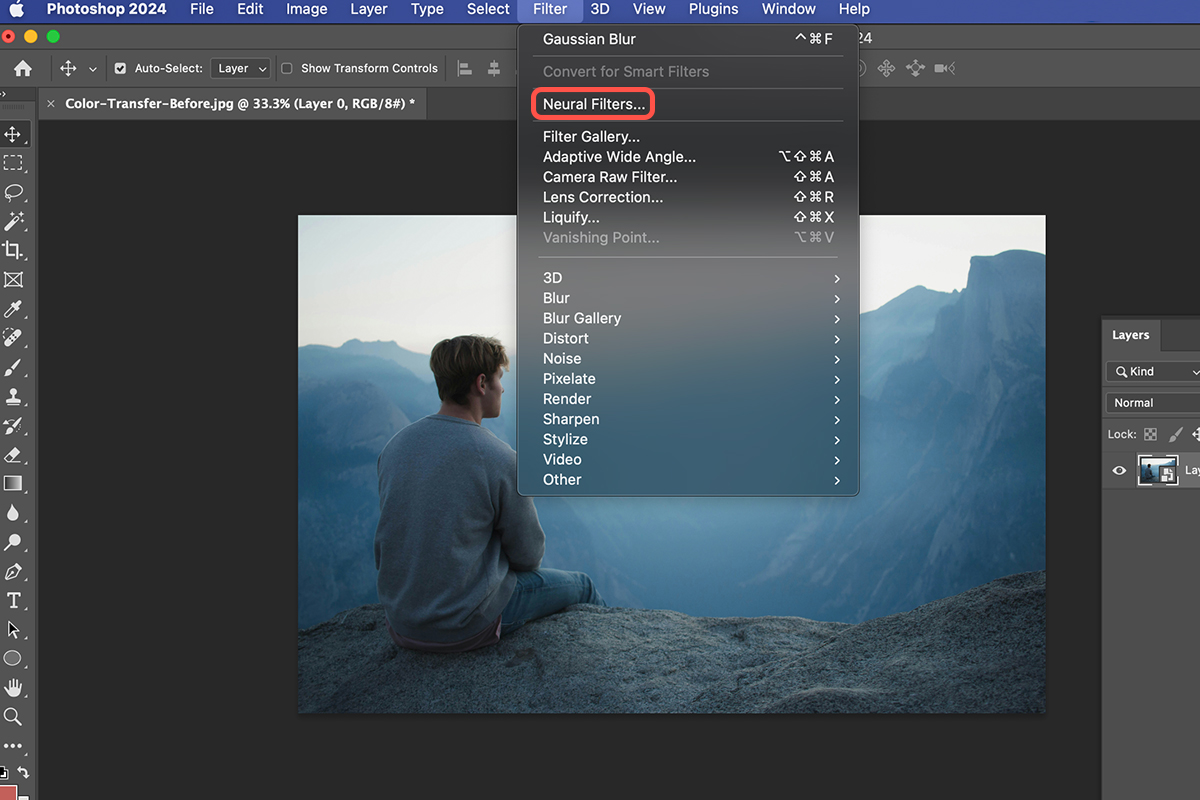
Go to Filter > Convert for Smart Filters and click OK. A small badge appears on the layer thumbnail confirming it is now a Smart Object.
-
Open the image you want to recolor
Any photograph will do. The color is coming from somewhere else.
-
Go to Filter > Convert for Smart Filters
Click OK on the dialog. The badge on the layer thumbnail confirms it worked.
Why This Step Cannot Wait Until Later
Every other smart-object tutorial tells you to convert first so you can re-edit a filter afterwards. Here the reason is sharper: the only usable strength control for Color Transfer lives in the smart filter’s blending options, and those blending options do not exist unless the layer was a Smart Object when the filter ran.
Apply Color Transfer to a flat layer and you get one result at full strength with no way to dial it back. If Smart Objects are new to you, this is the clearest example of why the habit matters, and the longer guide covers the rest.
Finding Color Transfer in Neural Filters
Go to Filter > Neural Filters. The panel opens with a list of filters down the left — Skin Smoothing, Smart Portrait and Makeup Transfer under Portraits, then Landscape Mixer and Style Transfer under Creative. Under Color you will find Harmonization, Color Transfer and Colorize. Toggle Color Transfer on.
The Beta Label Does Not Mean the Beta App
Color Transfer is marked Beta in the panel, which reliably confuses people. You do not need to install Photoshop Beta to use it — the filter ships in the full release version, and it is the individual filter that carries the beta label, not the software. Several of its neighbors are the same, including Colorize and Landscape Mixer.
Presets, Then the Custom Tab
The panel opens on the Presets tab — a row of ready-made looks including a black and white conversion. Click any of them and Photoshop processes the result locally on your own machine rather than sending it off somewhere.
They are worth clicking through once. But the reason to be here is the Custom tab, where you supply the reference yourself.
Loading Your Own Reference Image
-
Go to Filter > Neural Filters and switch Color Transfer on
It sits under the Color group in the list.
-
Click the Custom tab
This is where you point the filter at your own reference.
-
Open the Reference image dropdown
Choose Select an image from computer and pick the photo whose coloring you want.
-
Click Use this image
It uploads, and the palette from your reference lands on your photograph.

The panel gives you a few controls alongside it: a Color space set to Lab, a Preserve luminance checkbox, and sliders for Luminance, Color strength, Saturation, Hue and Brightness. At the bottom, Output is set to Smart filter — which is only possible because of the conversion you did in step 2.
You are not locked into your first choice either. Select another image swaps the reference whenever you like.
It Will Come In Too Strong
On most photographs the transfer arrives far heavier than you want it. The palette is right; the amount of it is not.
The Control You Want Is Not in This Panel
The obvious fix would be a fade or opacity slider for the finished result, and Neural Filters simply does not offer one. The sliders in the panel tune the transfer itself — they will not blend the filtered version back toward your original.
So do not fight the panel. Get the palette roughly right, click OK, and control the strength outside the filter.
Where the Opacity Control Actually Lives
Click OK to close Neural Filters. In the Layers panel your layer now shows Smart Filters with Neural Filters listed beneath it, and to the right of that entry sits a small icon of two sliders. That icon is the whole answer.
-
Click OK to apply the filter
It lands as a smart filter rather than as a permanent change.
-
Double-click the blending options icon
The two small sliders to the right of Neural Filters in the Layers panel.
-
Drop the Opacity
The Blending Options dialog opens at 100%. Around 60% is a sensible landing point for most images.
-
Try a different Mode while you are there
Mode sits directly above Opacity. Screen is worth auditioning alongside Normal.
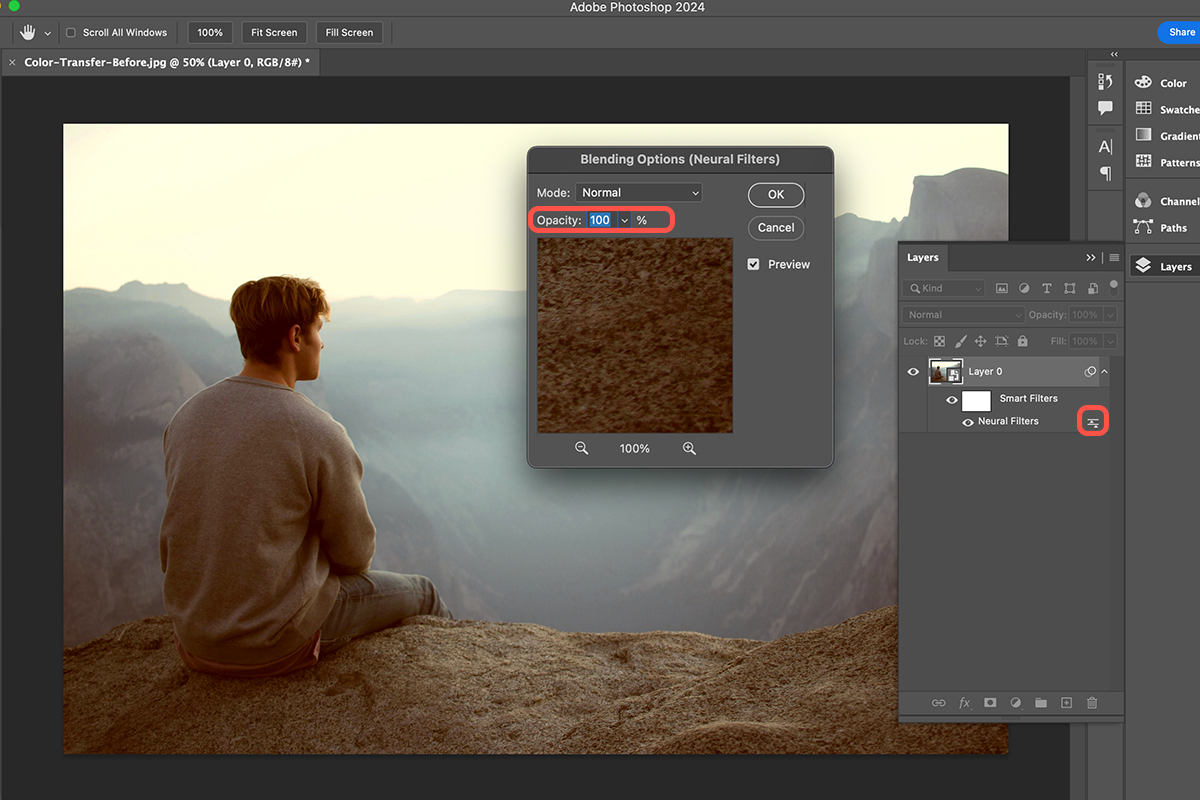
Click OK and you can now toggle the whole effect on and off from the Layers panel, at whatever strength you settled on. This is ordinary smart-filter behavior rather than anything special to Neural Filters — the same blending options are available to any filter applied to a Smart Object, and they are worth knowing about generally. If blend modes are unfamiliar territory, start here or work through the full set.
Swapping the Reference Without Starting Over
Double-click Neural Filters in the Layers panel and the panel reopens exactly as you left it. Choose Select another image, pick a different photograph, click Use this image, then OK.
This Is the Part That Makes It Usable
The result updates automatically and your blending options survive — the new reference arrives already at the opacity you set. That turns the whole thing into something you can actually audition: load a reference, judge it at 60%, swap it, judge again, without rebuilding anything between attempts.
Why the Smart Object Does the Heavy Lifting
It is tempting to read the conversion in step 2 as housekeeping. It is not — it is the step that turns a one-shot filter into an adjustable one.
Color Transfer on its own gives you a single answer at full strength. The same filter on a Smart Object gives you a blend mode, an opacity, an on/off switch, and a reference you can change your mind about. The filter did not get better; the container did.
The Reference Is the Real Variable
Once the setup is in place, the only decision left is which photograph you point it at — and swapping that takes about five seconds.
So gather a few images whose color you keep coming back to, and try them against the same photograph at the same opacity. Comparing references head to head tells you far more than perfecting any single one of them.
Quick Reference: Menus and Settings
- Set upFilter > Convert for Smart Filters, then OK
- Open the filterFilter > Neural Filters, switch on Color Transfer (Beta) in the Color group
- Load a referenceCustom tab > Select an image from computer > Use this image
- Fade the effectClick OK, double-click the two-slider icon beside Neural Filters, Opacity 60%
- Change the blendMode in the same Blending Options dialog: Screen, or back to Normal
- Try another referenceDouble-click Neural Filters > Select another image > Use this image > OK
No keyboard shortcuts in this one. It is all menus and clicks.
Free Downloads
Follow Along on the Same Photos
Get the photo to recolor, three reference images, the finished PSD with the Smart Filter still live and the 3-page PDF guide. Free with a PHLEARN account.
Color Transfer in Photoshop: Common Questions
How do I copy the colors of one photo onto another in Photoshop?
Use Color Transfer, one of the Neural Filters. Point it at a reference photo whose color you like and it brings those colors into your own image.
Do I need Photoshop Beta for Color Transfer?
No. Color Transfer is labeled Beta in the Neural Filters panel, but it is in the full version of Photoshop. It is the feature that is in beta, not the app.
Where is Color Transfer?
Go to Filter > Neural Filters. Color Transfer is in the Color group of the list, between Harmonization and Colorize. Click its toggle to turn it on.
How do I use my own reference photo?
Switch from the Presets tab to the Custom tab. Under Reference image choose Select an image from computer, pick the photo and click Use this image.
What do the Color Transfer presets do?
They are ready-made looks, including a black and white one. Click any of them and it is processed locally on your device. The Custom tab is where you use your own reference.
The color transfer is too strong. Where is the opacity slider?
There is no fade or opacity slider inside Neural Filters. Click OK, then double-click the two little sliders on the right of the Neural Filters row in the Layers panel and lower Opacity. Aaron goes to 60%.
Why convert for Smart Filters first?
Filter > Convert for Smart Filters makes the layer a Smart Object, so the neural filter lands as a Smart Filter with its own blending options. That is where the opacity and blend mode controls come from.
Can I change the blend mode of the effect?
Yes. Mode is in the same Blending Options dialog as Opacity. Aaron tries Screen, then goes back to Normal.
How do I try a different reference without starting over?
Double-click the words Neural Filters in the Layers panel, click Select another image, choose a photo, click Use this image and OK. The layer updates and keeps your 60% opacity.
Are the sample files free?
Yes, with a free PHLEARN account. You get 4 sample images, 1 sample PSD and 1 PDF guide: the photo to recolor, three reference images and the finished PSD with the Smart Filter still live.
Master Photoshop, Lightroom and Photography
Join PHLEARN PRO for $12.99 a month or $99.99 a year. Cancel anytime, with a 100% money-back guarantee.





