

Download Assets
This tutorial includes 2 sample images, 1 sample PSD and 1 PDF guide. Downloads are free with a PHLEARN account.
- Download the sample images and PSDs from every free tutorial on PHLEARN
- New free tutorials published every week
- One free account — sign up once, then download anything
Free PDF Guide · 4 Pages
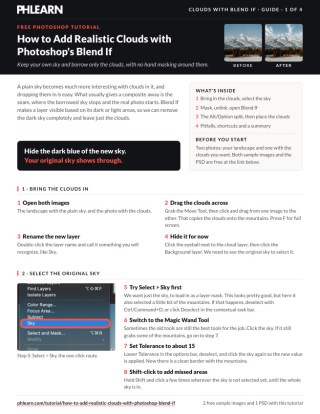
This Tutorial as a Step-by-Step PDF
The guide walks through dragging in the cloud photo, selecting the sky with Select > Sky or the Magic Wand at a Tolerance of about 15, loading it as a layer mask, unlinking the chain, and Blend If on Current Layer with the left handle split by Alt/Option-drag. Keep it next to your keyboard.
description
Add realistic clouds to a flat sky and the whole frame changes. The seam is the hard part, and Blend If is what hides it.
A plain sky is the easiest thing in a landscape to improve, but the seam where a borrowed sky meets the real photograph is what usually gives a composite away. Blend If removes that problem completely.
This free tutorial covers selecting the sky with the Magic Wand, loading it as a layer mask, unlinking the mask so you can position the clouds freely, and then the alt-drag that splits the Blend If slider and feathers the dark sky away so your own sky shows through underneath.
Enjoying This Free Tutorial?
We publish a new free tutorial every week, each one with sample images and PSDs you can download and follow along with. Sign up and they land straight in your inbox, along with early word on sales, events and subscriber-only offers.
Image Source
Photography by Bravingbird and Claudia Schmalz, sourced from Pexels.
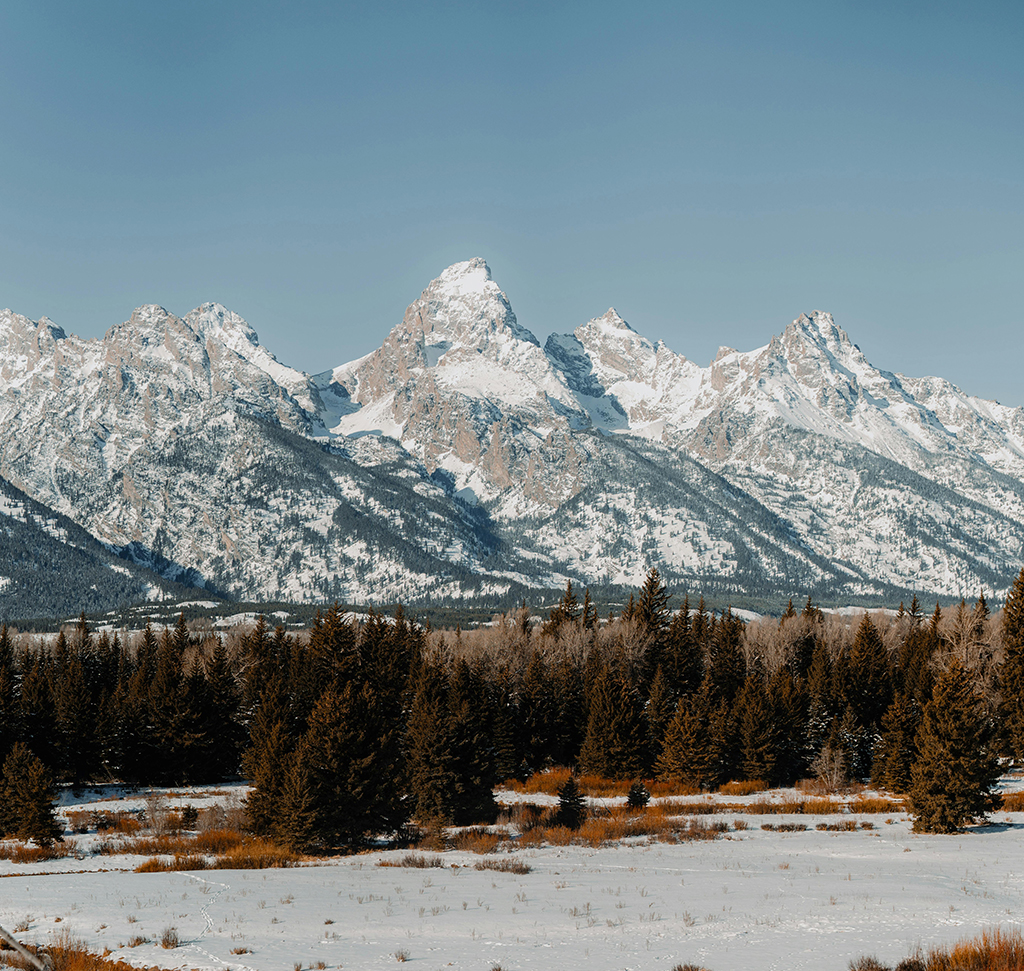
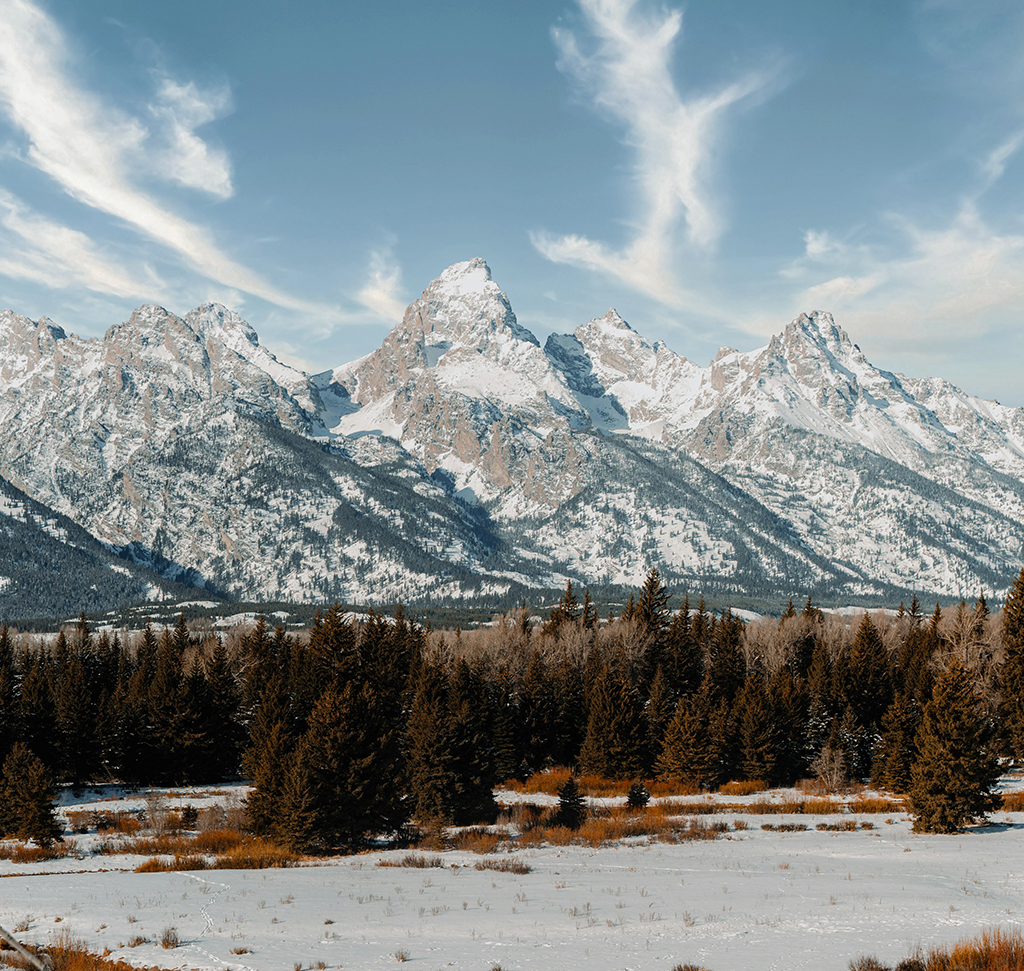
How to Add Realistic Clouds with Photoshop’s Blend If
A plain sky is the easiest thing in a landscape to improve, and dropping clouds into one takes about a minute. The part that usually gives it away is the seam — the hard edge where the borrowed sky stops and the real photograph starts.
Blend If removes that problem entirely. Instead of masking the clouds by hand, you tell Photoshop to hide the dark parts of the cloud layer, which leaves the clouds themselves floating over your original sky — a sky that is already perfectly color matched and light matched, because it is the one your camera recorded.
Add Realistic Clouds: Bring the Plate In
-
Open both images
Your landscape, and a photograph with the clouds you want.
-
Drag the clouds across with the Move Tool
Click and drag from one tab to the other to copy the cloud image onto your landscape. Press F for a full-screen view.
-
Rename the new layer
Double-click the layer name and call it something you will recognize. It saves confusion in a moment when there are masks involved.
-
Hide the cloud layer for now
Click its eyeball off. You need to see the original sky to select it.
Two Ways to Select the Sky
With the background layer active, you need a selection of the existing sky. Photoshop offers an automatic route and a manual one, and on this image the manual one wins.
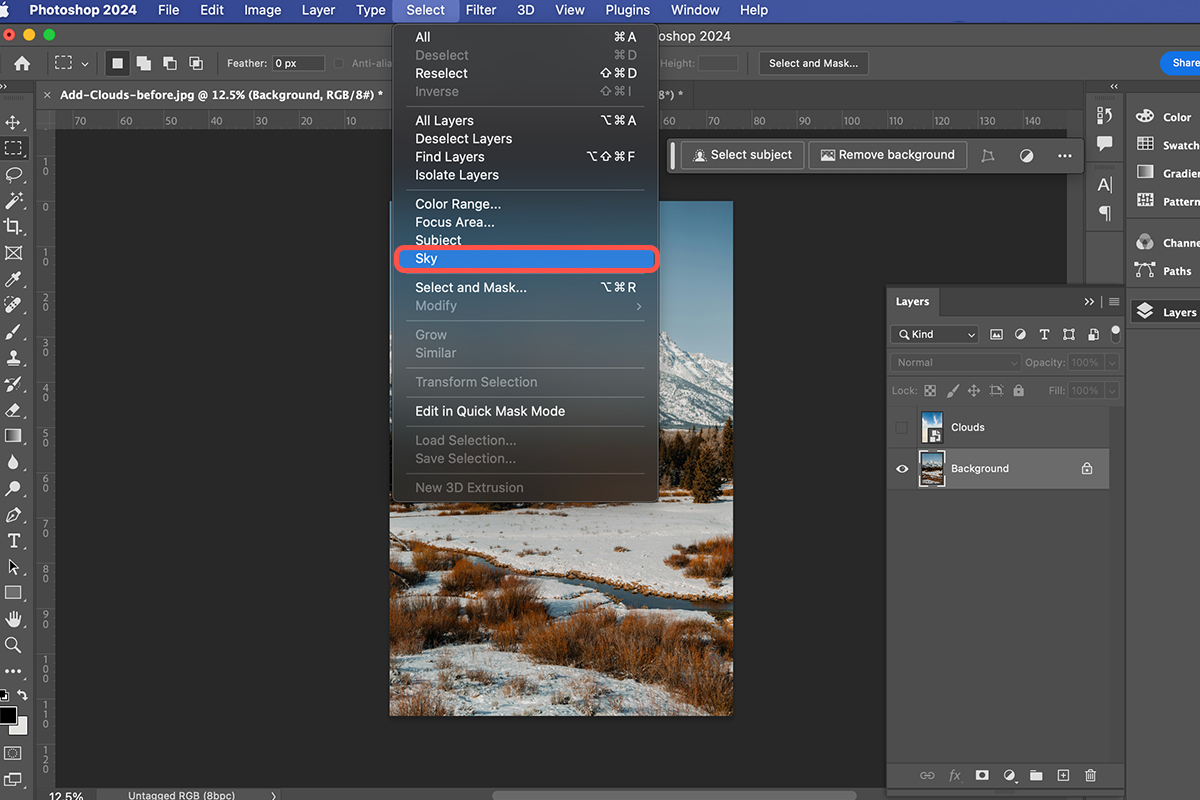
The automatic route is Select > Sky. It is one click and it gets most of the way there, but on a landscape with a jagged horizon it tends to grab a little of the mountains along with the sky.
-
Try Select > Sky first
Look closely at the horizon. If it has taken part of the landscape with it, deselect with Ctrl + D on PC or Cmd + D on Mac.
-
Switch to the Magic Wand Tool
Sometimes the old tools are still the best tools for the job.
-
Set the Tolerance to about 15, then click the sky
Deselect and click again after changing the tolerance so the new value is applied.
-
Hold Shift and click to add any missed areas
A few extra clicks along the horizon gives you a clean border against the landscape.
Why a Lower Tolerance Wins on a Sky
Tolerance controls how far from the pixel you clicked the Magic Wand is willing to travel. At its default it wanders past the horizon into the snow and rock, because those are bright too. Bringing it down to around 15 keeps it inside the range of blues that actually make up the sky, and the edge it leaves against the mountains is cleaner than the automatic selection managed.
If selections are an area you want to shore up, How to Use the Select and Mask Workspace and the Select and Mask workspace are the two to read.
Load the Selection as a Layer Mask
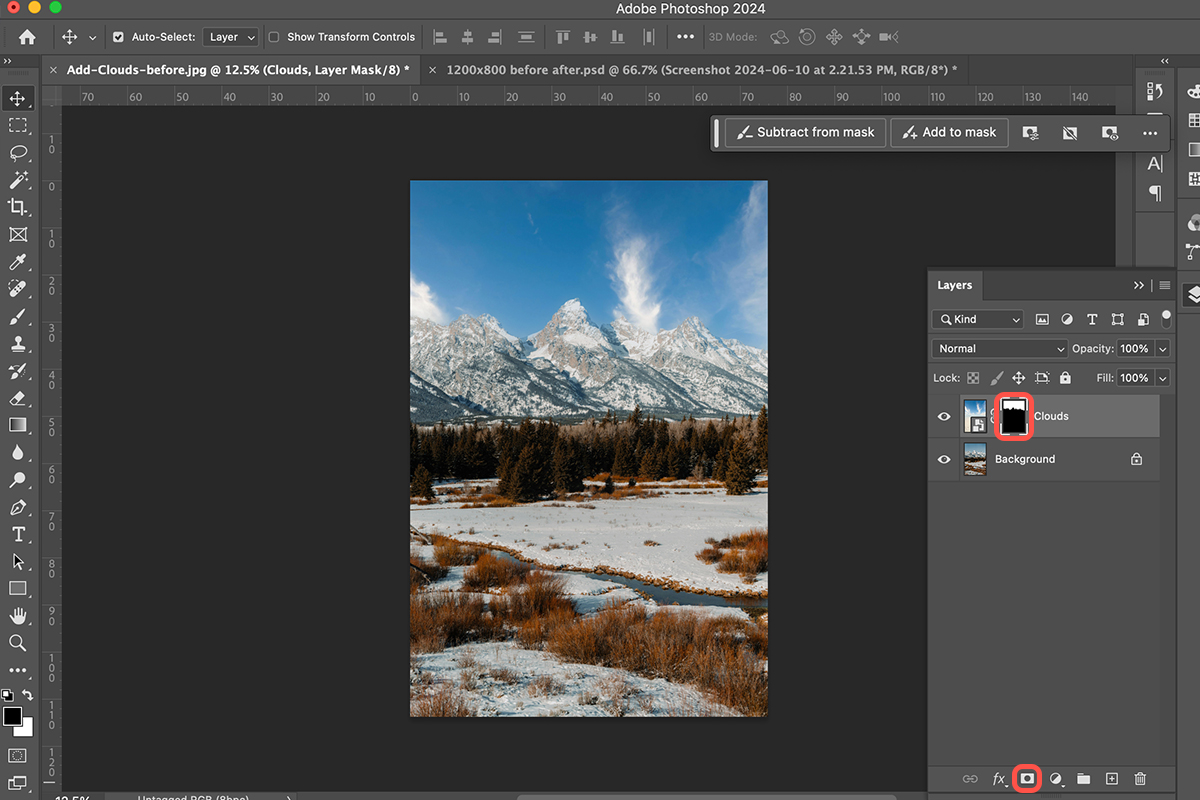
With a clean selection of the sky, turn the cloud layer back on, select it, and click the layer mask icon in the contextual task bar. The clouds are now visible only where the original sky was.
-
Turn the cloud layer back on and select it
The selection you made stays active while you do this.
-
Click the layer mask icon
The selection becomes a mask, and the clouds appear inside the sky only.
Layer masks are the backbone of every composite worth building — creating and using them and the fuller walkthrough both cover the ground properly.
Unlink the Layer From Its Mask
Between the layer thumbnail and the mask thumbnail sits a small chain icon, and it is the first genuinely useful trick in this tutorial.
-
Try moving the layer with the chain still on
Grab the Move Tool and drag. The mask travels with the layer, so nothing appears to change — and the clouds will not reposition. Undo.
-
Click the chain icon to unlink them
Now select the layer thumbnail and drag. The clouds move; the mask stays exactly where it was.
-
Click between the two thumbnails to link them again
Once the clouds are where you want them, relinking keeps the pair together if you move things later.
What the Chain Icon Actually Controls
The mask defines where the layer shows. The layer holds what is shown. Linked, those two move as one unit, which is almost never what you want once a mask is doing real work — you end up dragging the hole around with the thing that fills it.
Unlinked, the mask stays pinned to the horizon while you slide the clouds behind it until the composition reads well. You can also select the mask on its own and move that instead, though on this effect there is rarely a reason to.
Blend If: Hiding the Dark Sky
At this point the clouds sit inside the sky, but the composite does not blend. You have swapped one flat sky for another, seam and all.
What you actually want is the clouds from the new photograph and the sky from the original. Blend If gets you exactly that by making the dark blue of the borrowed sky invisible, so your own sky shows through underneath it.
-
Open Layer Style
Double-click the empty gray area to the right of the layer name, or click FX at the bottom of the Layers panel and choose Blending Options.
-
Find Blend If at the bottom of the dialog
It sits under Advanced Blending, with the channel set to Gray.
-
Work on the Current Layer slider
Current Layer is the cloud image. Underlying Layer is everything beneath it. You want the first one.
The Alt-Drag That Makes It Work
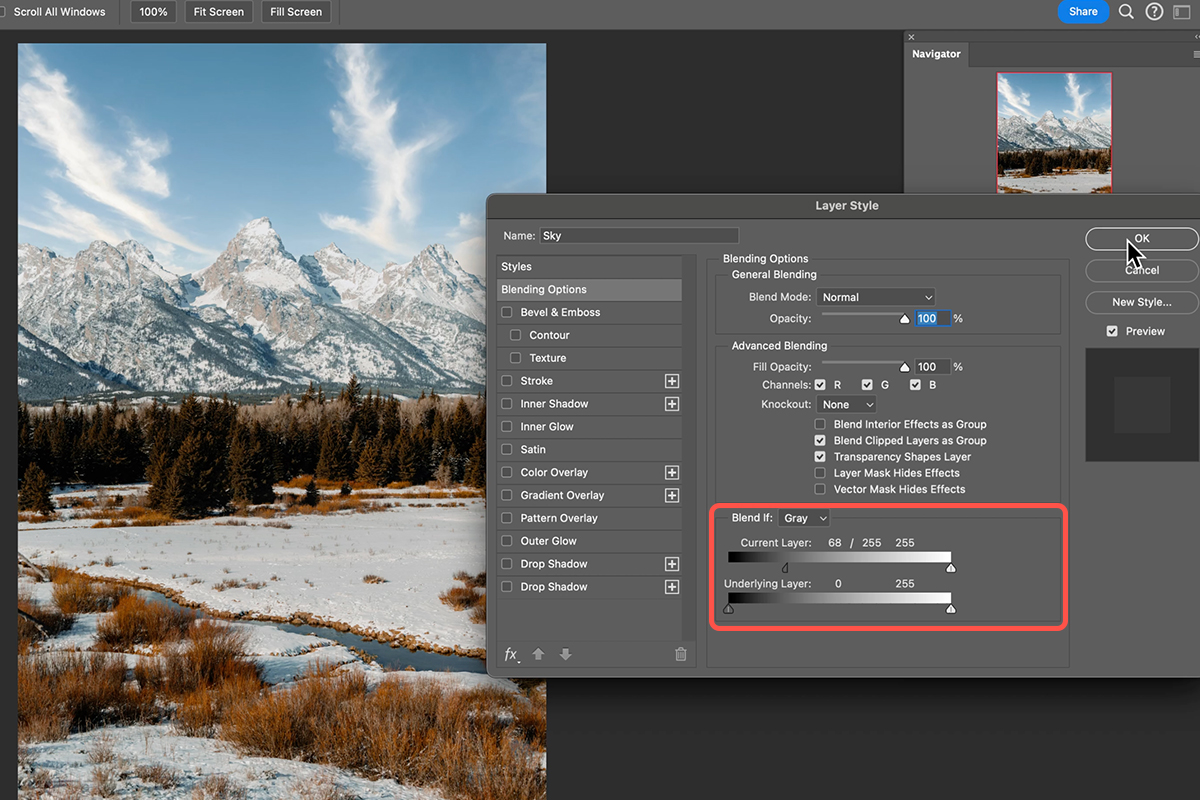
This is the step the whole technique rests on. Hold Alt on PC or Option on Mac and drag the left-hand slider. It splits into two independent halves.
-
Hold Alt or Option and drag the left slider to split it
Do this before you move it anywhere. In the example the two halves end up reading 68 and 255.
-
Drag the split halves to the right
The dark blue drops away and the clouds stay. Push it further to strengthen the effect.
Why Splitting the Slider Feathers the Transition
Unsplit, the slider is a single cutoff: every pixel below that brightness vanishes and every pixel above it stays, with nothing in between. That hard boundary is what produces a crunchy, cut-out edge around every wisp of cloud.
Split, the two halves define a range instead of a line. Pixels below the first half disappear, pixels above the second stay, and everything between the two fades gradually from one to the other. That gradient is the entire difference between a composite that reads as real and one that does not.
What Happens If You Skip the Alt Key
Drag the slider without holding Alt or Option and the result looks fake, strange and basically unusable. It is the single most common reason people try Blend If once and conclude it does not work. If you find yourself looking at a harsh, brittle edge, undo, put the slider back where it started, and split it properly before moving it.
Blend If repays learning beyond this one use — a full introduction, three practical applications and the sliders explained all go further.
Placing the Clouds
Click OK and toggle the layer off and on. The original sky reappears between the clouds, carrying its own color and its own light, because it never left.
With the layer and mask still unlinked, grab the Move Tool and slide the cloud layer around until the shapes sit where you want them relative to the horizon and the peaks. The mask holds its place while you do it, so nothing spills over the mountains.
Why This Beats Masking the Clouds by Hand
You could cut the clouds out manually, and people do. The trouble is that cloud edges are not edges — they are gradients hundreds of pixels wide, and any selection you paint will either clip them or leave a halo of borrowed sky around them.
Blend If sidesteps the problem by not making a selection at all. It works on brightness, and a cloud is by definition the bright part of a sky photograph. So the tool separates exactly the thing you were trying to separate, at every level of softness at once, without you drawing anything.
The bonus is the one worth repeating: what shows through underneath is your own sky. No color matching, no light matching, no grading the two images toward each other. They already agree.
Keep the Whole Thing Adjustable
Nothing here is destructive. The mask can be repainted, the chain relinked, and the Blend If sliders reopened by double-clicking the layer again at any point.
That matters because the right amount of cloud is a judgment you will want to revisit once you see the image at full size. Push the sliders further for a heavier sky, pull them back for something subtler, and move the layer until the shapes fall where the composition needs them.
Quick Reference: Keys, Menus and Settings
- Bring in the cloudsMove Tool, drag from one image to the other; F for full screen
- Select the skySelect > Sky, or the Magic Wand at Tolerance 15; Shift-click to add; Cmd/Ctrl + D to deselect
- Mask the cloudsSelect the cloud layer, Layer Mask icon in the Contextual Task Bar
- UnlinkClick the chain icon between the thumbnails; click between them again to relink
- Open Blend IfDouble-click the gray area of the layer, or fx > Blending Options; use Current Layer
- Split the sliderAlt/Option-drag the left handle, then drag the halves right (68 and 255 in the example)
No generative AI. The clouds come from a second photo and your own sky shows through.
Free Downloads
Follow Along on the Same Photos
Get the mountain photo, the cloud photo to bring in, the finished PSD and the 4-page PDF guide. Free with a PHLEARN account.
Adding Clouds With Blend If: Common Questions
How does Blend If add clouds without a seam?
Blend If makes a layer visible based on its dark or light areas. It hides the dark blue sky on the cloud layer and keeps the bright clouds, so your original sky shows through between them.
Select > Sky grabbed part of the mountains. What now?
Deselect with Cmd/Ctrl + D and switch to the Magic Wand Tool. Set Tolerance to about 15, click the sky, then Shift-click any areas it missed.
I lowered the Tolerance but the selection didn’t change. Why?
The new Tolerance only applies to the next click. Deselect, then click the sky again.
How do I make the clouds show only in the sky?
With the sky selection still active, turn the cloud layer back on, select it and click the Layer Mask icon in the Contextual Task Bar. The clouds are then visible only where the sky was.
Why does the mask move when I move the clouds?
The layer and mask are linked. Click the chain icon between the thumbnails to unlink them, then click the layer thumbnail and drag. Click between the thumbnails again to relink.
Where do I find Blend If?
Double-click the empty gray area of the layer, or click fx at the bottom of the Layers panel and choose Blending Options. Blend If is at the very bottom of the Layer Style dialog.
Should I use Current Layer or Underlying Layer?
Current Layer. It is the cloud layer, which has a dark blue sky and light clouds, so its left handle can hide the dark areas. Leave Underlying Layer alone here.
Why do my clouds look fake with a harsh edge?
The handle was dragged without splitting it. Put it back where it started, hold Alt/Option and drag the left handle so it separates into two halves, then drag them right. The split adds the feathered transition.
Do I need to color match the new clouds?
No. The blue you see between the clouds is your original sky, so it is already color matched and light matched to the photo.
Are the sample files free?
Yes, with a free PHLEARN account. You get 2 sample images, 1 sample PSD and 1 PDF guide: the mountain photo, the cloud photo, the finished file and a 4-page step-by-step guide.
Master Photoshop, Lightroom and Photography
Join PHLEARN PRO for $12.99 a month or $99.99 a year. Cancel anytime, with a 100% money-back guarantee.





