

Download Assets
This tutorial includes 4 sample images and 1 PDF guide. Downloads are free with a PHLEARN account.
- Download the sample images and PSDs from every free tutorial on PHLEARN
- New free tutorials published every week
- One free account — sign up once, then download anything
Free PDF Guide · 3 Pages
This Tutorial as a Step-by-Step PDF
Walks through the Lens Blur move in the Develop module: Apply, the Point/Area Focus target, Blur Amount, then Visualize Depth to check the map, Brush Refinement with the Blur and Focus brushes sized with [ and ], two subjects in one frame, and Boost and Bokeh. Keep it next to your keyboard.
description
Blur the background in Lightroom Classic and you never have to leave the catalog: Lens Blur reads the depth of the scene, masks the subject for you, and stays editable.
Tired of distracting backgrounds in your photos? Lightroom Classic’s new Lens Blur can help! In this tutorial we’ll show you how to easily achieve a shallow depth of field effect by automatically selecting your subject and letting you refine the focus area for a natural look. You’ll also learn how to adjust the blur amount and explore creative effects.
Enjoying This Free Tutorial?
We publish a new free tutorial every week, each one with sample images and PSDs you can download and follow along with. Sign up and they land straight in your inbox, along with early word on sales, events and subscriber-only offers.
Artist Credit
- Rajaa Lemnari
- Carla Searcy
- Kübra Kuzu
Images sourced from Pexels.


How to Blur the Background of a Photo in Lightroom Classic
Separating a subject from a busy background is usually a job for glass. You put a 50mm f/1.4 on the camera, open it up, and the background falls away on its own. But you do not always have that lens on you, and sometimes the photograph is already taken — shot on a phone, shot at f/8, shot before you noticed how cluttered the wall behind your subject was.
Lens Blur in Lightroom Classic solves that after the fact, and it does it convincingly. It is not a Gaussian blur painted over the background. Lightroom builds a depth map of the scene and blurs according to distance, so things fall out of focus gradually as they recede, the way a real lens behaves.
This tutorial walks through four different photographs — a single subject with an architectural element, a portrait where the hair gives the mask trouble, a two-person shot, and a seated subject where the chair confuses the depth map. Between them they cover most of what you will actually run into.
If you want a breakdown of what every individual slider does, read our guide to the Lens Blur controls. This one is about applying it to real images.
How to Blur the Background in Lightroom Classic: the Basic Move
Lens Blur now ships in the full release of Lightroom Classic — no beta install needed. Update through the Creative Cloud installer and it is there.
-
Open the photo in the Develop module
Lens Blur lives in the right-hand panel, near the bottom of the stack.
-
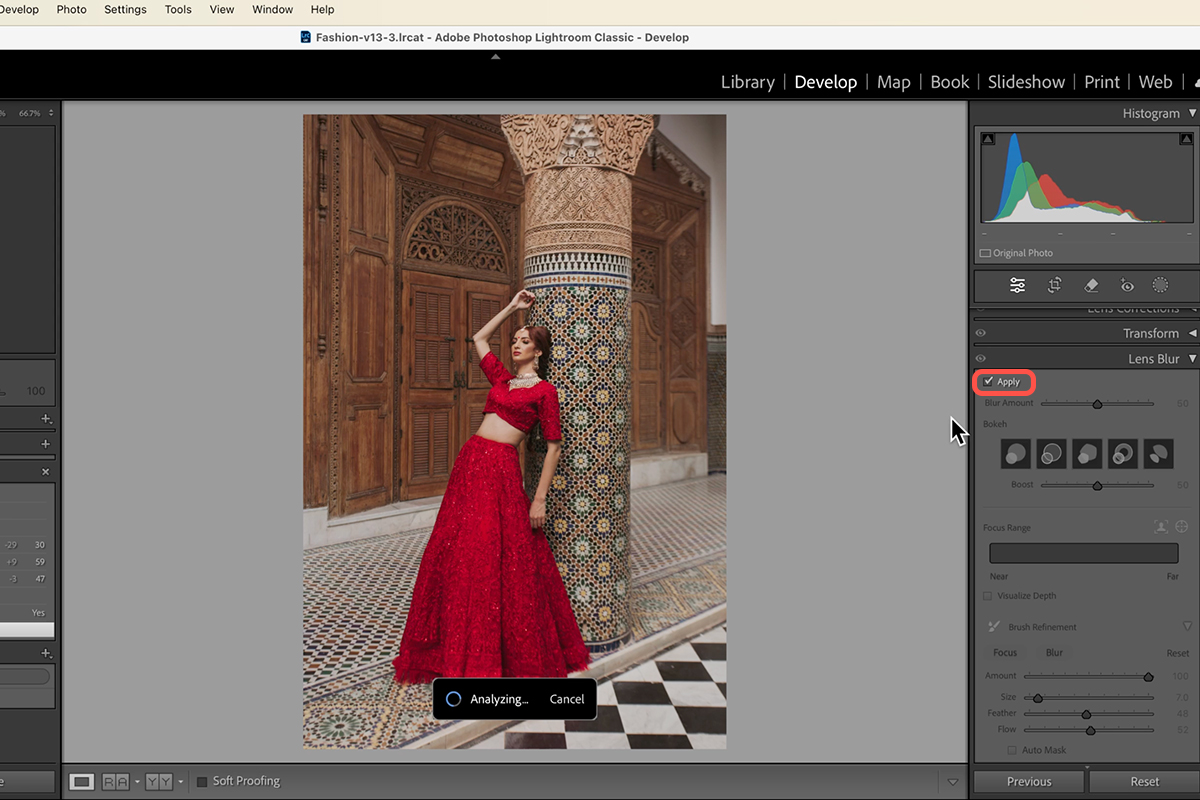
Click Apply
Lightroom analyzes the image, builds a depth map, and gives you an automatic result. On a well-separated subject this is often close on the first try.
-
Refine the focus point — always
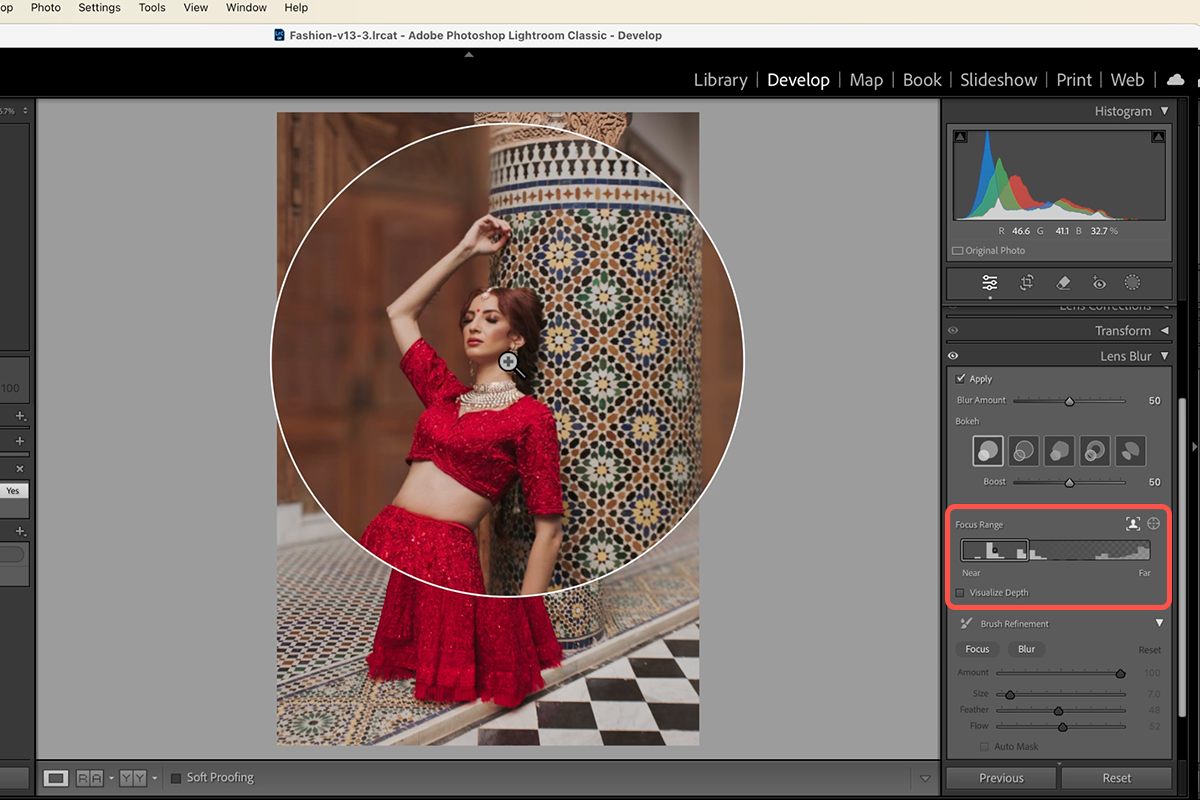
Next to Focus Range there is a small target icon labeled Point/Area Focus. Click it, then click and drag across the part of the image that should be sharp. This is the single step that most improves the result, and it takes two seconds.
-
Set the Blur Amount
Drag right for more separation, left for less. Restraint matters here — more on that below.
That four-step loop is the whole technique. Everything that follows is about the cases where the automatic pass gets something wrong.
Example One: Subject and Column
The first image has a subject standing beside an architectural column. The background is sharp all the way back, so there is almost no separation — everything competes for attention.
After clicking Apply, dragging the Point/Area Focus target across the subject snaps the outline neatly to her. The column keeps its sharpness too, because it sits at the same distance from the camera as she does. That is worth noticing: you are not selecting a subject, you are telling Lightroom which depth to hold in focus. Everything at that distance stays sharp, which is exactly how a real lens works.
Example Two: When the Mask Struggles With Hair
The second photograph has a nice background that is only slightly distracting. Apply and refine works as before, but zooming in reveals a problem.
Use Visualize Depth to Find Errors
Turn on the Visualize Depth checkbox. The image is replaced by a colored map showing what Lightroom thinks is near and what it thinks is far — yellow areas stay sharp, and the falloff runs gradually toward the back of the scene, including along the ground plane. It is the fastest way to see whether the depth map matches reality before you commit.
Zoom In Before Trusting It
At Fit view everything looks fine. At 50 percent it still looks fine. At 66 and 100 percent, the automatic masking gets confused around the edges of the hair — individual strands that should be soft are being held sharp.
This is normal and not a problem, because there is a manual override.
Fix It With Brush Refinement
Open the Brush Refinement section — it is often collapsed by default. Choose Blur, reduce the feathering, raise the flow, and paint directly over the areas that should be soft. Under the chin, along the shoulder, through the problem strands of hair.
Use the [ and ] bracket keys to size the brush rather than reaching for the slider — it is much faster when you are working at 100 percent zoom and moving around the frame.
The same brush has a Focus mode that does the opposite, which you will need in the fourth example.
Example Three: Two Subjects in One Frame
Two people, background slightly distracting. Apply gives a good starting result, but the refinement step has a wrinkle: you can only drag the Point/Area Focus target over one of them.
The answer is to try both. Drag across the first subject’s face and look at the result, then drag across the second and compare. Because Lightroom is holding a depth range in focus rather than a single point, one of the two will usually pull both people into the sharp zone better than the other. Pick whichever looks right and move on.
Try Boost on Backgrounds With Highlights
This image is a good candidate for the Boost control, which lifts the bright points in the blurred background. Where there are specular highlights or bright gaps back there, Boost turns them into the round, glowing bokeh balls you get from a fast lens. On a flat, evenly lit background it does very little; on this one it makes a visible difference.
The Bokeh options sitting alongside it change the character of the blur to emulate different lenses. There is no correct choice — cycle through them on each image and see which one suits the photograph.
Example Four: When Something Should Have Stayed Sharp
The last image is a seated subject. Apply and refine works well, but at 100 percent zoom the chair the subject is sitting in is being blurred — Lightroom has read it as background even though it is at the same distance as the person in it.
This is where the Focus brush earns its place. Select Focus in Brush Refinement and paint the chair back in. Then switch to Blur and darken down the area immediately behind the subject’s shoulder, which the automatic pass left too sharp.
The tool is very good, but it is not a mind reader. Objects that are physically connected to the subject — chairs, railings, tables, anything the subject is touching or leaning on — are the reliable failure case. Check them every time.
Do Not Overdo It
The most common mistake with Lens Blur is the same mistake people make with every post-production effect: pushing the slider to the end because you can.
Real lenses do not obliterate the background. They soften it enough that the eye goes to the subject first. Push Blur Amount to maximum and the result stops reading as a photograph and starts reading as a cutout on a smeared backdrop — the exact look this tool exists to avoid.
A modest amount does the job. If someone can tell you applied Lens Blur, you applied too much.
Why This Beats Blurring in Photoshop
The old approach was to select the background in Photoshop and run a Gaussian Blur on it. It never looked right, for two reasons. Gaussian Blur applies uniformly, so a wall six feet behind the subject blurs exactly as much as a tree sixty feet back — and no lens does that. And the selection had to be perfect, because any error showed up as a hard, obviously artificial edge.
Lens Blur solves both. The depth map gives you a gradient instead of a flat wash, and the brush refinement means a slightly imperfect automatic mask is a thirty-second fix rather than a reason to start over.
Quick Reference: Keys, Menus and Settings
- Start the blurDevelop module > Lens Blur panel, click Apply
- Choose what stays sharpPoint/Area Focus target to the right of Focus Range, then click and drag over the subject
- Set the strengthBlur Amount; a little is all it needs
- Check the depthVisualize Depth checkbox: yellow stays in focus
- Fix the edgesZoom to 50%, 66%, 100%; Brush Refinement > Blur, Feather down, Flow up; [ and ] size the brush
- Look of the blurBokeh icons emulate different lenses; Boost lifts background highlights
- Bring back focusBrush Refinement > Focus, paint over what was blurred by mistake
Lens Blur is in the full release of Lightroom Classic; update through Creative Cloud.
Free Downloads
Follow Along on the Same Photos
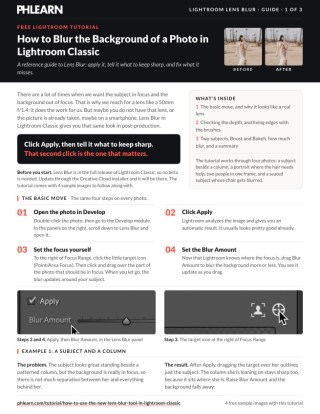
Get the four photos from the tutorial, one for each example including the tricky hair and the chair, and the 3-page PDF guide. Free with a PHLEARN account.
Lens Blur in Lightroom Classic: Common Questions
Where is Lens Blur in Lightroom Classic?
Double-click the photo, go to the Develop module and scroll down the panels on the right to Lens Blur. It is in the full release, so just update through the Creative Cloud installer.
How do I tell Lens Blur what to keep in focus?
After clicking Apply, click the little target icon to the right of Focus Range (Point/Area Focus). Then click and drag over the part of the photo that should be sharp, and the blur updates when you let go.
Why did an object next to my subject stay sharp?
Lens Blur works by distance, not by cutting out a person. Anything at the same depth as your subject stays in focus with them, like the column she is leaning on in the first example.
What does Visualize Depth show?
Check Visualize Depth under Focus Range and the photo turns into a color map. Yellow areas stay in focus, including the ground at the subject’s feet, and the scene falls out of focus gradually with distance.
Lens Blur left the edge of the hair sharp. How do I fix it?
Zoom in to 66% or 100% to see it, then open Brush Refinement and choose Blur. Bring Feather down, bring Flow up, size the brush with the [ and ] keys and paint over the areas that should be soft.
Something that should be sharp got blurred. What now?
Use the Focus brush in Brush Refinement and paint over it. In the last example the chair the subject sits in was blurred, and painting with Focus brings it back.
How do I use Lens Blur with two people?
The target only drags over one of them. Drag it over one subject’s face, then try the other, and keep whichever result looks better.
What do Boost and Bokeh do?
Boost brightens the highlights in the blurred background and works best when there are bright areas behind the subject. The Bokeh icons change the look of the blur, emulating different lenses.
How much blur should I use?
Just a little. Push Blur Amount all the way up and it stops looking realistic. You do not have to go crazy to make a big difference.
Are the sample files free?
Yes, with a free PHLEARN account. You get 4 sample images and 1 PDF guide: one photo for each example, including the hair edge and the chair, plus a 3-page walkthrough.
Master Photoshop, Lightroom and Photography
Join PHLEARN PRO for $12.99 a month or $99.99 a year. Cancel anytime, with a 100% money-back guarantee.





