

description
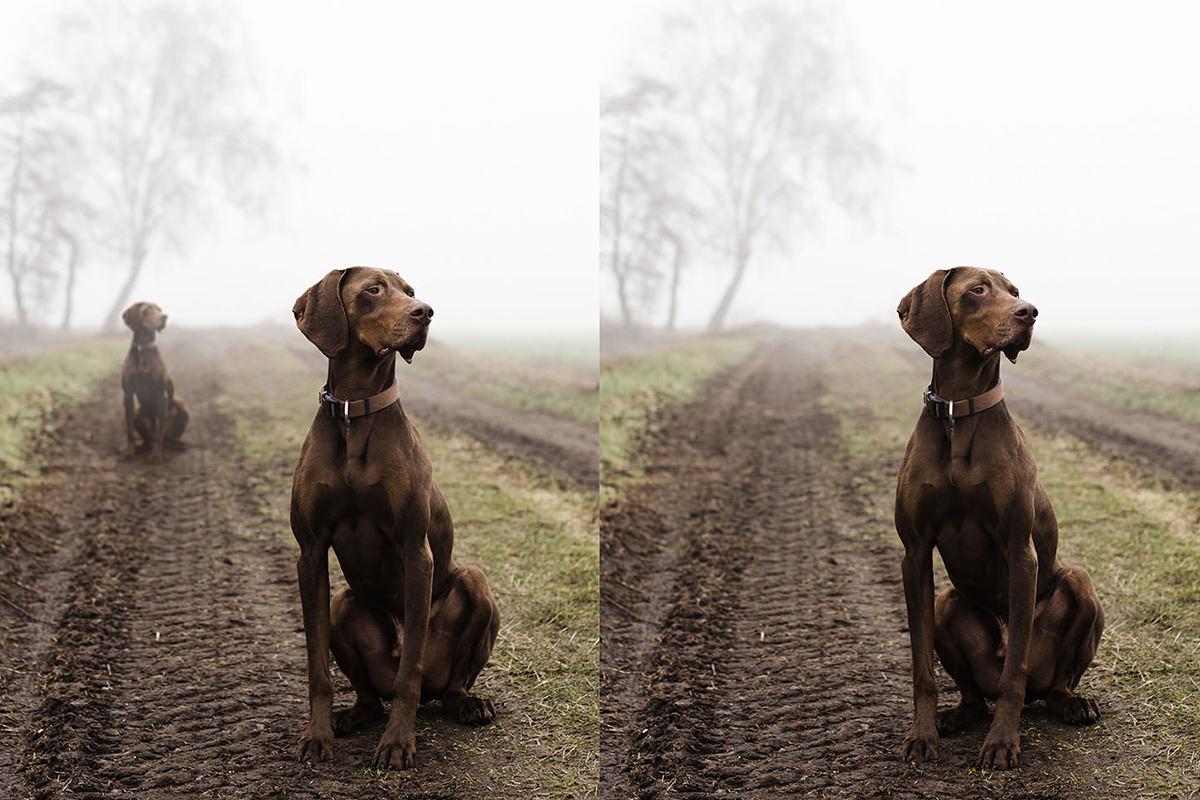
A duplicated subject only looks right further back in a scene if it shrinks at the rate perspective demands. The trick in this free tutorial is moving Free Transform’s reference point off the layer and onto the horizon line, so scaling with Shift and Alt follows the scene’s own converging lines instead of a guessed percentage. A Smart Object keeps the matching blur adjustable, and clipped fog and ground-tone layers supply the atmospheric cues that sell the distance.
Enjoying This Free Tutorial?
We publish a new free tutorial every week, each one with sample images and PSDs you can download and follow along with. Sign up and they land straight in your inbox, along with early word on sales, events and subscriber-only offers.
How to Duplicate Anything in Perspective Using Photoshop
Duplicating a subject and placing it further back in a scene sounds simple, but getting it to actually look correct means the copy has to shrink at exactly the right rate as it moves toward the horizon, blur to match its new distance, and pick up the same atmospheric haze as everything else at that depth. This tutorial covers all three, anchored around one key trick: transforming from the horizon point instead of the center of the layer.
Duplicating the Subject to a New Layer
The very first step is isolating the subject you want to place elsewhere in the scene.
-
Lasso the Subject and Duplicate It
Use the Lasso tool to draw a rough selection around your subject, then press Cmd/Ctrl+J to duplicate that selection onto its own new layer.
Setting the Transform Origin to the Horizon Point
Simply scaling the duplicate down and eyeballing a new position is where most attempts at this effect go wrong, since it’s genuinely difficult to judge by eye where a shrunk copy should sit to look correctly placed in perspective.
-
Move the Transform Reference Point to the Horizon
Press Cmd/Ctrl+T to enter Free Transform, then drag the transform’s reference point away from the center of the layer and place it on the image’s horizon line — the point all perspective lines in the scene lead back to.
Scaling With Shift and Alt to Maintain Perspective
With the reference point relocated, scaling the layer behaves completely differently than a normal transform.
-
Hold Shift and Alt/Option While Scaling
Hold Shift together with Alt (Option on Mac) and drag a corner handle. Because the transform now scales from the horizon point rather than the layer’s center, the subject shrinks and grows exactly as it would moving further from or closer to the camera, staying correctly grounded rather than just getting smaller in place.
-
Move Only Left and Right
Reposition the duplicate horizontally as needed, but avoid moving it vertically — any vertical movement breaks the perspective relationship this technique just established.
Why the Horizon Point Controls Perspective Scaling
Every object at a given distance from the camera in a scene with a defined horizon scales according to lines that converge at that horizon. Anchoring the transform’s reference point there means Photoshop’s scaling math follows that same convergence, so the duplicate naturally lands at the right size for wherever it sits along that line, rather than requiring you to guess a scale percentage manually.
Roughly Cutting Out the Duplicate
Cleaning up the edges of the duplicate doesn’t need to be precise if the final result is going to carry some blur anyway.
-
Add a Rough Layer Mask With the Brush Tool
Add a layer mask and use the Brush tool to paint away the parts of the background that were duplicated along with the subject, keeping the cutout reasonably clean but not obsessing over precision.
Why a Rough Cutout Is Fine Here
Since the duplicate is about to be blurred to match its new distance from the camera, any minor imperfections along the cutout edge will be softened away by that blur anyway. Spending extra time perfecting an edge that’s about to be blurred is time that isn’t buying any visible improvement in the final result.
Converting to a Smart Object for Adjustable Blur
Turning the duplicate into a Smart Object before blurring it is what keeps every decision in this process editable after the fact.
-
Convert the Layer to a Smart Object
Right-click the layer and choose Convert to Smart Object. The layer mask disappears from view, but double-clicking the Smart Object thumbnail reopens the original layered file for further edits, which update back on the main document as soon as you save.
-
Apply Gaussian Blur as a Smart Filter
Go to Filter > Blur > Gaussian Blur and choose an amount that roughly matches the blur already present in the background at that distance.
Why a Smart Object Keeps the Blur Editable
A Gaussian Blur applied to a regular layer is baked in permanently, so getting the amount wrong means starting the blur over from scratch. Applied to a Smart Object, the same blur becomes a Smart Filter that can be turned off, back on, or double-clicked to change its amount at any time, which matters a lot here since matching blur to distance is inherently a guess-and-check process.
Matching Atmospheric Fog and Ground Tone
Distance in a photo usually comes with more than just blur — atmospheric haze and lighter ground tone both increase the further back something sits in the frame.
-
Add a Clipped Layer for Fog
Create a new layer, right-click it and choose Create Clipping Mask so it only affects the duplicated subject, then paint white at a low flow of around 10% using the Brush tool to add a hint of fog appropriate for the added distance.
-
Lighten the Ground Tone to Match
On another clipped layer, sample the color of the ground at that distance and paint it in with the Brush tool, setting the blending mode to Lighten so it only brightens without darkening anything, then lower opacity to taste.
Fine-Tuning Blur and Position
Because everything is still fully adjustable, it’s easy to keep refining the placement even after the effect looks mostly complete.
-
Double-Click the Smart Filter to Adjust Blur
If the blur still looks too strong or too weak compared to the surrounding background, double-click the Gaussian Blur Smart Filter in the Layers panel and adjust its amount without redoing any of the earlier steps.
-
Reposition Left or Right for Composition
Move the grouped duplicate left or right as needed for the overall composition, since horizontal movement alone doesn’t disturb the perspective relationship already established.
Why This Approach Works
Relocating the Free Transform’s reference point to the horizon is what makes this technique work at all, since it lets Photoshop’s own scaling math handle the perspective calculation instead of requiring you to estimate a scale percentage by eye. Everything after that solves a different piece of the same believability problem: a Smart Object keeps the matching blur fully adjustable rather than a one-shot guess, and clipped layers for fog and ground tone add the atmospheric cues that sell distance beyond just size and sharpness. None of these individual pieces are difficult, but automated tools can’t replicate this combination, which is exactly why it’s worth learning to do manually.
Final Thoughts
This technique works for far more than dogs on a beach — the same horizon-anchored transform, Smart Object blur, and clipped atmosphere layers apply just as well to duplicating balloons, people, trees, or any other repeated element you want scattered convincingly through a scene with real depth. Once you’ve done it once, the process becomes fast enough to repeat as many times as a composition calls for.
Quick Reference: Keys, Menus and Settings
- Copy the subjectLasso tool, then Cmd/Ctrl + J
- Transform from the horizonCmd/Ctrl + T, drag the reference point onto the horizon
- Scale in perspectiveShift + Alt/Option-drag a corner; move only left or right
- Editable blurRight-click > Convert to Smart Object, then Filter > Blur > Gaussian Blur
- FogNew layer, Alt/Option + Cmd/Ctrl + G to clip, white at 10% flow
- Ground toneClipped layer, ground color, blend mode Lighten, lower opacity
- Adjust laterCmd/Ctrl + G to group; double-click the Gaussian Blur Smart Filter (about 3.7 in the video)
No AI, no generative credits.
Duplicating in Perspective: Common Questions
Why does my scaled-down copy look the wrong size?
Scaling around the middle of the layer and guessing a spot rarely matches the scene’s perspective. Scale from the horizon instead, and Photoshop keeps the size right as the copy moves back.
How do I copy the subject onto its own layer?
Draw a rough selection around it with the Lasso tool and press Cmd/Ctrl + J. The selection is duplicated onto a new layer.
How do I scale a copy in perspective?
Press Cmd/Ctrl + T and drag the reference point from the center of the layer to the horizon. Then hold Shift and Alt/Option while you drag a corner, and the copy shrinks as if it is moving back into the scene.
Can I move the copy after scaling it?
Left and right, yes. Up or down breaks the perspective, so the copy will look wrong.
How precise does the cutout need to be?
Not very, if the copy sits in a blurry part of the scene. A rough job with the Brush tool on a layer mask is enough, because the blur hides the edges. Without blur, cut it out more carefully.
Why convert the copy to a Smart Object before blurring?
Gaussian Blur becomes a Smart Filter you can turn off or double-click to change at any time. You can also double-click the thumbnail to edit the original layer and its mask, then save to update the main document.
How much blur should I add?
Match the blur already in the background at that distance. Aaron starts low with Filter > Blur > Gaussian Blur, then double-clicks the Smart Filter and settles around 3.7.
How do I add fog to the copy?
Make a new layer and clip it to the copy with Alt/Option + Cmd/Ctrl + G, or right-click and choose Create Clipping Mask. Paint white at about 10% flow, then lower the opacity until it fits.
The copy’s ground looks too dark. How do I fix it?
On another clipped layer, paint the ground color from that distance, set the blend mode to Lighten so nothing gets darker, and lower the opacity.
Master Photoshop, Lightroom and Photography
Join PHLEARN PRO for $12.99 a month or $99.99 a year. Cancel anytime, with a 100% money-back guarantee.





