

Download Assets
This tutorial includes 2 sample images, 2 sample PSDs and 1 PDF guide. Downloads are free with a PHLEARN account.
- Download the sample images and PSDs from every free tutorial on PHLEARN
- New free tutorials published every week
- One free account — sign up once, then download anything
Free PDF Guide · 4 Pages
This Tutorial as a Step-by-Step PDF
Every step from the video in order: the layer setup, the step-and-repeat bars, loading them as a layer mask, and the two ways to slide the slices, with the shortcuts. Keep it next to your keyboard.
description
Learn how to create a beautiful portrait slice effect in Photoshop using a classic insider trick called “step and repeat”. We’ll show you how to build custom vertical bars, convert them into a non-destructive layer mask, and shift your artwork to pull off two totally different looks. This is a complete manual technique from start to finish, no AI or generative credits required!
Enjoying This Free Tutorial?
We publish a new free tutorial every week, each one with sample images and PSDs you can download and follow along with. Sign up and they land straight in your inbox, along with early word on sales, events and subscriber-only offers.
Image Source
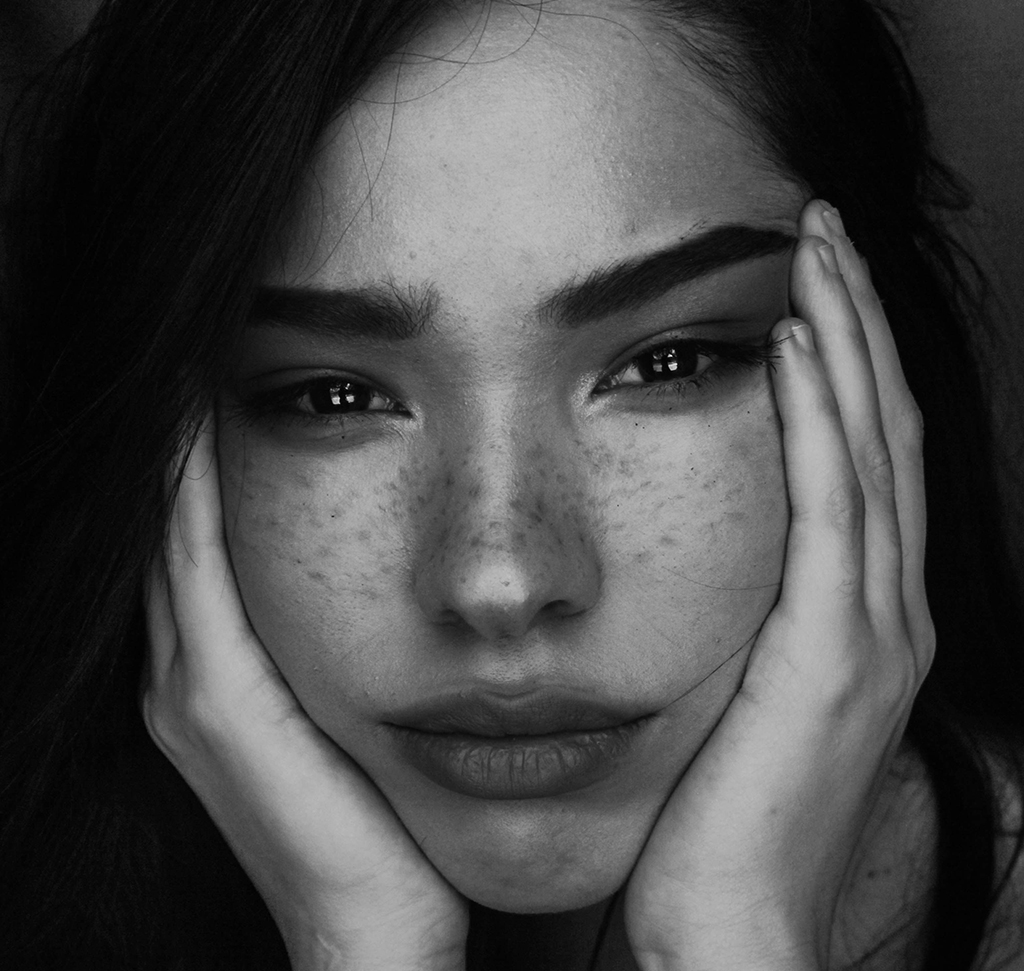
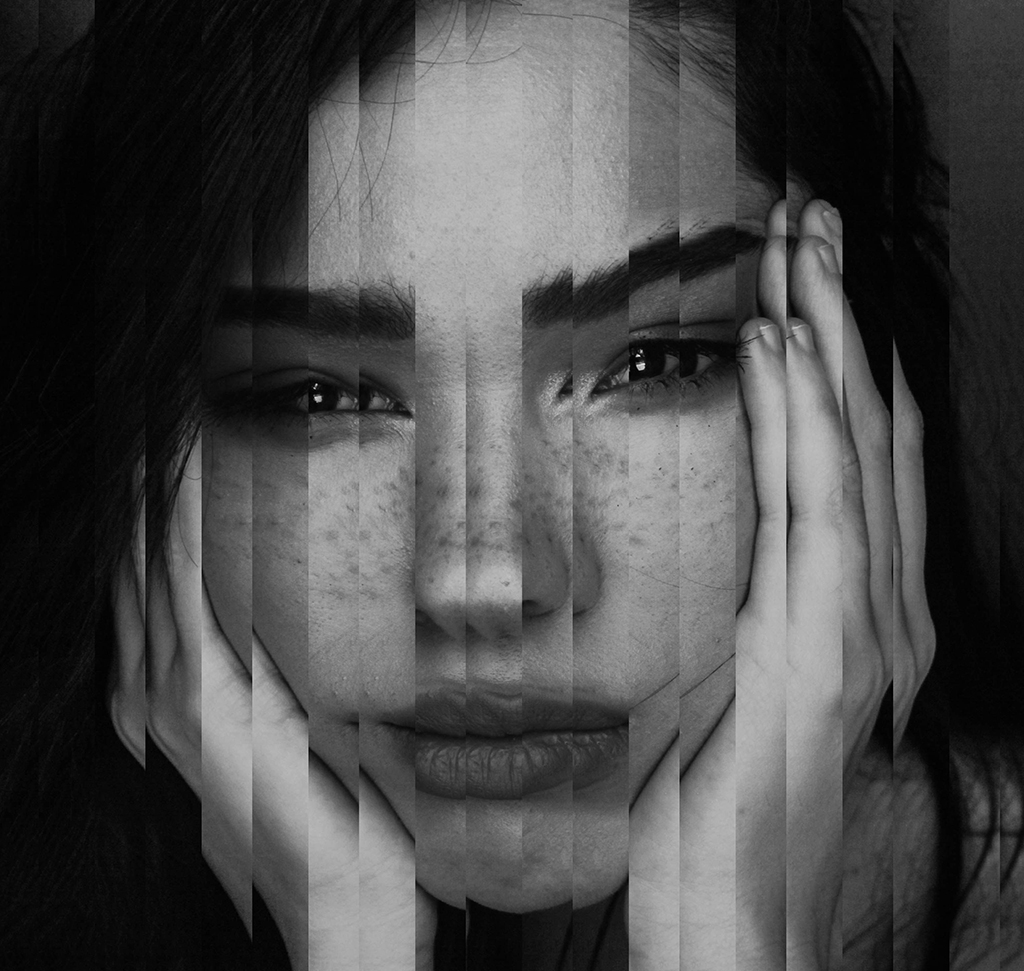
The Portrait Slice Effect, Built by Hand in Photoshop
Learning how to build effects manually in Photoshop is one of the best ways to sharpen your editing skills. Instead of relying on automatic tools or spending generative credits, this non-destructive slice effect gives you complete control over every line, gap, and pixel. It’s a quick, fun technique built entirely from a Photoshop insider trick called “step and repeat” — once you’ve got the rhythm of it, you can tweak it endlessly, save it as a template, and apply it to any photo in your workflow.
Why Skip the AI Route
Skip the AI and Generative Credits
There’s no generative fill, no AI plugin, and no credits to spend here. Every bar, every gap, and every slice is built from real Photoshop tools you already have, which means you can run this effect as many times as you want without watching a credit counter.
Full Creative Control, Completely Non-Destructive
Because the whole effect lives on its own layers and a layer mask rather than baked directly into your photo, nothing here is permanent. Want thinner bars? Wider gaps? A different offset? Every part of it stays editable, and you can always come back and adjust it later.
Getting Started
-
Convert Your Background Layer
Start by double-clicking your default Background layer in the Layers panel to convert it into a fully editable regular layer.
-
Duplicate Your Image
Duplicate this layer by pressing Cmd/Ctrl + J so you have a working copy sitting on top of your original image.
-
Add a New Blank Layer
Create a brand-new blank layer on top of your stack by clicking the New Layer icon at the bottom of the Layers panel. This is where your bar pattern will live.
-
Draw Your First Bar
Select the Rectangular Marquee Tool (Keyboard Shortcut “M”), then click and drag to draw a thin vertical selection near the edge of your canvas. Fill it with solid white by going to Edit > Fill and choosing White.

Build the Bars with Step and Repeat
This is the part that makes the whole effect click: a little bit of a Photoshop insider secret called “step and repeat.” Instead of manually duplicating and nudging your bar over and over, Photoshop can remember the exact distance you move it once, then repeat that same move automatically as many times as you need.
-
Set Your Step
With your white bar layer selected, press Option + Cmd + T on Mac (Alt + Ctrl + T on PC) to enter free transform on a duplicate.
-
Drag to Set the Gap
Hold Shift and drag the duplicate bar sideways to set the exact gap you want between bars, then press Enter/Return to confirm. Holding Shift keeps the movement perfectly horizontal.
-
Repeat the Pattern
Now press Shift + Option + Cmd + T on Mac (Shift + Alt + Ctrl + T on PC) to repeat that exact same offset again. Keep pressing it to fill the frame with evenly spaced bars — Photoshop reproduces the same gap every single time.
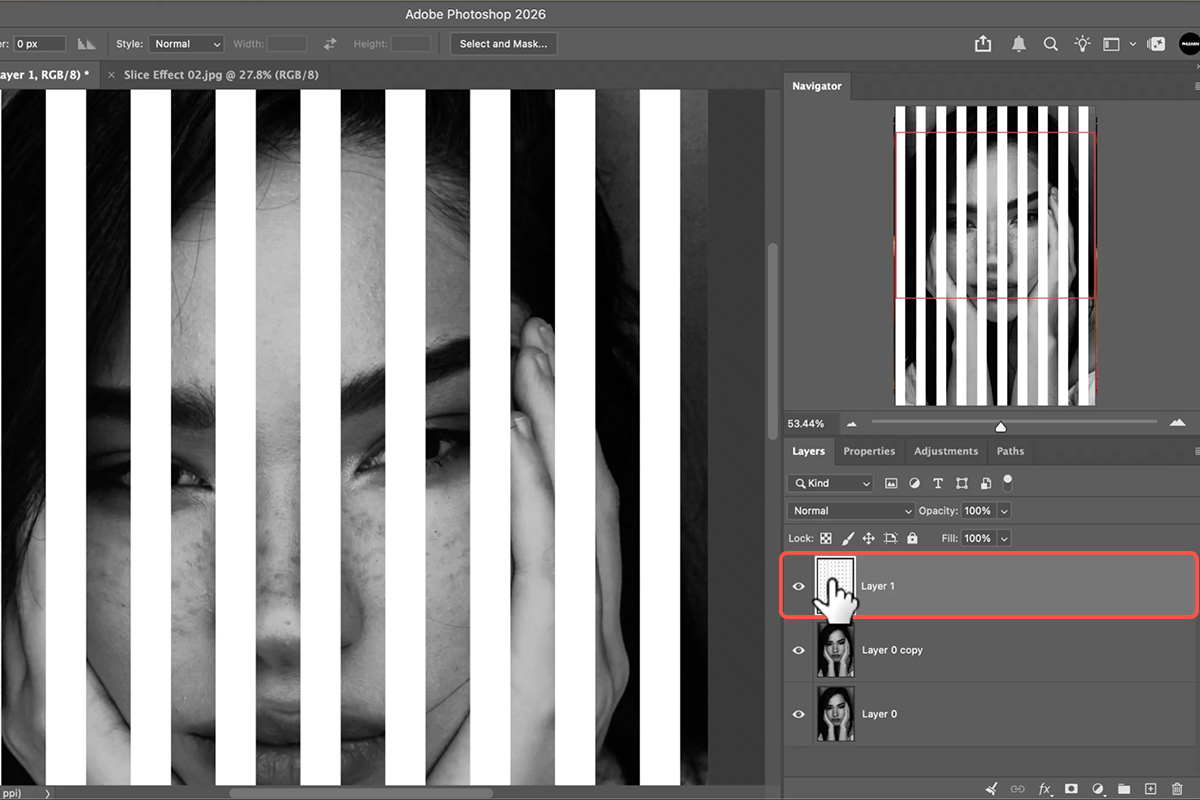
The video walks through two complete versions of this effect side by side — one with thin, tightly-packed bars and one with thick, bold bars — so it’s worth experimenting with both your bar width and the gap you set in step 6 before moving on.
Turn the Bars into a Layer Mask
-
Select Your Bar Pattern
Once your bars fill the frame, select all of the bar layers (or merge them into one layer first) and load them as a selection.
-
Apply as a Layer Mask
With your bar selection active, click on your duplicated photo layer from step 2, then click the Add Layer Mask icon at the bottom of the Layers panel. Your bar pattern now controls exactly which slices of that layer are visible.
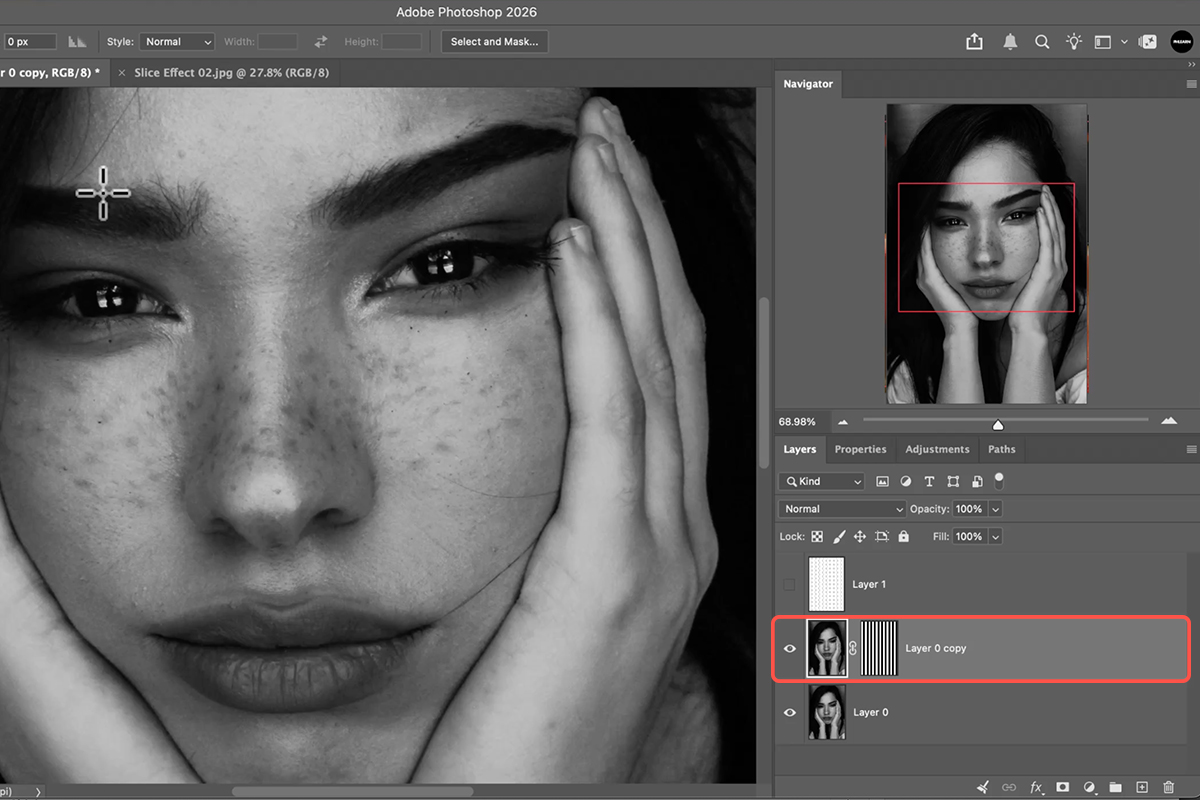
Create the Portrait Slice Effect with the Move Tool
-
Slide the Masked Layer
Grab the Move Tool (V), hold Shift, and drag the masked layer left or right. Because the mask only reveals thin slices of the layer underneath, this creates the shifted, sliced look.
-
Unlink for a Different Result
By default, moving a layer moves its mask along with it. Click the small chain icon between the layer thumbnail and its mask to unlink them — now you can move the layer and the mask independently for a completely different variation of the effect.
One more thing worth knowing: because this whole effect is built from real layers and a layer mask rather than a single locked-in filter, you can always go back and adjust your bar width, gap, or offset by editing the mask directly — nothing about this technique is a one-shot deal. And if you’d rather skip rebuilding the bar pattern from scratch on your own photos, the free download for this tutorial includes ready-made PSD templates you can drag and drop your own images into.
What Trips People Up
Skipping the Shift Key When Offsetting
Dragging your bar duplicate without holding Shift lets it drift vertically as well as horizontally, which throws off every repeat after it. Always hold Shift in step 6 to keep the movement locked to a straight line.
Uneven Bar Spacing
If your first “step” isn’t consistent, Step and Repeat will faithfully copy that inconsistency across the whole frame. Take an extra moment to get the gap right on your very first duplicate before repeating it.
Forgetting to Duplicate Before Masking
The layer mask needs a duplicate of your original image to reveal and hide — if you skip step 2, you’ll be masking your only copy of the photo instead of a non-destructive duplicate.
If you enjoy building graphic, layered effects like this one, our PRO course on graphic photography goes deeper into designing images this way.
What Makes the Result Yours
Part of what makes this look stand out is that it’s built, not filtered. A slice or glitch effect from a preset or a plugin tends to look identical from one photo to the next, but because you’re setting your own bar width, your own gap, and your own offset by hand, the result is genuinely yours — and it’s just as easy to dial back to something subtle as it is to push into something bold and graphic.
Take the Slice Further
You don’t need AI, generative credits, or a paid plugin to get a striking, editorial-looking slice effect. With a layer mask, the Move tool, and Photoshop’s own Step and Repeat trick, you can build this look from scratch on any photo — and because every part of it lives on editable layers, it’s just as easy to soften as it is to push further. That’s the real advantage of building this effect manually: it’s free, it’s repeatable, and it’s entirely yours.
For more creative looks like this taught in order, our PRO Artistic Effects Learning Path is where to go next.
Quick Reference: Keys, Menus and Settings
- Unlock the BackgroundDouble-click the Background layer, then OK
- Duplicate the layerCmd/Ctrl + J
- Draw the first barRectangular Marquee on a new layer, then Edit > Fill > White
- StepOption Cmd T · Alt Ctrl T, then Shift-drag the copy sideways and press Enter
- RepeatShift Option Cmd T · Shift Alt Ctrl T, once per bar
- DeselectSelect > Deselect
- Bars into a selectionCmd/Ctrl-click the bars layer’s thumbnail, then hide that layer
- Selection into a maskSelect the top photo copy, click the Add Layer Mask icon
- Slide the slicesMove tool, Shift-drag left or right
- The other versionClick the chain between the layer and its mask to unlink, then drag again
Mac first, then Windows where they differ.

Free Downloads
Follow Along on the Same Photos
Get both sample images, the 2 PSD templates (thick and thin bars; drop your own photo in and slide it) and the PDF guide. Free with a PHLEARN account.
Portrait Slice Effect: Common Questions
Does the slice effect use AI or generative credits?
No. It’s a marquee selection, a fill, two keyboard shortcuts and a layer mask. No AI, no credits, and it’s fully non-destructive.
Why does the Background layer have to be unlocked?
A Background layer is locked and can’t be moved. Double-click it, click OK, and it becomes Layer 0. Then duplicate it with Cmd/Ctrl+J so you have two copies of the photo.
What is step and repeat?
A hidden Photoshop command that copies a shape at an even spacing. Draw one bar with the Rectangular Marquee on a new layer and fill it white. Press Option+Cmd+T (Alt+Ctrl+T on Windows), Shift-drag the copy sideways and press Enter: that’s the step. Then press Shift+Option+Cmd+T (Shift+Alt+Ctrl+T) and each press adds another bar at the same spacing: that’s the repeat.
How wide should the bars be?
Any width works, and you can redo them at any time. Aaron makes the gaps about the same width as the bars. The first example uses thin bars, the second thick ones, and the downloads include both.
How do the bars become the slice?
Cmd/Ctrl-click the bars layer’s thumbnail to load it as a selection, hide the bars layer, select the top copy of the photo and click the Add Layer Mask icon. The mask hides the photo inside the bars, and the untouched copy underneath shows through.
Nothing changed after adding the mask. What now?
That’s expected: both copies sit exactly on top of each other. Choose the Move tool and Shift-drag the masked layer left or right. The slices appear as soon as the two copies are offset.
What’s the difference between linked and unlinked?
With the layer and mask linked, the image and the bars move together, so features like the eyes repeat. Click the chain icon between them to unlink, and the photo slides behind a fixed set of bars instead. Which looks better depends on the photo; small moves are often best.
Can I use thick and thin bars on the same photo?
Yes. Make another duplicate and another set of bars, mask it the same way, and switch between them or leave both on. Everything stays editable.
What are the PSD templates?
Ready-made files with thick and thin bars, in horizontal and vertical versions. Drop your own photo in, then drag it left or right and the effect is done for you.
Are the sample files free?
Yes, with a free PHLEARN account. You get both sample images, the two PSD templates and the PDF guide.
Master Photoshop, Lightroom and Photography
Join PHLEARN PRO for $12.99 a month or $99.99 a year. Cancel anytime, with a 100% money-back guarantee.





