

Download Assets
This tutorial includes 2 sample RAW files and 1 PDF guide. Downloads are free with a PHLEARN account.
- Download the sample images and PSDs from every free tutorial on PHLEARN
- New free tutorials published every week
- One free account — sign up once, then download anything
Free PDF Guide · 2 Pages
This Tutorial as a Step-by-Step PDF
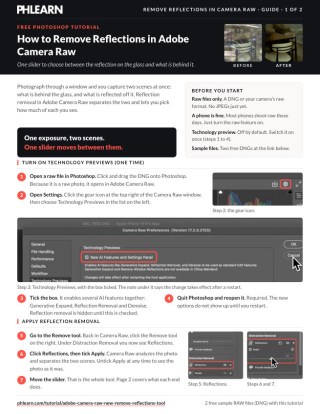
Every step from the video in order: dragging a DNG into Photoshop to open Camera Raw, Settings > Technology Previews and the restart, the Remove tool’s Reflections checkbox, Apply, and the slider that goes from reflection only to the scene behind the glass. Keep it next to your keyboard.
description
Remove Reflections in Adobe Camera Raw works on raw files only, and knowing that up front saves a lot of confusion. Learn to use the AI-powered reflection removal feature in Adobe Camera Raw. Discover the simple steps to activate the technology preview and utilize the intuitive reflection slider to reveal the clear view behind the glass. Make sure to download the included RAW file, so you can follow along!
Enjoying This Free Tutorial?
We publish a new free tutorial every week, each one with sample images and PSDs you can download and follow along with. Sign up and they land straight in your inbox, along with early word on sales, events and subscriber-only offers.


How to Remove Reflections in Adobe Camera Raw
Photograph through a window and you capture two scenes at once: what is behind the glass, and what is reflected off it. Until recently there was no way to separate them — the two images are physically superimposed in the file, and no amount of masking can pull them apart.
Reflection removal in Adobe Camera Raw does exactly that. It splits the two, and gives you a single slider to move between them. All the way one way shows only the reflection; all the way the other shows only what was behind the glass.
It is a technology preview, so it is switched off by default and has one significant limitation.
It Only Works on RAW Files
This is the constraint to know before anything else: the image must be RAW. A DNG, or your camera’s native format. JPEGs will not work.
The reason is straightforward — separating two superimposed scenes needs far more tonal information than an eight-bit JPEG retains. The data has to be there for the analysis to work at all.
Phone photographs are fine as long as they were captured as RAW. Most current phones support it; on iPhone that means ProRAW, and the shot in this tutorial was taken on an iPhone 15 Pro Max. If you photograph through windows with any regularity, it is worth turning RAW capture on.
Enable Technology Previews
The feature is hidden until you switch it on.
-
Open a RAW file so Adobe Camera Raw launches
Drag it onto Photoshop, or open it from Bridge or Lightroom.
-
Go to Settings, then Technology Previews
The gear icon in the Camera Raw window.
-
Tick the technology previews option
This enables several AI features together — generative expand, denoise, and reflection removal.
-
Quit and reopen Photoshop
Required. The features do not appear until you restart.

Apply It
Open your RAW file and go to the Remove tool. You will see a Reflection option. Tick it and click Apply.
Photoshop analyzes the image and separates the two scenes. Then you get one slider.
What the Slider Does
At one end you see only the reflection — whatever was behind you, isolated from the window’s contents. At the other end you see only what was behind the glass, with the reflection removed. Setting it to zero returns the original photograph with both.
Everything between is a blend, and that is where most images end up. A street photograph reflecting the photographer might be best at neither extreme — enough reflection removed to see into the shop, enough retained that the image still reads as being shot through glass.
Move the slider slowly and watch what the picture becomes. This is a creative decision rather than a correction.

Two Ways to Use It
Removing an Unwanted Reflection
The obvious case — a shop window, a museum case, a car interior — where you wanted the contents and got yourself and the street as well. Push the slider toward the contents and the reflection largely disappears.
Keeping the Reflection Instead
The other direction is more interesting. Isolating the reflection gives you a clean image of what was behind the camera, captured off the glass — something you could not have photographed directly. Shooting from inside a house toward a porch, one end of the slider gives you the room, the other gives you the garden.
One exposure, two usable photographs.
Expect It to Be Imperfect
It is a technology preview and it does not catch everything. Strong or sharply defined reflections may leave traces even at the extreme of the slider, particularly where the reflected content is high-contrast.
What it achieves is still remarkable for a single slider — and anything remaining can be handled conventionally afterwards. Click Open in Photoshop rather than Done, and clean up leftovers with the Remove Tool or Generative Fill.
Treat it as doing 90 percent of a job that was previously impossible, rather than as a perfect one-click fix.

Worth Shooting For
Knowing this exists changes how you shoot. Windows, glass cases, and car windscreens used to be situations to avoid or work around with a polarizer. Now they are situations to shoot in RAW and sort out later — and sometimes to shoot deliberately, because the reflection itself is now a separable image.

Summary
RAW only. Enable Technology Previews in Camera Raw settings and restart Photoshop. Open the RAW file, go to the Remove tool, tick Reflection, and click Apply. Then move the single slider between the reflection and the scene behind the glass, and stop wherever the photograph is best.
Quick Reference: Keys, Menus and Settings
- File typeRAW or DNG only; phones can shoot RAW (the sample is from an iPhone 14 Pro Max)
- Open itDrag the RAW file into Photoshop; Camera Raw opens
- Turn it onCamera Raw Settings > Technology Previews > enable the AI features, then quit and reopen Photoshop
- Run itRemove tool > tick Reflections > Apply
- The sliderLeft shows only the reflection, 0 is the original, right shows what’s behind the glass
- FinishOpen in Photoshop, or Done
A technology preview at recording; results vary by photo.
Free Downloads
Follow Along on the Same RAW Files
Get both RAW photos from the video (the San Francisco storefront and the porch window) and the PDF guide. Free with a PHLEARN account.
Reflection Removal: Common Questions
What does reflection removal do?
It separates a window photo into the reflection and the scene behind the glass, with a slider between them. Drag one way to keep only the reflection, the other to see through the window.
Why won’t it work on my JPEG?
At recording it needed a RAW file. Most phones can shoot RAW; the San Francisco sample is a DNG from an iPhone.
I don’t see the Reflections option. Where is it?
Turn on Technology Previews in Camera Raw’s settings, then quit and reopen Photoshop. Reflections then appears inside the Remove tool.
How do I use it?
Remove tool, tick Reflections, click Apply, then move the slider until the reflection is as weak (or as strong) as you want. Zero is the untouched photo.
Can I keep the reflection and drop the interior instead?
Yes. Slide to the left and only the reflection remains. The porch example in the video works both ways.
Is it perfect?
No. On the storefront shot a little reflection stayed in one area. It’s a technology preview, and a big step from nothing at all.
Does it use generative credits?
The video doesn’t show any credit use. It separates what’s in the file rather than generating new pixels.
Are the sample files free?
Yes, with a free PHLEARN account. You get both RAW files and the PDF guide.
Master Photoshop, Lightroom and Photography
Join PHLEARN PRO for $12.99 a month or $99.99 a year. Cancel anytime, with a 100% money-back guarantee.





