

Download Sample Images
Download Assets
This tutorial includes 2 sample images, 1 SVG file, 1 AI file, 1 EPS file and 1 PDF guide. Downloads are free with a PHLEARN account.
- Free sample files with every tutorial on PHLEARN
- New tutorials published every week
- Unlimited downloads with your free PHLEARN account
Free PDF Guide · 5 Pages
This Tutorial as a Step-by-Step PDF
The guide covers both parts: finding the highest-contrast channel, Levels to pure white on black, loading it as a selection, a black Solid Color stencil with an inverted mask, radial Gradient fill layers, Save for Web as PNG-24 at 1080 x 1080, then Rotation keyframes in After Effects and a GIF and MP4 from Media Encoder. Keep it next to your keyboard.
description
Join us for a two-part series where you’ll learn how create your own animated text and gradients in Photoshop and After Effects! Today we kick things off in Photoshop by cutting out some stylized text from a background, creating a custom gradient, and then exporting those Layers as PNGs to load into After Effects.
Then, in the next episode, we’ll bring everything together to complete the animation!
Enjoying This Free Tutorial?
We publish a new free tutorial every week, each one with sample images and PSDs you can download and follow along with. Sign up and they land straight in your inbox, along with early word on sales, events and subscriber-only offers.
Animating Gradients
- Part 1: Creating Text & Gradients in Photoshop
- Part 2: Animating Gradients in After Effects
CREATE YOUR OWN CUSTOM GRADIENTS
Cut Type Out of Its Background, Then Build Color Behind It
This is part one of a two-part series. Here we’ll build the artwork in Photoshop — isolating a piece of type using Channels, then constructing a layered gradient background behind it — and export the pieces as PNGs. In part two we take those into After Effects and animate them into a looping GIF and MP4.
The technique that carries this is worth learning on its own: a channel-based selection produces a far cleaner cut-out of detailed type than any selection tool, and it takes about a minute.
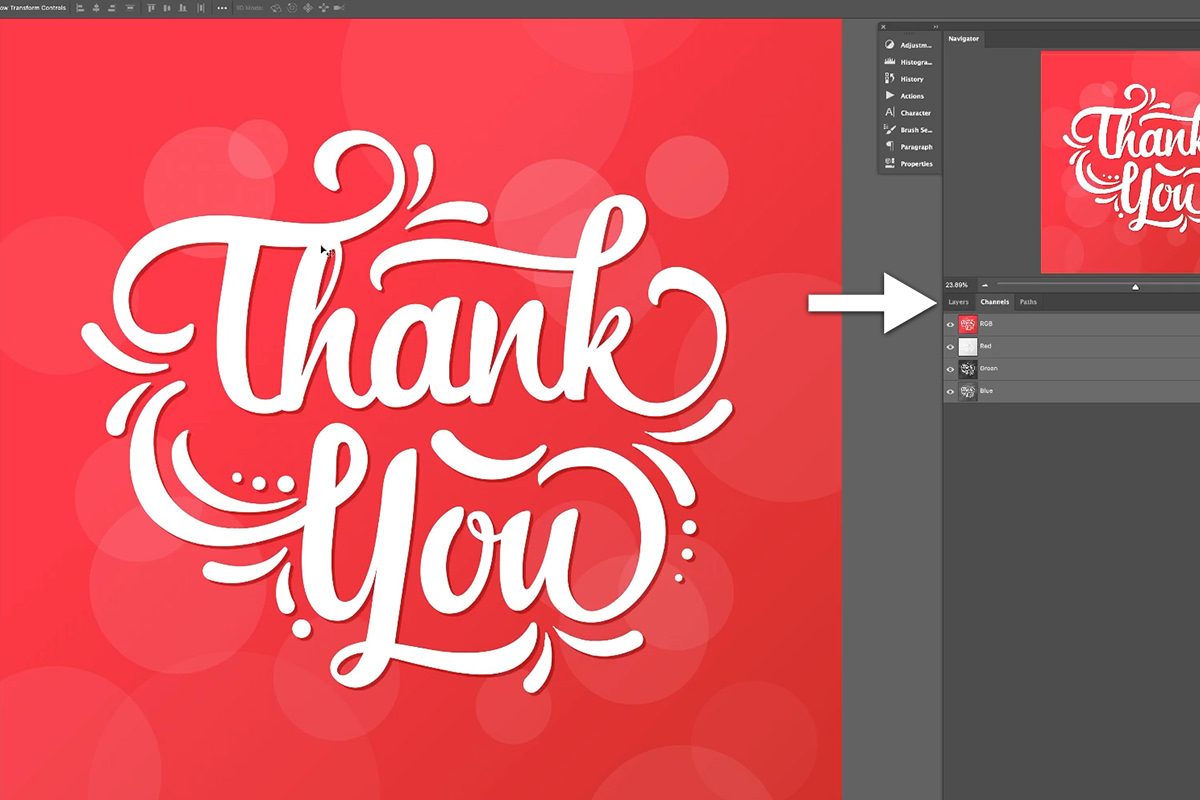
Why Channels Beat the Selection Tools Here
Every RGB image already contains three grayscale images — the Red, Green and Blue channels — each showing how much of that color is present as light and dark values.
That means one of them is very likely to show your subject almost separated from its background already. Instead of tracing an edge by hand, you find the channel with the most contrast and let Photoshop do it. For lettering with fine detail this is dramatically better than any lasso or wand. Our guide to removing backgrounds in Photoshop covers the other approaches for comparison.
Finding the Right Channel

-
Open Window › Channels
You’ll see RGB plus the three individual channels.
-
Click through Red, Green and Blue
Look at each as a black and white image and ask one question: which one has the biggest difference between the subject and the background?
-
Pick the clear winner
There always is one, and it changes per image. In this example Red shows the type and background at similar values — useless. Green separates them strongly. Blue is good but not as good. Green wins.
-
Duplicate that channel
Drag it onto the new-channel icon at the bottom of the panel. Always work on the copy — editing an original channel changes the image itself.
Pushing the Contrast to Pure Black and White
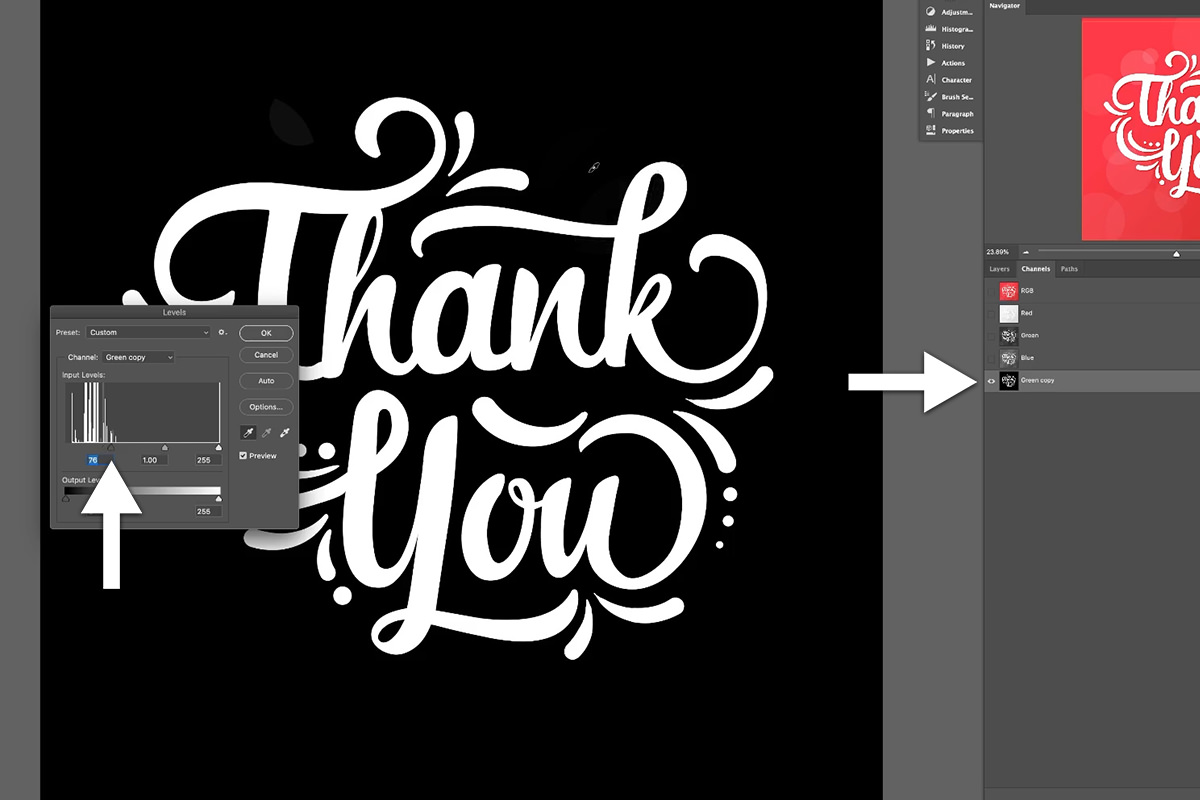
The goal is unambiguous: subject pure white, background pure black. Anything gray becomes a partial selection, which is what produces soft or fringed edges.
With the duplicate channel selected, press Cmd/Ctrl + L for Levels. The eyedroppers are the fastest route — click the black-point eyedropper on a dark area and everything darker snaps to black. Click again on any remaining stragglers. Dragging the input sliders inward does the same job manually.
Push until the background is genuinely black and the type genuinely white, with no gray haze in between. There’s more on this in How to Master Adjustment Layers in Photoshop.
Turning the Channel Into a Selection
Hold Cmd/Ctrl and click the channel’s thumbnail, or click the dotted-circle icon at the bottom of the Channels panel. The marching ants appear.
One rule to remember: a channel selection always selects the light areas. White becomes selected, black becomes unselected, gray becomes partially selected. That’s why forcing the contrast first matters so much.
Switch back to the Layers panel with the selection still live.
Building the Stencil
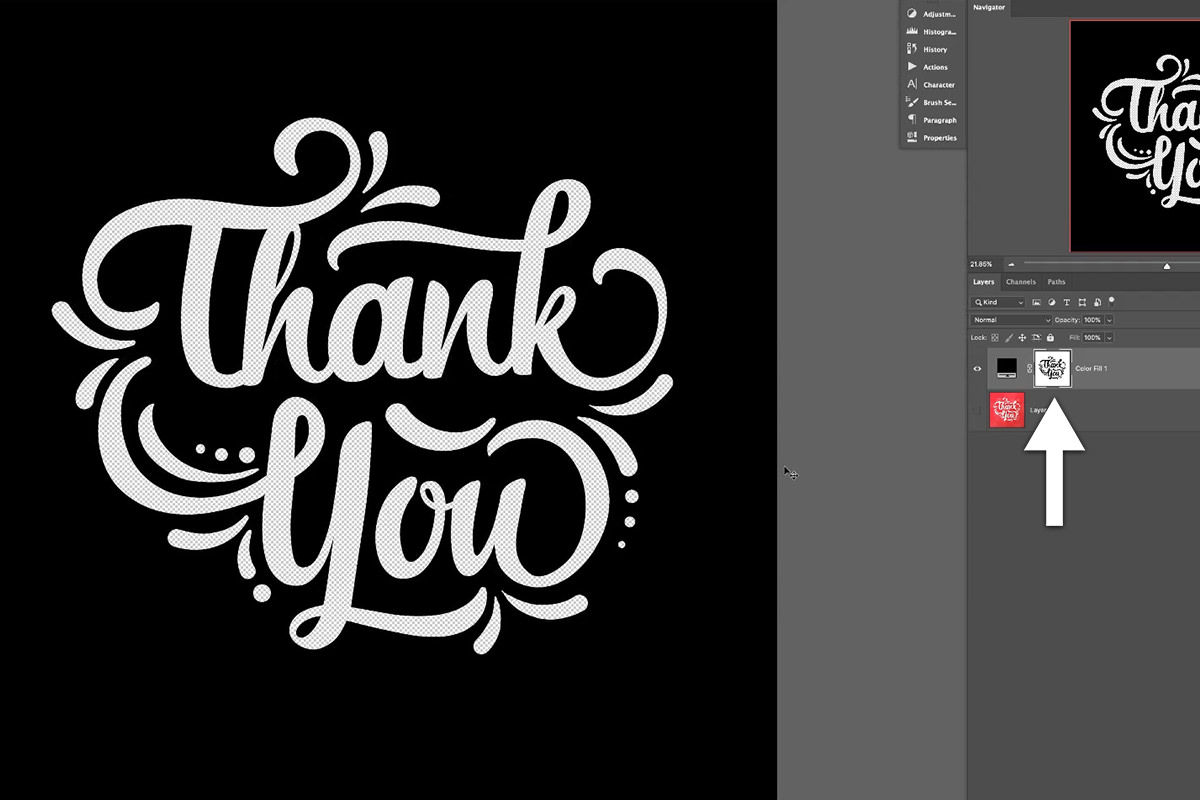
Here’s a small piece of Photoshop behavior worth knowing: create a fill or adjustment layer while a selection is active and that selection becomes its layer mask automatically.
-
Add a Solid Color fill layer
From the adjustments icon at the bottom of the Layers panel, or Layer › New Fill Layer › Solid Color. Choose black.
-
Hide the original layer
You now have black type on transparency, with a perfect mask — and the original is no longer needed.
-
Invert the mask
Click the layer mask and press Cmd/Ctrl + I. This flips it: the type becomes a hole and everything around it becomes solid.
That inversion is the whole trick. You’ve turned the text into a stencil — a solid card with letter-shaped holes in it. Anything placed underneath shows through the letters only. Which is exactly what makes the animation in part two work: nothing has to move except the layer behind the stencil.
Building the Gradient Background
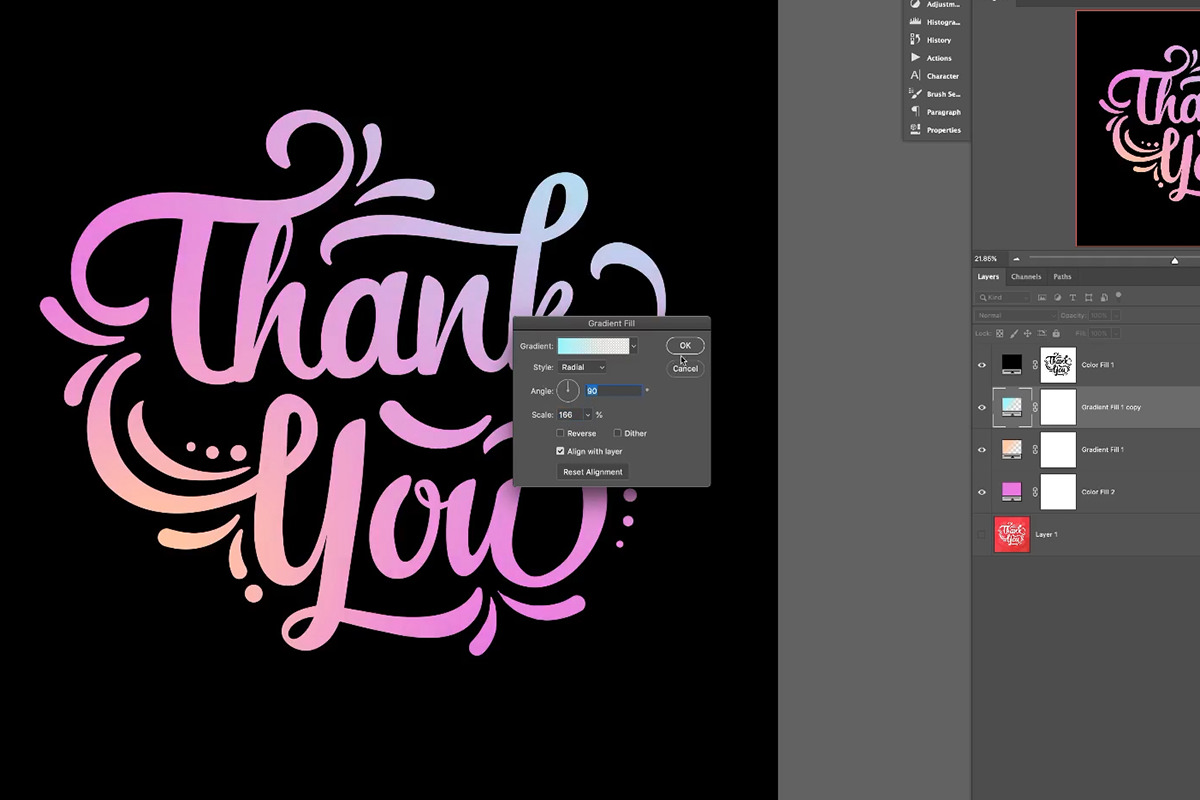
With the stencil in place, everything below it is free to be as elaborate as you like.
-
Start with a solid color base
Another Solid Color fill layer at the bottom — Aaron picks a purple-pink as a foundation. Turn the stencil back on and you can already see it through the letters.
-
Add a Gradient fill layer
From the same adjustments icon at the bottom of the Layers panel, choose Gradient (or Layer › New Fill Layer › Gradient). Set the style to Radial and pick a foreground-to-transparent gradient so it blends into what’s beneath.
-
Reposition it by dragging on the canvas
With the gradient dialog open, click and drag directly on the image to move the gradient’s center. The Scale slider makes it broader or tighter, and Reverse flips it inside out.
-
Duplicate it and change the color
Cmd/Ctrl + J, double-click the copy, move it elsewhere on the canvas and give it a different hue. Two or three overlapping radial gradients in different colors produce far more interesting light than any single gradient.
Why fill layers rather than the Gradient Tool
You could paint gradients with the Gradient Tool onto normal layers. Don’t. A gradient fill layer stays live — double-click it at any point and you can change its colors, position, scale and style with nothing baked in.
That means you can build the whole composition roughly and then tune every color afterward while looking at the finished result, which is a completely different experience from committing to each choice as you go. The base solid color is editable the same way.
Exporting for After Effects
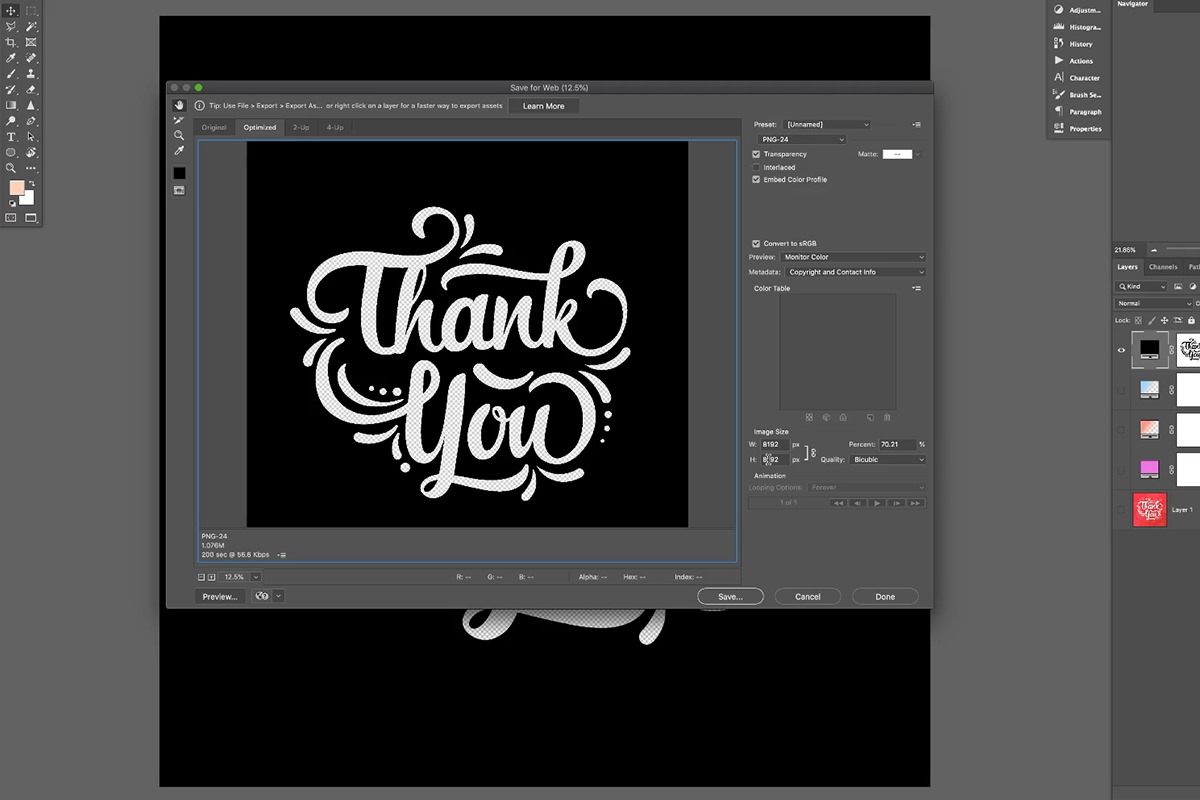
After Effects needs two flat files: the stencil (with real transparency) and the gradient background.
-
Hide everything except the stencil layer
You’re exporting one element at a time.
-
File › Export › Save for Web
The older dialog, and the most direct route to a transparent PNG.
-
Choose PNG-24 and check Transparency
Both are required. PNG-8 will not hold a clean alpha channel, and without the Transparency box the letter holes fill with white — which destroys the entire effect.
-
Set the size
Vector artwork can arrive enormous — over 8,000 pixels square here. 1080 × 1080 is right for social. You can resize in this dialog or beforehand via Image › Image Size.
-
Repeat for the gradient background
Hide the stencil, show the gradient layers, export at exactly the same dimensions. The two files must match in size or they won’t line up in After Effects.
Where This Goes Wrong
Editing the original channel instead of a duplicate
Levels applied to a live channel changes the image itself. Always duplicate first.
Stopping while the channel is still gray
Gray means a partial selection, which shows up as soft or haloed edges on the type. Push Levels until it’s genuinely black and white.
Exporting PNG-8, or forgetting the Transparency checkbox
Either produces a file with white where the letters should be. PNG-24 with Transparency checked.
Exporting the two files at different sizes
They have to align exactly in After Effects. Same dimensions, both times.
Flattening gradients onto normal layers
Once painted, the colors are fixed. Fill layers stay editable to the very end, which is when you actually know what you want.
The Stencil Is the Idea Worth Keeping
Cutting type out with channels is useful. Inverting it into a stencil is the part that changes what you can do — because from that moment, anything you put behind it shows through the letters, and you never have to touch the type again.
Photographs, video, patterns, animated gradients: it all works the same way. Build the stencil once and the letters become a window rather than an object.
Quick Reference: Keys, Menus and Settings
- Find the channelWindow > Channels; drag the best one onto the new channel icon
- Black and whiteCmd/Ctrl + L, black point eyedropper on the background
- Load the selectionCmd/Ctrl-click the channel thumbnail
- Make the stencilBlack Solid Color fill layer, then Cmd/Ctrl + I on its mask
- Gradient backgroundGradient fill, foreground to transparent, Radial; Cmd/Ctrl + J to duplicate and recolor
- ExportFile > Export > Save for Web: PNG-24, Transparency checked, 1080 x 1080
No AI, no generative credits.

Free Downloads
Follow Along on the Same Files
Get the two finished PNGs (the text stencil and the gradient), the lettering as SVG, AI and EPS vector files, and the 5-page PDF guide. Free with a PHLEARN account.
Text Stencils and Gradients in Photoshop: Common Questions
Why use channels to cut out text?
Each channel shows the image’s color information as light and dark, and one of them will always show the most contrast between the type and the background. That channel is already most of a selection, and it is far cleaner on detailed lettering than tracing by hand.
How do I pick the right channel?
Open Window > Channels and click Red, Green and Blue in turn. Pick the one with the biggest difference between the type and the background (Green here) and drag it onto the new channel icon to work on a copy.
How do I make the channel pure black and white?
With the copy selected, press Cmd/Ctrl + L for Levels. Click the background with the black point eyedropper, click any stragglers, or drag the left input slider to the right, until the text is white on pure black.
How do I turn a channel into a selection?
Cmd/Ctrl-click the channel’s thumbnail, or click the dotted circle at the bottom of the Channels panel. A channel always selects the light areas, so only the lettering is selected.
How do I make text see-through so color shows behind it?
With the selection active, add a black Solid Color fill layer; the selection becomes its mask. Click the mask and press Cmd/Ctrl + I to invert it, and the letters become holes in a solid stencil.
How do I build the gradient behind the text?
Start with a Solid Color fill layer, then add a Gradient fill layer from the adjustments icon, foreground to transparent, set to Radial. Press Cmd/Ctrl + J to duplicate it, move the copy and change its color.
How do I move a Gradient fill layer?
Double-click the layer to open the Gradient Fill dialog, then click and drag on the image. Scale makes it larger or smaller and Reverse flips it inside out.
How do I export the files for After Effects?
Show only the stencil, go to File > Export > Save for Web, choose PNG-24 with Transparency checked and set 1080 x 1080. Then do the same for the gradient at exactly the same size.
What happens in part two?
Both PNGs go into After Effects. The gradient gets Rotation keyframes that turn it full circle so it loops, and Media Encoder exports it as an MP4 and an animated GIF.
Are the sample files free?
Yes, with a free PHLEARN account. You get 2 sample images, 1 SVG file, 1 AI file, 1 EPS file and 1 PDF guide: the two finished PNGs, the lettering as vector files and the 5-page guide covering both parts.
Master Photoshop, Lightroom and Photography
Join PHLEARN PRO for $12.99 a month or $99.99 a year. Cancel anytime, with a 100% money-back guarantee.





