

description
A looping before-and-after GIF is one of the clearest ways to show what a retouch actually changed. Aaron stamps the finished edit onto a single layer with Apply Image, drops that layer and the untouched original into a new web-sized document as smart objects, animates between the two frames in Photoshop’s Timeline panel, and exports a looping GIF through Save for Web.
Enjoying This Free Tutorial?
We publish a new free tutorial every week, each one with sample images and PSDs you can download and follow along with. Sign up and they land straight in your inbox, along with early word on sales, events and subscriber-only offers.
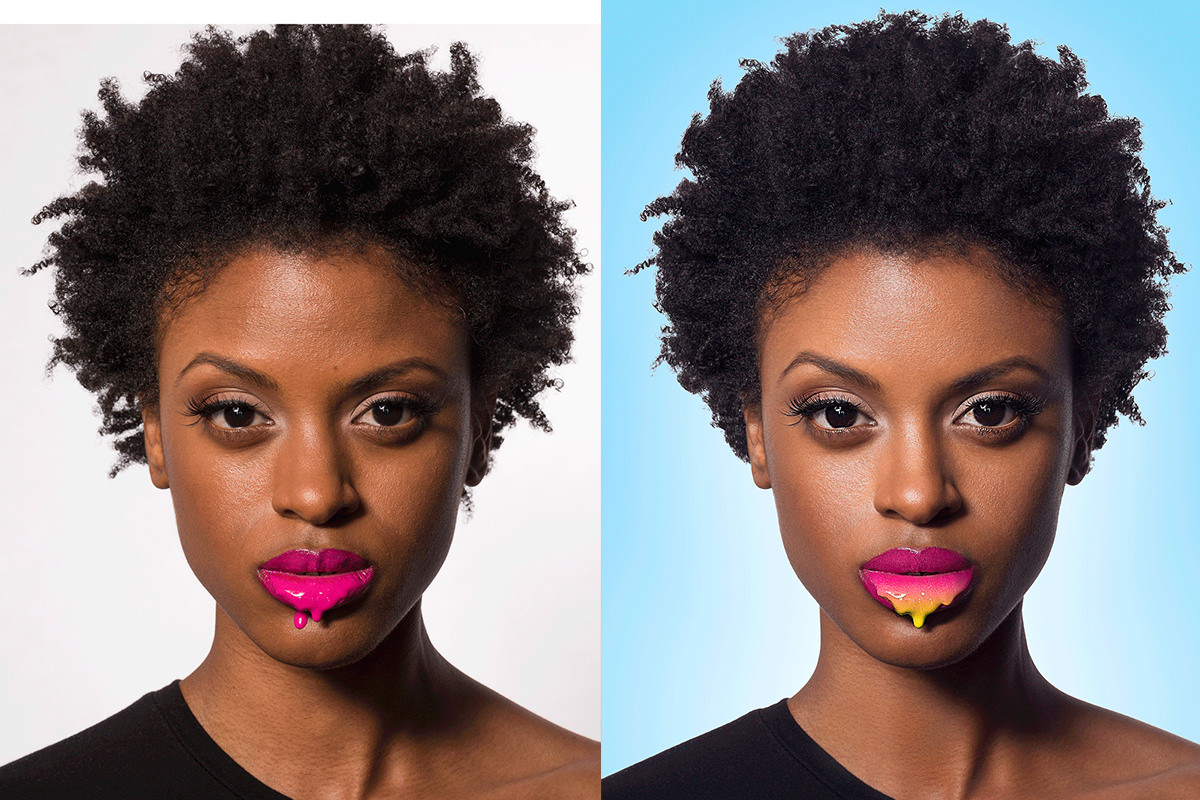
A before-and-after GIF is one of the best ways to show off your retouching work on social media: upload it once and it flips back and forth between the untouched original and your finished edit, giving your audience an instant sense of the work you put in. In this tutorial we’ll build a simple two-frame GIF directly in Photoshop, using the timeline panel to animate between a before layer and an after layer, then export it correctly so it actually plays once it’s online.
What You Need: A Before Layer and an After Layer
A before-and-after GIF really only needs two things: a layer showing your image exactly as it came out of the camera, and a layer showing the fully retouched result. If your retouching work is spread across a group of adjustment layers and edits, your original, untouched layer at the very bottom of the stack already serves as the “before.” The “after,” however, doesn’t exist as a single layer yet, since your finished look is really the combination of everything stacked on top of it.
Creating the After Layer with Apply Image
Create a new, blank layer at the very top of your layer stack. Go to Image > Apply Image. In the dialog, set Layer to Merged so it captures everything currently visible, Channel to RGB, and Blending to either Normal or Multiply (both work fine), with Opacity at 100% and Invert unchecked. Click OK, and Photoshop flattens a snapshot of your entire visible image directly onto that new layer. You now have exactly what you need: an untouched “before” layer at the bottom of your stack, and a fully retouched “after” layer sitting on top.
Setting Up a New Document Sized for the Web
Your original photo file is almost certainly far larger than anything you’d want to upload as a GIF. Create a new document sized appropriately for wherever you plan to post it, a square format like 1500 by 1500 pixels works well for Instagram, while a portrait or landscape ratio matching your original photo works better for a website or blog. There’s no single correct size, just make sure it matches the platform you’re uploading to.
Copying Your Layers Into the New Document
Back in your original file, hold Ctrl (Cmd on Mac) and click both your before layer and your after layer to select them together. Grab the Move Tool and drag both layers from the original document directly into your new, correctly sized document. Toggle each layer’s visibility to confirm they land in exactly the same position; if the before and after aren’t perfectly aligned, the flip between them will look like the image jumping around rather than a clean transformation.
Converting to Smart Objects Before Resizing
Before resizing anything, right-click each layer individually and choose Convert to Smart Object, doing this one layer at a time. A regular layer loses image quality if you shrink it and then scale it back up, but a smart object retains the original full-resolution data no matter how many times you transform it. With both layers converted, hold Shift to select them together, press Ctrl+T (Cmd+T on Mac) for Free Transform, and use the linked width and height field to scale both layers down together until the image fits neatly inside your new document.
Building the Frame Animation
With your before and after layers sized and positioned, it’s time to animate between them. Go to Window > Timeline and click Create Frame Animation. Photoshop generates a single starting frame based on whatever layers are currently visible.
-
Set your first frame to show the before
Make sure only your before layer is visible, then confirm the timeline’s first frame reflects that state.
-
Duplicate the frame
Click and drag the first frame onto the New Frame icon at the bottom of the Timeline panel to create a second, identical frame.
-
Set the second frame to show the after
With the new second frame selected, toggle your after layer on and your before layer off, so this frame captures the retouched version.
Setting Frame Delay and Loop Count
Set the loop count dropdown at the bottom of the Timeline panel to Forever so your GIF keeps cycling rather than stopping after a few flips. Click the delay dropdown beneath each frame and choose Other to set a custom time, three seconds per frame gives viewers enough time to actually study the before and after without the animation feeling sluggish. Click the play button in the Timeline panel to preview the loop before moving on to export.
Exporting as an Animated GIF
Go to File > Export > Save for Web (Legacy), or Save for Web on older versions of Photoshop. By default the format may be set to JPEG, which does not support animation, so change the file type dropdown to GIF.
Choosing the Right Export Settings
Near the bottom of the dialog, confirm your animation options show the correct frame count and Forever looping, and use the built-in play button to preview it right there in the export window. Set Color Reduction to Perceptual, Dither to Diffusion, and make sure Transparency and Convert to sRGB are both checked. You can also resize the output here, for example down to 1,000 pixels wide, if you want a smaller file for faster loading. Click Save and choose a destination for your finished GIF file.
Previewing Your GIF in a Browser
Animated GIFs don’t always preview accurately in a file browser’s thumbnail view, so right-click the exported file, choose Open With, and select a web browser like Chrome. This shows you exactly how the GIF will look once it’s live on a website or social platform, cycling between your before and after frames on the loop and timing you set.
More Free Photoshop Tutorials
Why This Approach Works
This technique works because it reduces a complex, multi-layered edit down to just two flattened states, a before and an after, which is all a GIF animation actually needs. Apply Image is the key step that makes this possible without manually flattening or duplicating your whole document, since it stamps a merged snapshot of your finished retouch directly onto a single layer while your original layered file stays completely intact underneath. Converting both layers to smart objects before resizing protects image quality through the transform step, and building the animation with Photoshop’s own Timeline panel means the whole process, from layer to looping export, happens inside one file without ever needing outside animation software.
Final Thoughts
A before-and-after GIF is a simple, high-impact way to show off retouching work, and building one takes just a handful of steps: flatten your finished edit onto its own layer with Apply Image, size and align your before and after layers in a new document, animate between them on the Timeline panel with a comfortable frame delay, and export as a looping GIF. Try previewing it in a browser before you post, so you know exactly how it’ll look the moment someone opens it.
Related Tutorials
New Free Tutorials View All »







Enjoying This Free Tutorial? Go Further with PRO.
200+ PRO courses. 1,000+ practice files. One membership.

Unlimited access to every PRO course
New PRO courses every month
Layered PSDs and RAW files to follow along
100+ Lightroom Presets, LUTs, Actions and Brushes
Stream in up to 4K, with captions and chapters
Watch on any device: desktop, tablet or phone
4.93 average from 3,900+ reviews · 2M+ students