

A whole portrait edit against a five-minute timer. This free Photoshop tutorial uses Apply Image twice to build exposure masks straight from the image’s own brightness values, smooths skin with a brush at 5 to 10% flow so texture survives, brightens the eyes with a hand-painted Curves layer, and masks High Pass sharpening to the eyes and lips alone before a quick Levels grade and vignette.
We publish a new free tutorial every week, each one with sample images and PSDs you can download and follow along with. Sign up and they land straight in your inbox, along with early word on sales, events and subscriber-only offers.
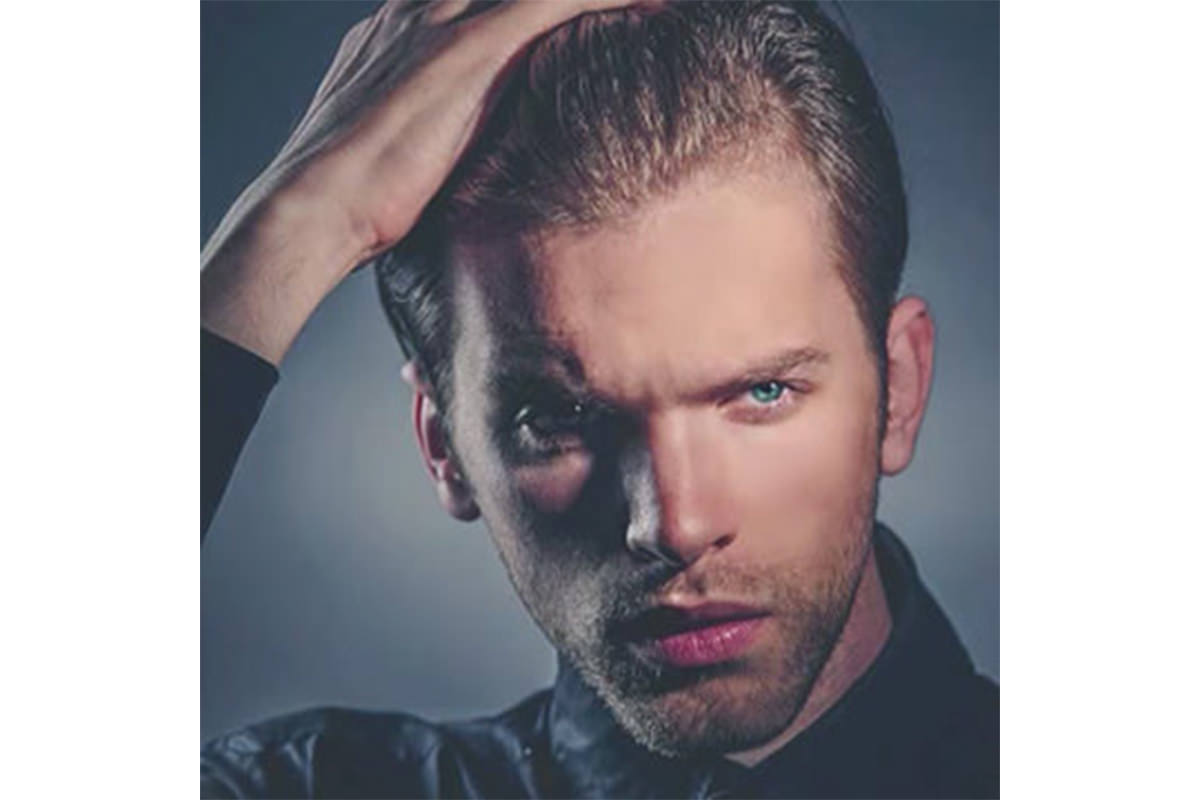
How to Edit a Photo in Under 5 Minutes: Exposure, Skin, Eyes, and Sharpening
Not every edit needs an hour of careful, methodical work. This tutorial races the clock on a single portrait, working through exposure correction, a quick skin smoothing pass, brightened eyes, targeted sharpening, and a final color grade — all inside a five-minute timer — to show just how much of a difference a handful of fast, well-chosen adjustments can make.
Fixing Blown-Out Highlights With Curves and Apply Image
The fastest way to fix exposure is to let the image build its own mask rather than painting one.
-
Add a Curves Adjustment and Pull Down the Midpoint
Add a Curves adjustment layer and drag the midpoint of the curve down, which will darken the overexposed highlight areas once the mask is set up correctly in the next step.
-
Restrict the Correction to Highlights With Apply Image
Go to Image > Apply Image, leave Invert unchecked, and set the blending mode to Multiply at 100% opacity on the Curves adjustment layer’s mask. This restricts the darkening effect specifically to the areas that were already bright, rather than affecting the whole image.
Why Apply Image Instead of Curves Alone
A Curves adjustment applied without any masking darkens everything in the image equally, including areas that were never overexposed in the first place. Using Apply Image to build the mask directly from the image’s own brightness values means the correction only lands where it’s actually needed.
Bringing Back Shadow Detail the Same Way
The same two moves, with one checkbox flipped, handle the other end of the tonal range.
-
Add a Second Curves Layer to Brighten Shadows
Add another Curves adjustment layer and raise the shadows, adding a touch more blue and green into the shadow tones as well, since shadows often shift slightly cool.
-
Apply Image With Invert Checked
Go to Image > Apply Image again on this layer’s mask, this time checking Invert, which flips the mask so the brightening effect targets the shadow areas instead of the highlights.
Shifting Blues Toward Green for an Editorial Look
One targeted Hue/Saturation layer changes the whole feel of the palette.
-
Target the Blue Range in Hue/Saturation
Add a Hue/Saturation adjustment layer, select the eyedropper, and click on a blue area of the image to target that specific color range. Lower the Lightness, raise the Saturation, and shift the Hue slightly toward green.
This small shift gives the overall image a slightly more editorial color feel rather than a straightforward, neutral blue.
Smoothing Skin With a Low-Flow Brush
No frequency separation here — just a brush turned right down.
-
Sample and Paint With a Low-Flow Brush
Select the Brush tool, set Flow to somewhere around 5 to 10%, hold Option/Alt to sample nearby skin tones, and paint gently over blotchy or uneven areas of skin, blending lighter and darker patches together.
Why a Low Flow Percentage Protects Skin Texture
Painting at full opacity with a sampled color would quickly flatten skin texture into a smooth, plastic-looking patch. A flow setting as low as 5 to 10% builds up color gradually with each stroke, smoothing out blotchiness while leaving the underlying texture largely intact — and if any area still looks too strong, lowering the layer’s opacity afterward brings it back down further.
Brightening and Adding Color to the Eyes
Eyes get their own masked Curves layer, painted in by hand.
-
Add a Curves Layer and Invert the Mask
Add a Curves adjustment layer, raise the Blue channel and the Green channel slightly, then press Cmd/Ctrl + I to invert the mask to black.
-
Paint the Effect Into the Eyes
Paint with white directly over the eyes to bring the brightened, colored effect into just that area. Include a touch of green along with blue, since eyes described as blue are usually a blue-green mix rather than pure blue.
Toning Down Saturation for a More Editorial Feel
A small global pull-back keeps the color work from tipping over into oversaturated.
-
Lower Overall Saturation Slightly
Add another Hue/Saturation adjustment layer and pull the overall Saturation down a small amount, pushing the color palette further toward a more restrained, editorial look.
Sharpening Just the Eyes and Lips With High Pass
High Pass sharpening is aggressive, which is fine as long as it only lands in two places.
-
Create a Stamp Visible Layer and Desaturate
Press Shift + Option/Alt + Cmd/Ctrl + E to stamp a flattened copy of everything visible, then desaturate it with Shift + Cmd/Ctrl + U.
-
Set to Overlay and Apply High Pass
Change the layer’s blend mode to Overlay, then go to Filter > Other > High Pass and choose a radius that brings out crisp detail.
-
Mask It to Just the Eyes and Lips
Add a black layer mask, then paint white only over the eyes and lips, since the sharpening looks too harsh applied everywhere else.
Why Mask the Sharpening Instead of Leaving It Global
Applied across the whole image, this level of High Pass sharpening looks overly harsh, especially on skin. Restricting it specifically to the eyes and lips draws attention to exactly the features that benefit most from extra crispness, without introducing unwanted texture or noise elsewhere.
Color Grading With Individual Channels
A single Levels layer, worked channel by channel, does the final grade.
-
Add a Levels Adjustment and Adjust the Blue Channel
Add a Levels adjustment layer, pull a bit of blue into the shadows on the Blue channel, and pull some yellow into the highlights, producing a subtle duotone effect and further correcting overall exposure.
-
Adjust the Green Channel for Warmth
Pull a small amount from the top of the Green channel, which introduces a touch of magenta and warms up the skin with a bit more red.
Removing Distractions and Adding a Simple Vignette
Two quick finishing moves with whatever seconds are left on the clock.
-
Paint Away Small Distracting Details
On a new layer, use the Brush tool to paint over small distracting elements, like a stray button, so they don’t pull attention away from the subject.
-
Darken the Edges With a Masked Curves Layer
Add a final Curves adjustment layer, darken it, then use a large, soft brush to paint that darkening in around the top and bottom edges of the frame, creating a simple vignette that draws the eye back toward the center.
Why Grouping Everything at the End Helps
Once every adjustment layer is in place, Shift-clicking all of them and grouping them together with Cmd/Ctrl + G makes the entire edit easy to toggle on and off as one unit for a quick before-and-after comparison, and keeps the layer stack organized if any single adjustment needs revisiting later.
Why This Approach Works
None of these individual moves are complicated on their own, which is exactly what makes them fast enough to fit inside a five-minute window. Apply Image does double duty for both highlights and shadows, converting the image’s own brightness values directly into a precise mask instead of requiring hand-painted selections. A very low brush flow protects skin texture while still smoothing out blotchiness, and masking the High Pass sharpening to just the eyes and lips means one aggressive filter can be used confidently without worrying about the rest of the image looking overly crisp. Individually, each step takes only seconds; the real value comes from stacking a small, well-chosen set of corrections — exposure, color, skin, focal sharpening, and a subtle vignette — that together add up to a noticeably more polished, editorial-feeling result.
Final Thoughts
The before-and-after here isn’t dramatic, but it’s meaningfully better: corrected exposure, smoother skin, brighter eyes drawing the viewer’s focus, and a color palette that reads as more intentional and editorial. None of it required advanced techniques, just a clear list of quick, purposeful adjustments applied in a sensible order. Following a similar sequence — exposure first, then skin, then eyes, then sharpening, then color and a vignette — is a reliable way to get a lot of visible improvement out of a genuinely small amount of editing time.
Quick Reference: Keys, Menus and Settings
- Fix highlightsCurves midpoint down; Image > Apply Image: Merged RGB, Multiply, 100%
- Fix shadowsCurves up; Image > Apply Image with Invert checked
- Smooth skinBrush at 5 to 10% Flow, Alt/Option-click to sample
- Color the eyesCurves Blue and Green up, Cmd/Ctrl + I, paint white
- SharpenShift + Alt/Option + Cmd/Ctrl + E, Shift + Cmd/Ctrl + U, Overlay, Filter > Other > High Pass
- Color gradeLevels: Blue channel for blue shadows and yellow highlights, top of Green for magenta
- Group the editShift-click the layers, Cmd/Ctrl + G
Five-Minute Photo Edit: Common Questions
How do I darken only the blown-out highlights?
Add a Curves layer and drag the midpoint down. Then go to Image > Apply Image with Invert unchecked, Merged RGB, Multiply at 100%, so the mask limits the darkening to the bright areas.
How do I brighten just the shadows?
Add a second Curves layer, raise it and add a little blue and green. Run Image > Apply Image again with Invert checked, so the mask targets the shadows instead of the highlights.
Why use Apply Image instead of painting a mask?
It builds the mask from the photo’s own brightness in one step. The correction lands only where the image is bright or dark, which is what makes it fast enough for a five-minute edit.
How do I give the blues a more editorial look?
Add a Hue/Saturation layer and click a blue area with the eyedropper. Lower the Lightness, raise the Saturation and shift the Hue a little toward green.
How can I smooth skin quickly without losing texture?
Use the Brush tool at a 5 to 10% Flow. Alt/Option-click to sample nearby skin and paint over blotchy areas to blend light and dark patches. The low flow leaves the skin texture in place.
How do I add color to blue eyes?
Add a Curves layer, raise the Blue and Green channels a little, press Cmd/Ctrl + I to invert the mask and paint white over the eyes. Blue eyes are usually blue-green, so include some green.
How do I sharpen only the eyes and lips?
Stamp a merged layer with Shift + Alt/Option + Cmd/Ctrl + E, desaturate it, set it to Overlay and run Filter > Other > High Pass. Add a black mask and paint white over the eyes and lips only.
How is the final color grade done?
With a Levels layer: in the Blue channel, add blue to the shadows and yellow to the highlights for a slight duotone. Then pull a little from the top of the Green channel to add magenta and warm the skin.
How do I finish with a vignette?
Paint out small distractions, like a button, on a new layer. Darken a Curves layer and paint it in at the top and bottom with a large soft brush, then Shift-click the layers and press Cmd/Ctrl + G to group them.
Master Photoshop, Lightroom and Photography
Join PHLEARN PRO for $12.99 a month or $99.99 a year. Cancel anytime, with a 100% money-back guarantee.





