

description
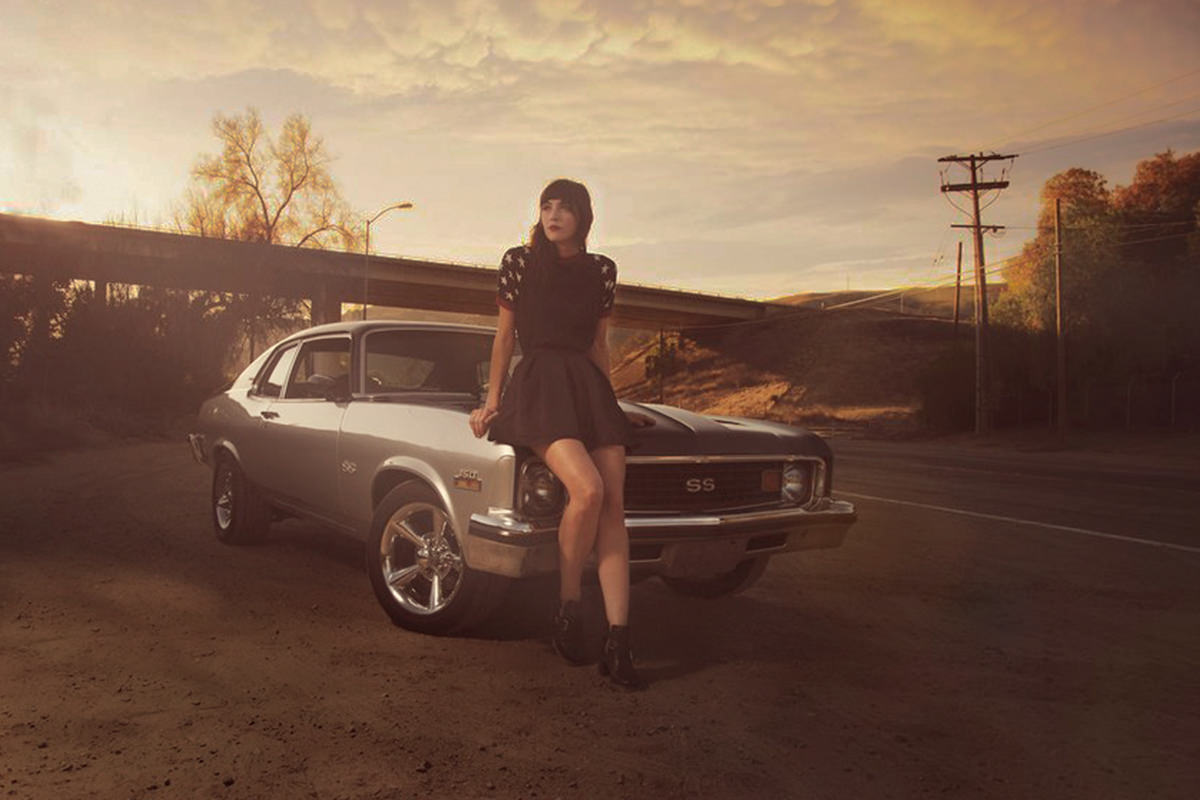
This free tutorial proves its point on a deliberately terrible file — a 74KB JPEG pulled off the web — and still pulls detail back out of the sky. Curves paired with Apply Image sets the mask from the image’s own tonal data, so the darkening lands where the image is already bright, no hand-painting needed. A second pass goes further, a clipped Hue/Saturation layer fixes the saturation that darkening leaves behind, and warm light is masked onto the subject.
Enjoying This Free Tutorial?
We publish a new free tutorial every week, each one with sample images and PSDs you can download and follow along with. Sign up and they land straight in your inbox, along with early word on sales, events and subscriber-only offers.
Finding Hidden Exposures in Photoshop
This tutorial makes its point with a deliberately extreme example: a heavily compressed, 74-kilobyte JPEG pulled off the web, far smaller than any file straight out of a camera. Even with almost no data to work with, Curves and Apply Image can recover a surprising amount of hidden detail in the sky, tame a distracting bright spot on the ground, and redirect a viewer’s attention squarely onto the subject — all techniques that work even better on a full-resolution raw file.
Darkening the Sky With Curves and Apply Image
A bright, blown-out-looking sky often has more recoverable detail than it appears to, and Apply Image is what makes that detail selectively visible.
-
Add a Curves Layer and Darken It Significantly
Add a Curves adjustment layer, click the middle of the curve, and drag it down substantially — this can always be refined later, so don’t worry about getting it exactly right yet.
-
Restrict the Effect to Light Areas With Apply Image
Click the layer’s mask, go to Image > Apply Image, and set Channel to Merged RGB, Blending to Multiply, and Opacity to 100%. Toggle Preview on and off to confirm the result, then click OK. This restricts the darkening to areas that were already light in the image.
Why Apply Image Targets Only the Light Areas
Apply Image copies a snapshot of the image’s own tonal values directly onto the layer mask, using the Multiply blend mode to make the layer more visible exactly where the underlying image is brighter. Since the sky is typically the brightest part of a backlit scene, this single step concentrates the darkening there automatically, without needing to hand-select or paint a mask.
Protecting Specific Highlights on the Layer Mask
An Apply Image mask is thorough, but it doesn’t know which bright spots you actually want to keep.
-
Paint Back Any Highlight You Want to Keep
Select the Brush tool, paint with black directly on the layer mask over any area where the darkening removed a highlight you actually wanted, such as a bright reflection on a car.
Repeating the Process for Even More Sky Detail
One pass of Curves and Apply Image rarely recovers everything available, especially from a heavily compressed source file.
-
Add a Second Curves and Apply Image Pass
Add another Curves adjustment layer, darken it further, and repeat the same Image > Apply Image process with the same settings, then touch up the mask by painting black over any areas that got too dark.
Darkening a Distracting Foreground Area
A bright, overexposed patch of ground can pull a viewer’s eye away from the actual subject just as easily as a blown-out sky.
-
Add a Curves Layer and Invert Its Mask
Add a Curves adjustment layer, darken it, then press Cmd/Ctrl+I to invert the mask to black, hiding the effect completely.
-
Paint the Darkening In Gradually
Select a large, soft brush with hardness at 0%, set flow to about 10% by pressing Shift+1, and paint white over the distracting area to build the darkening up gradually rather than all at once.
Fixing Saturation Shifts From Exposure Changes
Darkening an area in Photoshop often leaves its original saturation behind, which no longer matches its new, darker exposure.
-
Add a Clipped Hue/Saturation Layer
Add a Hue/Saturation adjustment layer, right-click it, and choose Create Clipping Mask so it only affects the Curves layer directly below it.
-
Lower Saturation to Match the New Exposure
Reduce the Hue/Saturation layer’s saturation until the newly darkened area looks properly exposed rather than overly vivid, then fine-tune the Curves layer’s mask further now that the color reads more clearly.
Why Changing Exposure in Photoshop Shifts Saturation
A properly exposed area of a photo naturally carries more saturation than one that’s over or underexposed. Darkening an area in Photoshop changes its brightness but leaves its original, properly-exposed saturation intact, which is why a masked Curves adjustment can leave an area looking too vivid for its new, darker exposure — a clipped Hue/Saturation layer is what brings the two back into agreement.
Warming the Light Directly on the Subject
With the sky and ground under control, a final push of warm color helps direct attention squarely onto the subject.
-
Push Curves Toward Warm Tones
Add a Curves adjustment layer, brighten the RGB curve slightly, add red, and pull out some blue to create a warm, yellow-orange tone appropriate for a sunset scene.
-
Mask the Warmth Onto the Subject
Press Cmd/Ctrl+I to invert the mask, then paint white with a regular brush selectively over the subject and any surrounding areas, like background haze, that should carry the warm light.
-
Soften the Mask With a Gaussian Blur
Apply a Gaussian Blur directly to the layer mask so the warm light transitions smoothly rather than having a hard, obviously painted edge.
Why Color Choices Must Match the Scene’s Actual Light
Pushing the same masked adjustment toward cool blues and greens instead of warm yellows and reds produces a technically similar effect that looks completely wrong, because it imitates daylight rather than the sunset actually present in the photo. Any color grading choice needs to match the light that’s genuinely happening in the scene, not just look interesting in isolation.
Adding an Overall Warm Tone With Levels
A final global adjustment ties the whole image together with a consistent warm cast.
-
Shift the Red Channel in Levels
Add a Levels adjustment layer, switch to the Red channel, pull some red into the shadows and some yellow into the highlights for a warm, sepia-leaning tone.
-
Tame the Resulting Saturation
If the color shift comes out too intense, add a Hue/Saturation adjustment layer and lower saturation until the warm tone feels balanced rather than oversaturated.
Comparing Your Before and After
A quick shortcut makes it easy to judge how far the image has come at any point in the process.
-
Alt-Click the Background Layer’s Eye Icon
Hold Alt/Option and click the eye icon next to your original background layer to instantly hide every adjustment layer above it and see the original image, then click again to bring everything back.
Why This Approach Works
The reason this works even on a heavily compressed JPEG is that Curves paired with Apply Image doesn’t guess at where detail might be hiding — it reads the image’s own tonal data directly and uses that to decide exactly where an adjustment should and shouldn’t apply. That precision is what recovers sky detail without needing to hand-paint a mask from scratch, and the same principle, restricting an adjustment to exactly the tonal range or area that needs it, carries through every other step here: protecting a highlight by hand, correcting saturation with a clipped adjustment layer, and masking warm color specifically onto the subject rather than the whole frame. None of these individual moves are complicated on their own, but stacked together they redirect a viewer’s attention with real precision.
Final Thoughts
If a technique like this can recover meaningful detail from a tiny, heavily compressed web JPEG, it will do considerably more with a full-resolution raw file straight out of a camera. Curves and Apply Image for targeted tonal control, a clipped Hue/Saturation layer to correct for saturation shifts after darkening or brightening, and deliberate, scene-appropriate color choices when adding warmth are all habits worth carrying into just about any exposure-focused edit.
Quick Reference: Keys, Menus and Settings
- Darken the skyCurves down, then Image > Apply Image on the mask: Merged RGB, Multiply, 100%
- Keep a highlightPaint black on the mask over it
- Darken the groundCurves down, Cmd/Ctrl + I, soft brush at 0% hardness, Shift + 1 for 10% flow
- Fix saturationHue/Saturation, right-click > Create Clipping Mask, lower Saturation
- Warm the subjectCurves: RGB up, Red up, Blue down; invert the mask, paint white, Filter > Blur > Gaussian Blur
- Overall warmthLevels: red in the shadows, yellow in the highlights; Hue/Saturation down if too strong
- Before and afterAlt/Option-click the background layer’s eye icon
No AI, no generative credits.
Recovering Hidden Detail: Common Questions
Can you really recover sky detail from a small JPEG?
Yes. The photo in this video is a 74 KB web JPEG, 850 by 569 pixels, and Curves with Apply Image still brings back a lot of sky. A raw file straight out of the camera gives you far more to work with.
What Apply Image settings darken the sky?
Pull a Curves adjustment layer way down, click its mask and go to Image > Apply Image. Use Merged RGB, Multiply and Opacity 100%, check the preview and click OK.
Why does only the sky get darker?
Apply Image puts a snapshot of the image on the layer mask, so the darkening shows only where the image underneath is light. The bright sky gets most of it.
The sky looks great but a highlight I wanted is gone. What now?
Paint black on the layer mask over it, like the highlight on the car in this photo. You can also put the layer in a group and paint on a mask on the group instead.
Can I pull out even more sky detail?
Add a second Curves layer, pull it down again and repeat Image > Apply Image. Then paint black on its mask where it went too far, such as on the model’s face.
How do I tone down a bright patch on the ground?
Add a Curves layer pulled down, press Cmd/Ctrl + I to hide it, then paint white with a large soft brush at 0% hardness. Press Shift + 1 for 10% flow so the darkening builds up gradually.
Why does the area I darkened look too saturated?
Changing exposure in Photoshop keeps the old saturation. Add a Hue/Saturation layer, right-click it and choose Create Clipping Mask so it only affects that Curves layer, then lower the saturation.
How do I bring warm light onto the subject?
Add a Curves layer, raise RGB a little, add red and pull out blue. Invert the mask, paint white over the subject and blur the mask with Gaussian Blur. Warm suits a sunset; cool blues and greens look like daylight and feel wrong.
How do I compare before and after quickly?
Hold Alt/Option and click the eye icon on the background layer. Everything above it is hidden; click again to bring it all back.
Master Photoshop, Lightroom and Photography
Join PHLEARN PRO for $12.99 a month or $99.99 a year. Cancel anytime, with a 100% money-back guarantee.





