


Download Assets
This tutorial includes 1 PDF guide. Downloads are free with a PHLEARN account.
- Download the sample files from every free tutorial on PHLEARN
- New free tutorials published every week
- One free account: sign up once, then download anything
Free PDF Guide · 3 Pages
This Tutorial as a Step-by-Step PDF
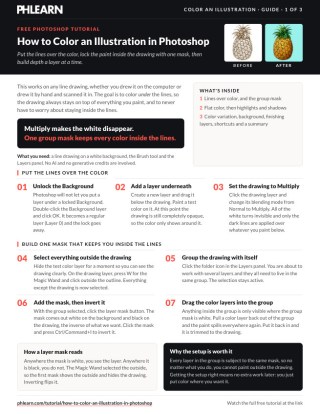
This guide walks through coloring a line drawing: setting the lines to Multiply above your color, a Magic Wand selection turned into one group mask, a layer per color, then shading with the Color panel and a soft brush for highlights and shadows. Use it on any drawing you want to color.
description
Coloring line art works best when the lines sit over the color instead of being painted around. This tutorial sets the drawing to Multiply so its white drops out, masks one group so every color layer stays inside the lines, then builds depth with sampled highlights and shadows, a Soft Light pass for color variation, and a Multiply shadow pass at the end.
Enjoying This Free Tutorial?
We publish a new free tutorial every week, each one with sample images and PSDs you can download and follow along with. Sign up and they land straight in your inbox, along with early word on sales, events and subscriber-only offers.

A black-and-white line drawing, whether it’s a digital sketch or a hand-drawn illustration scanned into the computer, can become a full-color image once the lines are set up to sit over the color rather than being painted over themselves. This tutorial preps a line drawing with a multiply blend mode and a layer mask, colors each area on its own layer, builds up highlights and shadows for depth, and finishes with soft light color variation and a background.
Preparing the Line Drawing With a Multiply Blend Mode
Changing a line drawing’s blend mode to Multiply makes its white areas disappear entirely, leaving only the dark lines visible over anything painted underneath it.
-
Unlock the Background Layer
Double-click the background layer and click OK to convert it into a regular, unlocked layer.
-
Create a New Layer Beneath the Illustration
Add a new layer and move it underneath the line drawing layer so color can be painted below the lines.
-
Change the Illustration’s Blend Mode to Multiply
Select the line drawing layer and change its blend mode from Normal to Multiply, making its white background invisible while keeping the dark lines visible over any color underneath.
Creating a Selection of the Illustration With the Magic Wand
The Magic Wand tool can select everything outside the illustration’s outline, which becomes the basis for a layer mask that keeps every color layer confined inside the lines.
-
Hide the Background Layer
Turn off the visibility of the background layer to see the illustration clearly.
-
Select Outside the Illustration With the Magic Wand
Press W for the Magic Wand tool and click outside the illustration’s outline to select everything except the drawing itself.
-
Group the Illustration Layer With Itself
Click the folder icon in the Layers panel to group the illustration layer with itself, keeping the selection active.
Building and Inverting the Layer Mask
Because the initial selection covers everything except the illustration, the resulting layer mask needs to be inverted before the illustration itself becomes visible.
-
Add a Layer Mask From the Selection
With the selection still active, click the layer mask button to add a mask to the group.
-
Invert the Mask
Select the layer mask thumbnail and press Cmd/Ctrl+I to invert it, since the mask starts out backward with the illustration hidden.
-
Move Color Layers Into the Group
Drag any color layers into this same group so they inherit the group’s layer mask and stay confined to the illustration’s shape.
Why Grouping Color Layers Together Saves Extra Work
Without the shared group and its layer mask, every single color layer would need its own individual mask painted carefully around the illustration’s outline. Placing every color layer inside one group that already has the correct mask means new colors can be painted freely without ever spilling outside the illustration’s lines.
Coloring Separate Areas on Separate Layers
Painting each dramatically different color, such as a pineapple’s body versus its green leaves, on its own layer keeps later adjustments to one area from affecting any other.
-
Paint the Main Body Color
Select a base color, such as yellowish-orange, and paint over the main body area with the brush tool, stopping before any area that needs a different color.
-
Create a New Layer for a Different Colored Area
Add a new layer beneath the first and select a different base color, such as green for leaves.
-
Paint the Second Area Freely
Paint the second color freely without worrying about staying inside the lines exactly, since the group’s shared layer mask already confines all color to the illustration’s shape.
-
Erase Any Overpainted Areas
Press E for the Eraser tool to clean up any color that spilled where it wasn’t wanted.
Adding Highlights and Shadows With the Color Panel
The Color panel’s eyedropper can load a base color and then shift it lighter or darker directly within the panel, making it easy to paint related highlight and shadow tones on top of a flat base color.
-
Open the Color Panel
Go to Window > Color to open the Color panel.
-
Sample a Base Color With the Eyedropper
Click the eyedropper icon in the Color panel and select a color already used, such as the leaf green.
-
Shift the Color Darker for Shadows
Move the selection point in the Color panel to a darker shade of the same color and paint shadow areas, such as the right side of a leaf catching less light.
-
Shift the Color Lighter for Highlights
Move the selection point to a lighter shade and paint highlight areas facing the light source.
Why Sampling From the Image Speeds Up Later Painting
Returning to the Color panel every time a slightly different shade is needed slows down the painting process once a few highlight and shadow colors already exist in the image. Sampling directly from areas already painted instead keeps color choices consistent with what’s already there and lets painting continue without breaking focus to adjust a slider each time.
Sampling Highlight and Shadow Colors Directly From the Image
Once some highlight and shadow colors already exist in the image, holding Alt or Option brings up the Eyedropper tool to sample them directly instead of returning to the Color panel each time.
-
Hold Alt/Option to Sample a Color From the Image
Hold Alt or Option while the Brush tool is active to temporarily switch to the Eyedropper and sample an existing highlight or shadow color directly from the illustration.
-
Continue Painting Shadows on the Shadow Side
Paint shadows on the side of each shape facing away from the established light source, such as the right side if the light comes from the left.
-
Continue Painting Highlights on the Light Side
Paint highlights on the side of each shape facing the light source, using an almost-white color for the brightest spots.
Shaping the Main Body With a Large Soft Brush
A large, low-hardness brush lays down broad highlight and shadow areas across a rounded shape like a pineapple’s body, establishing an overall sense of roundness before finer detail gets added.
-
Increase Brush Size and Lower Hardness
Right-click with the Brush tool active, increase the size significantly, and reduce the hardness to create a large, soft-edged brush.
-
Paint a Broad Shadow on One Side
Sample the base color and paint a soft shadow along one side of the rounded shape.
-
Paint a Broad Highlight on the Opposite Side
Sample a lighter shade and paint a soft highlight along the opposite, light-facing side.
-
Add Smaller Highlights on Upward-Facing Details
Paint smaller highlights on individual upward-facing details within the shape, such as the tips of a pineapple’s diamond pattern, using the same lighter color.
Adding Color Variation With a Soft Light Layer
A new layer set to Soft Light blend mode lets extra colors, like purple, orange, or bright yellow, blend naturally into the existing colors instead of covering them completely.
-
Create a New Layer Set to Soft Light
Add a new layer above the color layers and change its blend mode from Normal to Soft Light.
-
Paint Extra Colors Into Different Areas
Paint additional colors, such as a touch of purple, orange, red, or cool green, into different parts of the illustration, letting them blend with the color already beneath them.
Adding a Background and Final White Highlights and Shadows
A simple background color placed beneath the illustration’s group, followed by a few pure white highlights and dark shadows, brings the finished color work together.
-
Create a Background Layer Beneath the Group
Add a new layer underneath the illustration’s group and fill it with a solid background color using Alt/Option+Delete.
-
Add a New Layer for White Highlights
Create a new layer inside the illustration group and paint small white highlights with a small brush on areas that catch the most light.
-
Add a New Layer for Dark Shadows in Multiply Mode
Create another new layer, paint with a dark gray, and change its blend mode from Normal to Multiply so the shadows blend into the existing colors instead of sitting flat on top.
Why Multiply Works Better Than Normal for the Final Shadow Pass
Painting a final layer of dark gray shadows in Normal mode would sit as flat gray on top of the illustration, ignoring all the color already built up underneath. Switching that layer to Multiply mode instead lets the gray darken whatever color is already there, so the final shadows read as a natural deepening of the existing color rather than an unrelated overlay.
Why This Approach Works
Changing the line drawing’s blend mode to Multiply and grouping every color layer under one shared layer mask is what allows color to be painted freely without ever needing to carefully stay inside the lines. Building depth in stages, first a broad soft-brush base, then sampled highlights and shadows, then a soft light color variation pass, keeps the process approachable instead of demanding perfect color choices in a single step.
Final Thoughts
Coloring an illustration this way turns a flat line drawing into something with real dimension, using nothing more complicated than a handful of layers, a couple of blend modes, and some patient sampling of color. The same layered approach works on any line drawing, whether it started as a digital sketch or a hand-drawn illustration scanned in from paper.
Quick Reference: Keys, Menus and Settings
- Lines over colorDouble-click the Background layer to unlock it; drawing layer blend mode Multiply
- Select outsideW for the Magic Wand, click outside the drawing
- Group maskFolder icon to group, layer mask button, Cmd/Ctrl + I to invert
- Clean up spillsE for the Eraser
- ShadesWindow > Color and its eyedropper; Alt/Option samples from the image while painting
- Big soft brushRight-click with the Brush tool: Size up, Hardness down
- Variation and backgroundSoft Light layer for extra color; fill a layer under the group with Alt/Option + Delete
No AI, no generative credits.
Free Downloads
Take the Guide With You
Get the PDF guide for coloring: Multiply line art, a Magic Wand group mask, base colors, shading, a Soft Light layer and the background. Free with a PHLEARN account.
Coloring Line Art: Common Questions
How do I paint color under my line drawing?
Unlock the Background layer, put a new layer under the drawing and set the drawing layer’s blend mode to Multiply. The white disappears and the lines stay on top of whatever you paint.
Why can’t I move a layer under my drawing?
The Background layer is locked. Double-click it and click OK to turn it into a regular layer, then drag the new layer beneath it.
How do I keep color inside the lines?
With the Magic Wand (W), click outside the drawing to select everything but it. Group the drawing layer with the folder icon, click the layer mask button and press Cmd/Ctrl + I to invert the mask. Any color layer inside that group only shows within the drawing.
Why is my drawing hidden after I add the mask?
The selection was everything outside the drawing, so the mask comes out backward. Click the mask thumbnail and press Cmd/Ctrl + I to invert it.
Should each color go on its own layer?
Put each very different color on its own layer, like the yellow-orange body and the green leaves. Paint freely, since the group mask trims it, and press E for the Eraser to clean up spills between them.
How do I pick highlight and shadow shades of the same color?
Open Window > Color, use its eyedropper on the base color, then pick a darker shade for shadows and a lighter one for highlights. Once a few shades are painted, hold Alt/Option with the Brush tool to sample them from the image.
Where should the highlights and shadows go?
Pick a light direction and stick to it. In the video the light comes from the left, so highlights go on the left and on upward-facing areas, and shadows go on the right and underneath.
How do I add color variation without covering the shading?
Add a new layer above the color layers, set it to Soft Light and paint colors like purple, orange, red or bright yellow. They blend with the color underneath, and you can turn the layer off to compare.
Why put the final shadows on a Multiply layer?
Dark gray in Normal mode sits flat on top of the color. In Multiply it darkens the colors underneath, so the shadows keep some of the pineapple’s yellow. Soft Light was tried first in the video and looked weaker.
Is there a free download?
Yes, with a free PHLEARN account. You get 1 PDF guide with the coloring steps from the video, from the Multiply line art to the final highlights and shadows.
From the Magazine View all
Stories, interviews and guides for photographers, new every week.
 EditingLightCraft vs Lightroom: I Edited the Same RAW Files in BothThe free clone on the same RAW files: what matches, what breaks and who should switch.
 InspirationRare Historical Photos: 13 of the Rarest Pictures Ever TakenFrom the earliest surviving picture of a person to the last passenger pigeon: who took each one and why it survives.
 EditingArtCraft: Photoshop Cloned by AI in Two Weeks. Is It Legal?ArtCraft cloned Photoshop and Lightroom with AI and gave them away. Any good? Legal? Safe?
Master Photoshop, Lightroom and Photography
Join PHLEARN PRO for $12.99 a month, or $99.99 a year (save 36%). Cancel anytime, with a 100% money-back guarantee.





