

description
Changing the color of one specific element in a photo, without touching anything else, comes down to a reliable combination: Color Range to make the selection, and a Hue/Saturation adjustment layer to shift it. This tutorial covers sampling a color with the eyedropper and Fuzziness, changing it, repeating the process on a second color, and refining the resulting layer mask so the change only affects exactly the areas intended.
Enjoying This Free Tutorial?
We publish a new free tutorial every week, each one with sample images and PSDs you can download and follow along with. Sign up and they land straight in your inbox, along with early word on sales, events and subscriber-only offers.

Changing the color of one specific element in a photo, without affecting anything else, comes down to a reliable combination: Color Range to make the selection, and a Hue/Saturation adjustment layer to shift it. This tutorial covers selecting a color, changing it, repeating the process on a second color, and refining the resulting layer mask so the color change only affects exactly the areas intended.
Creating a New Layer Before Selecting a Color
Starting fresh on a new layer keeps each color selection and adjustment organized as separate, independent pieces of the edit.
-
Create a New Layer
Add a new layer above the photo before making the first color selection.
Choosing a Sampling Method in Color Range
The Color Range dialog offers preset color categories, like Reds or skin tones, as well as a Sampled Colors option for picking any exact color directly from the image.
-
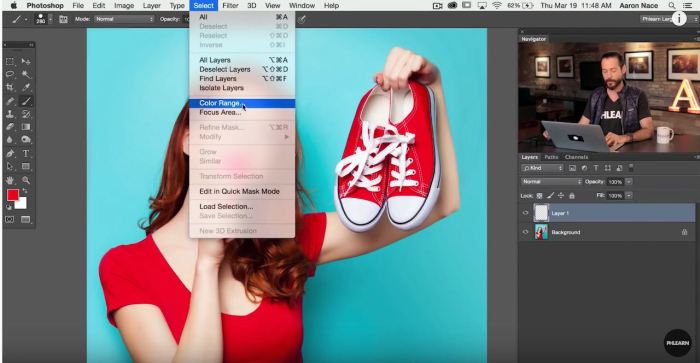
Open Color Range
Go to Select > Color Range.
-
Choose Sampled Colors
Select Sampled Colors from the Select dropdown to sample an exact color directly with the eyedropper, rather than relying on a preset category.
Selecting the Color With the Eyedropper and Fuzziness
Clicking a color with the eyedropper and adjusting Fuzziness controls exactly how broad or narrow the resulting selection ends up.
-
Click the Target Color
Click directly on the color to select, such as a background or a piece of clothing.
-
Adjust Fuzziness
Lower or raise the Fuzziness slider until the grayscale preview shows a clean, accurate selection of the intended color.
Why the Grayscale Preview Doesn’t Change the Selection
Switching the Color Range preview between grayscale, black matte, white matte, or quick mask only changes how the selection is displayed, not which pixels are actually included. Choosing whichever preview makes white (selected) and black (unselected) easiest to distinguish just makes judging the selection’s accuracy simpler, without altering the result itself.
Refining the Selection With the Plus Eyedropper
The plus eyedropper adds any missed areas of a similar color to the existing selection, filling in gaps the first click didn’t fully capture.
-
Select the Plus Eyedropper
Choose the plus eyedropper tool within the Color Range dialog.
-
Click Any Missed Areas
Click on any remaining areas of the same color that weren’t fully included in the initial selection.
-
Confirm the Selection
Click OK once the entire target color is selected.
Changing the Color With a Hue/Saturation Adjustment Layer
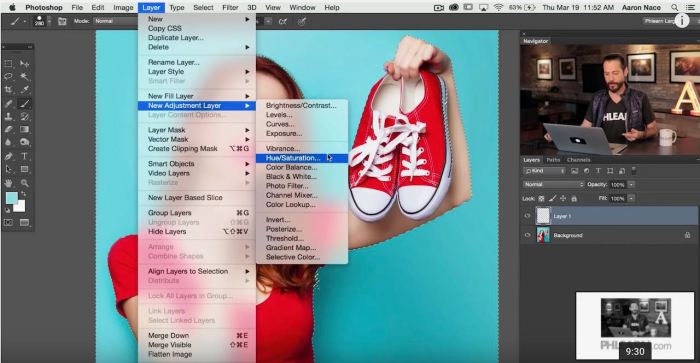
Creating a Hue/Saturation adjustment layer while a Color Range selection is active automatically loads that selection into the new layer’s mask.
-
Add a Hue/Saturation Adjustment Layer
Go to Layer > New Adjustment Layer > Hue/Saturation.
-
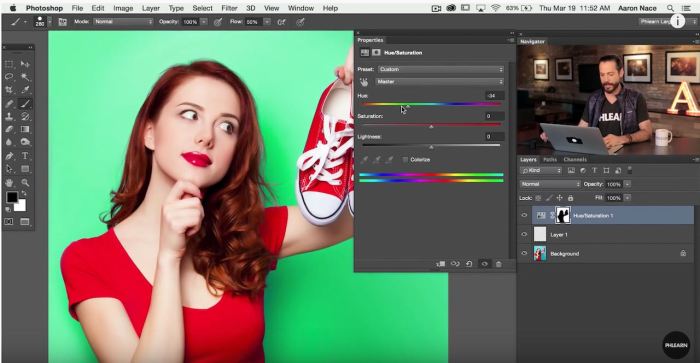
Shift the Hue
Drag the Hue slider left or right to change the selected color to a new one.
-
Adjust Saturation as Needed
Adjust the Saturation slider to make the new color more or less vivid.
Repeating the Process for a Second Color
The same new-layer, Color Range, and Hue/Saturation sequence works independently on a second color elsewhere in the same photo.
-
Create Another New Layer
Add another new layer for the second color change.
-
Select the Second Color
Repeat the Color Range selection process on a different color, such as a shirt.
-
Add a Second Hue/Saturation Layer
Add another Hue/Saturation adjustment layer and shift its Hue slider to change the second color.
Viewing the Layer Mask to Check What’s Affected
Holding Alt/Option while clicking a layer mask thumbnail displays it directly, making it easy to see exactly which areas of the photo a color change is touching.
-
Alt/Option-Click the Layer Mask
Hold Alt/Option and click a Hue/Saturation layer’s mask thumbnail to view it directly in black and white.
-
Identify Unexpected White Areas
Look for any unexpected white areas in the mask, which indicate spots the color change is also affecting.
Deciding Whether to Keep an Unexpected Color Cast
An unexpected area included in the selection might actually be picking up a genuine color cast from the original photo, which is worth considering before removing it.
-
Toggle the Layer to Compare
Turn the adjustment layer on and off to see what the unexpected area looked like before and after the color change.
-
Judge Whether the Effect Looks Realistic
Consider whether the included area, such as a shoe reflecting color from the background, actually looks more natural with the change applied.
Why Color Range Sometimes Picks Up a Slight Color Cast
An object near a colored background often reflects a subtle tint of that color onto its own surface, which Color Range can pick up as part of the same selected color. Recognizing that this reflected tint is real, rather than an error, helps decide whether to keep it included, since removing it might actually make the final image look less natural.
Painting Black to Exclude Areas From the Color Change
Painting black directly on a layer mask removes any area, like lips or hair, from a color change without needing to redo the entire selection.
-
Select the Brush Tool
Press B for the Brush tool and choose black as the foreground color.
-
Paint Over Unwanted Areas on the Mask
With the layer mask selected, paint black over any area, such as lips or hair, that shouldn’t be affected by the color change.
-
Recheck the Mask
Hold Alt/Option and click the mask thumbnail again to confirm the excluded areas are now black.
Why Checking the Mask Before Painting It Away Matters
Viewing a layer mask directly before deciding to paint over any part of it prevents accidentally removing an area that’s actually contributing something worthwhile, like a realistic reflected color cast. Checking first, then choosing deliberately what to exclude, keeps the final result intentional rather than a guess at what might need fixing.
Why This Approach Works
Sampling an exact color with Color Range’s eyedropper, rather than relying on a broad preset category, keeps the selection precise even on unusual or specific colors. Loading that selection directly into a Hue/Saturation layer’s mask means the color change stays fully non-destructive and endlessly adjustable rather than baked permanently into the pixels. Checking the mask before painting anything away is what prevents accidentally discarding a genuine, realistic detail like a reflected color cast.
Final Thoughts
Selecting and changing a color in Photoshop comes down to the same short sequence every time: a new layer, a Color Range selection, a Hue/Saturation adjustment, and a bit of mask refinement if needed. The same steps work on any color in any photo, whether it’s a single accent piece or an entire background that needs a different look.
Quick Reference: Keys, Menus and Settings
- Select a colorSelect > Color Range, Select: Sampled Colors, click the color
- Widen or narrow itFuzziness slider; Selection Preview: Grayscale
- Add missed areasPlus eyedropper in the Color Range dialog
- Change the colorLayer > New Adjustment Layer > Hue/Saturation, drag Hue; Saturation for intensity
- See the maskAlt/Option-click the mask thumbnail
- Leave areas aloneB, paint black on the mask
No AI, no generative credits.
Changing Colors in Photoshop: Common Questions
How do I select one color in Photoshop?
Go to Select > Color Range, set Select to Sampled Colors and click the color in the photo with the eyedropper. Click OK when the whole color shows white in the preview.
What does Fuzziness do in Color Range?
It sets how wide a range of similar colors gets selected. In the video it starts out selecting almost everything, so Fuzziness comes down until only the background is white.
Color Range missed part of the color. How do I add it?
Use the plus eyedropper in the Color Range dialog and click the missed areas. Raising Fuzziness a little also picks up more.
Which Selection Preview should I use?
Grayscale is the easiest to read: white is selected and black is not. Black Matte, White Matte and Quick Mask only change how the selection is shown, not what is selected.
How do I change the color once it is selected?
Go to Layer > New Adjustment Layer > Hue/Saturation. The active selection loads into its mask, so dragging the Hue slider changes only that color; Saturation makes it more or less vivid.
Can I change two colors in the same photo?
Yes. Repeat the Color Range selection on the second color, like the red shirt, and give it its own Hue/Saturation layer. Each color stays adjustable on its own.
How do I see exactly what my color change affects?
Hold Alt/Option and click the adjustment layer’s mask thumbnail. White areas are changed and black areas are not; Alt/Option-click again to go back.
Why is my color change showing on things I didn’t pick?
Color Range also catches color reflected onto nearby objects, like the blue cast on the side of a shoe. Toggle the layer before painting it out; keeping it can make the change look more natural.
How do I keep the lips and hair their original color?
Select the layer mask, press B for the Brush and paint black over those areas. They go back to the original color without redoing the selection.
Master Photoshop, Lightroom and Photography
Join PHLEARN PRO for $12.99 a month, or $99.99 a year (save 36%). Cancel anytime, with a 100% money-back guarantee.





