


Download Assets
This tutorial includes 1 sample image. Downloads are free with a PHLEARN account.
- Download the sample files from every free tutorial on PHLEARN
- New free tutorials published every week
- One free account: sign up once, then download anything
description
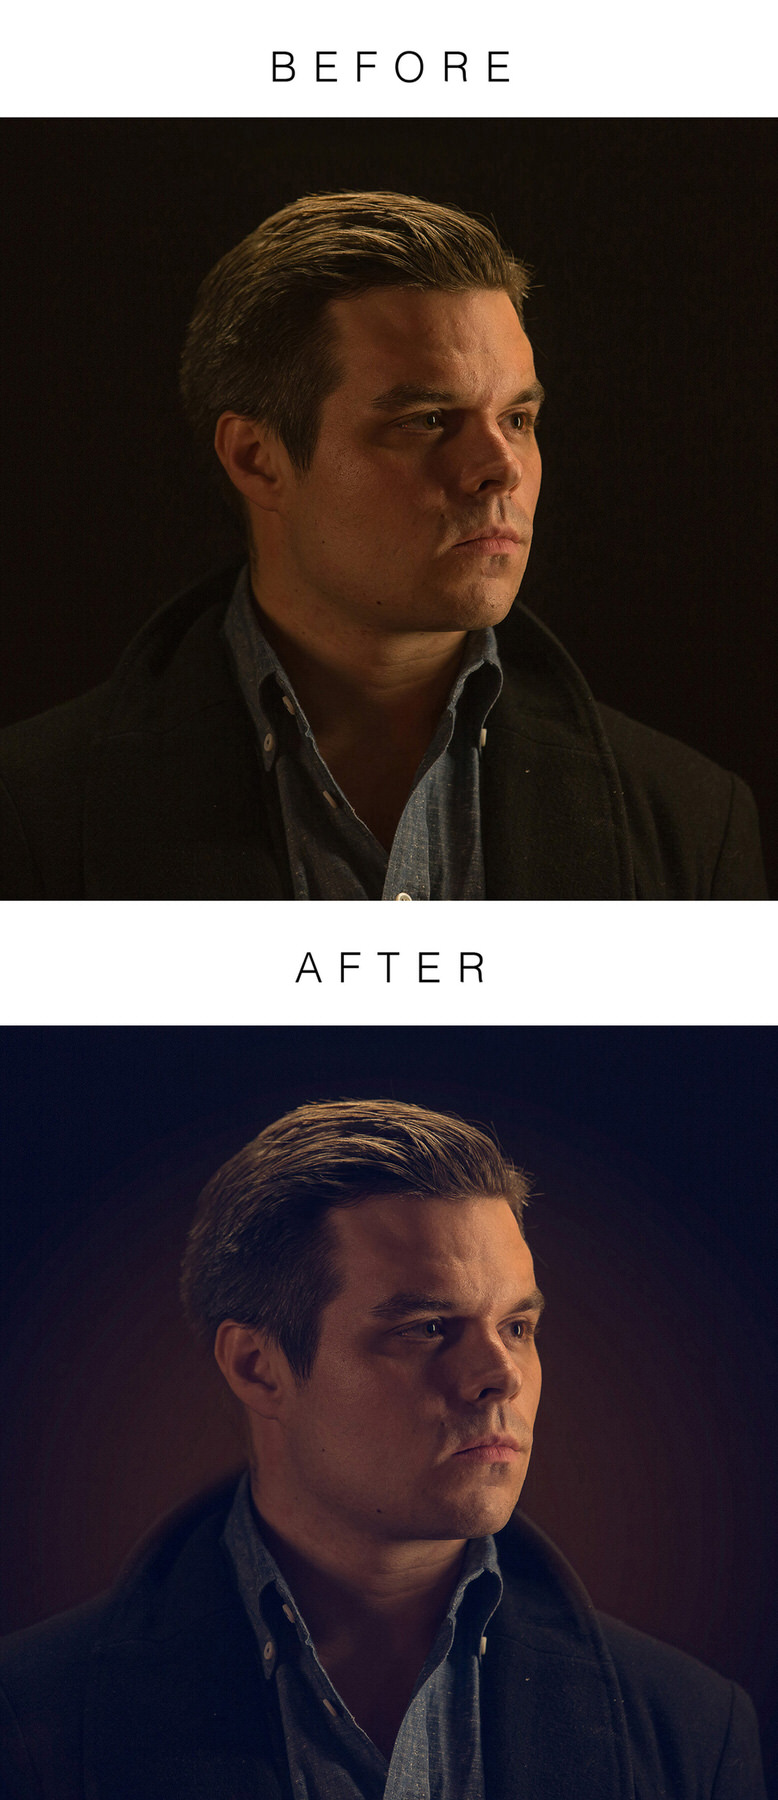
Picking up where the DIY lighting kit episode left off, this tutorial brings a dramatic male portrait into Photoshop for a full retouch. You will clear small blemishes with the Healing Brush while leaving permanent features like moles intact, isolate and neutralize blotchy red skin tones with a targeted Hue/Saturation adjustment, build a soft background glow from a Levels layer and a radial gradient, and finish with a classic color tone and a square crop.
Enjoying This Free Tutorial?
We publish a new free tutorial every week, each one with sample images and PSDs you can download and follow along with. Sign up and they land straight in your inbox, along with early word on sales, events and subscriber-only offers.

How to Retouch a Dramatic Male Headshot in Photoshop
Picking up from the DIY lighting kit episode, this tutorial brings that portrait into Photoshop for a full retouch. It covers clearing small skin imperfections with the Healing Brush, correcting red skin tone variation, adding a soft background glow, and finishing with a classic color tone. You can download the image from this episode in the Download Assets card to follow along.
Sampling Good Skin With the Healing Brush Tool
The regular Healing Brush Tool, set to sample from a nearby area of good skin, clears out small blemishes without needing any precision or focus on each individual spot.
-
Create a New Layer
Add a new layer above the portrait to hold the retouching work.
-
Select the Healing Brush Tool
Click and hold on the healing brush tool group and choose the regular Healing Brush Tool rather than the Spot Healing Brush.
-
Sample an Area of Good Skin
Hold Alt/Option and click on an area of skin with texture and tone worth reusing.
-
Paint Over Small Imperfections
Paint over blemishes, small scars, or stray hairs, letting the sampled texture replace them.
Deciding What to Retouch and What to Leave In
A male headshot generally calls for removing temporary blemishes while keeping permanent, identifying features like moles fully intact.
-
Remove Temporary Blemishes
Retouch out things like small pimples or spots from shaving that won’t be there the next day.
-
Leave Moles and Identifying Features In
Leave permanent features like moles untouched, since they’re part of what defines the person’s appearance.
-
Set the Healing Brush’s Mode and Sample Options
Set Mode to Normal and Sample to Current & Below in the options bar so the healing work can be done on a separate new layer.
Zooming Out to Catch Missed Imperfections
Finishing a close-up pass at high zoom, then zooming back out, reveals broader texture issues that were easy to miss up close.
-
Retouch at a Close Zoom Level First
Work through the portrait at a high zoom, such as 200%, to catch fine detail.
-
Zoom Out and Retouch Again
Zoom back out to view the face as a whole, and retouch any broader bumps or unevenness that weren’t obvious up close.
Why Moles and Identifying Features Are Left In
A mole or other permanent facial feature is part of what makes someone recognizably themselves, unlike a temporary blemish from shaving or a passing breakout. Retouching those permanent features away risks making a portrait feel less like an accurate likeness of the actual person, which is why they’re treated differently from anything genuinely temporary.
Isolating and Neutralizing Red Skin Tones With Hue/Saturation
A Hue/Saturation adjustment layer targeted specifically at reds, rather than the master channel, can isolate and shift just the blotchy red areas of skin back toward a natural tone.
-
Add a Hue/Saturation Adjustment Layer
Add a Hue/Saturation adjustment layer above the healing work.
-
Switch From Master to Reds
Change the channel from Master to Reds so only red tones in the image are affected.
-
Temporarily Boost Hue and Saturation to See the Selection
Raise the Hue and Saturation sliders significantly so the affected red areas become obviously visible, such as turning bright green.
-
Narrow the Range Slider to the Red Blotches
Click inside the range slider on the color bars at the bottom of the panel and drag it left or right (to the left here) until only the blotchy red areas, not the rest of the skin, are highlighted.
-
Reset Hue and Saturation to Zero
Bring the Hue and Saturation sliders back down to zero now that the correct range is isolated.
-
Shift the Hue Toward Natural Skin Tone
Drag the Hue slider until the red blotches shift into a color that matches the surrounding skin.
Why the Range Slider Matters More Than the Hue Slider Alone
Shifting the Hue slider without first narrowing the range would recolor every red tone in the image at once, including areas that never needed correction in the first place. Dragging the range slider to isolate just the blotchy areas first means the Hue shift that follows only affects the actual problem spots, leaving the rest of the skin’s natural color untouched.
Restoring Original Lip Color
Because lips often share the same red range as blotchy skin, the hue shift can unintentionally recolor them too, which a quick mask fix corrects.
-
Identify Any Unwanted Color Shift on the Lips
Check whether the hue shift has also changed the color of the lips.
-
Paint Black on the Layer Mask Over the Lips
Select the Brush tool, choose black, and paint over the lips on the adjustment layer’s mask to restore their original color.
Adding a Background Glow With Levels and a Radial Gradient
A Levels adjustment that lifts the darks, combined with a radial gradient, creates a soft glow that helps the subject stand out from a dark background.
-
Add a Levels Adjustment Layer
Add a Levels adjustment layer above the retouching work.
-
Lift the Red and Green Output Levels
Switch to the Red channel and drag its shadow output slider from the left to the right, to about 20, then do the same for the Green channel. This lifts the darks to a light brown that contrasts nicely with the image.
-
Invert the Layer Mask to Black
Press Cmd/Ctrl+I to invert the Levels layer’s mask, hiding the adjustment everywhere.
-
Paint a Radial Gradient in White
Select the Gradient tool set to a radial gradient in white, and drag out from the center of the subject to reveal the warm tone as a soft glow.
Refining the Glow’s Mask With a Group and a Blur
Grouping the gradient layer and adding a second mask on the group keeps the glow perfectly circular, while a blur softens its edge into the background.
-
Group the Gradient Layer With Itself
Select the Levels layer that holds the gradient and group it, keeping its gradient mask untouched inside the group.
-
Add a Mask to the Group
Add a new layer mask to the group itself, separate from the gradient layer’s own mask.
-
Paint Black Over the Subject on the Group Mask
Paint black on the group’s mask over the subject so the glow only shows up in the background.
-
Blur the Group’s Mask
Select the group’s mask and apply a Gaussian Blur so the glow blends smoothly into the background.
Why a Separate Layer Mask Keeps the Glow Circular
Painting directly on the gradient layer’s own mask with a brush would introduce visible brush strokes and an uneven edge, breaking the perfectly round shape a radial gradient naturally has. Adding a second mask on the group instead keeps the gradient’s own mask untouched and organic, while the group mask handles hiding the glow from the subject and blurring its edge separately.
Color Toning With the Blue Channel
Shifting the blue channel’s shadows and highlights in opposite directions gives the whole portrait a more classic, filmic color tone.
-
Add a Second Levels Adjustment Layer
Add another Levels adjustment layer above the glow group.
-
Add Blue Into the Shadows
Switch to the Blue channel and drag its shadow output slider from the left to the right to add blue into the darker tones.
-
Add Yellow Into the Highlights
Drag the Blue channel’s highlight output slider from the right to the left to add yellow into the brighter tones, completing the classic color-tone look.
Cropping to a Square
A square crop, centered with the arrow keys, gives the finished portrait a clean, classic frame.
-
Select the Crop Tool
Press C for the Crop tool.
-
Set the Ratio to Square
Change the crop ratio from the default to a 1:1 square ratio.
-
Center the Crop and Confirm
Use the arrow keys to nudge the crop into a centered position, then press Enter to apply it.
Why This Approach Works
Leaving permanent features like moles untouched while clearing only temporary blemishes keeps a male headshot looking like an authentic likeness rather than an overly smoothed version of the subject. Isolating the Hue/Saturation adjustment to the Reds channel specifically targets the actual color variation causing the blotchy look, without disturbing the rest of the skin’s natural tone. Using a separate mask on the glow’s group, rather than painting directly on the gradient layer’s own mask, is what keeps that glow perfectly round and cleanly blurred into the background.
Final Thoughts
None of these steps, healing small blemishes, correcting red tones, adding a glow, and color toning, took very long individually, but together they turn a well-lit portrait into a genuinely polished headshot. The same healing, color-correction, and glow techniques work equally well on any portrait with a dark background, not just this one.
Quick Reference: Keys, Menus and Settings
- Heal the skinNew layer; Healing Brush, Alt/Option-click to sample; Mode: Normal, Sample: Current & Below
- Even out rednessHue/Saturation layer, Master to Reds, narrow the range slider, then shift Hue
- Restore the lipsPaint black on the Hue/Saturation mask
- Background glowLevels: Red and Green shadow output up (Red about 20); Cmd/Ctrl + I on the mask; white radial gradient
- Refine the glowGroup it, mask the group, paint black over the subject; Filter > Blur > Gaussian Blur
- Color toneLevels > Blue: blue into the shadows, yellow into the highlights
- Square cropC, ratio 1:1, arrow keys to center, Enter
No AI, no generative credits.
Free Downloads
Follow Along on the Same Photo
Get the dramatic headshot from the video, shot with the low-cost DIY lighting kit, and retouch it step by step right along with Aaron. Free with a PHLEARN account.
Male Headshot Retouching: Common Questions
Should I use the Healing Brush or the Spot Healing Brush on skin?
The video uses the regular Healing Brush Tool, which sits under the Spot Healing Brush in the toolbar. Hold Alt/Option and click to sample skin you like, then paint over the blemish.
Why won’t the Healing Brush work on my empty layer?
Check the options bar: Mode should be Normal and Sample should be Current & Below. With Sample set to Current Layer, you can’t heal on a new layer.
Should I remove moles in a headshot?
Leave them in. Anything that will still be there the next day, like moles and other identifying features, is part of who the person is. Temporary things like pimples or marks from shaving can go.
How smooth should skin be on a male portrait?
Not porcelain smooth. The aim is to clear blemishes, small scars and stray hairs while keeping the texture. Work at around 200%, then zoom out to catch small bumps you missed up close.
How do I fix red blotches on skin?
Add a Hue/Saturation adjustment layer and switch Master to Reds. Crank Hue and Saturation up so the affected areas show, narrow the range slider until only the blotches light up, set both back to zero, then drag Hue until the red turns into skin color.
The red fix changed the lips too. How do I get them back?
Paint black on the Hue/Saturation layer’s mask over the lips to bring back their original color.
How do I add a glow behind the subject?
Add a Levels adjustment layer and drag the Red and Green shadow output sliders to the right (Red to about 20). Invert the mask with Cmd/Ctrl + I, then drag a white radial gradient out from the subject with the Gradient tool.
Why put the glow in a group with its own mask?
So the gradient’s mask stays a clean circle with no brush strokes in it. Paint black over the subject on the group’s mask instead, then soften it with Filter > Blur > Gaussian Blur.
How do I give a portrait a classic color tone?
Add another Levels adjustment layer, choose the Blue channel, and move the output sliders to add blue into the shadows and yellow into the highlights.
Are the sample files free?
Yes, with a free PHLEARN account. You get 1 sample image: the dramatic headshot from the video, shot with the DIY lighting kit in the previous episode.
From the Magazine View all
Stories, interviews and guides for photographers, new every week.
 BusinessHow to Compete With AI: Give Your Clients MoreEveryone has the same tools now, and your clients know it. The way to compete is to give them more.
 EditingLightCraft vs Lightroom: Is the Free Clone Any Good?The free clone on the same RAW files: what matches, what breaks and who should switch.
 EditingHow to Tell If a Photo Is AI, and Prove Yours Is RealThe tells that still work in 2026, why detectors disagree, and how to prove your own photos.
Master Photoshop, Lightroom and Photography
Join PHLEARN PRO for $12.99 a month, or $99.99 a year (save 36%). Cancel anytime, with a 100% money-back guarantee.





