
Download Assets
This tutorial includes 1 PDF guide. Downloads are free with a PHLEARN account.
- Download the sample files from every free tutorial on PHLEARN
- New free tutorials published every week
- One free account: sign up once, then download anything
Free PDF Guide · 4 Pages
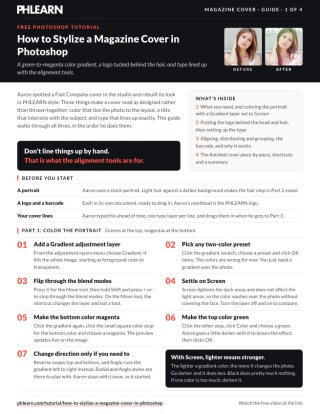
This Tutorial as a Step-by-Step PDF
This guide walks through styling a magazine cover: a Gradient adjustment layer set to Screen, a logo tucked behind the hair with a layer mask and Select > Color Range, type set in the Character and Paragraph panels, then the Move tool alignment buttons. Keep it next to you while you build your own cover.
description
What makes a cover look professionally designed is the interaction between the photo, the logo and the type. This tutorial grades a portrait with a Gradient adjustment layer set to Screen, tucks the masthead behind the subject and picks up stray hair with Color Range, then squares up the type using the Character, Paragraph and alignment tools.
Enjoying This Free Tutorial?
We publish a new free tutorial every week, each one with sample images and PSDs you can download and follow along with. Sign up and they land straight in your inbox, along with early word on sales, events and subscriber-only offers.

A magazine cover needs more than a striking photo; the color grading, the logo placement, and the type all have to work together to feel professionally designed. This tutorial adds a colorful gradient to a portrait using a screen blend mode, masks a logo behind the subject’s hair, and uses Photoshop’s alignment tools to line up type and graphics precisely.
Adding a Gradient Adjustment Layer
A Gradient adjustment layer fills the entire image with a customizable color transition, providing the raw material for the magazine cover’s signature color effect.
-
Add a Gradient Adjustment Layer
Go to the Adjustment Layers menu and choose Gradient to fill the image with a default gradient.
-
Choose a Starting Gradient Preset
Click the gradient swatch in the adjustment layer’s properties and choose any preset gradient as a starting point.
Cycling Through Blend Modes With a Keyboard Shortcut
A keyboard shortcut can flip rapidly through every blend mode on a selected layer, making it fast to preview which one produces the right effect without opening the blend mode dropdown repeatedly.
-
Switch to the Move Tool
Press V or click the Move tool, since the blend mode shortcut only works while this tool is active.
-
Hold Shift and Press Plus or Minus
Hold Shift and press the plus or minus key repeatedly to cycle through the layer’s available blend modes.
-
Settle on Screen for This Effect
Choose the Screen blend mode, which lightens dark areas of the underlying image without affecting the lighter areas.
Why the Screen Blend Mode Suits a Colorful Portrait Gradient
A blend mode like Normal would simply paint the gradient flatly over the portrait, hiding the photo’s own detail and contrast entirely. Screen mode instead lightens and colors the dark areas of the photo while leaving lighter areas mostly untouched, which is what allows the gradient to add color without erasing the subject underneath it.
Customizing the Gradient’s Colors
Editing the gradient’s individual color stops swaps in the exact colors needed, such as green fading into magenta, while a live preview shows the effect updating on the image in real time.
-
Reopen the Gradient Editor
Click the gradient in the adjustment layer’s properties to reopen the gradient editor.
-
Change the Bottom Color Stop
Click the bottom color stop and change it to a color such as magenta, noting that lighter shades affect the image more strongly than darker ones under the Screen blend mode.
-
Change the Top Color Stop
Click the top color stop and change it to a color such as green, adjusting brightness to control how strongly it affects the image.
-
Adjust the Gradient’s Direction if Needed
Use the reverse and angle options in the gradient editor to change which direction the color transition runs across the image.
Bringing In a Logo and Masking It Behind the Subject
A simple black-painted layer mask hides the logo exactly where it overlaps the subject’s head, creating the illusion that the type sits behind them.
-
Drag the Logo Into the Document
Hold Shift and click and drag the logo from its own document into the magazine cover document.
-
Scale and Position the Logo
Press Cmd/Ctrl+T, hold Shift and Option/Alt to scale the logo proportionally from its center, then nudge it into place with the arrow keys.
-
Add a Layer Mask and Paint Black Over the Subject’s Head
Click the layer mask button, then paint black directly over the area where the subject’s head overlaps the logo to make that portion invisible.
-
Paint White to Correct Any Mistakes
Switch to a white brush and paint back over any area accidentally hidden that should remain visible.
Masking Fine Hair Detail With Color Range
Color Range can select thin, light-colored hair strands against a darker background, turning that selection into a precise addition to the existing layer mask.
-
Open Select and Color Range
Go to Select > Color Range.
-
Click on the Hair to Sample It
Turn off the layers above the photo so the hair is easy to see, then click directly on a strand of hair to sample it and lower the Fuzziness so mainly the light hair gets selected rather than the darker background.
-
Paint Black Within the Selection on the Same Mask
With the selection active, turn the layers back on and paint black directly onto the same layer mask already in use, hiding the logo specifically where the hair should appear on top of it.
-
Hide the Selection Marching Ants to Check the Result
Press Cmd/Ctrl+H and choose Extras to temporarily hide the selection outline so the masked result can be seen clearly.
Setting Up the Character and Paragraph Panels for Type
The Character and Paragraph panels control a text layer’s size, weight, letter spacing, and alignment, all of which matter for getting a magazine-style type treatment right.
-
Open the Character and Paragraph Panels
Go to Window > Character and Window > Paragraph to open both panels.
-
Set Text Alignment in the Paragraph Panel
Use the Paragraph panel to align a text layer to the left, center, or right.
-
Adjust Font Weight and Letter Spacing in the Character Panel
Use the Character panel to choose a font weight, such as light, regular, or bold, and adjust the tracking value to control the spacing between letters.
Aligning Multiple Layers Precisely With the Alignment Tools
The alignment tools, nested with the Move tool, line up two or more selected layers to each other automatically, whether that means matching their edges or evenly distributing the space between them.
-
Select the Move Tool
Click the Move tool to reveal the alignment options along the top of the screen.
-
Cmd/Ctrl-Click to Select Multiple Layers
Hold Cmd/Ctrl and click each layer that needs to be aligned together.
-
Choose an Alignment Option
Click an alignment icon, such as align left, align right, or align center, to line up the selected layers along that edge.
-
Distribute Evenly Spaced Layers
With three or more layers selected, click Distribute Vertical Centers to space them evenly apart from each other.
Why Alignment Tools Beat Positioning Elements by Eye
Nudging several text and graphic layers into place by eye rarely results in edges that line up exactly or spacing that reads as intentional. Using the alignment and distribute tools instead guarantees that selected layers share exact edges or even spacing, giving the finished cover the precise, structured look expected of real magazine design.
Why Grouping Layers Simplifies a Complex Layout
Moving several lines of text as separate layers risks knocking their careful alignment out of sync every time one of them gets repositioned. Grouping them into a single unit means the whole combination moves, scales, and repositions together, keeping their relationship intact throughout the rest of the design process.
Grouping Related Elements and Adding a Barcode
Grouping related layers together makes them easier to move as a single unit, and a simple barcode graphic adds one final realistic touch to the finished cover.
-
Group Related Layers Together
Cmd/Ctrl-click related layers, such as the three stacked cover lines, and press Cmd/Ctrl+G to group them. Then Cmd/Ctrl-click the group and the logo and click align left edges so the cover lines start at the same edge as the logo.
-
Drag In a Barcode Graphic
Hold Shift and drag a barcode image in from another document.
-
Rotate the Barcode in 15-Degree Increments
Press Cmd/Ctrl+T, hold Shift to constrain rotation to 15-degree increments, and rotate the barcode into its final position.
Why This Approach Works
Using a Gradient adjustment layer set to Screen, rather than painting color directly onto the photo, keeps the effect fully editable and non-destructive to the underlying portrait. Masking the logo behind the subject’s head, including the fine detail of stray hair with Color Range, is what sells the illusion that the type genuinely sits behind the person rather than simply overlapping them. Relying on the Character, Paragraph, and alignment tools instead of positioning everything by eye is what gives the finished layout the precise, deliberate structure expected of a real magazine cover.
Final Thoughts
Recreating a professional magazine cover comes down to a handful of specific techniques working together: a coordinated color gradient, a logo that interacts believably with the subject, and type that lines up with genuine precision. Once these tools are familiar, the same workflow can style a completely different portrait and layout just as convincingly.
Quick Reference: Keys, Menus and Settings
- Color the photoAdjustment layer: Gradient, blend mode Screen; edit the color stops
- Cycle blend modesV, then Shift + + or -
- Place the logoShift-drag it in; Cmd/Ctrl + T with Shift + Alt/Option; arrow keys to nudge
- Logo behind hairLayer mask, paint black; Select > Color Range on the hair, lower Fuzziness; Cmd/Ctrl + H hides the selection
- Type settingsWindow > Character and Window > Paragraph
- Align and spaceMove tool, Cmd/Ctrl-click the layers, align icons; Distribute Vertical Centers
- Group and barcodeCmd/Ctrl + G; Cmd/Ctrl + T, Shift rotates in 15-degree steps
Free Downloads
Take the Guide With You
Get the PDF guide: a Screen gradient, a logo masked behind the hair with Color Range, type panels, the alignment tools and a barcode. Free with a PHLEARN account.
Magazine Cover Design: Common Questions
How do I add the color gradient over the portrait?
Add a Gradient adjustment layer, pick a preset and set the layer’s blend mode to Screen. Then edit the color stops: magenta at the bottom and green at the top in the video.
Is there a shortcut to flip through blend modes?
Press V for the Move tool, then hold Shift and press + or – to cycle the selected layer’s blend modes. With a painting tool active, the shortcut changes the tool’s mode instead.
Why use Screen for the gradient?
Screen lightens the dark areas and leaves the light areas mostly alone, so the gradient colors the photo without covering the face.
Why is one of my gradient colors too strong?
With Screen, lighter colors affect the image more and black does almost nothing. Choose a darker shade for that color stop in the Gradient Editor to lessen it.
How do I make the title look like it’s behind the head?
Add a layer mask to the logo layer and paint black where the head overlaps it. Switch to white and paint to bring back anything you hid by mistake.
How do I mask fine hair over the title?
Turn off the layers above the photo, go to Select > Color Range, click the light hair and lower Fuzziness so the dark background isn’t picked. Turn the layers back on and paint black inside the selection on the same logo mask.
How do I hide the marching ants to check my mask?
Press Cmd/Ctrl + H. If Photoshop asks whether to hide Photoshop or the extras, choose Hide Extras. The selection stays active; only the outline is hidden.
How do I change the weight and letter spacing of type?
Open Window > Character and Window > Paragraph. Character sets the size, the weight (Light, Regular or Bold in a font like Helvetica Neue) and the tracking; Paragraph aligns text left, center or right.
How do I line up type exactly?
Choose the Move tool, Cmd/Ctrl-click two or more layers and click an alignment option in the options bar. With three layers selected, Distribute Vertical Centers spaces them evenly.
Is there a free download?
Yes, with a free PHLEARN account. You get 1 PDF guide with the cover steps from the video, from the Screen gradient to the barcode.
Master Photoshop, Lightroom and Photography
Join PHLEARN PRO for $12.99 a month or $99.99 a year. Cancel anytime, with a 100% money-back guarantee.





