
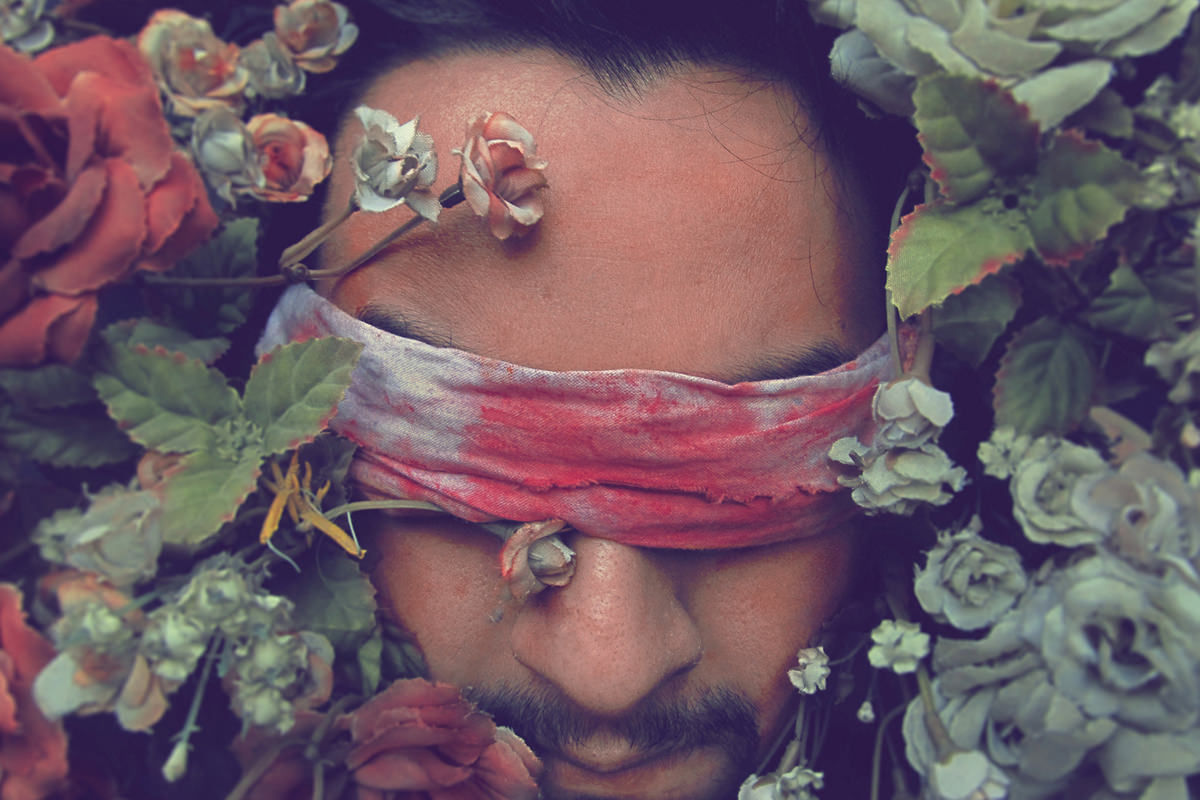

Widespread redness is a color problem, and the Healing Brush is a texture tool, which is why it never quite copes. This free Photoshop tutorial targets the exact range instead: a Hue/Saturation layer set to Reds, its values pushed to extremes purely so the affected pixels become visible, then narrowed with the range handles until only the discolored skin reacts, and finally rebuilt from zero.
We publish a new free tutorial every week, each one with sample images and PSDs you can download and follow along with. Sign up and they land straight in your inbox, along with early word on sales, events and subscriber-only offers.

How to Remove Any Skin Blemish in Photoshop
Redness, rosacea, broken blood vessels, or just uneven blotchy skin tone all share the same underlying problem: a patch of color that doesn’t match the rest of the skin around it. Rather than painting over that area or relying on a healing brush, this technique targets the exact color range causing the trouble with a Hue/Saturation adjustment layer and shifts it to match, using an extreme case — a face covered in red powder — to prove the method works on anything less severe.
Why Hue/Saturation Beats a Healing Brush for Widespread Redness
A Healing Brush or Clone Stamp tool samples texture and detail from a nearby area, which works well for a small, isolated mark but falls apart when redness is spread across a large portion of the skin. What’s actually needed for widespread discoloration is a way to target a specific color range and shift it, which is exactly what a Hue/Saturation adjustment layer, used correctly, can do.
Adding a Hue/Saturation Adjustment Layer and Choosing a Color Range
The first move is simply telling Photoshop which family of colors to look at.
-
Add a Hue/Saturation Adjustment Layer
Go to your adjustment layers and choose Hue/Saturation.
-
Switch From Master to a Specific Color
Instead of leaving the dropdown set to Master, choose a specific color range, such as Reds, so the adjustment only affects colors within that range rather than the entire image.
Why the Master Setting Affects Too Much
Adjusting Hue or Saturation with the dropdown set to Master changes every color in the image at once, which is far too broad a brush for fixing a localized skin tone problem. Switching to a named color range like Reds restricts the effect to colors within that family, leaving colors like greens untouched.
Using the Range Sliders to Isolate the Problem Color
Even with Reds selected, the range being affected is usually still too broad, catching normal skin tones along with the actual problem areas.
-
Push Hue and Saturation to Extreme, Visible Values
Temporarily drag the Hue and Saturation sliders to strong, obvious values so the affected areas become easy to see — this is only a visual aid and gets reset once targeting is finished.
-
Drag the Targeting Range Sliders at the Bottom of the Panel
Move the range sliders at the bottom of the Hue/Saturation panel left and right. As you drag, watch which areas of the image start reacting — different positions will affect different colors, from background elements to specific parts of the face.
Why Temporarily Boosting Saturation Makes Targeting Easier
With subtle settings, it’s hard to tell exactly which pixels a given range is affecting. Pushing the values to an exaggerated, almost heat-map-like extreme makes the targeted area obvious at a glance, which makes narrowing the range down to just the problem area much faster and more accurate.
Narrowing the Targeted Range
The two handles at the bottom of the panel are what actually set the width of the range.
-
Click Between the Range Handles to Narrow the Selection
Click in the middle of the two range handles and drag to shrink the width of the targeted range, then continue nudging the range left or right until it isolates only the problem-colored areas and leaves normal skin tone untouched.
Once the range is dialed in so the highlighted areas match only the red powder (or, on a real photo, only the actual blemished or discolored skin), the targeting half of the job is done.
Shifting Hue and Lightness to Match Skin Tone
With the range locked in, the correction gets rebuilt from zero.
-
Reset Hue and Saturation Back to Zero
Bring the Hue and Saturation sliders back down to zero now that the color range is properly targeted — the targeting itself stays in place even though the values are reset.
-
Raise Lightness and Saturation
Increase the Lightness slider, then bring Saturation back up gradually, watching how the targeted color starts shifting toward the surrounding skin tone.
-
Adjust Hue Until the Color Matches
Drag the Hue slider left or right until the targeted color lines up with the actual skin tone elsewhere in the photo — dragging one direction can shift red toward purple, while the other direction brings it closer to a natural skin tone.
Why Lightness Matters as Much as Hue in Extreme Cases
A color problem isn’t always just a hue shift — in this extreme example, the red powder is also noticeably darker than the surrounding skin. Raising Lightness alongside adjusting Hue accounts for that difference; on a milder, more typical case of redness, Lightness may need little or no adjustment at all.
Masking Areas That Should Keep Their Original Color
Anything else in the frame that shares the targeted color needs protecting.
-
Add a Layer Mask and Paint Black Over Protected Areas
Add a layer mask to the adjustment layer and paint with black over anything that shouldn’t be affected by the color shift, such as a bandana or hair, so those areas keep their original color.
Lowering Opacity for a More Natural Blend
A correction at full strength often reads as slightly too clean.
-
Reduce the Adjustment Layer’s Opacity
If the corrected area looks a little flat or unclear once the color shift is applied at full strength, lower the adjustment layer’s opacity slightly until it blends more naturally with the surrounding skin.
Cleaning Up Remaining Small Marks With the Healing Brush
The two tools solve different halves of the problem, so they pair well.
-
Grab the Healing Brush for Any Leftover Isolated Marks
Once widespread color problems are fixed with the Hue/Saturation approach, use the Healing Brush for any small, isolated blemishes still remaining — the two techniques work well as a one-two combination, with Hue/Saturation solving color and the Healing Brush solving texture.
Restoring Natural Highlights With Blend If
After the widespread color correction, skin can look a bit flat compared to how it looked with its original natural highlights.
-
Paint White Highlights on a New Layer
Set white as your foreground color and paint over the areas where natural highlights should sit on the skin.
-
Restrict the White With Blend If
Double-click the white paint layer to open Blend If, then hold Option/Alt and drag the underlying-layer slider so the white is hidden where the layer beneath it is darker and only shows on the brighter areas, letting natural highlight areas show through without flattening the whole face with solid white.
Why Blend If Instead of Just Lowering Opacity
Simply lowering the opacity of a painted white layer dims the highlight everywhere evenly, which still looks flat and unnatural. Blend If instead restricts where the white is visible based on the brightness of the layer underneath, so the highlight only reappears in areas that were already relatively bright, restoring a natural-looking sheen rather than a uniform wash of light.
Why This Approach Works
The trick that makes this technique work is treating targeting and correcting as two separate steps rather than trying to do both at once. Choosing a named color range like Reds instead of Master narrows the starting point, but it’s the range sliders at the bottom of the panel — pushed to exaggerated values purely so the affected area becomes visible — that let you dial the range down until it catches only the actual problem color and nothing else. Once that range is locked in, resetting Hue and Saturation back to zero and rebuilding the correction from scratch means the adjustment can push exactly as far as needed, including raising Lightness for cases where the discoloration is darker as well as differently colored. Because it’s a standard adjustment layer, it also accepts a layer mask and an opacity change like any other layer, which is what allows fine control over exactly where the correction applies and how strongly. Following it with Blend If to restore natural highlights, rather than just repainting flat white, keeps the fixed skin looking like skin instead of looking retouched.
Final Thoughts
This example is deliberately extreme — an entire face covered in red powder — specifically to prove the technique holds up under the worst-case scenario. Rosacea, sunburn, uneven blotchiness, or any other widespread color problem in skin responds to the exact same combination of targeted Hue/Saturation correction followed by a small Healing Brush cleanup for any remaining isolated marks. It’s a fast fix once the targeting step is understood, and it succeeds precisely where a Healing Brush or Clone Stamp tool alone would fail, since those tools sample texture rather than shift color.
Quick Reference: Keys, Menus and Settings
- Add the layerAdjustment layers > Hue/Saturation, dropdown from Master to Reds
- See the targetPush Hue and Saturation to extremes while you move the range sliders
- Narrow the rangeClick between the range handles, slide until only the red areas react
- Match the skinHue and Saturation back to 0, then Hue right, Lightness up if needed, Saturation to taste
- Protect and softenPaint black on the mask; lower the layer’s Opacity a little
- Small marksHealing Brush
- Highlights backPaint white on a new layer; double-click for Blend If, Alt/Option-drag the Underlying Layer dark slider
No AI, no generative credits.
Removing Skin Redness: Common Questions
Why not just use the Healing Brush on red skin?
The Healing Brush and Clone Stamp can’t change a whole color range. A Hue/Saturation adjustment layer targets the red areas and shifts them to match the rest of the skin.
Why does Hue/Saturation change my whole photo?
It is set to Master, which adjusts everything. Change the dropdown to a color range like Reds so it leaves colors such as the greens alone.
How can I see which areas the adjustment is affecting?
Drag Hue and Saturation up to extreme values for a moment. The affected areas light up like a heat map as you move the range sliders at the bottom of the panel.
How do I target only the red patches and not the normal skin?
Click between the two range handles to make the range smaller, then slide it left or right until it picks up the red areas and leaves the normal skin tone alone.
How do I shift the red to the right skin tone?
Set Hue and Saturation back to zero; the targeting stays. Then drag Hue right toward the skin tone (left turns it purple) and adjust Saturation to match.
Do I need to change Lightness?
In most photos, no. The red powder in this example is also darker than the skin, so Lightness goes up here.
What if something red should stay red?
Paint black on the adjustment layer’s mask over it, like the bandana here. If the fix looks unclear in places, lower the layer’s opacity a little.
What about small blemishes left over?
Fix the overall color with Hue/Saturation first, then use the Healing Brush on any small marks that remain.
The skin looks flat after the fix. How do I bring highlights back?
Paint white on a new layer, double-click it to open Blend If and Alt/Option-drag the Underlying Layer slider so the white is hidden where the layer below is darker.
From the Magazine View all
Stories, interviews and guides for photographers, new every week.
 BusinessHow to Compete With AI: Give Your Clients MoreEveryone has the same tools now, and your clients know it. The way to compete is to give them more.
 EditingLightCraft vs Lightroom: Is the Free Clone Any Good?The free clone on the same RAW files: what matches, what breaks and who should switch.
 EditingHow to Tell If a Photo Is AI, and Prove Yours Is RealThe tells that still work in 2026, why detectors disagree, and how to prove your own photos.
Master Photoshop, Lightroom and Photography
Join PHLEARN PRO for $12.99 a month, or $99.99 a year (save 36%). Cancel anytime, with a 100% money-back guarantee.





