

Download Sample Images
Download Assets
This tutorial includes 1 sample image and 1 PDF guide. Downloads are free with a PHLEARN account.
- Free sample files with every tutorial on PHLEARN
- New tutorials published every week
- Unlimited downloads with your free PHLEARN account
Free PDF Guide · 3 Pages
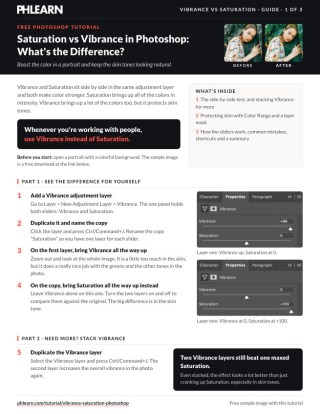
This Tutorial as a Step-by-Step PDF
The guide walks through the side-by-side test with Layer > New Adjustment Layer > Vibrance, stacking a second Vibrance layer with Ctrl/Command+J, selecting the skin with Select > Color Range and the plus eyedropper, painting black on each mask, and copying the mask to a Saturation layer. Keep it next to your keyboard.
description
Vibrance and Saturation are both helpful options that allow us to enhance the colors in our photos. But what’s the difference between the two and when should we use one over the other? Find out in this short demonstration!
Learn how to use Vibrance and Saturation to enhance the colors in a portrait while making sure skin tones look natural.
Enjoying This Free Tutorial?
We publish a new free tutorial every week, each one with sample images and PSDs you can download and follow along with. Sign up and they land straight in your inbox, along with early word on sales, events and subscriber-only offers.
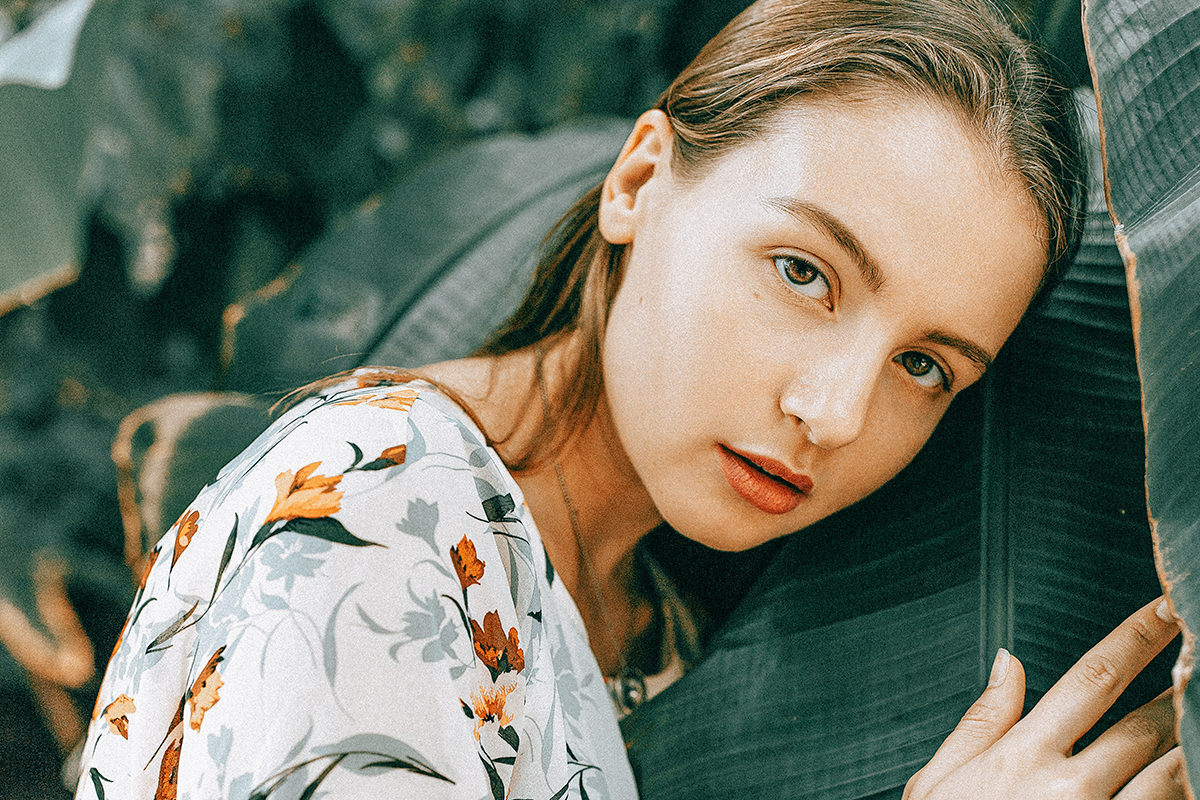

Same Panel, Two Sliders, Completely Different Behavior
Vibrance and Saturation sit side by side in the same adjustment layer and look like the same control at different strengths. They aren’t.
Saturation raises every color in the image equally. Vibrance raises the least-saturated colors hardest and deliberately protects skin tones. That single difference decides which one belongs on almost any photograph containing a person — and there’s a stacking trick that gets more color out of Vibrance without the damage Saturation does to skin.
What Each Slider Actually Does
Saturation is a flat multiplier. Every pixel’s color intensity goes up by the same proportion, whether it started gray or already vivid. Colors that were nearly maxed out clip first, which is where that harsh, posterized look comes from.
Vibrance is weighted. It pushes muted colors substantially and already-saturated colors barely at all — and it carries a specific protection for the orange range that skin occupies.
The practical consequence: Vibrance brings a photograph up without wrecking the parts that were already strong, and without turning people orange.
See the Difference Side by Side
Worth doing once on your own image rather than taking anyone’s word for it.
-
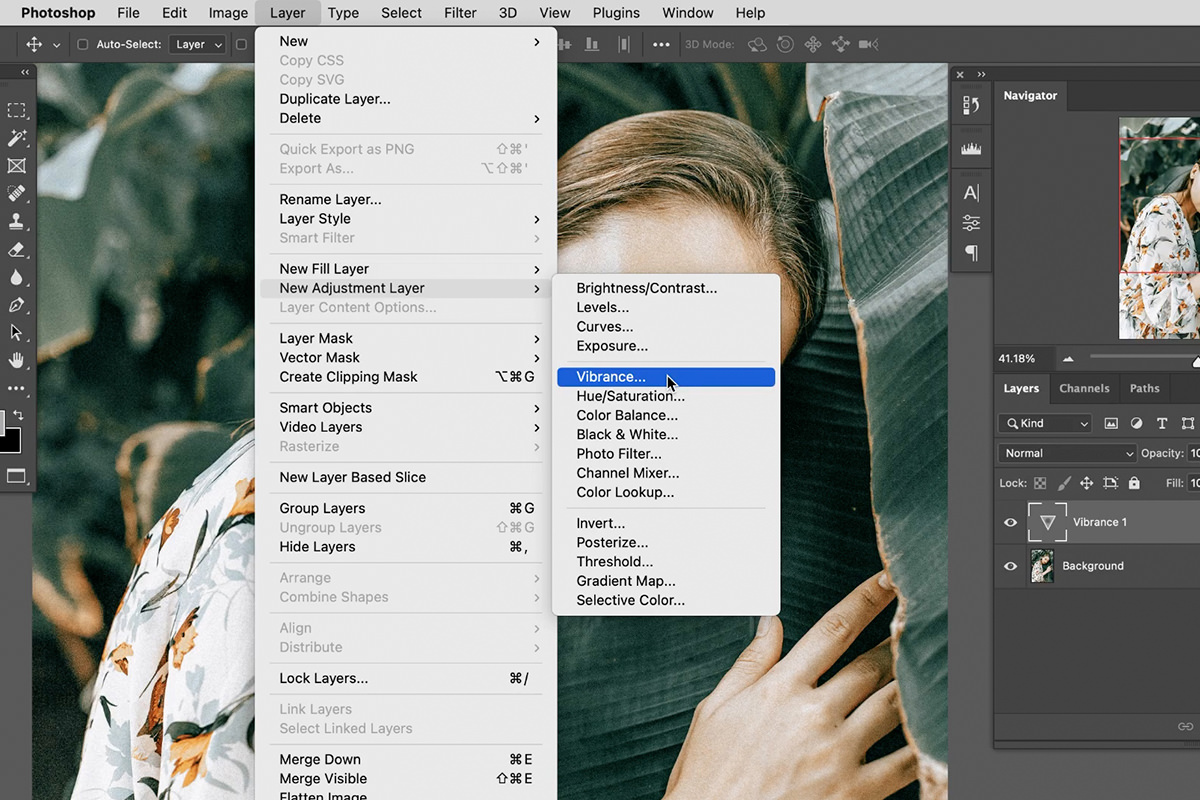
Add a Vibrance adjustment layer
Layer › New Adjustment Layer › Vibrance. Note that this one panel contains both sliders — Vibrance and Saturation live together.
-
Duplicate it and name the copy
Press Cmd/Ctrl + J and rename the copy Saturation, so you have one layer for each slider.
-
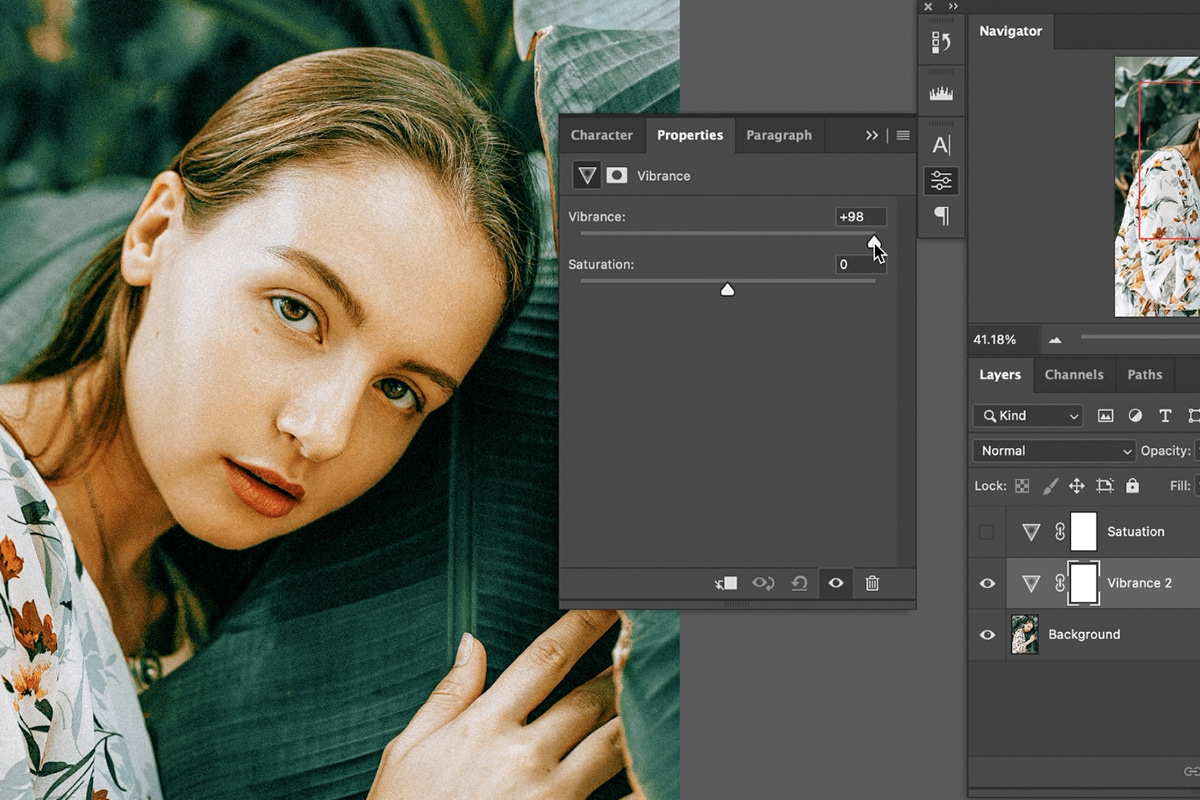
Push Vibrance to maximum on the first layer
Zoom out to see the whole frame. It is a little too much in the skin, but the greens and the other tones in the photo lift nicely.
-
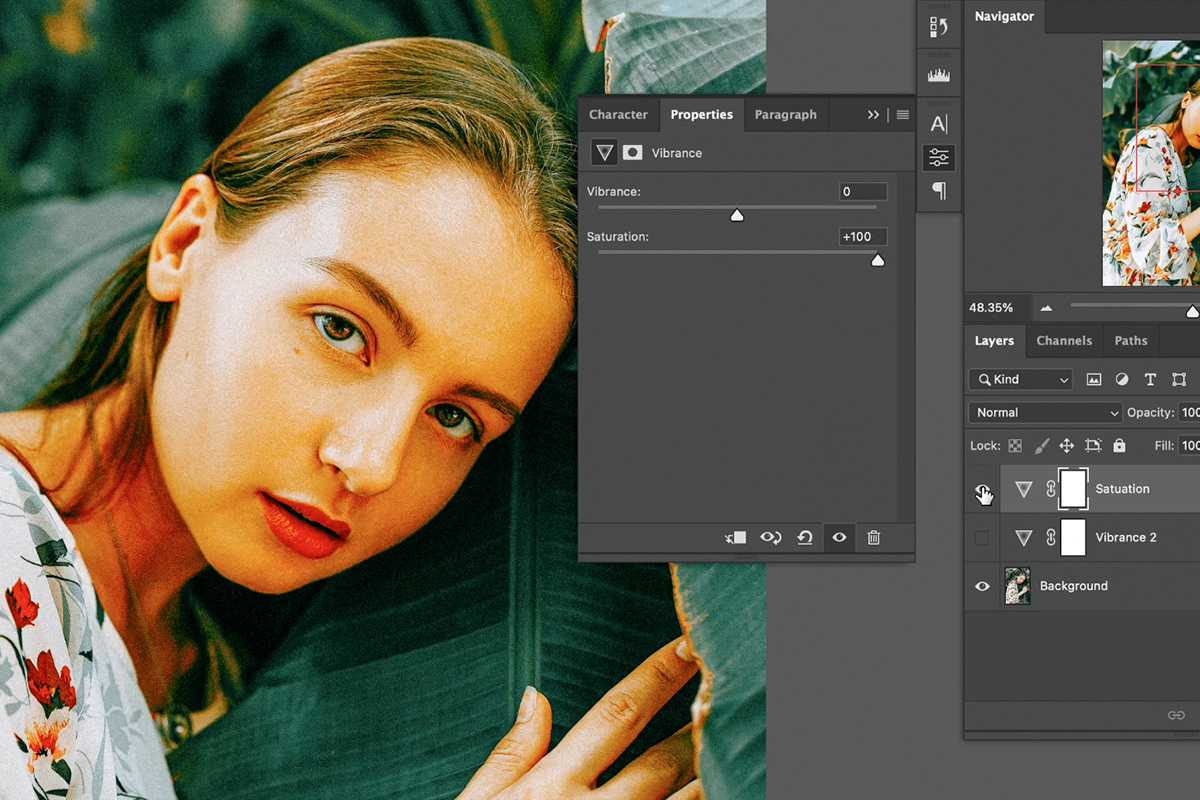
Push Saturation to maximum on the copy
Leave Vibrance at zero on this one, then turn the two layers on and off against the original. The big difference is in the skin tone.
The rule that falls out of this: if there is a person in the photograph, reach for Vibrance.
Need More? Stack Vibrance Instead of Switching to Saturation
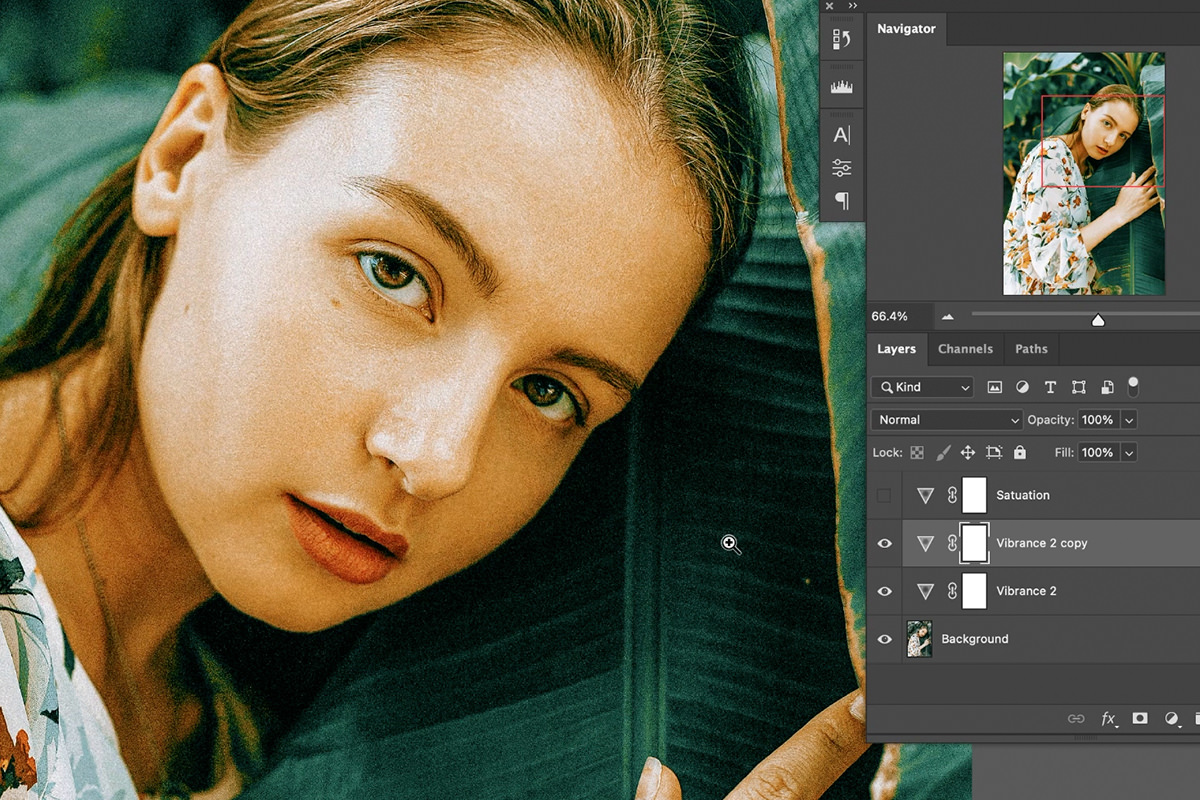
The usual reasoning is that Vibrance at 100 has run out, so Saturation must be next. It hasn’t, and it doesn’t.
Duplicate the Vibrance layer with Cmd/Ctrl + J. The effect compounds — and because each pass still applies the same weighting, the least-saturated colors keep receiving most of the increase and skin keeps being protected.
Even with two Vibrance layers, the effect still looks a lot better than just cranking up Saturation, especially in skin tones. That’s the practical takeaway: the ceiling on Vibrance is not the slider, it’s how many layers you’re willing to stack.
And because they’re separate layers, each has its own opacity and its own mask, so you can fade or restrict any pass independently.
Protecting Skin Precisely with Color Range
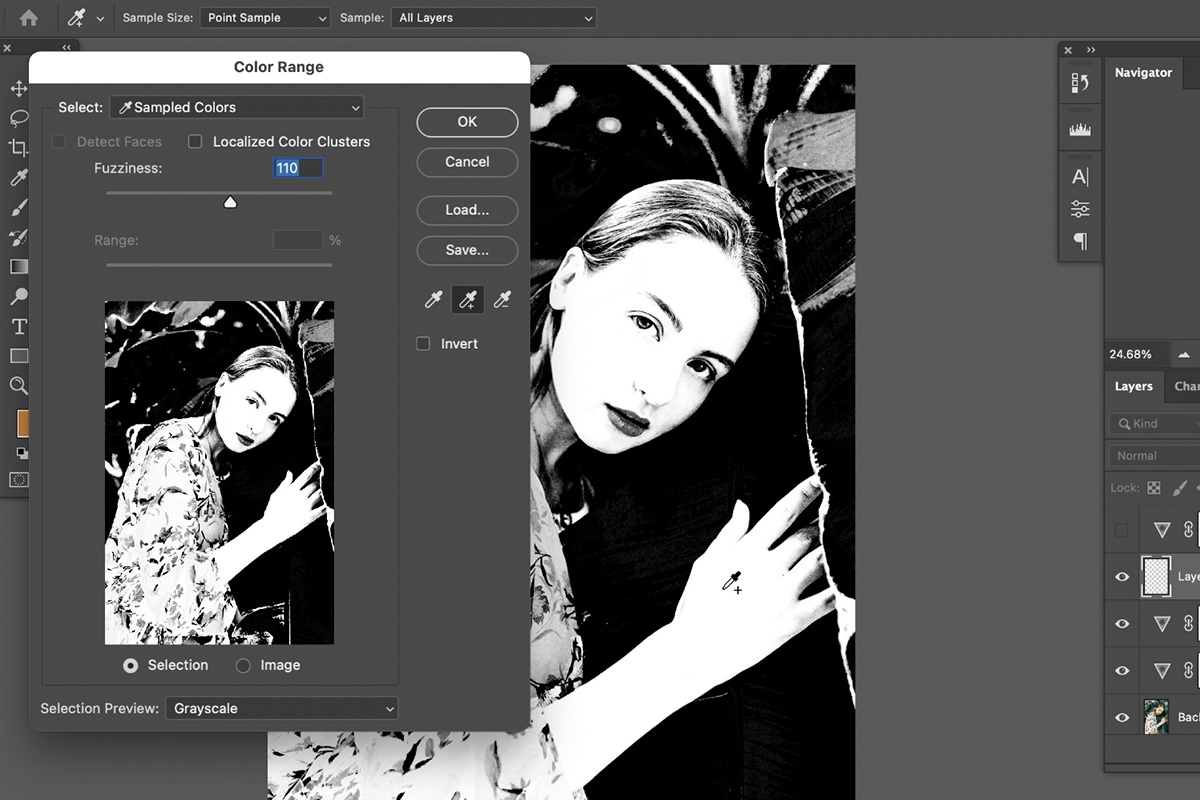
Sometimes even Vibrance is slightly too much on the face while being right everywhere else. Rather than backing the whole thing off, remove it from the skin only.
-
Select › Color Range
Click the subject’s skin with the eyedropper. In the preview, white areas are selected and black areas are not — so you’re looking for the face and hands to go white.
-
Use the plus eyedropper to add tones
Skin spans a range across highlights and shadows. Use the + eyedropper to add a couple more areas until the whole face and the hands are white.
-
Click OK
The white areas become an active selection. The skin needs to stay selected for the next step.
-
Click the Vibrance layer’s mask and paint black
With the selection still active, take a black brush and paint over the skin. Because the selection constrains the brush, you cannot stray outside it — so this is fast rather than fiddly. Cmd/Ctrl + H hides the marching ants while you work.
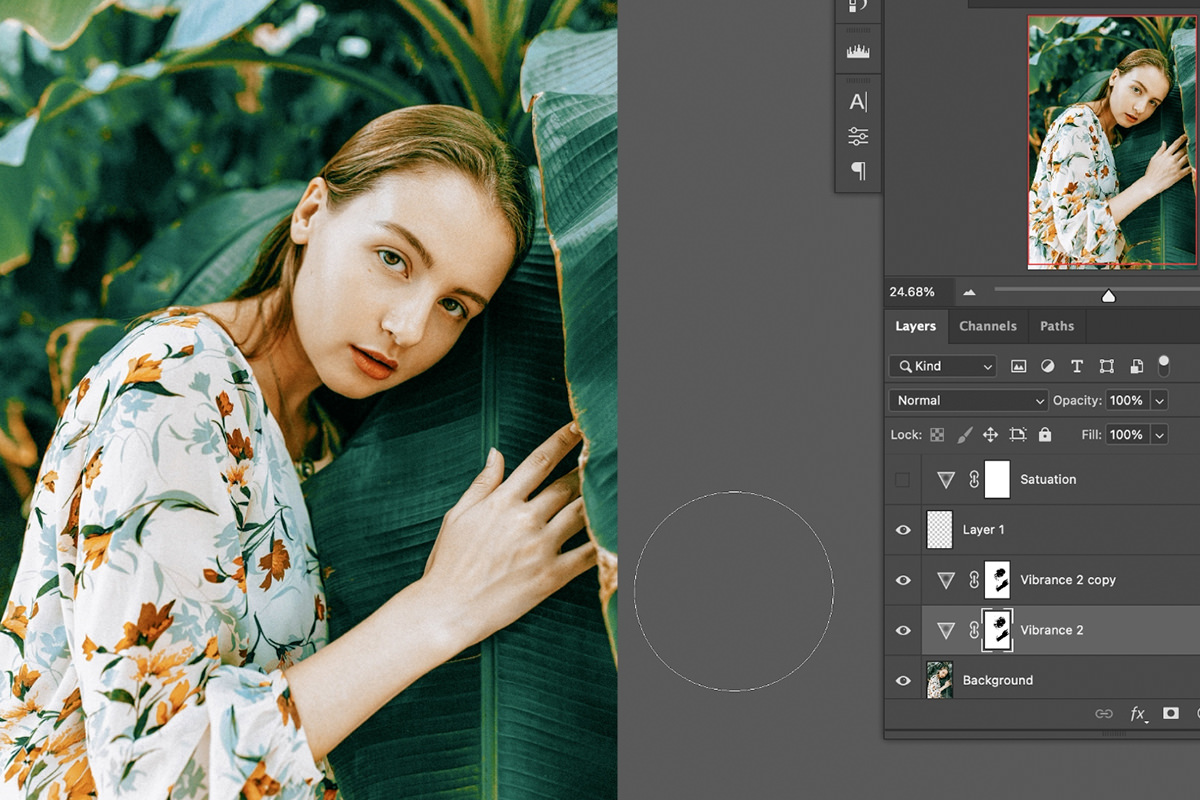
Do the same on the other Vibrance layer’s mask. The skin returns to its original color from the original photo while everything else keeps the boost. Alt/Option-click the mask thumbnail to inspect it — you should see a black silhouette of the face and hands on white.
Copy a mask between layers
Having built that mask once, you don’t need to build it again. Hold Alt/Option and drag the mask thumbnail onto another layer and it copies across — Photoshop asks whether to replace the existing one; say yes.
Drag without the modifier and you move the mask rather than copying it. The modifier is what makes it a duplicate, and it’s the same behavior as copying layer effects.
In the tutorial, the mask goes onto the Saturation layer. Turn that layer on: with the skin blacked out it looks really nice and brings out the colors in her shirt. Paint black around the face wherever the Saturation still affects the skin, then bring the layer’s Opacity down a little (it ends up at 60%).
When Saturation Is Actually the Right Choice
Saturation isn’t a bad tool, it’s a blunt one, and there are photographs where blunt is correct.
With no people in the frame there’s nothing to protect, and Saturation’s even treatment is often exactly what a landscape or a product shot wants. It’s also the better choice when you’re reducing color — pulling Saturation down desaturates evenly, while pulling Vibrance down leaves already-saturated colors largely untouched and can look uneven.
And with a skin mask in place, Saturation becomes safe to use even on portraits — masked off the face, it can lift the color in clothing or background where Vibrance alone was too gentle.
Where These Sliders Go Wrong
Using Saturation on people
The single most common color mistake. Vibrance exists precisely for this.
Assuming Vibrance at 100 is the limit
Stack a second layer instead of switching sliders.
Sampling one point in Color Range
Skin spans a wide range of tones. Add several samples with the plus eyedropper.
Judging color zoomed in
Saturation is a whole-image relationship. Zoom out to decide.
Applying it directly rather than as a layer
An adjustment layer gives you opacity, a mask and the ability to change your mind. Image › Adjustments gives you none of that.
Losing the selection
Keep the Color Range selection active while you paint on the mask. Cmd/Ctrl + H only hides its edges.
One Slider Knows About Skin
That’s the whole distinction, and it’s worth remembering in that form: Saturation treats every color identically, Vibrance doesn’t, and the difference is built specifically around the range human skin occupies.
Run the two-layer test on a portrait of your own. Seeing maxed Saturation against maxed Vibrance on a face you know well makes the point far better than any explanation.
Quick Reference: Keys, Menus and Settings
- Vibrance layerLayer > New Adjustment Layer > Vibrance; one panel holds both sliders
- Duplicate or stackCmd/Ctrl + J; rename the copy Saturation
- Select the skinSelect > Color Range, click the skin, plus eyedropper, OK
- Hide it on the skinB, paint black on each Vibrance mask; Cmd/Ctrl + H hides the selection edges
- View the maskAlt/Option-click the mask
- Copy the maskAlt/Option-drag it onto the Saturation layer, replace: Yes; then lower its Opacity
No AI, no generative credits.
Free Downloads
Follow Along on the Same Photo
Get the portrait sample image from the video and the 3-page PDF guide, from the first Vibrance layer to the masked Saturation layer. Free with a PHLEARN account.
Vibrance vs Saturation: Common Questions
What is the difference between Vibrance and Saturation?
Saturation brings up all of the colors in intensity by the same amount. Vibrance brings up a lot of the colors too, but it protects skin tones.
Should I use Vibrance or Saturation on a portrait?
Vibrance. Push each slider all the way up on its own layer and compare: the big difference is in the skin tone, which Saturation pushes much too far.
Where are the Vibrance and Saturation sliders?
Go to Layer > New Adjustment Layer > Vibrance. The one adjustment layer holds both sliders, Vibrance and Saturation.
Vibrance is all the way up. How do I get more?
Duplicate the Vibrance layer with Cmd/Ctrl + J instead of switching to Saturation. Even with two Vibrance layers, the result looks better than maxed Saturation, especially in skin tones.
How do I select just the skin?
Go to Select > Color Range and click the skin with the eyedropper. Add a couple more areas with the plus eyedropper until the face and hands are light in the preview, then click OK.
How do I take the color boost off the skin only?
Keep the skin selection active, click the Vibrance layer’s mask, press B and paint black over the skin. Do it on each Vibrance layer; Cmd/Ctrl + H hides the selection edges while you paint.
How do I check what my mask is hiding?
Hold Alt/Option and click the layer mask. You should see black just where the skin is. Alt/Option-click again to go back to the image.
How do I copy a layer mask to another layer?
Hold Alt/Option and drag the mask onto the other layer. Photoshop asks whether to replace the layer mask; click Yes.
Is Saturation ever the right choice?
Yes, with no people in the frame, or when you are reducing color. On a portrait, mask the skin out first: in the tutorial the masked Saturation layer brings out the shirt at a lower Opacity.
Is the sample file free?
Yes, with a free PHLEARN account. You get 1 sample image and 1 PDF guide: the portrait from the video and the 3-page step-by-step guide.
Master Photoshop, Lightroom and Photography
Join PHLEARN PRO for $12.99 a month or $99.99 a year. Cancel anytime, with a 100% money-back guarantee.





