Download the Sample Image
description
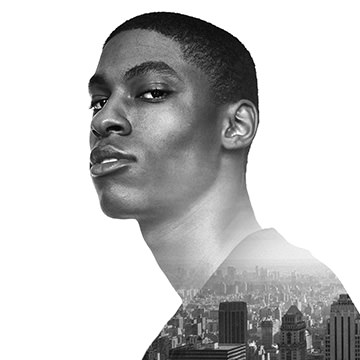
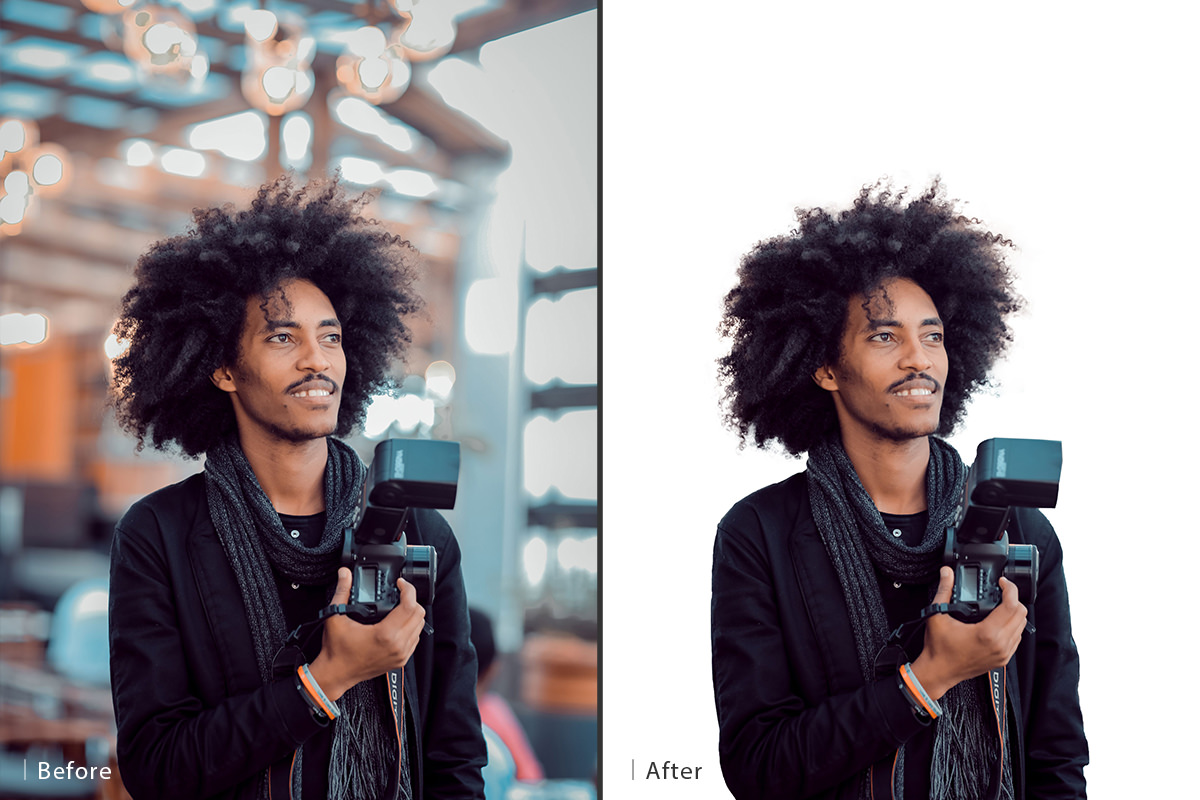
Working with hair in Photoshop can be a major challenge–especially when you need to cut it out from the background. Learn how to use smart tools like Select Subject and Select and Mask to make the process of cutting out hair easier than ever!
This is Day 27 of our 30 Days of Photoshop series. Follow along with all 30 episodes as we explore the magic of Photoshop together!
Watch Next
30 Days of Photoshop

Sign up to receive email updates to keep you going, sample images to follow along, and a printable calendar to keep track of your progress!
Share

Hair Cutouts Made Easy!
How to Cut Out Hair
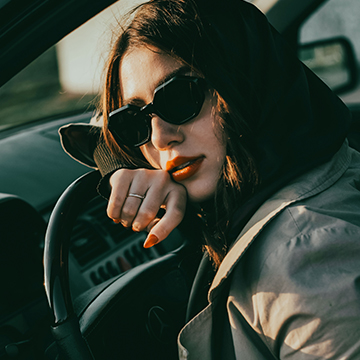
Hair continues to be one of the most challenging things to select and cut out in Photoshop. When something in an image has a hard, defined edge, like a mug or a car, we can turn to super accurate tools like the Pen Tool to make quick work of the selection. But when something has a soft and detailed edge, like a wild head of hair, things get tricky. The Pen Tool likely won’t work in these situations, and even if it would, it would take hours to do what should take minutes. So how do we get accurate selections of soft details in an image?
Fortunately, we can make also selections using the light and color information in a photo (as opposed to visually recognizing the edge and tracing it with a tool). Options like Select Color Range, Select Subject, and Channels are all fantastic option when you need to cutout something more complex. Combined with Select and Mask, we have a versatile suite of tools that will allow us to cut out anything in Photoshop!
Select Subject
For today’s example, we’re going to focus on one of Photoshop’s newer selection tools, Select Subject. Designed to be easy and automatic, Select Subject will try to identify and select what it things is the subject in a photo. As with most selection tools, it will have an easier time if the subject is clearly separated from the background, whether it be by color, focus, or contrast.
Our example image was taken with a relatively shallow depth of field, leaving the subject in focus and the background out of focus. This makes it easier for automated tools like Select Subject (or Select Focus Area) to identify what you want selected.
Using automated tools will usually only get us part of the way there. While the smart tools in Photoshop do work really well under the right circumstances, they’re not always perfect. This is especially true with soft and detailed areas like hair. That’s where Select and Mask comes in, allowing us to further refine our selections to get smooth and seamless cutout.
Select and Mask
Select and Mask has a variety of tools that help us control what to included and not included as part of a selection. One such option is the Refine Edge Tool, which gives us the ability to simply paint around an edge and have Photoshop try and make a more precise selection around the finer details.
By using Select Subject to get a rough cutout of the subject, and then the Refine Edge Tool within Select and Mask to paint the details back in, we’re pretty close to having an almost perfect selection of the subject and their hair!
For some images, this might be enough. But if not, we can output this selection to a Layer Mask where we can make some final adjustments with the Brush Tool.
Layer Masks
As you’ve likely noticed by now, selections are a constantly evolving part of an edit. Sometimes you might get it in one go, like if you’re using the Pen Tool to cut out something with a hard edge. But when you’re working with more delicate areas like hair, it’s something you might spend time on using a handful of tools to get it right.
Layer Masks are the foundation of making selections and cutouts in Photoshop. Once you’ve refined a selection with a Select and Mask, you can output that selection to a Layer Mask. As a Layer Mask, the selection is converted into only two colors; black and white. Selected areas are filled with white and those areas of the Layer will remain visible. Unselected areas are filled with black and those areas will be made invisible. This is what allows us to cut people out and place them on a new background. We first make a selection of the person, load the selection as a Layer Mask making the person visible and the background invisible, and then we can place that person on top of a new background on the Layer Stack.
When Select and Mask can’t get a selection to a point where you’re happy with it, you can try editing the newly made Layer Mask directly. To do this, view the Layer Mask, select the Brush Tool, set the Brush Blend Mode to Overlay, and paint with black along any edges that you want to clean up. This will fill any soft, gray areas with black while protecting the finer details of the selection which will appear as pure white.