

description
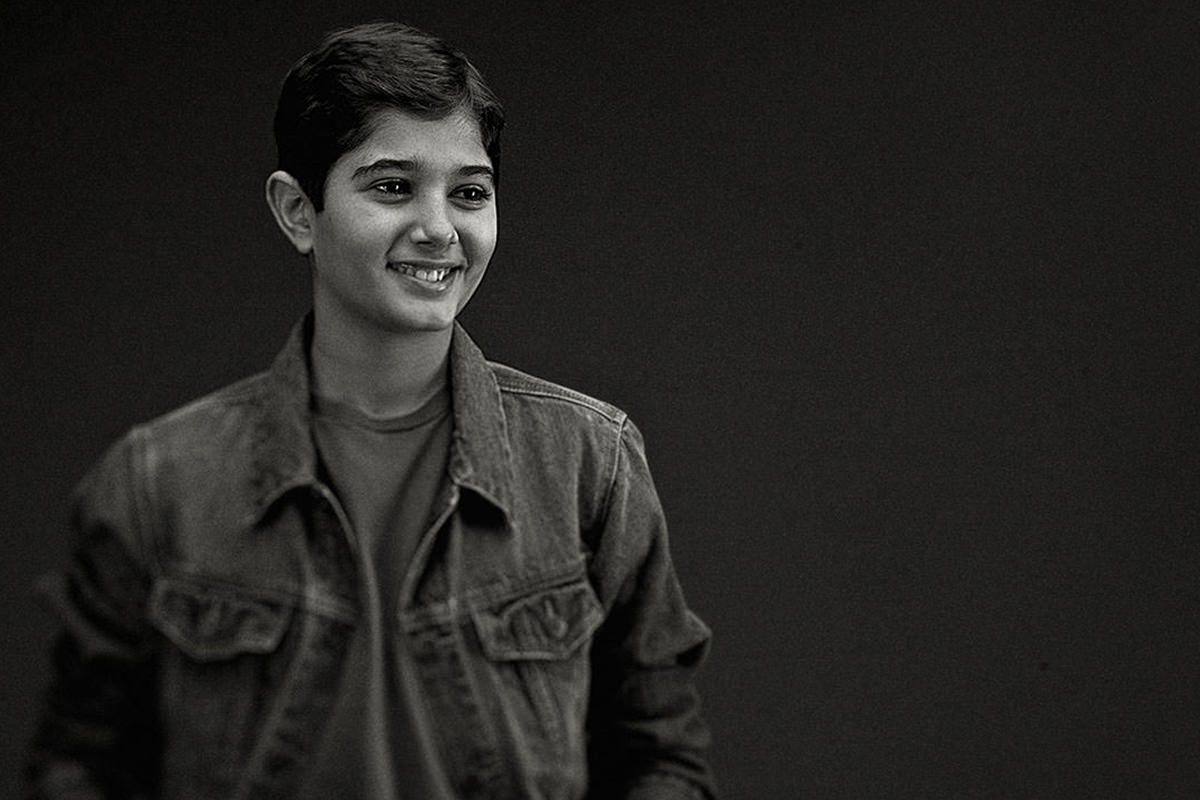
A black and white conversion is only the starting point. This free tutorial stretches a backdrop to fill the frame, builds a soft vignette, and then splits sharpening into two High Pass passes — one pushed far harder than usual, with Blend If hiding the harsh dark edges it creates, and one gentle pass across the whole image. A Field Blur keeps attention on the face, and film grain is built on a resized copy so it reads at the right scale.
Enjoying This Free Tutorial?
We publish a new free tutorial every week, each one with sample images and PSDs you can download and follow along with. Sign up and they land straight in your inbox, along with early word on sales, events and subscriber-only offers.
How to Stylize a Black and White Portrait in Photoshop
Converting a portrait to black and white is only the first step toward a genuinely stylized look. This tutorial extends a stretched backdrop, adds a soft vignette, works through two different sharpening passes with a trick for pushing High Pass further than usual, and finishes with hand-built film grain for a more polished, intentional black and white result. For the fundamentals of the conversion itself, see Black and White in Photoshop: Master It in 8 Chapters.
Extending the Backdrop With the Marquee Tool
A seamless backdrop that doesn’t quite reach the edge of the frame is an easy fix before any other work begins.
-
Select the Backdrop Edge
Press M for the Marquee tool and select a strip of the backdrop near the edge that needs extending.
-
Transform and Stretch It
Press Cmd/Ctrl+T to transform the selection, then drag the edge handle outward to stretch the backdrop to cover the gap.
-
Deselect
Press Cmd/Ctrl+D to deselect once the backdrop covers the full frame.
Converting to Black and White
Photoshop’s dedicated Black and White adjustment gives far more control than simply desaturating the image.
-
Add a Black and White Adjustment Layer
Add a Black and White adjustment layer, which comes loaded with a set of presets to experiment with as a starting point.
-
Customize the Channel Sliders
Adjust the individual color sliders directly to fine-tune exactly how bright or dark each original color reads in the black and white conversion, rather than settling for a preset.
-
Leave Tint Off for This Look
Skip the Tint option at this stage, since a fully neutral black and white base works best for the sharpening and grain that come later.
Building a Soft Vignette
A darkened, blurred border around the frame helps direct attention toward the subject before the sharpening work begins.
-
Add a Darkening Curves Layer
Add a Curves adjustment layer and drag the curve down to darken the image.
-
Invert the Mask and Select Around the Subject
Press Cmd/Ctrl+I to invert the mask to black, use the Marquee tool to select a rectangle around the subject, then invert that selection so the surrounding border is selected instead.
-
Fill and Blur the Selection on the Mask
Fill the selected border area with white on the mask, then go to Filter > Blur > Gaussian Blur to soften the edge of the vignette.
Sharpening With a Deliberately Pushed High Pass
Before sharpening, the vignette layer needs to be hidden so its darkened edges don’t get sharpened along with the subject.
-
Turn Off the Vignette Layer
Hide the vignette layer’s visibility so it isn’t affected by the sharpening steps that follow.
-
Stamp a Visible Layer and Duplicate It
Create a new layer, press Shift+Option/Alt+Cmd/Ctrl+E to stamp a merged layer, then press Cmd/Ctrl+J to make a second copy for a separate sharpening pass.
-
Set to Linear Light and Push High Pass Further Than Usual
Change the first stamped layer’s blending mode to Linear Light, then go to Filter > Other > High Pass and push the radius higher than you normally would (about 20 pixels here), even to the point where it starts to look too strong.
-
Tame the Darks With Blend If
Double-click the layer, hold Alt/Option, and drag the underlying layer’s black slider from left to right so the harsh dark edges the aggressive High Pass introduced are hidden, while the sharpened highlights stay visible.
Why Pushing High Pass This Far Still Works
Cranking a High Pass sharpening radius up usually looks bad because the darkened edges it introduces become too heavy and obvious. What tends to still look good even at a strong radius are the lightened edges, so restricting the layer with Blend If to hide just the problematic darks, while keeping the flattering lights, makes it possible to push the effect much further than a straightforward High Pass application would allow.
A Second, Lighter Sharpening Pass
A gentler second sharpening layer adds a more general, even sharpness across the whole image.
-
Set the Second Layer to Linear Light and Apply a Lower-Radius High Pass
Change the second duplicated layer’s blending mode to Linear Light, then apply another High Pass filter, this time at a noticeably lower radius for a more general sharpening effect.
-
Re-Enable and Fine-Tune the Vignette
Turn the vignette layer’s visibility back on and lower its opacity slightly if it looks too strong alongside the new sharpening.
Softening the Bottom of the Frame With Field Blur
A little extra blur away from the face helps pull attention back up toward the subject’s expression.
-
Stamp Another Visible Layer
Create a new layer and press Shift+Option/Alt+Cmd/Ctrl+E to stamp everything visible onto it.
-
Apply Field Blur With Multiple Pins
Go to Filter > Blur > Field Blur, click a pin directly on the subject’s face and set its blur amount to zero, then add another pin lower in the frame with a small amount of blur.
Why the Field Blur Targets the Bottom of the Frame, Not the Face
Adding blur across an entire image treats every part of the frame as equally important, which works against drawing attention to any one area. Placing a zero-blur pin directly on the face and a small amount of blur lower in the frame keeps the subject’s expression the sharpest part of the image without an obvious, heavy-handed blur effect anywhere else.
Adding Film Grain on a Separate, Resized Document
Grain that looks convincing at web size needs to be built on a smaller copy of the image rather than the full-resolution original.
-
Stamp a Visible Layer and Duplicate It to a New Document
Stamp a new visible layer, right-click it, choose Duplicate Layer, and set the destination to New Document.
-
Resize the New Document
In the new document, go to Image > Image Size and set the width to something like 1,000 pixels, matching roughly the size the image will actually be viewed at online.
-
Fill a New Layer With 50% Gray
Add a new layer, press Shift+Delete to open the Fill dialog, and choose 50% Gray.
-
Add Monochromatic Noise
Go to Filter > Noise > Add Noise, choose either Uniform or Gaussian, and check Monochromatic since this is a black and white image.
-
Set the Noise Layer to Soft Light
Change the noise layer’s blending mode from Normal to Soft Light and lower its opacity until the grain looks natural rather than overwhelming (17% here).
Why Grain Needs Its Own Smaller, Separate Document
Adding noise directly to a full-resolution image makes the individual grain particles too small relative to the file, so the effect all but disappears once the image is viewed at a normal size. Building it instead on a duplicated document resized down to roughly its final display size means each grain particle reads at the correct visual scale, and working on a duplicate keeps the full-resolution original completely untouched for any future edits.
Grouping the Finished Layers
With every step complete, grouping the layers keeps the final file organized.
-
Select and Group Everything
Shift-click to select every layer used in the edit, then press Cmd/Ctrl+G to group them together.
Why This Approach Works
Blend If is what makes it possible to push the first High Pass sharpening pass much harder than it could otherwise go, hiding only the darkened edges that make an aggressive sharpen look bad while keeping the flattering highlights. Splitting sharpening into two separate passes, one pushed hard and restricted, one gentle and general, gives more control than a single sharpening step ever could. Building the grain on its own resized document, rather than the full-resolution file, follows the same instinct running through the whole tutorial: match the technique to the actual scale and context the image will be seen at, rather than applying it uniformly and hoping it holds up.
Final Thoughts
None of these individual techniques — extending a backdrop, a vignette, layered sharpening, hand-built grain — take very long on their own, which is part of what makes this stylized black and white treatment worth adding to any portrait. Keeping a resized duplicate for grain, rather than working on your original file, is a small habit that saves real frustration down the line if you ever need to go back and re-edit the full-resolution image.
Quick Reference: Keys, Menus and Settings
- Extend the backdropM, select a strip, Cmd/Ctrl + T and drag, Cmd/Ctrl + D
- ConvertBlack & White adjustment layer, presets or custom sliders, Tint off
- Stamp for sharpeningVignette off, Shift + Alt/Option + Cmd/Ctrl + E, then Cmd/Ctrl + J
- Pushed sharpeningLinear Light, Filter > Other > High Pass about 20 px, Alt/Option-drag the Underlying Layer black slider
- General sharpeningLinear Light, High Pass at a lower radius
- Soften the bottomFilter > Blur > Field Blur, a pin at 0 on the face
- GrainDuplicate Layer to a new document; Shift + Delete, 50% Gray; Add Noise, Monochromatic; Soft Light at about 17%
Stylized Black and White Portraits: Common Questions
The seamless doesn’t reach the edge of the frame. How do I fix it?
Press M for the Marquee tool and select a strip of the backdrop near that edge. Press Cmd/Ctrl + T, drag the side handle out to stretch it over the gap, then Cmd/Ctrl + D to deselect.
What’s the best way to convert the portrait to black and white?
A Black & White adjustment layer. Try its presets, like Blue Filter or Darker, as a starting point, then move the color sliders yourself. Aaron leaves Tint off for this look.
How is the soft vignette made?
A Curves layer pulled down a little, with a mask that is white around the edges and black over a Marquee rectangle around the subject. Filter > Blur > Gaussian Blur on the mask softens the edge.
Why turn the vignette off before sharpening?
The vignette can show banding. If it is visible when you stamp the layer for sharpening, the sharpening picks up those bands too.
How can I push High Pass sharpening further without it looking bad?
Set the stamped layer to Linear Light and use a big radius, about 20 pixels here. Then double-click the layer, hold Alt/Option and drag the Underlying Layer black slider to the right. The harsh darks drop out and the lights stay.
Why are there two sharpening layers?
Duplicate the stamp with Cmd/Ctrl + J before you start. The first copy gets the pushed High Pass; the second, also on Linear Light, gets a lower radius for general sharpening across the image.
What does the Field Blur add?
On a new stamp visible layer, Filter > Blur > Field Blur with one pin on the face set to 0 and one lower in the frame with a little blur. It takes some detail out of the bottom so you look at his face.
Why add grain on a smaller copy of the image?
On a full-size file the noise is so small the effect gets lost. Right-click the stamp, choose Duplicate Layer to a new document and resize that with Image > Image Size, so you never save over the full-resolution original.
How do I make the grain layer?
Make a new layer, press Shift + Delete and fill it with 50% Gray. Run Filter > Noise > Add Noise with Monochromatic checked, set the layer to Soft Light and lower the opacity; 17% works here.
Master Photoshop, Lightroom and Photography
Join PHLEARN PRO for $12.99 a month or $99.99 a year. Cancel anytime, with a 100% money-back guarantee.





