

Download Assets
This tutorial includes 4 sample images, 1 sample PSD and 1 PDF guide. Downloads are free with a PHLEARN account.
- Download the sample images and PSDs from every free tutorial on PHLEARN
- New free tutorials published every week
- One free account — sign up once, then download anything
Free PDF Guide · 3 Pages
This Tutorial as a Step-by-Step PDF
Every step from the video in order: Remove Background, zooming out and the Rotate tool for scale and placement, the Harmonize button, clicking through variations, Select Sky for the sky layer, and the Blend If and Screen fallback when Harmonize won’t do a sky. Keep it next to your keyboard.
description
The Harmonize tool matches a pasted object to the photograph it lands in. It works well on objects, unevenly on people, and badly on skies. This AI-powered feature automatically matches color and light to seamlessly blend objects into a scene, making them appear as if they were photographed together. Learn the best practices for using this tool and when to rely on traditional methods.
Enjoying This Free Tutorial?
We publish a new free tutorial every week, each one with sample images and PSDs you can download and follow along with. Sign up and they land straight in your inbox, along with early word on sales, events and subscriber-only offers.
Image Source
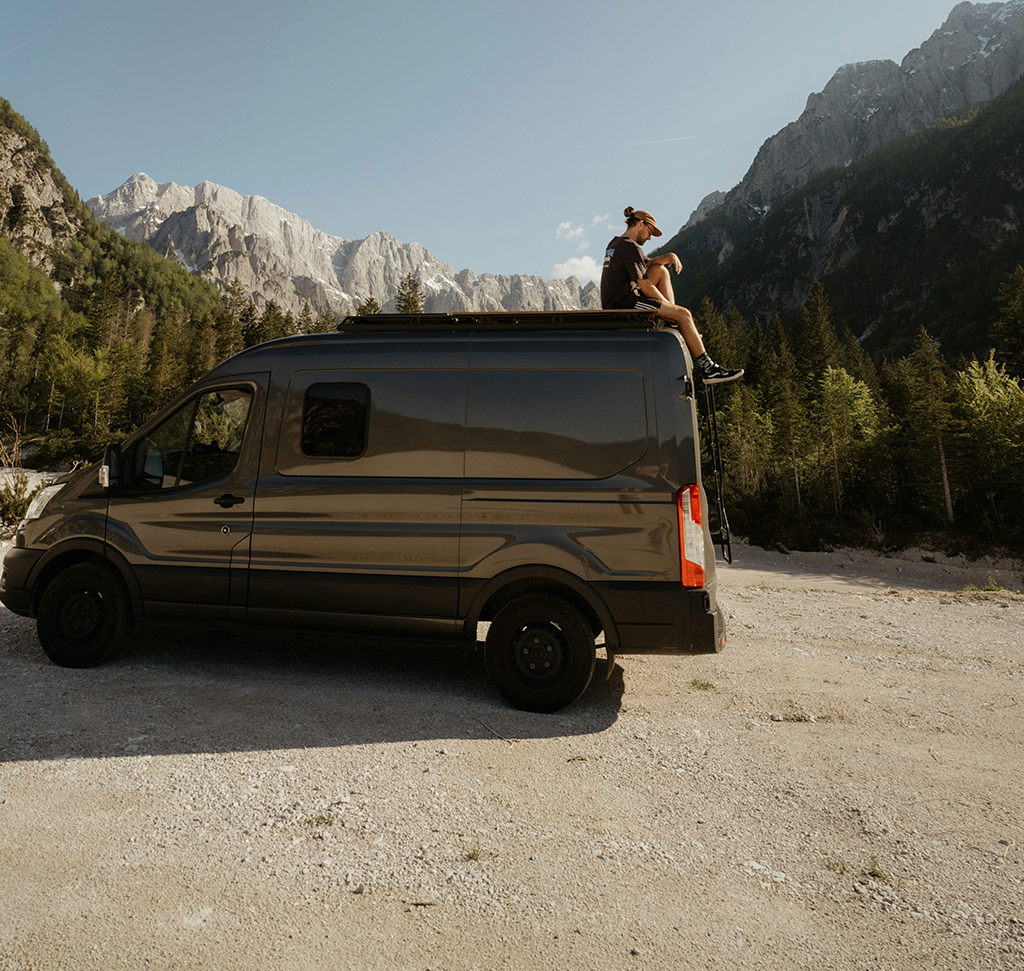
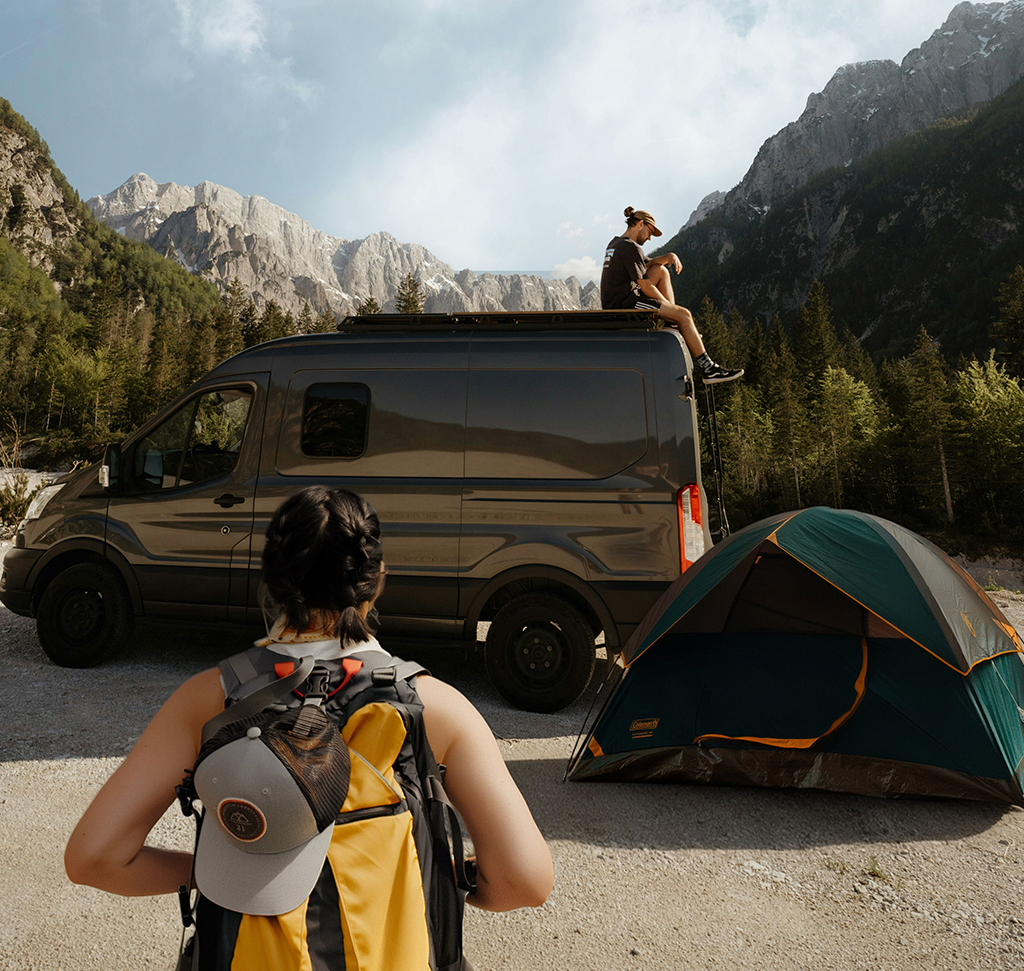
How to Use the Harmonize Tool in Photoshop Beta
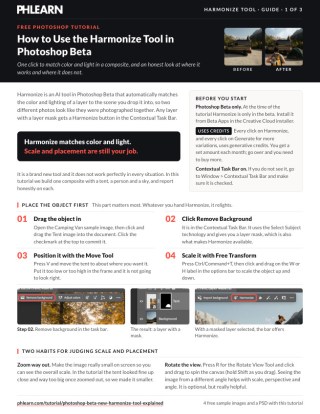
Harmonize is an AI tool in Photoshop Beta that automatically matches the color and lighting of a composited layer to the scene you have dropped it into. Any layer with a layer mask gets a Harmonize button in the Contextual Task Bar — one click, and Photoshop relights the object to belong in the frame.
It is genuinely good at some things and genuinely poor at others. This tutorial builds a composite — a tent, a person, and a sky — and reports honestly on where it works, where it falls apart, and what to use instead.
Two practical notes before starting. It is beta-only, so install Photoshop Beta from Beta Apps in the Creative Cloud installer. And it consumes generative credits on every click — including every time you press Generate for another set of variations. Your plan includes a monthly allowance; beyond that you buy more.
Place the Object First — This Matters Most
Harmonize adjusts color and light. It does not fix perspective, scale, or placement. Whatever you hand it, it relights — a badly sized object comes back as a badly sized object that is beautifully lit.
So the work you do before clicking Harmonize determines the result.
-
Drag the object in and commit it
Click the checkmark in the Contextual Task Bar. If you cannot see the bar, enable it under Window ? Contextual Task Bar.
-
Click Remove Background
This runs Select Subject and creates the layer mask — which is also what makes Harmonize available.
-
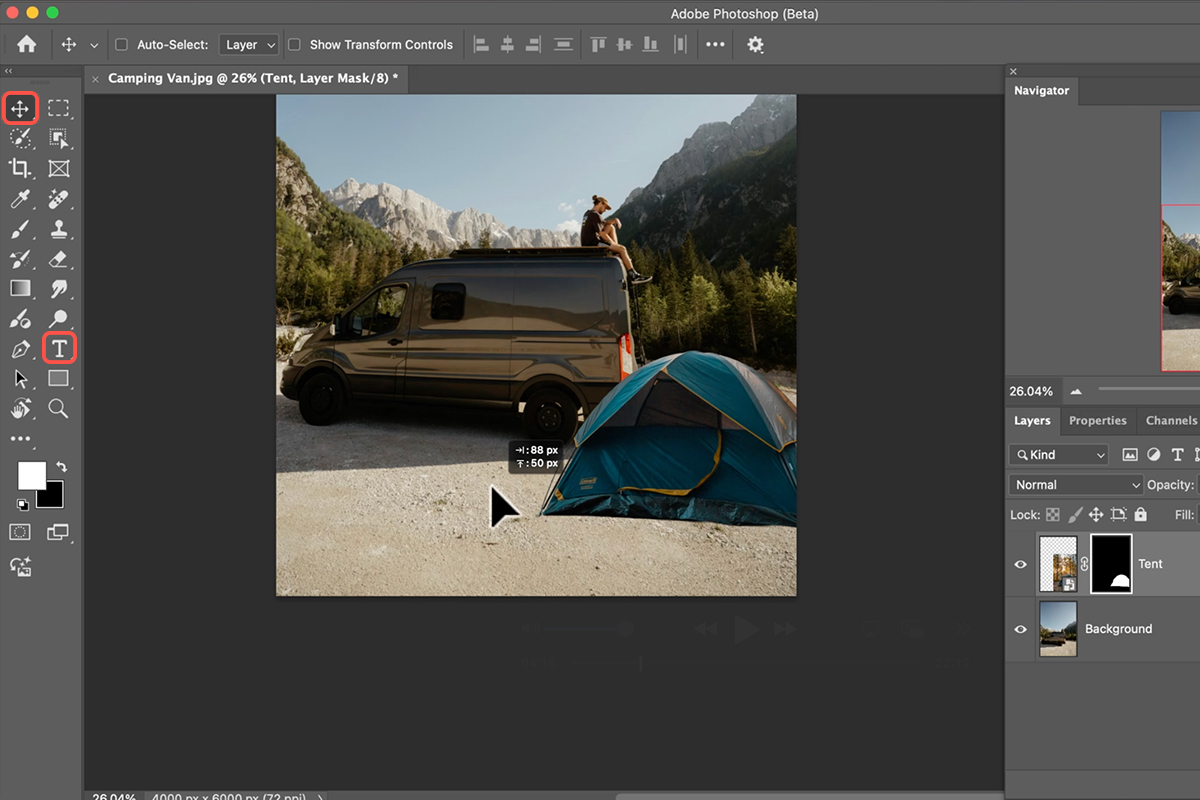
Position with the Move Tool
Press V and place it roughly.
-
Scale with Free Transform
Ctrl+T or Cmd+T, then scrub the W or H field in the options bar.
Zoom Out to Judge Scale
The single most useful habit here: zoom the image right out until it is small on screen.
Scale errors that are invisible at 100 percent are obvious at thumbnail size. A tent that looked reasonable while you were nudging it turns out to be far too large the moment you can see the whole frame at once. Height in the frame matters as much as size — place an object too high or too low against the horizon and it will not sit in the scene however well it is lit.
Use the Rotate View Tool
Press R for Rotate View and drag to spin the canvas — hold Shift to snap to increments. This rotates your view, not the image.
Looking at a composite from an unfamiliar angle breaks the habituation that sets in after staring at it for a few minutes, and scale and perspective problems tend to jump out. It is optional, but it is a quick way to get a fresh eye on your own work.
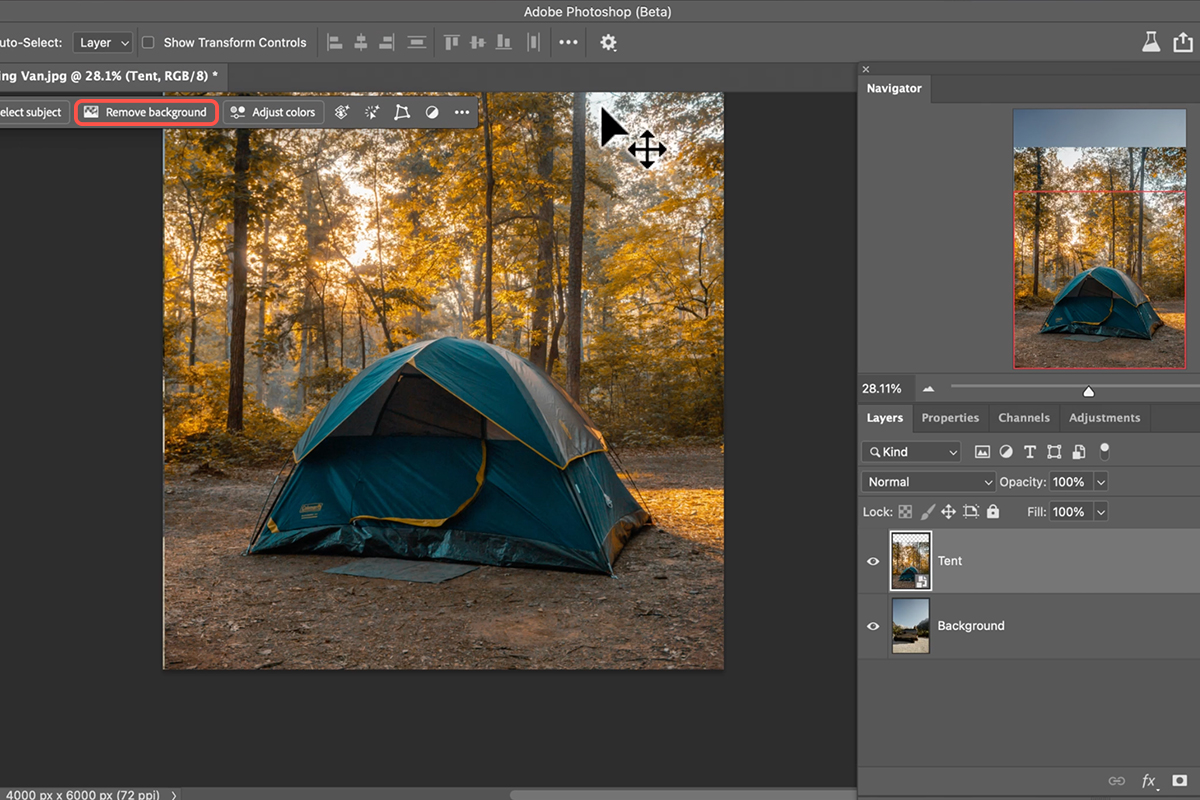
Run Harmonize
With the masked layer selected, Harmonize appears in the Contextual Task Bar. Click it.
Photoshop notes that the feature is still learning and results may vary, then generates several variations in the Properties panel. Click through them.
What to Judge
Look at the shadow first. Harmonize does not only recolor the object — it generates contact shadows, and whether the shadow falls in the right direction with the right softness is what decides if the composite reads.
Then check the light direction against the rest of the frame. Then look for incidental details: on a good variation you may find something you did not ask for, like a faint reflection of the tent in the side of a camper van. That kind of second-order detail is where the tool is impressive.
Press Generate for another set if none work — remembering each press spends credits.
Your Original Layer Survives
Harmonize adds its result as a new layer above your original rather than replacing it. Toggle it to compare, and discard it freely if you dislike it. Nothing you did is lost.
Objects: Works Well
On the tent, it performs. Color and light match, the shadow is convincing, and the object sits in the scene. Matching this by hand with Curves, Levels and hand-painted shadows is slow work and hard to do this well.
People: Depends Entirely on the Face
A backpacker facing away from camera harmonizes well — light direction matched correctly to the existing subject, believable result, better than a manual match in a fraction of the time.
But there is a hard limit worth being clear about. Harmonize regenerates the person. If a face is prominent in frame, what comes back is an AI-generated face, not your subject’s face relit.
So: a person small in the background, or turned away, is fine. A person near camera with their face visible is not. For that, use traditional compositing — adjustment layers, hand-matched color and light — because keeping the actual person is the entire point.
Sky: Do Not Use It
Harmonize is built around the idea of placing an object into a scene, and a sky is not an object. Given a sky layer, it tries to generate shadows and contact lighting for something that has neither, and the result falls apart.
Worth knowing it accepts any layer mask, however made — Select ? Sky works as an input just as Remove Background does. The limitation is not how the mask was created; it is that skies are the wrong kind of subject.
Use Blend If Instead
The right tool for dropping clouds into an existing sky is Blend If, and it takes seconds.
-
Unlink the layer and its mask
Click the chain icon between the thumbnails so you can position the sky independently, then Ctrl/Cmd+T to scale it.
-
Double-click the layer to open Layer Style
Find the Blend If sliders at the bottom.
-
Split the This Layer black slider
Hold Alt or Option and drag one half away from the other. Splitting the slider gives a gradual transition instead of a hard cut.
-
Hide the dark values
Drag inward so the layer becomes invisible where it is dark — which drops the blue of your cloud photo and keeps only the bright clouds.
-
Set the blend mode to Screen and adjust opacity
Screen drops black entirely, so the clouds sit over the existing sky rather than covering it.
Cleaner than a mask, and it keeps the original sky’s color underneath.

An Honest Verdict
Use it for objects. Get scale, placement and perspective right yourself, and it handles color, light and shadow better and faster than doing it by hand.
Use it for distant or turned-away people. Good results where the face is not the point.
Do not use it for skies. Blend If does that job better in less time and costs nothing.
Do not use it for a prominent face. You will get a stranger where your subject was.
It is a beta feature and it is improving, so these boundaries will move. What will not change is the part that is your job: perspective and scale. Harmonize matches light. Everything else you still have to get right.
Quick Reference: Keys, Menus and Settings
- Bring in the objectDrag the image in, Enter, then Remove Background in the contextual taskbar (Window > Contextual Task Bar if hidden)
- Place it properlyV to move, Cmd/Ctrl + T and drag W/H to scale; zoom way out to judge size; R rotates the view for a fresh look
- Run itWith the masked layer selected, click Harmonize in the contextual taskbar; variations appear in Properties, Generate for more
- What to judgeThe shadow and the light direction; the original layer stays underneath the harmonized one
- Sky insteadBackground layer > Select > Sky, then add a mask to the sky layer; unlink the mask to scale the sky freely
- Sky fallback (no Harmonize)Double-click the layer > Blend If > This Layer: Alt/Option-split the black slider and drag right; blend mode Screen; lower Opacity
- CostGenerative credits on every Harmonize and every Generate
Recorded in Photoshop Beta.
Free Downloads
Follow Along on the Same Photos
Get the camper van, tent, hiker and sky images, the layered PSD with every Harmonize result, and the PDF guide. Free with a PHLEARN account.
Harmonize: Common Questions
What does Harmonize do?
It matches the color and light of a masked layer to the scene underneath and adds a shadow, so a dropped-in object looks photographed in place. Any layer with a layer mask shows a Harmonize button in the contextual taskbar.
Why does placement matter so much?
Harmonize changes color and light, not perspective or scale. Zoom way out to judge size, use the Rotate tool to see the composition fresh, and get the object sitting where it would really be before you click.
How did it do on the tent?
Well. It adjusted the color and light and added a convincing shadow; one variation even put a reflection of the tent in the camper van. Judge the variations by the shadow and the light direction.
Does it work on people?
It regenerates the person, so a face close to the camera comes back AI-generated rather than the real face. The video uses a hiker facing away and gets a good result. For a prominent face, match light and color by hand.
Can I use it for a sky?
No. It doesn’t understand that the layer is a sky and tries to shade and shadow it. Use Blend If instead: split the black slider on This Layer to hide the dark blue, set the layer to Screen and lower the opacity.
Does it overwrite my layer?
No. The original stays and the harmonized version sits above it, so you can toggle a before and after or go back.
Does it use generative credits?
Yes, every Harmonize and every extra Generate. You get a monthly allowance; beyond that you buy more.
Aaron’s verdict?
Good for objects and distant people once the scale and perspective are right. Not for skies, not for faces near the camera. Still in beta at recording, still learning.
Are the sample files free?
Yes, with a free PHLEARN account. You get the camper van, tent, hiker and sky images, the layered PSD and the PDF guide.
Master Photoshop, Lightroom and Photography
Join PHLEARN PRO for $12.99 a month or $99.99 a year. Cancel anytime, with a 100% money-back guarantee.





