

Download Assets
This tutorial includes 1 PDF guide. Downloads are free with a PHLEARN account.
- Download the sample files from every free tutorial on PHLEARN
- New free tutorials published every week
- One free account: sign up once, then download anything
Free PDF Guide · 3 Pages
This Tutorial as a Step-by-Step PDF
The 3-page guide walks through importing both photos, flipping and scaling the second one, a tour of the sidebar tools, Layer Properties > Blend Mode > Screen, adding the layer mask to the lower image and painting it with a soft round brush at low Hardness and Flow. Keep it next to your iPad.
description
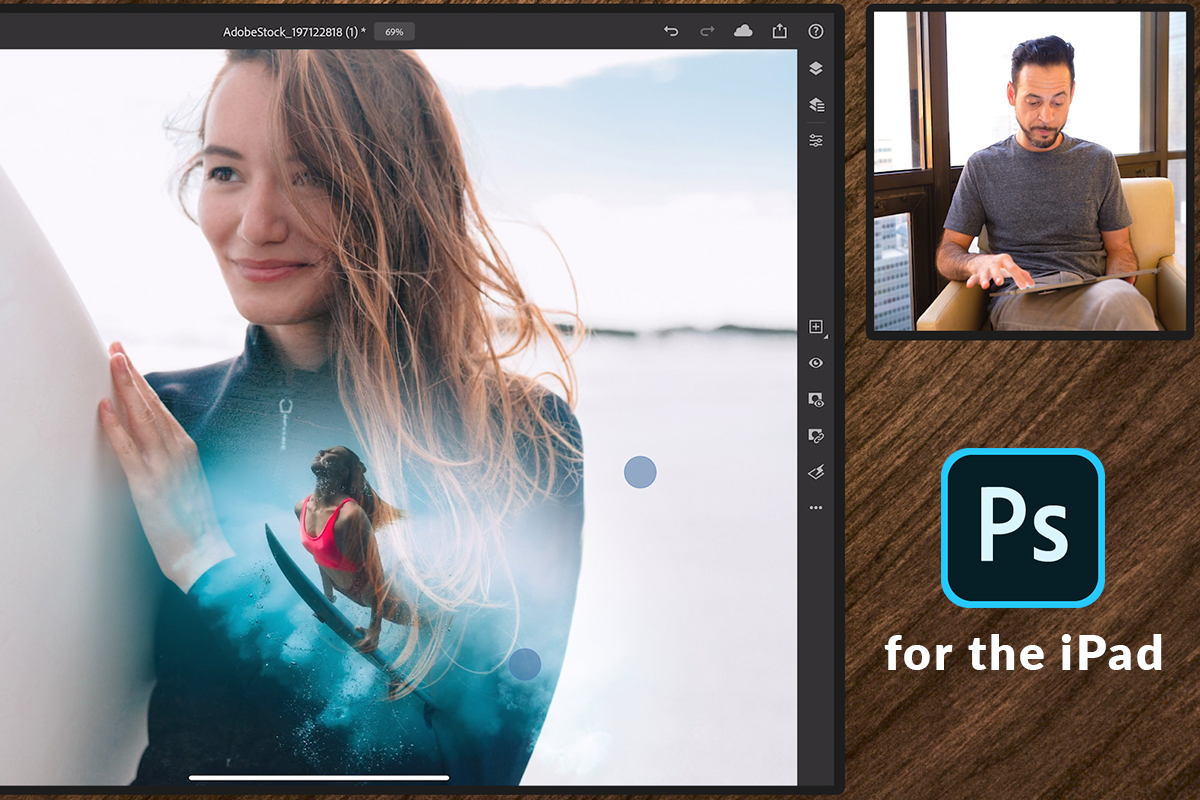
Photoshop for iPad brings real Photoshop editing to a touchscreen — layers, masks, blend modes, adjustment layers — opening the same files as the desktop version rather than offering a stripped-down substitute. This is a tour of the interface and the sidebar toolbar, followed by a double-exposure composite built start to finish entirely on an iPad, including masking the blend with a soft brush.
Enjoying This Free Tutorial?
We publish a new free tutorial every week, each one with sample images and PSDs you can download and follow along with. Sign up and they land straight in your inbox, along with early word on sales, events and subscriber-only offers.

The New Photoshop for iPad
Photoshop for iPad brings real Photoshop editing capabilities — layers, masks, blend modes, adjustment layers — to a touchscreen tablet, opening files right alongside the desktop version rather than offering a stripped-down substitute. Here’s a tour of the interface and a real double-exposure composite built start to finish, entirely on an iPad.
Getting Started: Importing Files on the iPad
The first difference from a typical mobile editing app is what kinds of files Photoshop for iPad can actually open.
-
Import Your Images
Tap Import and open at the bottom of the home screen, choose Files and pick your first photo. Thanks to the new iPad operating system, Photoshop for iPad can open PSDs, TIFFs, and JPEGs, so files started on a desktop can be picked back up directly on the tablet rather than needing a separate export step first.
-
Bring In a Second Image
Tap the image icon just below the Text tool in the sidebar, go back to Files and choose the second photo. It comes in as a new layer on top with the transform controls active: use the controls at the top of the screen to flip it horizontally, drag a corner to scale it down a little, and tap Done.
Touring the Sidebar Toolbar
Before building anything, it helps to know where the familiar Photoshop tools live in the iPad layout.
Selection, Painting, and Retouching Tools
The sidebar starts with the Move tool and the Transform tool, which can also warp and scale, followed by the Lasso, Quick Selection, and Marquee tools grouped together. Below that sit the Brush and Eraser tools — both work with a finger, but support pressure sensitivity when used with an Apple Pencil or another stylus — along with the Paint Bucket and Gradient (nested together), the Spot Healing Brush and the Clone Stamp, plus cropping, text, and a color picker for sampling foreground and background colors.
Cloud Sync and Layer Access
In the top-right corner sit undo/redo controls, automatic cloud upload, export options, and access to the Layers panel — available in both a compact quick-view and a larger expanded view where layers can be toggled on and off individually.
Working with Layers, Masks, and Adjustments
The layers system on iPad carries over most of what a desktop Photoshop user would expect.
-
Create and Manage Layers
Tap the plus icon to add a new regular layer, adjustment layer, or group. Tapping a layer opens its properties, where opacity and blend mode can be adjusted directly.
-
Access Layer Options
Tap the three-dot menu on any layer for more options, including deleting, renaming, and grouping layers. Groups can even have their own masks applied, and layers support standard masks, clipping masks (Aaron was especially glad to see those) and a handful of filters and adjustments like Gaussian Blur and Invert, with more features marked as coming soon.
Building a Double Exposure Composite
With the tools covered, the rest of the tutorial builds a real double-exposure composite from two stock images, entirely with touch controls.
-
Reorder the Layers and Switch to Screen Mode
Drag the background layer above the second image, then open its layer properties and change the blend mode from Normal to Screen. Screen mode hides the dark areas of that layer while keeping the light areas visible, letting the layer beneath show through wherever the top layer is dark.
Why Screen Mode Is the Right Choice for a Double Exposure
On a layer set to Screen, the light areas stay visible and the dark areas become invisible, which is exactly the behavior a double exposure needs: the darker parts of one image disappear so the second image reads through in their place, while the lighter, more prominent parts of the top layer stay visible on top.
Masking the Blend with a Soft Brush
The Screen blend mode does most of the work, but a layer mask fine-tunes exactly where the effect shows up.
-
Add a Layer Mask
Tap the lower layer, the second image, and bring its opacity back up to full if you lowered it. With that layer selected, tap the layer mask button. Hide the panels for a clean workspace, then use the Move tool to scale and position the image where you want it, and tap Done.
-
Paint the Transition by Hand
Select the layer mask (swiping between layer and mask thumbnails switches which one is active), choose a soft round brush and set a medium flow, then paint with black. If the first strokes leave a hard edge, as Aaron’s did, bring Hardness down for a soft brush, then lower the flow further for a gentler, more gradual transition between the two images.
Why Editing on the Go Changes the Workflow
Beyond the feature set itself, the biggest shift is where this kind of editing can now happen — on a plane, in a car, or anywhere a laptop would normally be too much to carry. A tablet that supports pressure sensitivity with a stylus removes the need to also carry a separate drawing tablet, which means a full compositing workflow now fits in a much smaller bag than it used to.
Why This Approach Works
What makes Photoshop for iPad more than a novelty is that it isn’t a simplified companion app — it runs the same core building blocks as desktop Photoshop: real layers, real blend modes, real masks, and file compatibility with PSDs coming straight from a desktop machine. That’s what makes a genuine double-exposure composite, built with a Screen blend mode and a hand-painted layer mask, possible with nothing but a finger and a touchscreen. Anyone who wants to see this same layered approach applied by a working mobile photographer can look at Mobile Editing with Elise Swopes for a different perspective on building a full mobile workflow.
Final Thoughts
The double-exposure composite built here isn’t a simplified demo — it’s the same Screen-blend-mode-plus-layer-mask technique used on desktop, just built entirely with touch. That matters because it means the iPad isn’t limited to quick touch-ups; it’s capable of the same compositing work that used to require a full desktop setup. If Photoshop for iPad is new to you, Adobe’s website has the full feature rundown, and the app itself is available on the iOS App Store. And since a lot of this same cloud-based, cross-device thinking extends to editing raw photos as well, The Ultimate Guide to Lightroom for Desktop & Mobile is a natural next stop for rounding out a fully mobile editing workflow.
Quick Reference: Menus and Settings
- Open the first photoImport and open > Files on the home screen
- Place the second photoImage icon below the Text tool > Files; flip and scale at the top, then tap Done
- Blend the twoDrag Layer 0 to the top, then Layer Properties > Blend Mode > Screen
- Mask the lower imageOpacity back to full, layer mask button, Move tool, Done
- Select the maskSwipe back and forth on the layer thumbnail
- Paint the blendBrush, soft round, black; lower Hardness, then lower Flow
Done with a finger, no stylus. No AI, no generative credits.

Free Downloads
Take the Guide With You
Get the 3-page PDF guide with the app tour, every step of the double exposure and the mistakes to watch for. Free with a PHLEARN account.
Photoshop for iPad: Common Questions
What files can Photoshop for iPad open?
Aaron opens JPEGs with Import and open > Files on the home screen. The app can also bring in PSDs and TIFFs, so a PSD you started at home can be picked up on the iPad.
Do I need an Apple Pencil?
No. Aaron builds the whole composite with his finger. An Apple Pencil or another stylus adds pressure sensitivity, which gives you more control and can drive things like brush size.
Which tools are in the sidebar?
Move and Transform at the top, then Lasso, Quick Selection and the Marquee tools nested together, Brush, Eraser, Paint Bucket and Gradient, Spot Healing Brush, Clone Stamp, Crop, Text, an image icon for placing photos and an eyedropper for sampling colors.
Where do I change opacity and blend mode?
Open the layers on the right and tap the Layer Properties icon. Opacity and Blend Mode both live there. The three-dot menu holds more actions, like delete, rename and group.
Why use Screen for a double exposure?
On a layer set to Screen, the light areas stay visible and the dark areas become invisible. The dark parts of the portrait turn into a window onto the image underneath.
Which layer gets the layer mask?
The lower layer, the second image. Tap it, bring its opacity back up to full if you lowered it, and tap the layer mask button. Then use the Move tool to position it and tap Done.
How do I make sure I’m painting on the mask?
The layer and its mask share one thumbnail spot. A quick swipe back and forth switches between them, so check the mask is active before you paint.
Why does my brush leave a hard edge?
The Hardness is too high. Aaron’s first strokes at a medium flow looked way too hard, so he brought Hardness down for a soft edge, then lowered Flow for a more gradual transition.
Does it have clipping masks and filters?
Yes. The launch version Aaron shows has layer masks, masks on groups, clipping masks and a few filters and adjustments such as Gaussian Blur and Invert, with more features marked as coming soon.
Is there a free download?
Yes, with a free PHLEARN account. You get 1 PDF guide: 3 pages with the app tour, every step of the double exposure and the common mistakes. There are no sample photos; Aaron uses two Adobe Stock images.
From the Magazine View all
Stories, interviews and guides for photographers, new every week.
 EditingLightCraft vs Lightroom: I Edited the Same RAW Files in BothThe free clone on the same RAW files: what matches, what breaks and who should switch.
 InspirationRare Historical Photos: 13 of the Rarest Pictures Ever TakenFrom the earliest surviving picture of a person to the last passenger pigeon: who took each one and why it survives.
 EditingArtCraft: Photoshop Cloned by AI in Two Weeks. Is It Legal?ArtCraft cloned Photoshop and Lightroom with AI and gave them away. Any good? Legal? Safe?
Master Photoshop, Lightroom and Photography
Join PHLEARN PRO for $12.99 a month, or $99.99 a year (save 36%). Cancel anytime, with a 100% money-back guarantee.





