
Download Assets
This tutorial includes 1 photoshop brush. Downloads are free with a PHLEARN account.
- Download the sample images and PSDs from every free tutorial on PHLEARN
- New free tutorials published every week
- One free account — sign up once, then download anything
description
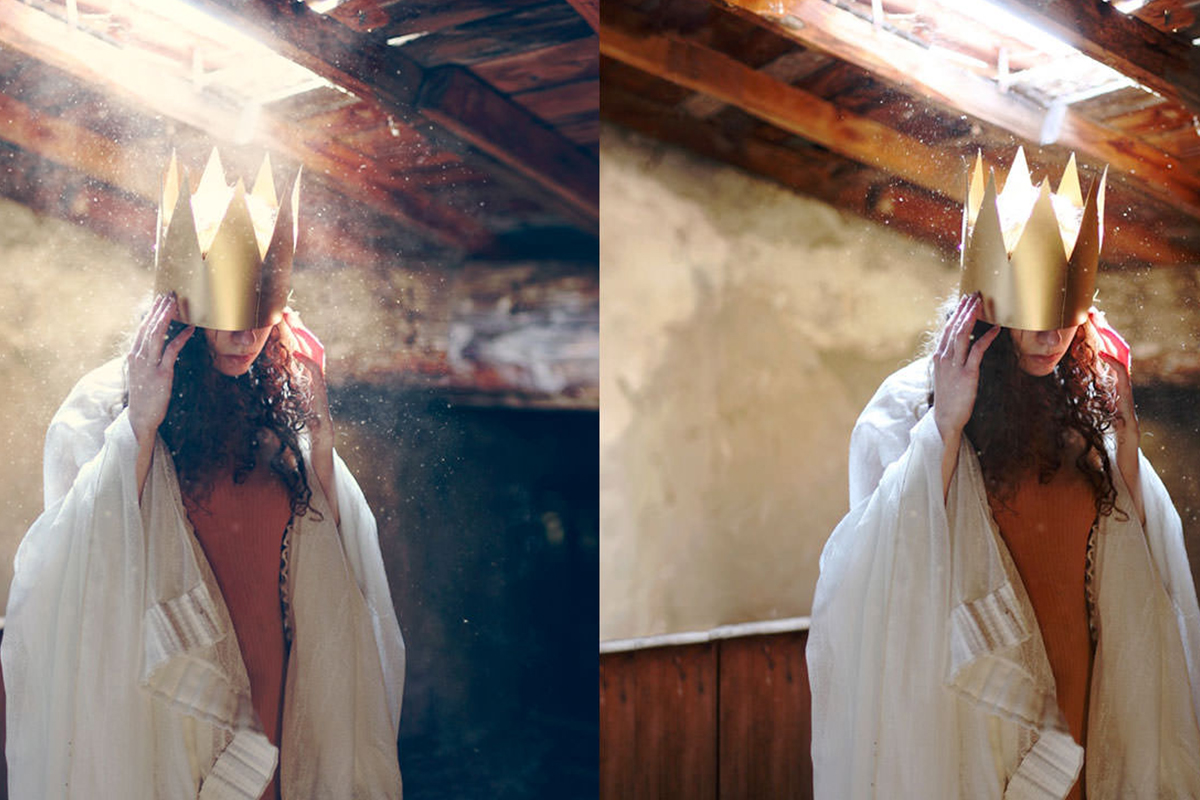
This free Photoshop brush builds atmosphere out of the photo itself rather than out of stock texture. Made with the Clone Stamp Tool on Screen or Multiply blending, it pulls light and dark shape directly from tones already in the image, so painted fog and haze carry that photo’s own tonal character instead of a generic soft-round falloff. Shape Dynamics and Scattering are already configured, so particles vary in size and spread as soon as you start painting.
Enjoying This Free Tutorial?
We publish a new free tutorial every week, each one with sample images and PSDs you can download and follow along with. Sign up and they land straight in your inbox, along with early word on sales, events and subscriber-only offers.
Free Photoshop Brush: Atmosphere
This atmosphere brush isn’t built from an outside stock texture — it’s built directly from the photo it’s used on, using the Clone Stamp Tool on Screen or Multiply blending to pull light-and-dark shape straight out of tones already present in the image. Because of that, painted fog and haze from this brush blends into a photo’s existing lighting far more convincingly than a generic soft round brush ever could, since it’s carrying that photo’s own tonal texture rather than a generic circular falloff.
What’s in the Download
The download includes both brushes built in the paired tutorial: a larger fog and haze brush, and a smaller companion brush for fine floating dust specks, each with Shape Dynamics and Scattering already configured so particles vary in size and spread naturally as soon as you start painting. Exact file contents can vary, so check the download link on this page for the current version rather than assuming a fixed count.
How to Load the Brushes into Photoshop
Open Window > Brush Presets, click the small panel-menu icon in the corner, and choose Load Brushes. Point it at the downloaded .abr file and click Open, and both brushes will appear at the bottom of your existing list, ready to paint with immediately.
Getting the Most Out of Both Brushes Together
Use the larger brush first to build the overall fog or haze shape on one layer, then switch to the smaller dust-speck brush on a separate layer to add fine detail on top. Keeping them on separate layers lets you adjust the opacity and placement of each independently once you see how they’re reading together, and the Eraser Tool with the same brush selected is the fastest way to soften or remove any area that ends up looking too heavy.
Where This Brush Comes In Handy
It’s most useful anywhere a photo already hints at atmosphere — a bit of backlit haze, a glow around a window or doorway, dust visibly catching a beam of light — and you want more of that same feeling without it looking added on. It works less well painted into an area with no implied light source at all, since real fog and dust only really show up where light is actually hitting them.
See the Full Technique
This page is just the download. For the complete walkthrough — building each brush from your own photo with the Clone Stamp Tool, fixing a visible square edge, painting and erasing to shape the atmosphere naturally, and finishing with a color grade — see the full tutorial: How to Use Custom Brushes to Add Atmosphere in Photoshop.
Related Tutorials
New Free Tutorials View All »






Enjoying This Free Tutorial? Go Further with PRO.
200+ PRO courses. 1,000+ practice files. One membership.

Unlimited access to every PRO course
New PRO courses every month
Layered PSDs and RAW files to follow along
100+ Lightroom Presets, LUTs, Actions and Brushes
Stream in up to 4K, with captions and chapters
Watch on any device: desktop, tablet or phone
4.93 average from 3,900+ reviews · 2M+ students