
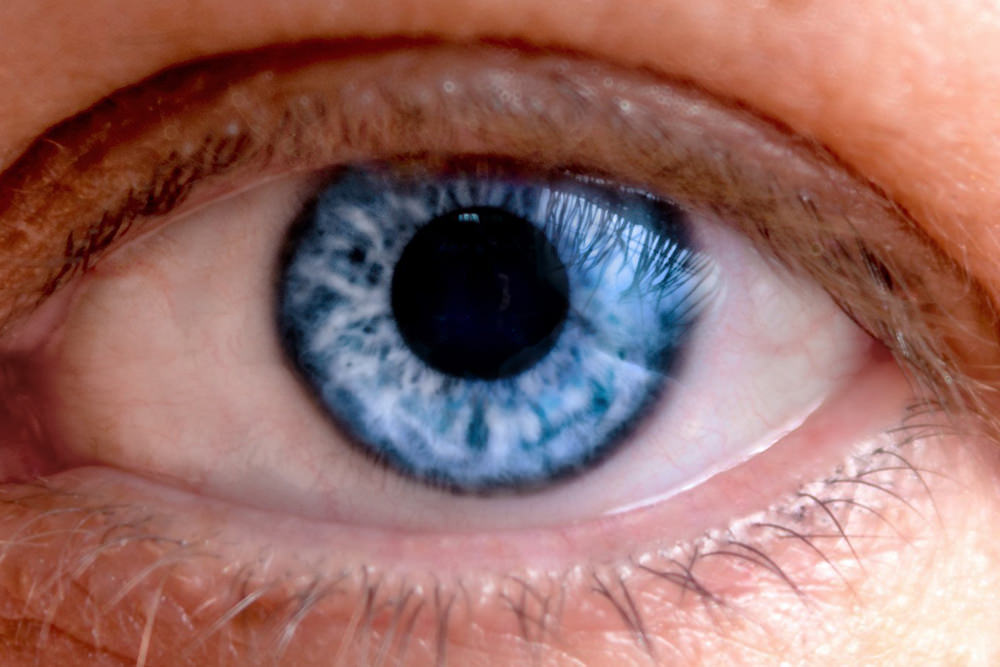

A close-up eye is easy to over-correct in both directions: leave too much redness and it looks unhealthy, remove every vein and it stops looking like an eye. This free Photoshop tutorial targets reds through Hue/Saturation and Select > Color Range, heals only the handful of veins that genuinely distract, then rebuilds depth with swirled dodge-and-burn masks and adds a little red back at the end.
We publish a new free tutorial every week, each one with sample images and PSDs you can download and follow along with. Sign up and they land straight in your inbox, along with early word on sales, events and subscriber-only offers.

How to Clean Up Eyes in Photoshop
Eyes are full of natural detail that’s easy to over-correct in either direction: too much redness or too many distracting veins reads as unhealthy, but removing every trace of them leaves an eye looking artificial and flat. This tutorial works through a full pass on a close-up eye, targeting specific colors, healing away only the most distracting elements, and finishing with subtle depth and color work, all aimed at finding a natural balance rather than a scrubbed, unrealistic result.
Targeting Redness With a Hue/Saturation Color Range
The first pass goes after general redness without touching any other color in the frame.
-
Target Reds Specifically in Hue/Saturation
Add a Hue/Saturation adjustment layer, switch the dropdown from Master to Reds, then use the built-in eyedropper to click directly on the red areas you want to adjust — this loads exactly that color range as the active target rather than affecting every color in the image.
-
Lighten the Targeted Reds
Drag the Lightness slider up slightly to brighten just the targeted red areas, using the plus eyedropper to add more similar red tones to the selection if needed.
-
Mask the Effect to Just the Problem Areas
Press Cmd/Ctrl + I to invert the mask to black, then paint white only over the specific red areas that need lightening, since this correction won’t look right applied everywhere.
Why Isolate a Specific Color Range Instead of Adjusting Globally
Blood vessels in an eye are a natural and necessary part of how eyes actually look, so the goal isn’t removing redness entirely but toning down whatever reads as excessive. Targeting Reds specifically inside Hue/Saturation, rather than adjusting brightness or saturation across the whole image, means the correction only touches the color that’s actually causing the problem.
Targeting and Brightening Veins With Color Range and a Clipped Curves Layer
Individual veins need a tighter selection than Hue/Saturation’s color range gives, which is what Select > Color Range is for.
-
Build a Selection With Select > Color Range
On a new layer, go to Select > Color Range, switch the selection preview to grayscale, and click directly on the red veins to target that specific color. Raise the Fuzziness slider if more of the surrounding red tones need to be included.
-
Add a Curves Layer From the Active Selection
With the selection still active, add a Curves adjustment layer — the selection automatically becomes that layer’s mask. Raise overall brightness slightly, then nudge the Green channel up and the Red channel down a touch if the result looks too magenta.
-
Soften and Adjust the Mask’s Opacity
Blur the layer mask slightly for a softer transition, and lower the adjustment layer’s opacity if the brightening effect looks too strong.
Removing Distracting Veins and Marks With the Healing Brush
Color work can only go so far — a few elements are large enough that they need to come out altogether.
-
Set the Healing Brush to Sample All Layers or Current and Below
On a new layer, select the Healing Brush tool and set its sample option to All Layers or Current & Below.
-
Heal Away the Most Distracting Veins and Marks
Hold Option/Alt to sample a clean nearby area, then click or dot the brush over the largest, most distracting individual veins, stray eyelashes, or small marks, blending harsh transitions along the way.
Why Not Remove Every Single Vein
Eyes are naturally full of small veins and imperfections, and eliminating all of them entirely would make the eye look unnaturally smooth and artificial. The goal is targeting only the handful of elements that are genuinely distracting — a few larger, more obvious veins — while leaving the eye’s natural texture otherwise intact.
Balancing Overall Brightness With a Hand-Tool Curves Adjustment
With the problem areas handled, the eye’s overall exposure needs evening out.
-
Use the On-Image Adjustment Tool in Curves
Add a Curves adjustment layer on the combined RGB channel, select the on-image adjustment (hand) tool, click on a bright area and drag down slightly, then click a dark area and drag up slightly, evening out the overall exposure across the eye.
-
Adjust the Red Channel if Needed
Switch to the Red channel and pull it down slightly if the overall color needs a small correction. In the video this took out too much red, so it was reset later: to reset a channel, drag its point down and off the graph.
-
Brighten the Center Separately if It Lost Brightness
Add another Curves layer to brighten the center of the eye if the previous adjustment dimmed it too much, restricting the effect to just that area with an inverted mask.
Softly Masking the Brightening to the Iris
The brightening Curves layer from the last step is kept to the center of the eye with a soft-edged ellipse on its mask.
-
Select the Iris and Invert on the Mask
Use the Elliptical Marquee tool to select the iris area, then invert the mask so the brightening shows only inside that selection, over the center of the eye.
-
Blur the Selection Edge
Go to Filter > Blur > Gaussian Blur on the mask and choose a blur radius that softens the transition until it no longer looks like an obvious selection edge.
Mirroring the Clean Side Over a Reflection
Where a reflection distracts on one side of the eye, the clean opposite side can be borrowed and mirrored over it.
-
Clone the Clean Side of the Eye
On a new layer, use the Clone Stamp tool set to sample all layers, hold Option/Alt to sample the clean left side of the eye, and paint a copy of it off to the side.
-
Flip and Position the Cloned Patch
Press Cmd/Ctrl + T, right-click, and choose Flip Horizontal to mirror the cloned patch, position it over the distracting reflection on the right side and press Enter.
-
Adjust Opacity and Mask as Needed
Lower the cloned layer’s opacity (pressing a number key with the Move tool active adjusts opacity quickly) and add a layer mask to blend its edges into the surrounding eye.
Why Clip a Hue/Saturation Layer to the Cloned Patch
A cloned patch can come in slightly less saturated than the area around where it lands. Adding a Hue/Saturation layer and clipping it specifically to the cloned layer (right-click and choose Create Clipping Mask) restricts that color boost to only the cloned area, matching its saturation to the rest of the eye without affecting anything else.
Neutralizing Redness With a Low-Flow Color Blend Brush
This is an optional finishing touch rather than a major correction — it makes a smaller, gradual difference on top of the more significant work already done.
-
Sample and Paint With the Color Blend Mode
On a new layer set to Color blend mode, sample a neutral surrounding tone with the Brush tool, lower the brush’s flow to around 20%, and paint gently over remaining red areas to even them out further.
Adding Depth With Swirled Dodge-and-Burn Curves Masks
Irises have a radial structure, so painting the dodge and burn masks in swirls rather than blobs gives the depth somewhere believable to sit.
-
Brighten the Center With a Swirled Mask
Add a Curves adjustment layer, brighten it, invert the mask to black, and use a small hard-edged brush to paint loose, swirling marks radiating from the center of the iris.
-
Darken the Edges the Same Way
Add another Curves layer, darken it, invert its mask, and paint similar swirling marks around the outer edge of the iris instead of the center.
Grouping both layers together and lowering the group’s opacity is an easy way to dial the overall intensity of this depth effect up or down without adjusting each layer individually.
Fine-Tuning Overall Eye Color
The last pass is about making the color read as a real eye rather than a corrected one.
-
Lower Overall Saturation Slightly
Add a Hue/Saturation layer and lower overall saturation a small amount if the eye color reads as too intense.
-
Shift Blues Toward Green
Target Blues specifically and shift the Hue slightly toward green, since blue eyes naturally carry a fair amount of green as well, which helps the color read as more realistic.
-
Add Back a Small Amount of Red
If earlier steps removed too much natural redness, add a final Curves layer, raise the Red channel slightly, and check the result against the fully desaturated version — a small amount of red often looks noticeably more natural than none at all.
Why Add Red Back After Spending So Much Effort Removing It
Correcting redness is rarely a single decisive move — it’s easy to remove more than intended while chasing a cleaner-looking eye. Comparing a fully corrected version against one with a small amount of red restored often reveals that some natural redness needs to stay for the eye to look believable rather than artificially clean; adjusting back and forth like this is a normal part of the process, not a sign something went wrong earlier.
Why This Approach Works
The whole workflow depends on isolating exactly the right area before making any change, rather than adjusting the eye as a single flat region. Targeting a specific color range through Hue/Saturation or Color Range, then loading that same selection directly into a Curves adjustment’s mask, means brightness and color corrections land precisely on the reds and veins that actually need attention. The Healing Brush handles the handful of individual marks too large or distracting to fix with color alone, while deliberately stopping short of removing every vein keeps the eye looking like a real eye rather than an artificially smoothed graphic. Layer masks, clipping masks, and grouped layers throughout make every one of these adjustments reversible and independently adjustable, which matters because, as the back-and-forth with redness shows, getting the balance right often takes more than one pass in either direction.
Final Thoughts
Cleaning up an eye well is less about applying a fixed set of steps and more about constantly checking the result against what a real eye actually looks like — some redness, some visible veins, a natural reflection, and color that isn’t perfectly uniform. Grouping the entire set of adjustments together and lowering the group’s overall opacity is a simple final safeguard against overdoing it, letting the whole effect settle back toward something more natural if the individual steps added up to more correction than the eye actually needed.
Quick Reference: Keys, Menus and Settings
- Target redsHue/Saturation: Master to Reds, eyedropper on the red, Lightness up; Cmd/Ctrl + I inverts the mask
- Select veinsSelect > Color Range, Grayscale preview, Fuzziness up; then a Curves layer uses the selection as its mask
- HealHealing Brush on a new layer, Sample: All Layers or Current & Below; Alt/Option-click to sample
- Mirror a patchClone Stamp S, then Cmd/Ctrl + T, right-click > Flip Horizontal
- Quick opacityV, then 5 for 50% or 0 for 100%
- Even out rednessBrush on a new layer in Color mode, sampled tone, 20% flow
- Tone it downShift-click layers, Cmd/Ctrl + G, lower the group opacity (about 75%)
No AI, no generative credits.
Cleaning Up Eyes: Common Questions
How do I reduce redness in the whites of the eyes?
Add a Hue/Saturation adjustment layer, switch Master to Reds and click the red areas with the eyedropper. Raise Lightness a little, then press Cmd/Ctrl + I to invert the mask and paint white only where the redness needs it.
Should I remove every vein from an eye?
No. Eyes naturally have veins and some red, and removing all of it looks fake. Take out only the larger veins and marks that distract.
How do I select just the red veins?
Go to Select > Color Range, set the selection preview to Grayscale and click a red vein. Raise Fuzziness to include more. Add a Curves layer while the selection is active and it becomes the mask.
My brightened veins look magenta. How do I fix that?
In the same Curves layer, nudge the Green channel up and the Red channel down a touch. Soften the mask with a little blur and lower the layer’s opacity if it is still too strong.
What Healing Brush settings work for veins and stray lashes?
Work on a new layer with Sample set to All Layers or Current & Below. Alt/Option-click a clean nearby area, then dot over the larger veins, a stray eyelash or a mark; brushing along a harsh line also blends it.
How do I even out the brightness of an eye?
In a Curves layer on RGB, pick the on-image hand tool, drag down on a bright area and up on a dark one. If the center loses brightness, add a brightening Curves layer masked to the iris with an Elliptical Marquee and a Gaussian Blur on the mask.
How do I remove a distracting reflection in the eye?
On a new layer, clone the clean side of the eye with the Clone Stamp set to All Layers, press Cmd/Ctrl + T, right-click and choose Flip Horizontal, and place it over the reflection. Lower the opacity, mask the edges and clip a Hue/Saturation layer to it to match saturation.
How do I add depth to the iris?
Use two Curves layers with inverted masks: one brightened and painted in swirls at the center, one darkened and painted in swirls around the edge, with a small hard brush. Group them with Cmd/Ctrl + G and lower the group’s opacity if it is too strong.
How do I make blue eyes look more natural?
Lower the saturation a little with Hue/Saturation, then pick Blues and move Hue slightly left toward green; blue eyes usually have green in them. If the eye now looks too clean, a Curves layer with the Red channel raised a touch brings back natural red.
From the Magazine View all
Stories, interviews and guides for photographers, new every week.
 EditingLightCraft vs Lightroom: I Edited the Same RAW Files in BothThe free clone on the same RAW files: what matches, what breaks and who should switch.
 InspirationRare Historical Photos: 13 of the Rarest Pictures Ever TakenFrom the earliest surviving picture of a person to the last passenger pigeon: who took each one and why it survives.
 EditingArtCraft: Photoshop Cloned by AI in Two Weeks. Is It Legal?ArtCraft cloned Photoshop and Lightroom with AI and gave them away. Any good? Legal? Safe?
Master Photoshop, Lightroom and Photography
Join PHLEARN PRO for $12.99 a month, or $99.99 a year (save 36%). Cancel anytime, with a 100% money-back guarantee.





