


Download Assets
This tutorial includes 2 sample images, 1 sample PSD and 1 PDF guide. Downloads are free with a PHLEARN account.
- Download the sample images and PSDs from every free tutorial on PHLEARN
- New free tutorials published every week
- One free account — sign up once, then download anything
Free PDF Guide · 3 Pages
This Tutorial as a Step-by-Step PDF
The 3-page guide walks through typing the word in a dense font, Right-click > Create Clipping Mask, a second clipped copy masked with the Marquee tool and Shift+Delete, a Layer Style > Stroke on the original text layer, and filling the flower icon the same way. Keep it next to your keyboard.
description
Learn how to fill text with an image in Photoshop using a clipping mask. This tutorial builds a “Florist” wordmark filled with flower photography: choose a dense, bold font so more of the photo shows through, clip the image to the text layer and scale it into place, duplicate and re-clip a second copy to fill any gaps, add a stroke outline on a duplicated text layer to keep the letters legible, and fill a bonus icon with the same technique.
Enjoying This Free Tutorial?
We publish a new free tutorial every week, each one with sample images and PSDs you can download and follow along with. Sign up and they land straight in your inbox, along with early word on sales, events and subscriber-only offers.
Image Source
Photo by blazhin.ru via Pexels


How to Fill Text with an Image in Photoshop
Filling lettering with a photo instead of a flat color is a simple clipping mask technique that reads as a much more sophisticated design move than it actually is. This walkthrough builds a “Florist” wordmark filled with flower photography, then adds a stroke outline and a bonus icon using the same underlying trick.
Setting Up Your Text
The font you choose matters more than usual here, since it directly determines how much of your fill image will actually be visible.
-
Type Your Text
Press T for the Type tool, click on your canvas, and type your word or phrase in black so it’s visible against a light background.
-
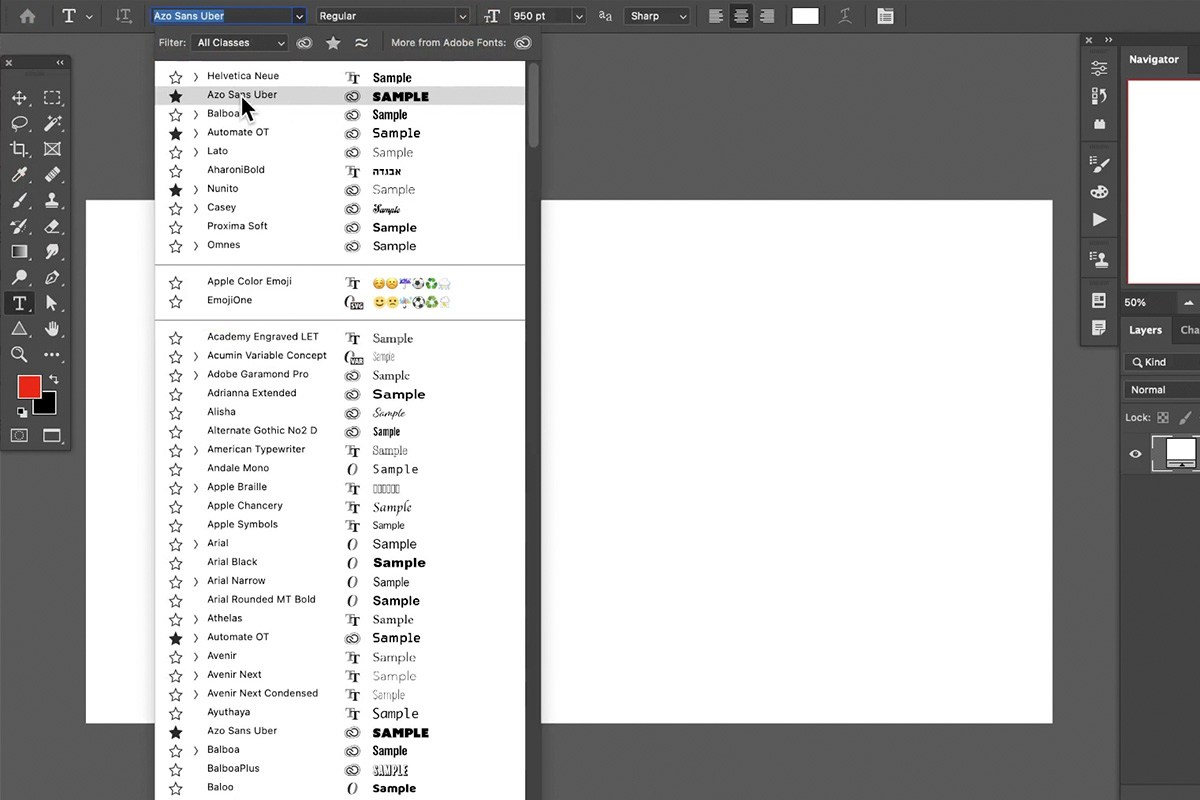
Choose a Dense, Bold Font
Pick a thick, dense font from the Character panel — the denser the letterforms, the more of your fill image will show through once the effect is applied.
Why Font Density Matters for This Effect
A thin, delicate font leaves very little actual pixel area inside each letter for an image to fill, so the fill photo ends up reduced to thin slivers that are hard to read as an image at all. A bold, dense typeface gives the fill photo much more visible surface area within each letterform, which is what makes the effect actually look like a photo-filled word rather than a thin colored outline.
Filling Text with an Image via a Clipping Mask
A clipping mask is what restricts an image layer to showing only within the shape of the text layer beneath it.
-
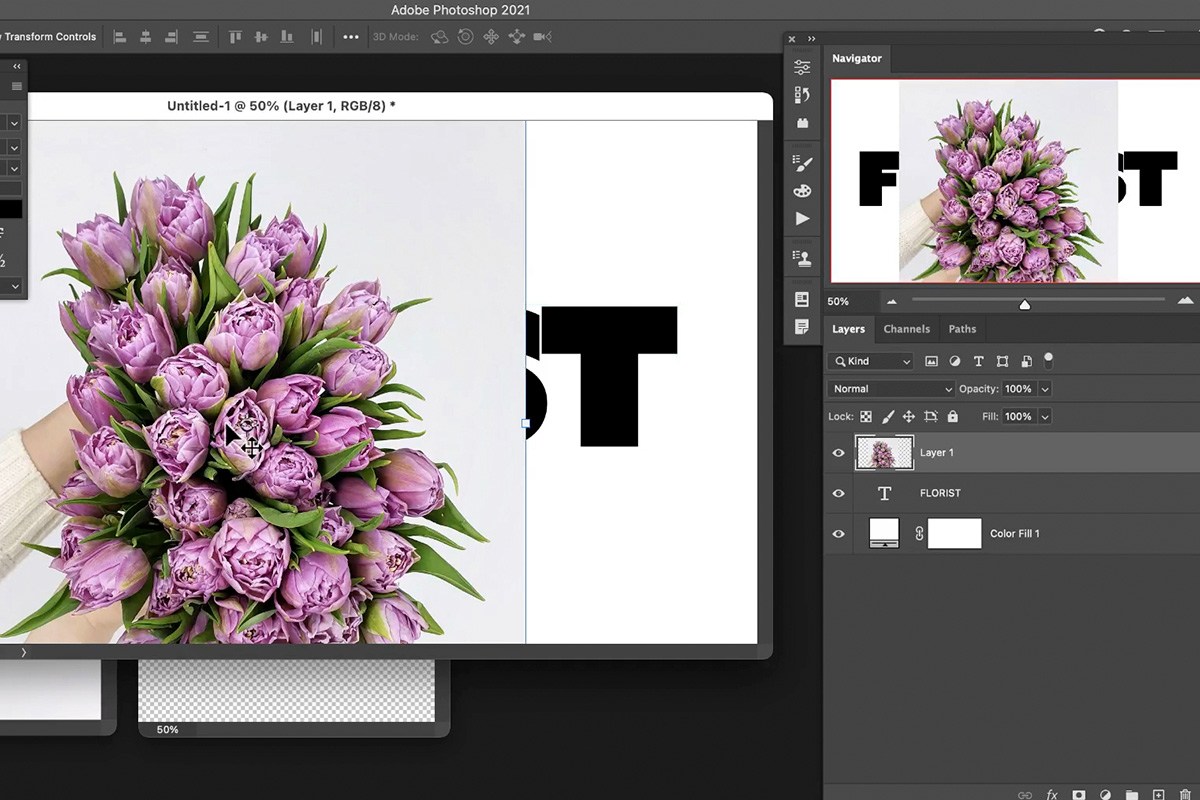
Place Your Image Above the Text Layer
Drag your fill image (flowers, in this example) directly into your document, positioned on a layer above your text layer.
-
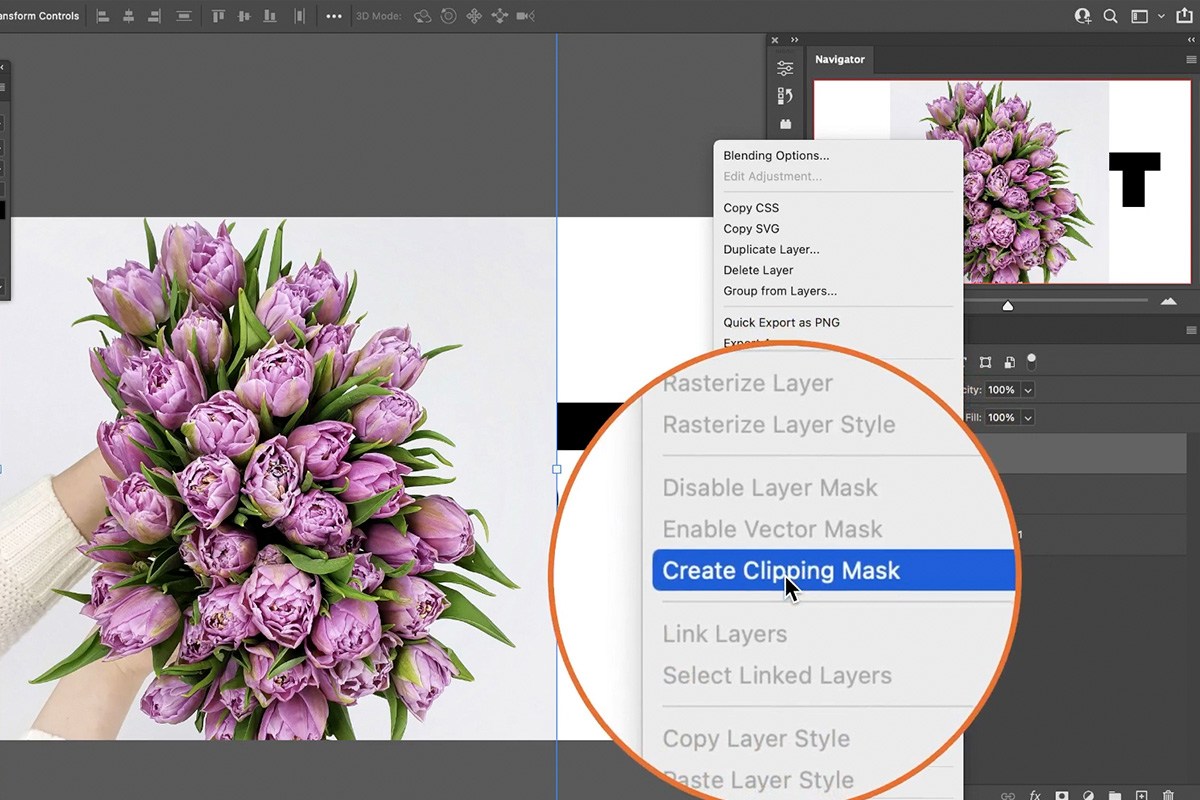
Create a Clipping Mask
Right-click the image layer and choose Create Clipping Mask. The image now only shows through wherever the text layer beneath it is visible.
-
Scale and Reposition
Press Ctrl + T on PC (Cmd + T on Mac) to scale and reposition the clipped image within the text, choosing whichever part of the photo interacts most interestingly with the letterforms.

Adding a Second Image to Fill Remaining Space
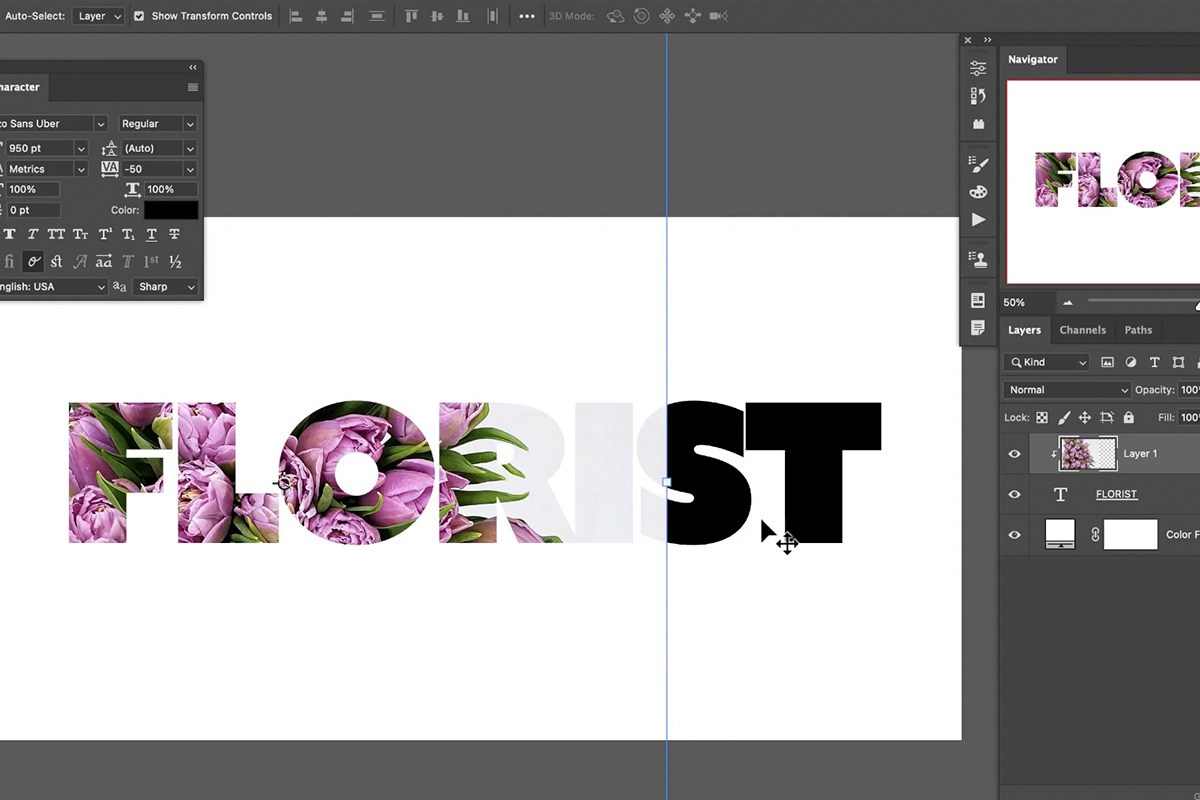
One image rarely covers an entire word cleanly, so a second copy, positioned differently, fills whatever the first one missed.
-
Duplicate Your Image Layer
Press Ctrl + J on PC (Cmd + J on Mac) to duplicate your clipped image layer.
-
Re-Clip the Duplicate
Right-click the duplicate and choose Create Clipping Mask again — a duplicated layer doesn’t automatically stay clipped, so this step needs repeating on the copy.
-
Reposition to Cover the Remaining Area
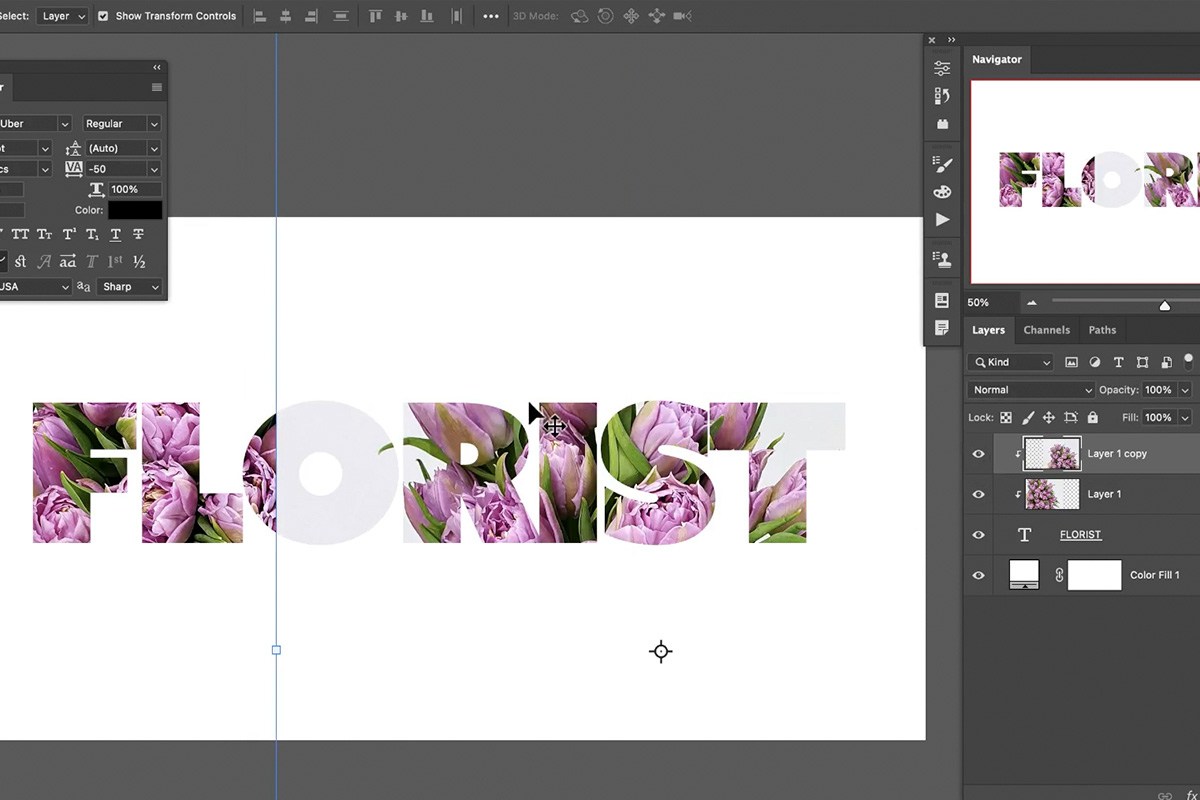
Use the Move tool to shift the duplicate over whichever part of the text still needs filling.
Why the Clip Doesn’t Carry Over Automatically
Duplicating a clipped layer copies the image and its position, but Photoshop treats the clipping relationship itself as a separate property that has to be reapplied on the new layer. It’s a quick extra click, but skipping it means the duplicate shows up across the entire canvas instead of staying contained to the text.
Masking Part of an Image with the Marquee Tool
If a clipped image should only fill part of a letter rather than the whole thing, a simple rectangular mask can cut it off cleanly.
-
Make a Rectangular Selection
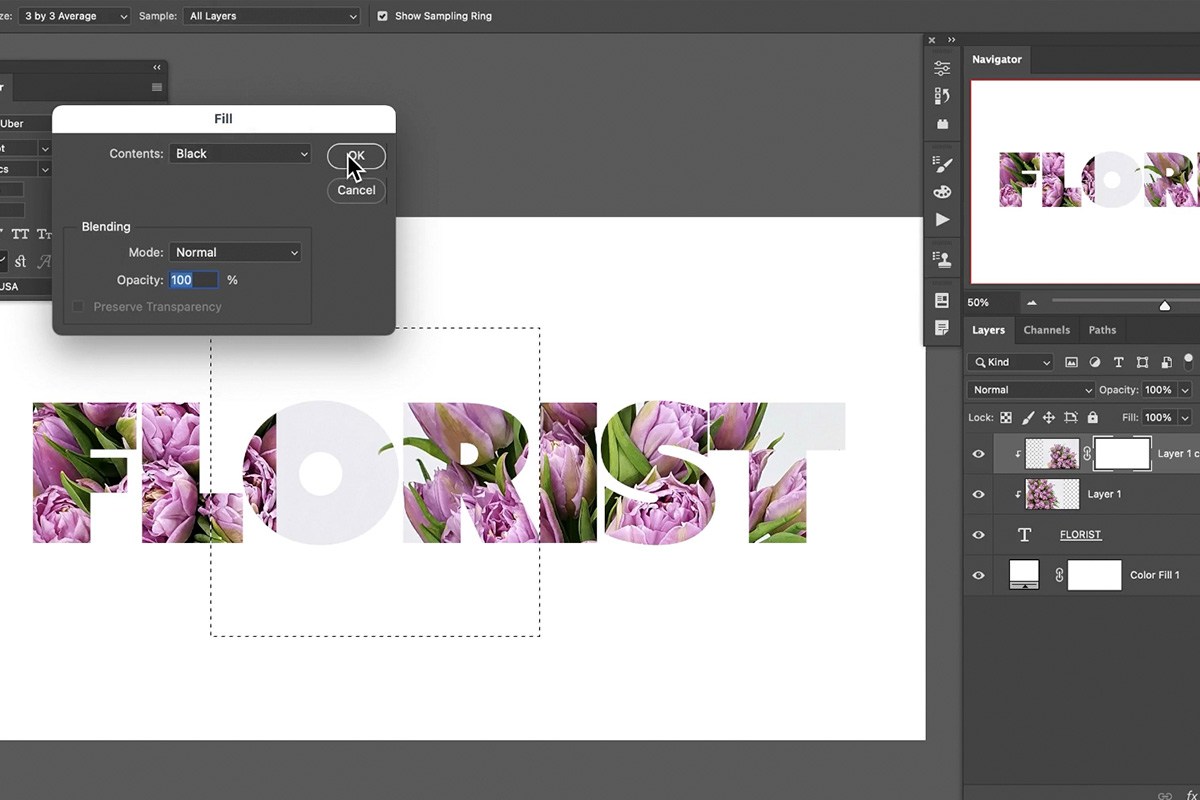
Press M for the Marquee tool and draw a rectangle over the area of your clipped image you want to hide.
-
Add and Fill a Layer Mask
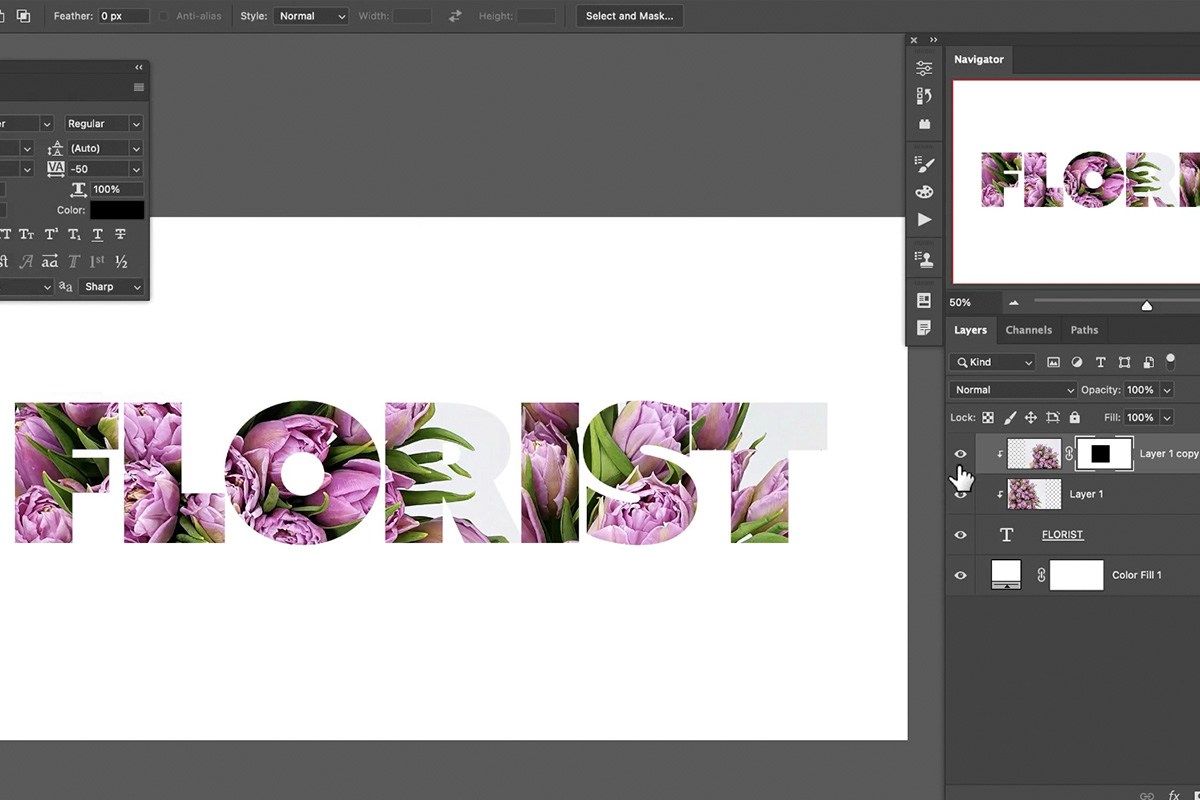
Click the Add Layer Mask icon first, before making the selection (with a selection active, it would hide everything outside the rectangle instead). With the rectangle drawn, click the mask thumbnail and press Shift + Backspace on PC (Shift + Delete on Mac) to fill the selection with black on the mask, hiding that portion of the image.


Adding a Stroke Outline to the Letters
An image-filled letterform can be hard to read on its own, so a colored stroke around the outline of the text helps define its shape clearly.
-
Duplicate the Original Text Layer
Select your original text layer (the one underneath all the clipped images) and press Ctrl + J on PC (Cmd + J on Mac) to duplicate it. The copy lands directly above the original, and the clipped photos are now clipped to the copy: hide the copy and the filled letters disappear with it.
-
Add a Stroke Layer Style
Double-click the gray area of the original text layer, the one underneath, to open Layer Style, check Stroke, and use the eyedropper to sample a color from your fill image.
-
Adjust the Stroke Size
Adjust the stroke’s size — somewhere around 5 to 6 pixels is a good starting point — until the outline reads clearly without overpowering the image fill.
Why Duplicate the Text Layer for the Stroke
After you duplicate the text, the photos are clipped to the copy, so the copy is the shape every clipped photo shows through. The original underneath is then free to carry the stroke on its own text layer, fully independent of the fill images, so you can toggle the stroke on or off at any time without disturbing the fill effect above it.

Adding a Bonus Icon with the Same Technique
The exact same clipping mask approach works on any shape, not just text — including a small decorative icon placed alongside your wordmark.
-
Add a Small Icon Shape
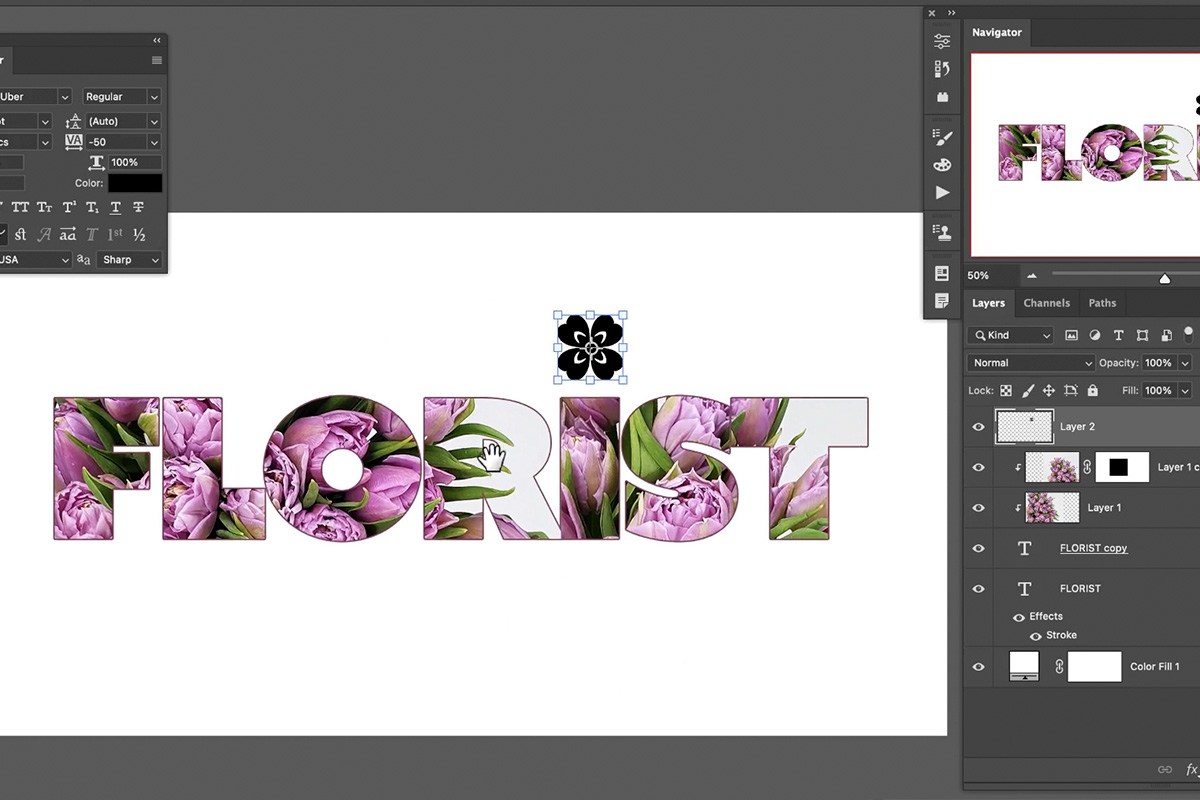
Bring in a simple icon or shape — sized small and positioned somewhere that complements your text, such as above a letter.
-
Duplicate Your Fill Image and Clip It
Duplicate one of your fill image layers with Ctrl + J on PC (Cmd + J on Mac), move it above the icon layer, right-click, and choose Create Clipping Mask so the image fills the icon the same way it filled your letters.
-
Add a Matching Stroke
Hold Alt on PC (Option on Mac) and drag the layer effects from your stroked text layer straight onto the Flower Icon layer to copy the same stroke onto the icon.



Why This Approach Works
Every part of this effect rests on the same simple mechanic — a clipping mask restricts an image to the shape of whatever’s directly beneath it — applied repeatedly to solve different small problems: filling the letters, covering the parts one image missed, and even filling a completely unrelated icon shape. Clipping the photos to the text copy and putting the stroke on the original text layer underneath means every clipped image keeps relying on the same unstroked shape. Because the stroke lives on its own text layer, and the fill images live on their own clipped layers, every visual component of this design stays independently editable, which is what makes it easy to swap in a different photo, font, or color later without rebuilding the whole thing from scratch.
Final Thoughts
Filling text with an image comes down to one core technique — the clipping mask — used a few different times with small variations: choosing a dense font so the fill actually reads, layering a second image where the first one falls short, and adding a stroke on a separate layer to keep the letterforms legible. Once this pattern feels familiar, it applies to any shape you can create in Photoshop, not just text, which is exactly what the bonus icon step demonstrates.
Quick Reference: Keys, Menus and Settings
- Type the wordT, then a dense bold font and All Caps in the Character panel
- Fill the lettersPhoto above the text, right-click > Create Clipping Mask; Cmd/Ctrl + T to scale
- Fill the gapsCmd/Ctrl + J, Create Clipping Mask again, V to move the copy
- Stop at a letterLayer mask, M for a rectangle, Shift + Delete/Backspace fills black; Cmd/Ctrl + D deselects
- OutlineCmd/Ctrl + J the text; double-click the original > Layer Style > Stroke, about 5 or 6 px
- Bonus iconClip a copy of the photo to it; Alt/Option-drag the effects onto the Flower Icon layer
No AI, no generative credits.

Free Downloads
Follow Along With the Same Files
Get the flower photo, the flower icon, the layered PSD and the 3-page PDF guide to every step. Free with a PHLEARN account.
Fill Text with an Image: Common Questions
How do I put a picture inside text in Photoshop?
Put the photo on a layer directly above the text layer, right-click it in the Layers panel and choose Create Clipping Mask. The photo now shows only where the type is.
What font works best for image-filled text?
A really dense, bold font, so more of the photo shows. Aaron uses Azo Sans Uber, an Adobe font, but any very heavy font works. Thin letters reduce the photo to slivers.
How do I make the letters all capitals?
Click the All Caps button in the Character panel. It capitalizes the word so every letter is nice and large.
How do I move or resize the photo inside the letters?
Select the clipped photo layer and press Cmd/Ctrl + T to scale it, or press V for the Move tool and drag. The letters stay where they are.
Why does my duplicated photo cover the whole canvas?
A copy made with Cmd/Ctrl + J is not clipped to the text. Right-click the copy and choose Create Clipping Mask again; clipped layers show a small down arrow.
How do I stop a photo partway through a word?
Add a layer mask to the copy, press M for the Marquee tool and drag a rectangle over the part to hide. Click the mask, press Shift + Delete (Shift + Backspace on Windows) to fill it with black, then Cmd/Ctrl + D to deselect.
How do I add an outline to the filled letters?
Duplicate the text layer with Cmd/Ctrl + J; the photos are now clipped to the copy. Double-click the gray area of the original text layer underneath, click Stroke in Layer Style, sample a color with the eyedropper and set the Size to about 5 or 6 pixels.
Why did my filled letters disappear when I hid a text layer?
After you duplicate the text, the photos are clipped to the copy, so hiding the copy hides the fill too. The stroke is on the original, so that is the layer to switch off and on.
Can I fill an icon or shape with a photo too?
Yes. Place the icon, duplicate a flower layer with Cmd/Ctrl + J, drag it above the icon and choose Create Clipping Mask. Alt/Option-drag the effects from the stroked text layer onto the Flower Icon layer for a matching outline.
Are the sample files free?
Yes, with a free PHLEARN account. You get 2 sample images, 1 sample PSD and 1 PDF guide: the flower photo, the flower icon, the layered PSD and a 3-page guide.
Master Photoshop, Lightroom and Photography
Join PHLEARN PRO for $12.99 a month, or $99.99 a year (save 36%). Cancel anytime, with a 100% money-back guarantee.





