


Download Assets
This tutorial includes 1 PDF guide. Downloads are free with a PHLEARN account.
- Download the sample files from every free tutorial on PHLEARN
- New free tutorials published every week
- One free account: sign up once, then download anything
Free PDF Guide · 3 Pages
This Tutorial as a Step-by-Step PDF
This guide walks through typing a huge headline with the Type Tool, widening the canvas with the Crop Tool, why Ctrl/Command+T stretches the subject, selecting the right side with the Marquee Tool and running Edit > Content-Aware Scale, then warping the clouds with Polygonal Lasso, Ctrl/Command+T and Warp. Use it whenever a photo needs room for type.
description
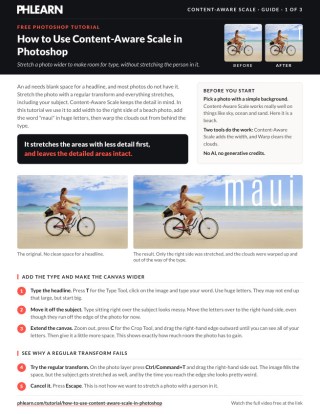
Stretching a photo wider to make room for a headline normally stretches the subject along with it. Content-Aware Scale pulls the low-detail areas first, sky, water, sand, and leaves the subject alone. Aaron adds the type, widens the canvas, scales just the right-hand section, then protects the subject with a Polygonal Lasso selection and warps the clouds out from behind the text.
Enjoying This Free Tutorial?
We publish a new free tutorial every week, each one with sample images and PSDs you can download and follow along with. Sign up and they land straight in your inbox, along with early word on sales, events and subscriber-only offers.

Stretching a photo out with a regular transform stretches everything in it, including any subject, which usually looks distorted and unnatural. This tutorial uses the Content-Aware Scale tool to add width to an image while keeping a subject intact, adds large type in the newly created space, and finishes by warping some clouds out of the way so the type has clean room to sit in.
Adding Type and Cropping to Create Room
Typing out the ad’s headline first, then cropping the canvas wider around it, establishes exactly how much extra room the image will need to gain.
-
Add the Headline Text
Press T for the Type tool, click on the image, and type the headline, such as a destination name, using a large font size.
-
Position the Text in Open Space
Move the type to one side of the image, away from the main subject, so it sits in blank space rather than overlapping anything busy.
-
Crop the Canvas Wider
Press C for the Crop tool and drag the canvas edge outward until there’s enough room to fully see the new text.
Why a Regular Transform Distorts the Subject
Stretching the canvas with a normal Free Transform pulls every part of the image, including any subject, by the same amount, quickly making a person or object look warped.
-
Try a Regular Transform First
Press Cmd/Ctrl+T, drag from the side to stretch the image out, and notice how the subject stretches along with the background.
-
Cancel the Transform
Press Escape to cancel once it’s clear the subject is becoming distorted.
Stretching the Background With Content-Aware Scale
Content-Aware Scale identifies areas with little detail, such as sky, water, or sand, and stretches those first while keeping detailed areas like a subject intact.
-
Open Content-Aware Scale
Go to Edit > Content-Aware Scale to switch into this stretching mode.
-
Drag From the Side to Stretch
Click and drag from one side of the image to stretch it outward, watching low-detail areas stretch first while the subject stays intact.
-
Stop Before Detail Starts Distorting
Continue stretching only as far as the low-detail background allows, since pushing too far eventually starts distorting detailed areas too.
Why Content-Aware Scale Isn’t Unlimited
Content-Aware Scale can stretch a background a surprising amount before it runs out of low-detail area to pull from, but it isn’t magic, and pushing it too far will eventually start warping subjects and other detailed elements just like a regular transform would. Treating it as a tool with a practical limit, rather than something that can stretch an image infinitely, keeps the results looking natural.
Scaling Just One Section With a Marquee Selection
Making a selection around only the area that needs to grow, then running Content-Aware Scale on just that selection, keeps the rest of the image completely untouched.
-
Select the Area to Stretch
Use the Marquee tool to select just the section of the image, such as the right-hand side, that needs more width.
-
Apply Content-Aware Scale to the Selection
Go to Edit > Content-Aware Scale again and drag to stretch only the selected area outward.
-
Confirm and Deselect
Press Enter to confirm the scale, then press Cmd/Ctrl+D to deselect and review the result.
Resizing and Repositioning the Headline Text
With extra width added to the image, the headline text can be scaled down slightly and moved into a cleaner position, such as along the horizon line.
-
Scale the Text Down Slightly
Press Cmd/Ctrl+T on the text layer and drag a corner handle to reduce its size a bit.
-
Reposition Along the Horizon
Move the text down so it sits along the horizon line, or wherever it reads most clearly against the background.
Selecting Around the Subject to Protect It From Warping
Drawing a selection around the subject with the Polygonal Lasso tool, and leaving extra room past the area actually being warped, keeps the subject untouched while the background behind the text gets reshaped.
-
Select the Subject With the Polygonal Lasso Tool
Use the Polygonal Lasso tool to click a series of points tracing around the subject, protecting it from the upcoming warp.
-
Include the Area That Needs Warping
Extend the selection to include the background area behind the text, such as clouds that are interfering with readability.
-
Leave Extra Room Around the Warp Area
Make the selection somewhat larger than the exact area to be warped, since a warp affects everything within the selection, not just its center.
Why the Selection Should Be Larger Than the Warp Itself
A warp affects the entire selected area, not just the specific spot being dragged, so a selection sized exactly to the intended warp can produce unexpected results at its edges. Leaving extra room in the selection gives the warp space to blend naturally into the surrounding image instead of creating a visible seam right at the selection’s border.
Warping the Background Clouds Out of the Way
The Warp transform mode lets specific corners and areas of a selection be pushed and pulled freely, which works especially well on something as shapeless as clouds.
-
Enter Free Transform and Switch to Warp
Press Cmd/Ctrl+T, then right-click and choose Warp, or click the Warp icon in the options bar.
-
Skip the Preset Warp Shapes
Ignore preset warp shapes like Arc or Bulge, since a custom, freeform warp gives more control for this kind of adjustment.
-
Drag Corner Handles to Reshape the Clouds
Grab a corner handle of the warp grid and drag it to stretch and reshape the clouds, staying mostly on the side of the image being cleared for text.
-
Confirm the Warp
Press Enter to confirm the new cloud shape once it clears enough space for the text.
-
Deselect and Compare
Press Cmd/Ctrl+D to deselect, then compare the before and after to confirm the clouds look natural.
Why Clouds Are an Easy Subject to Warp
Because clouds don’t have a fixed, recognizable shape the way a building or a face would, warping them into a new form rarely looks wrong, since clouds naturally appear in nearly any shape imaginable. This makes them an ideal candidate for a warp used purely to clear visual space, without worrying about the kind of distortion that would be obvious on a more rigid subject.
Why This Approach Works
Content-Aware Scale is what makes stretching an image possible without distorting a subject, since it specifically targets low-detail areas first rather than treating the whole image as one uniform surface to pull. Selecting just the section that needs more width, rather than scaling the entire image, is what keeps areas that should stay untouched, like the left side of this photo, completely unaffected. Warping the clouds instead of trying to paint or clone them out of the way works because a shapeless subject like a cloud can be reshaped freely without ever looking artificial.
Final Thoughts
Turning a regular photo into ad-ready space for text comes down to two tools working together here, Content-Aware Scale to add width without warping the subject, and the Warp transform to clear out any remaining visual clutter behind the text. The same combination works for any image that needs extra room for a logo or headline, not just this particular beach photo.
Quick Reference: Keys, Menus and Settings
- Add the headlineT Type Tool, then C Crop Tool to drag the canvas wider
- Regular stretch (avoid)Cmd/Ctrl + T, Esc to cancel
- Stretch the backgroundMarquee the right side, Edit > Content-Aware Scale, drag, Enter
- DeselectCmd/Ctrl + D
- Protect the subjectPolygonal Lasso around the area to warp, leaving the subject out and extra room
- Move the cloudsCmd/Ctrl + T, right-click > Warp, drag the corner handles
No AI, no generative credits.
Free Downloads
Take the Guide With You
Get the PDF guide to making room for an ad headline with Content-Aware Scale, a Marquee selection and a Warp transform on the clouds. Free with a PHLEARN account.
Content-Aware Scale: Common Questions
What does Content-Aware Scale do?
It stretches the areas with little detail, like sky, ocean and sand, first and tries to keep detailed areas such as a person intact. That lets you add width to a photo without warping the subject.
Where is Content-Aware Scale in Photoshop?
Go to Edit > Content-Aware Scale, then drag a side handle to stretch the image and press Enter to confirm.
Why not just stretch the photo with Free Transform?
Cmd/Ctrl + T stretches everything by the same amount, so the subject gets stretched too and quickly looks wrong. Press Escape to cancel it.
How do I stretch only one side of the image?
Select that side with the Marquee Tool first, then run Edit > Content-Aware Scale. Only the selection is stretched and the rest stays as it was.
How far can I stretch an image?
Only so far. If you keep going, it runs out of low-detail areas and starts stretching subjects too, so stop while the detail still looks right.
How do I make room for text in the canvas first?
Type the headline, move it into the open side of the photo, and use the Crop Tool (C) to drag the canvas edge out until all the letters are visible. Then fill that space with Content-Aware Scale.
How do I move clouds out from behind my text?
Select the area around the clouds with the Polygonal Lasso, press Cmd/Ctrl + T and choose Warp. Drag the corner handles to push the clouds up, staying mostly on the side you’re clearing.
Why make the selection bigger than the area I’m warping?
A warp affects the whole selection, so extra room gives it space to blend in. Leave the subject outside the selection so it isn’t warped.
Is there a free download?
Yes, with a free PHLEARN account. You get 1 PDF guide with the Content-Aware Scale and Warp steps from the video.
From the Magazine View all
Stories, interviews and guides for photographers, new every week.
 BusinessHow to Compete With AI: Give Your Clients MoreEveryone has the same tools now, and your clients know it. The way to compete is to give them more.
 EditingLightCraft vs Lightroom: Is the Free Clone Any Good?The free clone on the same RAW files: what matches, what breaks and who should switch.
 EditingHow to Tell If a Photo Is AI, and Prove Yours Is RealThe tells that still work in 2026, why detectors disagree, and how to prove your own photos.
Master Photoshop, Lightroom and Photography
Join PHLEARN PRO for $12.99 a month, or $99.99 a year (save 36%). Cancel anytime, with a 100% money-back guarantee.





