

Download Assets
This tutorial includes 1 Photoshop brush. Downloads are free with a PHLEARN account.
- Free sample files with every tutorial on PHLEARN
- New tutorials published every week
- Unlimited downloads with your free PHLEARN account
description
Patchy facial hair is common enough that being able to fill it in convincingly is a genuinely useful retouching skill, not just a novelty. This tutorial builds a custom facial hair brush from a single hand-drawn hair, then adds enough randomization through Shape Dynamics, Scattering, and Transfer, plus direction control and multi-colored sampling, to make painted-in hair look like it actually grew there.
Enjoying This Free Tutorial?
We publish a new free tutorial every week, each one with sample images and PSDs you can download and follow along with. Sign up and they land straight in your inbox, along with early word on sales, events and subscriber-only offers.
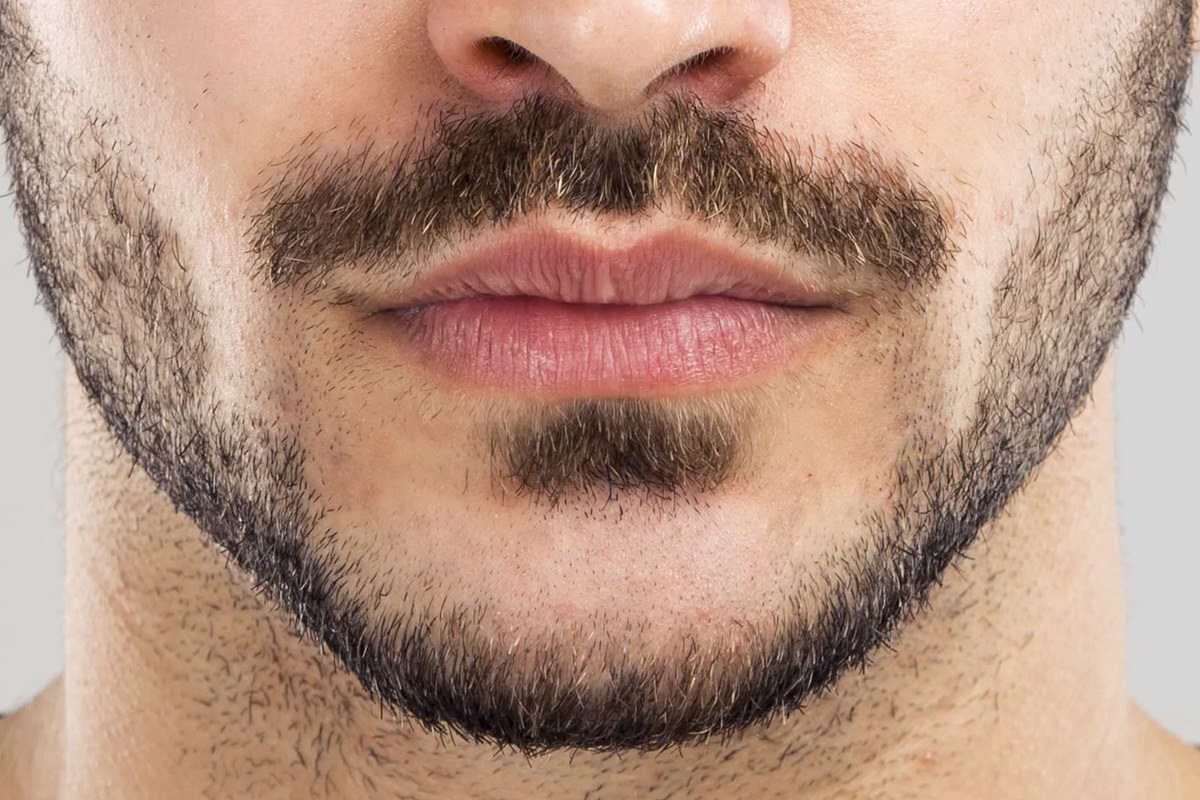
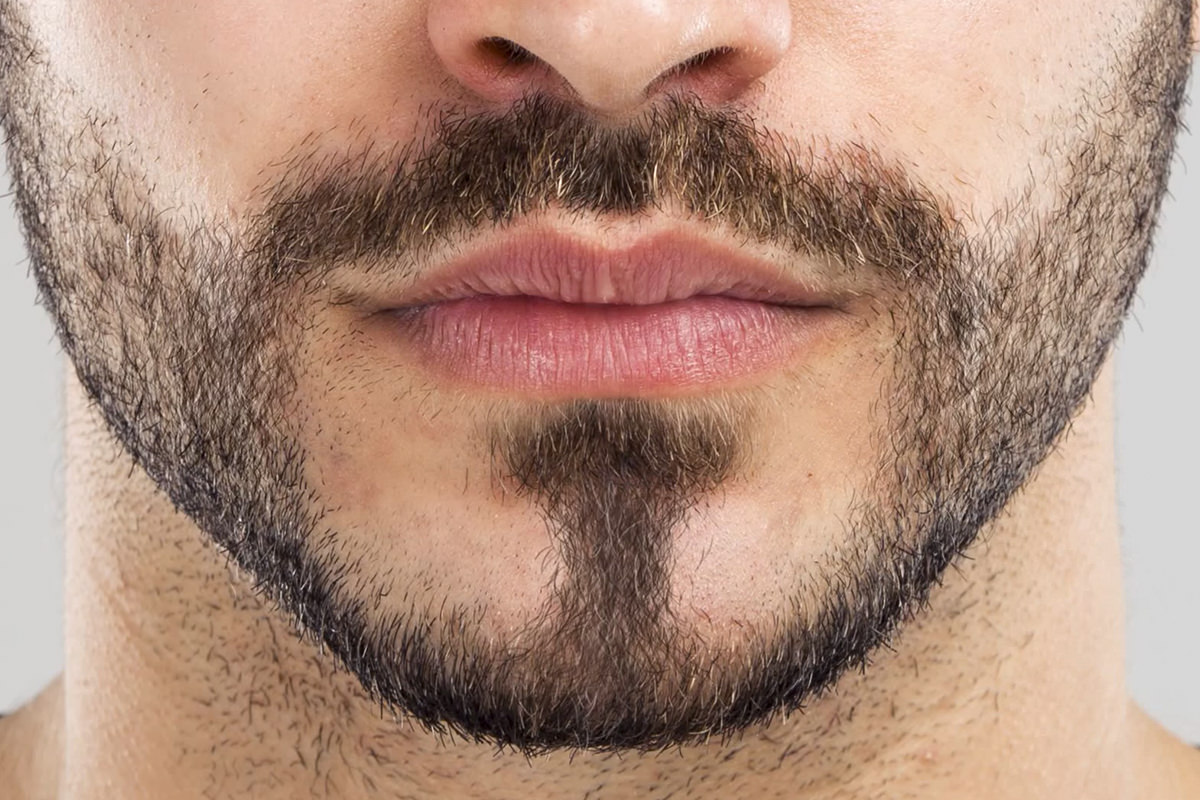
How to Make Facial Hair in Photoshop
Patchy facial hair is common enough that being able to fill it in convincingly is a genuinely useful retouching skill, not just a novelty. This tutorial builds a custom facial hair brush from a single hand-drawn hair, then adds enough randomization, direction control, and color variation to make painted-in facial hair look like it actually grew there.
Drawing a Single Hair Shape and Defining the Custom Brush
One carefully drawn hair, isolated on a white background, becomes the raw shape that Photoshop turns directly into a reusable brush.
-
Paint a Single Hair on a New Layer
Select the Brush tool, raise hardness to around 80 percent, and paint a single hair shape, using the bracket keys to adjust brush size as needed.
-
Add a White Background Layer Beneath It
Hold Cmd/Ctrl and click the New Layer icon to add a layer underneath, then use the Rectangular Marquee tool to draw a box and fill it with white using Shift+Delete.
-
Turn the Hair Into a Selection
Hold Cmd/Ctrl and click the hair layer’s thumbnail to load it as a selection.
-
Define the Brush Preset
Go to Edit > Define Brush Preset and name the new brush Facial Hair.
Adding Randomness With Shape Dynamics
The Brush panel (Window > Brush)’s Shape Dynamics options turn one static hair shape into strands that vary in size, angle, and roundness with every stroke.
-
Turn Up Size Jitter
Under Shape Dynamics, raise Size Jitter so painted hairs come out in a range of different sizes.
-
Turn Up Angle Jitter
Raise Angle Jitter so each individual hair sits at a different angle.
-
Turn Up Roundness Jitter
Raise Roundness Jitter for additional shape variation between hairs.
Scattering Hairs for a Natural Growth Pattern
Turning on Scattering spreads individual hairs out randomly instead of stacking them along a single line, which matches how facial hair actually grows.
-
Turn On Scattering on Both Axes
Enable Scattering on both axes so hairs spread out in every direction rather than following a straight path.
-
Adjust the Amount of Scattering
Raise or lower the scattering amount until the spread of hairs looks natural rather than uniform.
Controlling Hair Direction With the Angle Jitter Control
Setting the Angle Jitter control to Direction ties each hair’s angle to the direction the brush is actually moving, making it possible to paint hair that follows a specific path.
-
Set Angle Jitter’s Control to Direction
Under Shape Dynamics, change the Angle Jitter control setting from Off to Direction so hair angle follows the brush stroke.
-
Adjust the Brush Tip Angle
Change the brush tip’s angle setting from 0 to 90 degrees so hair travels with the direction of the stroke instead of perpendicular to it.
Why the Brush Direction Control Matters for Realistic Hair
Real facial hair grows in a consistent direction across an area, such as downward on a chin or along the jawline, rather than pointing every which way at random. Linking the brush’s angle to the direction it’s painted in makes it possible to paint hair that follows that same consistent growth direction, rather than looking scattered and directionless.
Adding Opacity and Flip Variation Under Transfer
Transfer settings control how visible or faint individual hairs appear, while flipping the brush shape on its axes keeps hairs from all curving in exactly the same direction.
-
Turn On Opacity Jitter
Under Transfer, turn on and raise Opacity Jitter so some hairs appear fully visible and others more faint.
-
Turn On X and Y Jitter for Curve Variation
Turn on X Jitter and Y Jitter under Shape Dynamics so some hairs curve one way and others curve the opposite way, rather than all sharing the same arc.
Adjusting Spacing for More or Less Hair Density
The brush tip’s spacing setting directly controls how densely packed the painted hairs end up.
-
Lower Spacing for Denser Hair
Lower the Spacing value in Brush Tip Shape to pack more hairs closely together.
-
Raise Spacing for Sparser, More Realistic Hair
Raise Spacing back up for a lighter, more naturally sparse result.
Painting Multi-Colored Facial Hair
Real facial hair is rarely a single flat color, so sampling several different shades from the existing hair and switching between them keeps the painted result convincing.
-
Sample an Existing Hair Color
Hold Alt/Option with the Brush tool to sample a color, such as dark brown, from the subject’s existing facial hair.
-
Paint in the Direction Hair Should Grow
Paint using the sampled color in the actual direction the hair should grow, taking advantage of the brush’s direction control.
-
Switch to a Second Sampled Color
Sample a second, slightly different color and continue painting to build up realistic color variation across the patch.
Why Facial Hair Needs More Than One Color
A patch of facial hair painted in a single flat color reads as obviously artificial, since real hair naturally varies between darker and lighter shades even within the same beard. Sampling multiple colors directly from the subject’s existing hair and switching between them while painting is what keeps a filled-in area matching the surrounding, unretouched hair.
Adding Highlights for Realism
A separate layer of painted white highlights adds the subtle shine that real hair picks up when it catches the light.
-
Add a New Layer for Highlights
Create a new layer above the painted facial hair specifically for highlights.
-
Paint White Over a Few Selected Hairs
Paint white with the same custom brush over a handful of hairs to simulate light catching them.
-
Lower Opacity for a Subtle Effect
Reduce the highlight layer’s opacity so the effect stays subtle rather than looking like gray or white hair.
Why Highlights Make Painted Hair Look More Convincing
Real hair, even hair that reads as solid black or brown, still catches light and shows subtle highlights depending on its angle and texture. Adding a light, low-opacity highlight layer over the painted facial hair recreates that same subtle shine, which is often the detail that separates a convincing result from an obviously flat, painted patch.
Sculpting Denser, More Defined Facial Hair Areas
Lowering spacing further and layering in both color and highlights makes it possible to sculpt more deliberate, defined facial hair shapes rather than just filling in patchy areas.
-
Lower Spacing for a Denser Sculpted Area
Lower the brush’s spacing setting further to pack in more hair for a denser, more sculpted look.
-
Layer Sampled Color Beneath Highlights
Paint sampled base colors first, then add a highlight layer above to give the sculpted area more definition.
-
Erase Any Highlights That Look Unintentional
Use the Eraser tool to remove any highlight that reads as unwanted gray hair rather than a natural shine.
Why This Approach Works
Building the brush from a single, carefully drawn hair, rather than relying on a default Photoshop brush, is what gives the finished result a shape that actually resembles real facial hair up close. Linking the brush’s angle to the direction it’s painted is what allows hair to be painted so it follows a specific, consistent growth direction rather than pointing randomly. Sampling multiple real hair colors and adding a subtle highlight layer on top is what turns a flat, single-color patch into something that blends convincingly with the surrounding, unretouched hair.
Final Thoughts
Once this custom facial hair brush is built and fine-tuned, it works on any photo with patchy or missing facial hair, not just the one used in this tutorial. The same brush and technique also work for adding a full beard, a goatee or even a mustache (for stubble, start from a stubble-shaped brush instead of a single hair) to someone who’s never had one.
Quick Reference: Keys, Menus and Settings
- Draw one hairBrush tool, Hardness about 80%; [ and ] change the size
- White box behind itCmd/Ctrl-click the New Layer icon, Rectangular Marquee, Shift + Delete to fill with white
- Make the brushCmd/Ctrl-click the thumbnail, Edit > Define Brush Preset, name it Facial Hair
- RandomizeWindow > Brush > Shape Dynamics: Size, Angle and Roundness Jitter up; Scattering on Both Axes
- Follow the strokeAngle Jitter Control: Direction; Brush Tip Shape angle 0 to 90
- Vary and spaceTransfer: Opacity Jitter; Flip X and Y Jitter; Spacing down for dense, up for sparse
- Paint and highlightB, Alt/Option-click to sample beard colors; white on a new layer at lower opacity
No AI, no generative credits.
Free Downloads
Paint With the Same Brush
Get the facial hair brush built in the video, with its direction, scattering and jitter settings, ready to fill in a patchy beard on any photo. Free with a PHLEARN account.
Facial Hair Brush: Common Questions
How do I make a custom hair brush in Photoshop?
Paint one black hair at about 80% hardness on a new layer, put a white box behind it, and Cmd/Ctrl-click the layer thumbnail to select it. Then go to Edit > Define Brush Preset and name it Facial Hair.
Why does the hair need a white background?
A custom brush is made from black on white: black becomes the part that paints. Hold Cmd/Ctrl and click the New Layer icon to add the white layer underneath, then fill a Rectangular Marquee box with white using Shift + Delete.
Where are the brush settings that make the hair look random?
Open Window > Brush. Under Shape Dynamics, turn up Size Jitter, Angle Jitter and Roundness Jitter so every hair comes out a little different.
Why do my hairs stack up in a straight line?
Turn on Scattering and check Both Axes, then raise the amount until the hairs spread out naturally around your stroke.
How do I make the hairs follow my brush stroke?
Under Shape Dynamics, set the Angle Jitter Control to Direction. If the hairs run sideways to your stroke, change the angle in Brush Tip Shape from 0 to 90, then paint in the direction the hair grows.
How do I stop every hair curving the same way?
Turn on Flip X Jitter, and Flip Y Jitter if you like, so some hairs curve one way and some the other. Opacity Jitter under Transfer makes some hairs fainter than others.
How do I paint thicker or thinner facial hair?
Use Spacing in Brush Tip Shape. Lower it to pack in more hairs for a dense, sculpted beard; raise it for a sparser, more natural fill.
What color should I paint the beard?
Sample the existing beard with Alt/Option and switch between a few shades, like a dark brown and a darker one. Real facial hair is never one flat color.
How do I make painted hair look real?
Add highlights. On a new layer above, paint white over a few hairs with the same brush and lower the opacity. Erase any that look like gray hairs instead of shine.
Is the facial hair brush free?
Yes, with a free PHLEARN account. You get 1 Photoshop brush: the facial hair brush built in the video, ready to paint with.
From the Magazine View all
Stories, interviews and guides for photographers, new every week.
 EditingHow to Color Grade Photos in Photoshop and LightroomCorrect the photo first, then put color in the shadows, midtones and highlights. Aaron Nace on the order, the tools and skin.
 BusinessHow to Compete With AI: Give Your Clients MoreEveryone has the same tools now, and your clients know it. The way to compete is to give them more.
 EditingLightCraft vs Lightroom: I Edited the Same RAW Files in BothThe free clone on the same RAW files: what matches, what breaks and who should switch.
Master Photoshop, Lightroom and Photography
Join PHLEARN PRO for $12.99 a month, or $99.99 a year (save 36%). Cancel anytime, with a 100% money-back guarantee.





