

Download Assets
This tutorial includes 2 sample images and 1 PDF guide. Downloads are free with a PHLEARN account.
- Download the sample images and PSDs from every free tutorial on PHLEARN
- New free tutorials published every week
- One free account — sign up once, then download anything
Free PDF Guide · 2 Pages
This Tutorial as a Step-by-Step PDF
The guide covers the shoot (tripod, manual focus, manual mode, one photo holding the frame and one without you) and the Photoshop steps: Shift-drag the empty scene onto the frame photo with the Move Tool (V), hide it, click the inside corners with the Polygonal Lasso Tool, Feather off, then click the layer mask icon. Keep it next to your keyboard.
description
Most of this effect happens at the shoot, not the computer. Lock the camera on a tripod, switch focus and exposure to manual, and take two frames — one holding an empty picture frame, one with you stepped out of the shot. In Photoshop the two stack up automatically, so tracing the frame’s inner opening with the Polygonal Lasso and clicking the layer-mask icon is all it takes to see straight through.
Enjoying This Free Tutorial?
We publish a new free tutorial every week, each one with sample images and PSDs you can download and follow along with. Sign up and they land straight in your inbox, along with early word on sales, events and subscriber-only offers.


How to Create a See Through Frame Effect in Photoshop
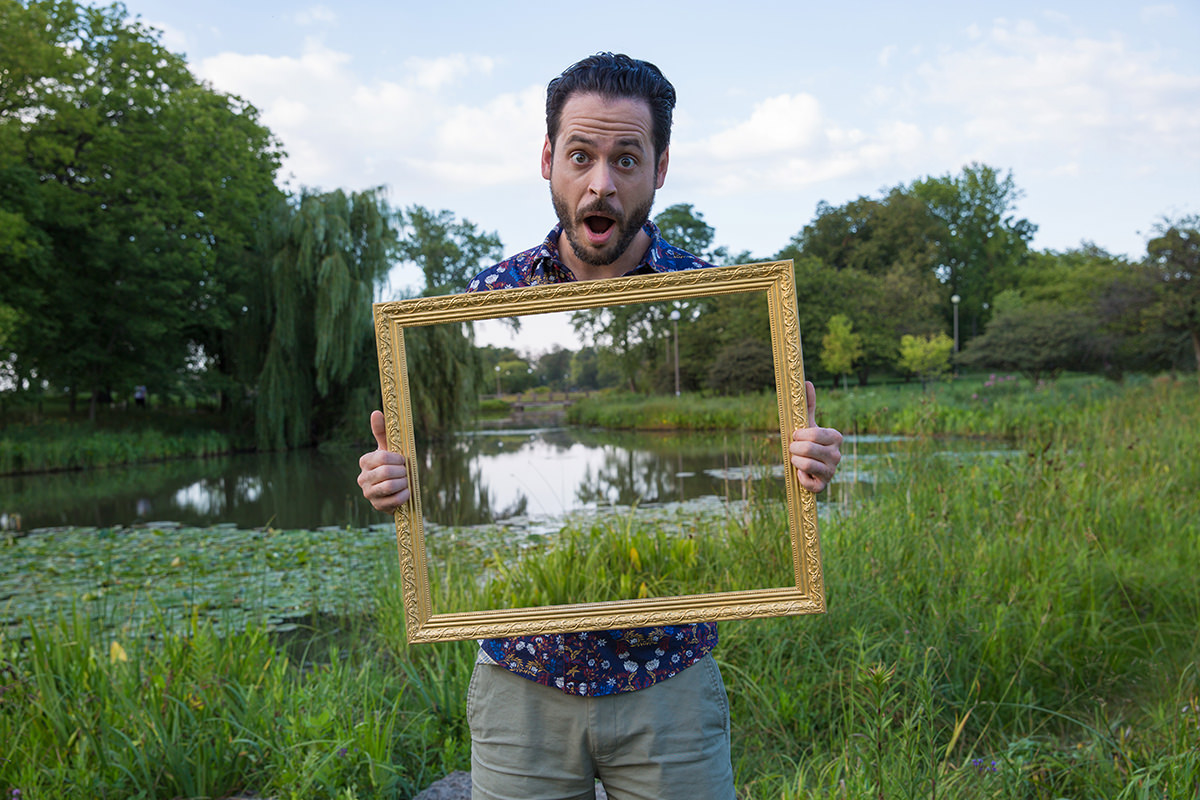
This is one of the simplest effects you can pull off with just a camera, a tripod, and an empty picture frame — ideally one that’s actually see-through, like the kind you can pick up cheap at a thrift store. The idea is to shoot the same scene twice, once with you holding the frame and once with you stepped completely out of it, then combine the two in Photoshop so it looks like the frame is showing a real view straight through wherever you were standing.
Shooting the Two Photos You’ll Need
Set up your camera on a tripod so the framing and position stay exactly the same between both shots. Take the first photo holding the frame up in front of you, then step completely out of frame and take a second photo of the same scene with nobody in it.
Locking Focus and Camera Position with a Tripod
Switch your camera to manual focus once you’ve locked in on the correct distance, so it doesn’t try to refocus between the two shots. Shooting in manual exposure mode as well helps keep settings like aperture and shutter speed identical across both photos. A tripod is what makes the whole effect possible in the first place — since the camera never moves, the two images line up perfectly by default once they’re brought into Photoshop, with no manual alignment needed.
Bringing Both Images into Photoshop
Open both photos in Photoshop as separate documents, then use the Move tool and hold Shift while clicking and dragging the empty background image onto the document with the frame photo. Holding Shift while dragging keeps the two layers perfectly aligned on top of each other, since the shift key constrains the placement to match the exact position of the original.
Aligning the Two Shots Since the Camera Never Moved
Because both photos were shot from a locked-down tripod position with manual focus, the scene itself lines up automatically between the two layers — minor differences, like clouds shifting slightly in the sky, aren’t a problem and won’t be noticeable in the final result. Make sure the photo of you holding the frame sits as the background layer, with the empty background photo directly above it.
Tracing the Inside of the Frame with the Polygonal Lasso Tool
Temporarily hide the top layer (the empty background photo) so you can see the frame clearly on the layer below. Zoom in and select the (Polygonal Lasso Tool), then click at each corner of the frame’s inner opening, clicking just slightly inside the frame’s edge rather than exactly on it. Holding the spacebar while dragging lets you pan around the zoomed-in image without switching tools, which makes it easy to reach each corner precisely.
Turning Off Feathering for a Crisp Edge
Before making the selection, make sure feathering is turned off in the Polygonal Lasso’s options. A crisp, hard-edged selection matches the sharp inner edge of a real picture frame far better than a soft, feathered one would, keeping the illusion convincing rather than blurry around the border.
Loading the Selection as a Layer Mask
With the selection tracing the inside of the frame complete, turn the top layer (the empty background photo) back on. Click the layer mask icon at the bottom of the Layers panel, and Photoshop loads the active selection directly as a (Layer Mask) on that layer — instantly making only the area inside the frame’s opening visible, while the rest of that layer stays hidden. This single click is what actually produces the see-through effect, revealing the empty background exactly where the frame’s opening sits, and nowhere else.
Using a Circular or Elliptical Frame Instead
The video uses a rectangular frame, but the same technique works with any frame shape. For a round or oval frame, the (Elliptical Marquee Tool) traces a curved opening far more accurately than trying to click corner points with the Polygonal Lasso tool. If you’d rather draw a perfectly proportioned (circle) shape to match a round frame precisely, that approach works well too — either way, the rest of the process (hiding the layer, making the selection, then loading it as a mask) stays exactly the same regardless of the frame’s shape.
Why This Effect Works
The entire illusion depends on the two photos being shot from an absolutely identical camera position, which is exactly what a locked-down tripod with manual focus and manual exposure guarantees. Because nothing about the framing or focus changes between the two shots, stacking the empty background layer directly on top of the frame photo lines everything up automatically, with no manual repositioning required. From there, a simple selection around the frame’s opening, loaded as a layer mask, is all it takes to reveal the empty background exactly where the frame is — the mask does the heavy lifting, cutting a precise window through to the layer below with a single click.
Final Thoughts
This is about as simple as a Photoshop compositing effect gets, and most of the actual work happens during the photo shoot rather than at the computer — get the tripod locked down, the focus and exposure set to manual, and shoot both photos from the exact same position. Once those two images are in Photoshop, tracing the inside of the frame and turning that selection into a layer mask takes just a couple of minutes, and the result looks like a genuinely see-through frame with almost no effort.
Quick Reference: Keys, Menus and Settings
- ShootTripod, manual focus, manual mode; one photo holding the frame, one with you out of the shot
- Stack the photosMove Tool V, Shift-drag the empty scene onto the frame photo
- Full screenF
- Trace the frameHide the top layer; Polygonal Lasso Tool, Feather off, click just inside each corner
- Pan while tracingHold Space for the Hand
- Reveal the sceneTurn the top layer back on, click the layer mask icon in the Layers panel
No AI, no generative credits.

Free Downloads
Follow Along on the Same Photos
Get the 2 sample photos, one holding the frame and one of the empty scene, plus the 2-page PDF guide. Free with a PHLEARN account.
See Through Frame Effect: Common Questions
What do I need for the see-through frame effect?
A camera, a tripod and an empty picture frame. If the frame is see-through, it’s better; a thrift store is a good place to find one.
Why switch to manual focus?
Focus where you’ll be standing, then switch to manual focus so the camera doesn’t refocus on the background when you step out. Both photos then have exactly the same focus.
Should I shoot in manual mode too?
If you can. Manual mode keeps the camera from changing its settings between the two pictures.
How do I get both photos into one document, lined up?
With both open, take the Move Tool, hold Shift and drag the empty scene onto the photo of you holding the frame. Because the camera never moved, the two line up on their own.
Which layer goes on top?
The photo of you holding the frame is the Background layer, with the empty scene right above it. The mask goes on that top layer.
What if something moved between the two shots?
Small changes are no big deal. In the video the clouds moved a little, and it doesn’t show in the result.
How do I select the inside of the frame?
Hide the top layer, zoom in and use the Polygonal Lasso Tool with feathering turned off. Click each of the four corners slightly inside the frame, holding the Spacebar to pan between clicks.
How does the selection become the see-through window?
Turn the top layer back on and click the layer mask icon. Photoshop loads the selection as a layer mask, so the empty scene shows only inside the frame.
Does this work with a round frame?
Yes. The video uses a rectangular frame; for a round or oval one, select the opening with the Elliptical Marquee Tool instead. The rest stays the same.
Are the sample files free?
Yes, with a free PHLEARN account. You get 2 sample images and 1 PDF guide: the photo holding the frame, the empty scene and the step-by-step guide.
From the Magazine View all
Stories, interviews and guides for photographers, new every week.
 EditingHow to Color Grade Photos in Photoshop and LightroomCorrect the photo first, then put color in the shadows, midtones and highlights. Aaron Nace on the order, the tools and skin.
 BusinessHow to Compete With AI: Give Your Clients MoreEveryone has the same tools now, and your clients know it. The way to compete is to give them more.
 EditingLightCraft vs Lightroom: I Edited the Same RAW Files in BothThe free clone on the same RAW files: what matches, what breaks and who should switch.
Master Photoshop, Lightroom and Photography
Join PHLEARN PRO for $12.99 a month, or $99.99 a year (save 36%). Cancel anytime, with a 100% money-back guarantee.





