

A texture pasted onto a wall gives itself away twice: at the seams where it repeats, and in the perspective it does not follow. This free Photoshop tutorial handles both, blending all four edges of a patch with Clone Stamp and a clipped Curves layer until it tiles invisibly, then distorting each corner of the fill to the room’s own vanishing lines before masking it around windows and anything standing in front of the wall.
We publish a new free tutorial every week, each one with sample images and PSDs you can download and follow along with. Sign up and they land straight in your inbox, along with early word on sales, events and subscriber-only offers.
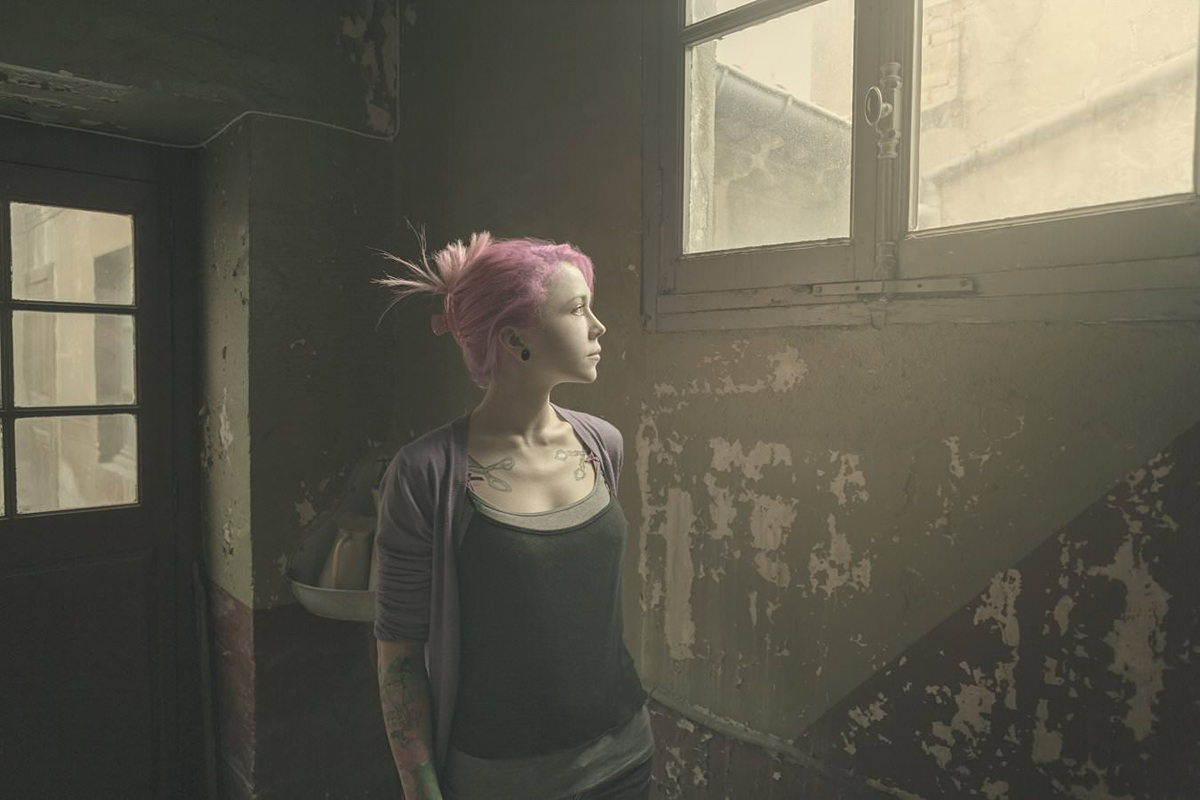
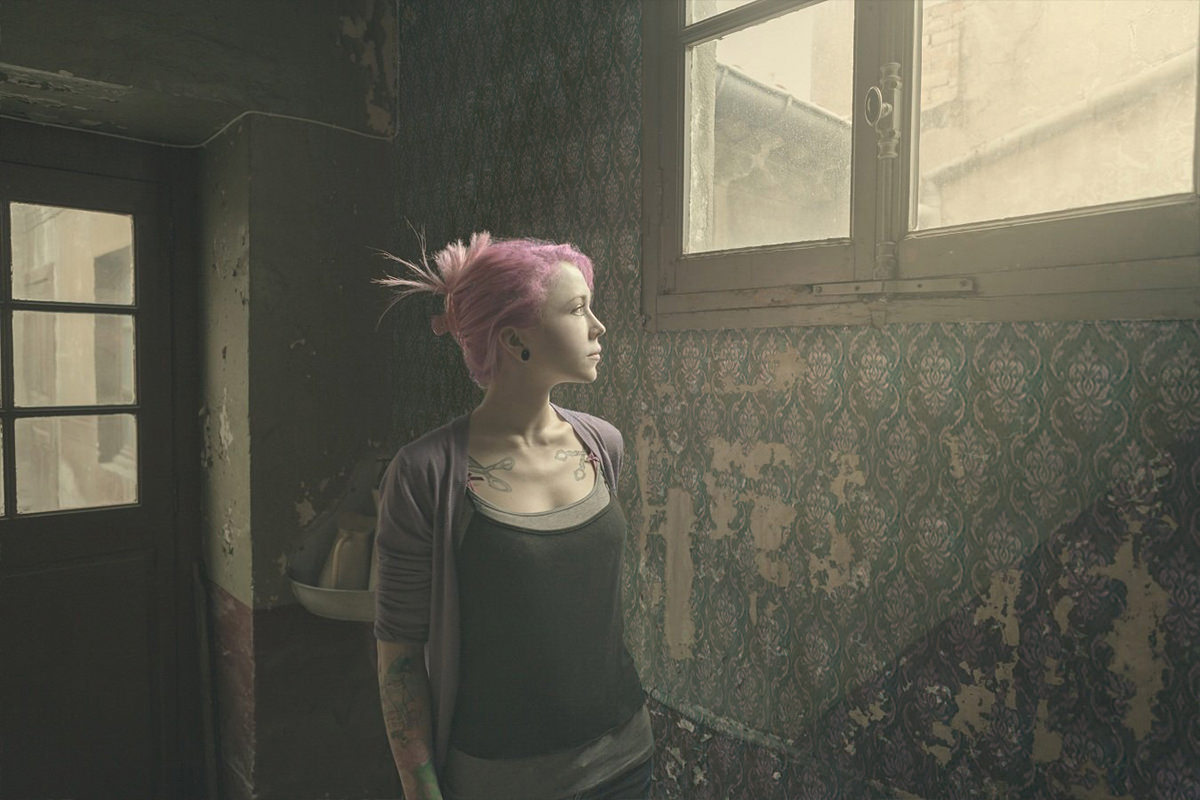
How to Apply Wallpaper Texture to Walls in Photoshop
Turning a photo of a texture into a realistic-looking wallpaper on a wall comes down to two separate skills: building a seamless, repeating pattern out of a single texture image, and then warping that pattern to match the perspective of the room in your photo. Neither step is complicated on its own, but skipping either one is what makes a fake wallpaper effect look obviously fake.
Getting Started with Your Source Texture
Before anything else, you need a texture image to work from. Free texture sites often license images for personal and commercial use as long as you credit the source, so download one you like and be sure to attribute it if you use it outside of practice work.
-
Choose a Texture with Even Lighting
Look for an area of the texture that’s relatively consistent in color and brightness. Avoid sections with heavy vignetting or areas that swing from very dark to very light — those variations will repeat obviously once the pattern tiles, giving away that it’s the same image copied over and over.
The goal is to find one patch of the texture that can tile seamlessly in every direction, rather than trying to make the entire original image repeat.
-
Select a Section That Naturally Repeats
Using the Marquee Tool, select from one repeating element in the pattern (like the top of one diamond shape) to the same point on the next repeating element. This gives you a patch whose edges should already align reasonably well.
-
Duplicate the Selection to a New Document
Press Ctrl + J on PC (Cmd + J on Mac) to duplicate the selection to its own layer, then right-click and choose Duplicate Layer to move it into a brand-new document just for this patch.
Why You Test the Repeat Before Committing
Duplicate the patch again and place copies side by side and top to bottom to preview how it tiles. It doesn’t need to be a perfect match at this stage — you’re just confirming the general pattern repeats reasonably well before spending time fixing the seams.
Blending the Seams Between Tiles
Even a well-chosen patch usually has a visible line where two copies meet, and that seam is what needs fixing before the texture is usable as a true tiling pattern.
-
Duplicate the Patch and Add a Curves Adjustment
Duplicate the layer again, then add a Curves adjustment layer and clip it to that duplicate (Alt + Cmd + G on Mac, or right-click and choose Create Clipping Mask) so the adjustment only affects that one layer.
-
Paint the Adjustment Onto the Seam
Invert the adjustment layer’s mask with Ctrl + I on PC (Cmd + I on Mac) to hide it completely, then paint with white directly over the visible seam to brighten or darken just that edge until it blends into its neighbor.
-
Refine with the Clone Stamp Tool
For a tighter blend, use the Clone Stamp Tool to sample texture from one edge and paint it over the opposite edge, which pulls the exact same texture across the seam so both sides match precisely.
Why You Delete the Original and Merge the Copies
Once you’re happy with how an edge blends, delete the original unedited layer and merge the remaining layers together (Ctrl + E on PC (Cmd + E on Mac)) before testing the seam again. Working this way — adjust, then merge, then re-test — keeps every fix cumulative instead of undoing your previous work each time you test a different edge.
A texture only tiles seamlessly if every edge matches its opposite edge, so this same blending process needs repeating on each side of the patch.
-
Repeat the Blend on the Remaining Edges
Duplicate the patch again and test the left edge against the right, then the top against the bottom, using the same Clone Stamp and Curves approach on each seam until duplicating the layer in any direction produces no visible line.
Cropping and Defining the Pattern
Once every edge tiles cleanly, the patch is ready to become an actual reusable Photoshop pattern.
-
Crop to the Clean Tiling Area
Make a selection around just the area that tiles well, then go to Image > Crop to trim the document down to that clean, seamless section.
-
Define the Pattern
Go to Edit > Define Pattern, give it a name, and click OK. This saves your cropped, seamless texture as a reusable pattern in Photoshop’s pattern library.
Filling a Layer with the Pattern
With the pattern defined, applying it as a repeating fill takes just a couple of clicks in your main image document.
-
Create a New Layer and Open the Fill Dialog
Create a new layer in your main document, then press Shift + Delete on PC (Shift + Backspace on Mac), or go to Edit > Fill.
-
Fill with Your Custom Pattern
Choose Pattern from the Contents menu, select the pattern you just created from the Custom Pattern picker, and click OK. Photoshop tiles the pattern seamlessly across the entire layer.
Sizing the Pattern Before You Fill
Check how large your source texture is relative to the wall you’re covering — it’s often much bigger than needed. Scale the image down (10% of the original size is a reasonable starting point) using Image > Image Size before defining the pattern, so the repeating tile ends up at a realistic scale on the wall.
Matching the Wall’s Perspective
A flat, unwarped pattern will look pasted-on no matter how seamless it is, because real walls recede into the distance following the room’s vanishing point. Set the pattern layer’s blending mode to Overlay and lower its opacity before you start warping, which makes it easier to see how it’s lining up with the wall underneath.
-
Open Free Transform and Distort the Corners
Press Ctrl + T on PC (Cmd + T on Mac), then hold Ctrl + Alt + Shift on PC (Cmd + Option + Shift on Mac) while dragging a corner to distort it toward the room’s vanishing point.
-
Adjust Each Corner to Follow the Room’s Lines
Repeat the corner-drag on each corner of the pattern so its edges roughly follow the same converging lines as the walls, floor, and ceiling in your photo — a rough match built on real perspective reads as convincing even if it isn’t pixel-perfect.
Masking the Wallpaper Into Place
With the perspective matched, the last major step is hiding the wallpaper anywhere it shouldn’t be visible — windows, doorways, and anything in front of the wall.
-
Mask Out Windows and Openings
Use the Polygonal Lasso Tool to rough in the shape of any window or opening, then Alt/Option-click the Add Layer Mask button at the bottom of the Layers panel to hide the pattern inside that selection. Working on a layer mask like this keeps every change reversible if you need to adjust it later.
-
Mask Away From the Subject and Foreground Details
Anything positioned in front of the wall — a person, a pipe, a fixture — needs the wallpaper masked away from it too, since those objects should always read as blocking the wall behind them.
Selecting Small Peeling or Damaged Areas
For small details like a peeling patch on the original wall, use the Magic Wand Tool with a low tolerance (around 9) to select just those specific areas without grabbing large parts of the surrounding wall, then fill that selection with black on the layer mask to keep the original detail visible through the new wallpaper.
Finishing Touches for Realism
A few small adjustments after the wallpaper is masked in are what separate a convincing composite from an obviously flat one.
-
Lower Contrast on Low-Contrast Textures
Add a Curves adjustment layer clipped to the wallpaper layer and pull your darks up and your brights down slightly — a texture that started out low-contrast can otherwise look too intense once it’s tiled across an entire wall.
-
Bring Back Shadows from the Original Wall
Sample a shadow color from the original photo using the Color Range or Eyedropper tool, fill a new clipped layer with that color, and set its blending mode to Multiply at a low opacity to let the original wall’s shadows show back through the new texture.
Common Mistakes to Avoid With This Technique
The most common mistake is skipping the seam-blending step and assuming any cropped patch will tile cleanly — textures with visible vignetting or uneven lighting almost always show an obvious repeat pattern once filled across a large area. The second is warping the pattern loosely without actually referencing the room’s real vanishing lines, which leaves the wallpaper looking flat even after everything else is done correctly. If the effect still looks fake once it’s placed, check contrast and shadow first, since a wallpaper that’s too high-contrast or missing the room’s original shadow detail tends to look pasted-on no matter how well the perspective matches.
Why This Technique Works
The reason this holds up as a realistic effect is that it separates two problems that are easy to conflate: making a texture tile seamlessly, and making that tile look like it belongs on a specific wall in a specific photo. Solving the tiling problem first, with a properly defined Photoshop pattern, means the repeat itself is invisible before you even start worrying about perspective. Solving the perspective problem second, by distorting the pattern to match the room’s real vanishing lines rather than eyeballing a generic angle, is what keeps the eye from immediately spotting it as pasted-on. Layer masking and a final pass of shadow and contrast work are really just cleanup at that point — the seamless tile and the correct perspective are what make or break the effect.
Final Thoughts
Once you’ve built one seamless pattern this way, the process gets faster every time — finding an even section, blending all four edges, defining it as a pattern, then warping and masking it into a photo. It’s a technique that applies well beyond wallpaper too: any repeating surface, from tile to fabric to flooring, can be built and applied the same way.
Quick Reference: Keys, Menus and Settings
- Copy the patchMarquee Tool, Cmd/Ctrl + J, then right-click > Duplicate Layer to a new document
- Fix a seamCurves clipped with Alt/Option + Cmd/Ctrl + G, Cmd/Ctrl + I on the mask, paint white; or the Clone Stamp Tool
- Merge and testDelete the original, Cmd/Ctrl + E to merge, Cmd/Ctrl + J to test the next edge
- Make the patternImage > Crop; Image > Image Size at 10%; Edit > Define Pattern
- Fill a layerShift + Delete (Edit > Fill), Contents: Pattern, then your Custom Pattern
- Match perspectiveOverlay at lower opacity; Cmd/Ctrl + T, Cmd/Ctrl-drag the corners
- Mask and finishAlt/Option-click Add Layer Mask; Magic Wand Tolerance 9; Curves to lower contrast; shadow color on Multiply
Wallpaper on Walls: Common Questions
Why can I see the repeat when I tile a texture?
The whole photo has vignetting and dark and light areas, so tiling it repeats those too. Pick one small area that is even in color and brightness and tile only that.
How do I choose the patch that repeats?
With the Marquee Tool, select from one point of the design to the same point on the next repeat, like the top of one diamond to the top of the next. Press Cmd/Ctrl + J, then right-click and choose Duplicate Layer to put it in its own document.
How do I get rid of the line where two tiles meet?
Clip a Curves adjustment layer to a copy with Alt/Option + Cmd/Ctrl + G, invert its mask with Cmd/Ctrl + I and paint white on the seam. Or use the Clone Stamp Tool to carry texture from one edge over the other, then merge with Cmd/Ctrl + E and test again.
How do I turn the patch into a pattern?
Select the clean area and choose Image > Crop. Then go to Edit > Define Pattern, name it and click OK.
Why is my wallpaper pattern far too big?
The source texture is often much larger than the wall needs. In the video, Image > Image Size at 10 percent of the original makes the tile the right scale before Define Pattern.
How do I fill a layer with my pattern?
Make a new layer and press Shift + Delete (Shift + Backspace) or go to Edit > Fill. Set Contents to Pattern, pick your pattern from Custom Pattern and click OK.
How do I make the wallpaper follow the wall’s perspective?
Set the layer to Overlay and lower its opacity so you can see the wall. Press Cmd/Ctrl + T, then hold Cmd/Ctrl, with Alt/Option and Shift for perspective, as you drag the corners toward the point where the room’s lines converge. A rough match still reads as real.
How do I keep the wallpaper off windows and peeling paint?
Select the window with the Polygonal Lasso and Alt/Option-click the Add Layer Mask button. For small peeling spots, Shift-click them with the Magic Wand at a low Tolerance (9 in the video) and fill the selection with black on the mask. Mask it off the person in front of the wall too.
The wallpaper looks pasted on. What helps?
Clip a Curves layer to it and lower the contrast. Then pick a shadow color with Select > Color Range, fill a clipped layer with it set to Multiply at a low opacity, and mask it to where the original wall had shadows.
Master Photoshop, Lightroom and Photography
Join PHLEARN PRO for $12.99 a month or $99.99 a year. Cancel anytime, with a 100% money-back guarantee.





