

Download Assets
Download Assets
This tutorial includes 1 sample RAW file. Downloads are free with a PHLEARN account.
- Free sample files with every tutorial on PHLEARN
- New tutorials published every week
- Unlimited downloads with your free PHLEARN account
Watch the Full Series
description
Lightroom Mobile is not a companion app. It is the same cloud library running on a phone, with a genuinely full editing panel behind it — and it will happily take RAW files straight off a card reader.
On Day 26 of 30 Days of Lightroom Classic we import RAW files without touching a computer, cull with flags and star ratings that sync, run AI Actions that mask a subject in a single tap, build a radial mask by hand, and watch every change appear on the desktop still fully editable.
This is Day 26 of our 30 Days of Lightroom Classic series. Follow along with all 30 episodes as we explore the magic of Lightroom together!
Continue Watching 30 Days of Lightroom Classic
JOIN 30 DAYS OF LIGHTROOM (FOR FREE!)
Ready to jump in? Sign up and we’ll email you a printable calendar and daily class schedule so you can get started right away!
Image Source


Lightroom Mobile Is the Same Library, on a Phone
Lightroom Mobile is not a companion app. It is the same cloud library you toured yesterday, running on a phone or tablet, with a genuinely full editing panel behind it. Masking, AI Remove, Lens Blur, adaptive presets — they are all here, and they all work on full RAW files.
That last point is the one people underestimate. You can plug a card reader into your phone, import RAW files straight off the card, edit them properly on a screen the size of your hand, and have every change waiting on your desktop by the time you get home. For travel, that changes what is possible.
Getting Around: The Bottom Tabs
Everything starts with the row of tabs along the bottom of the screen.
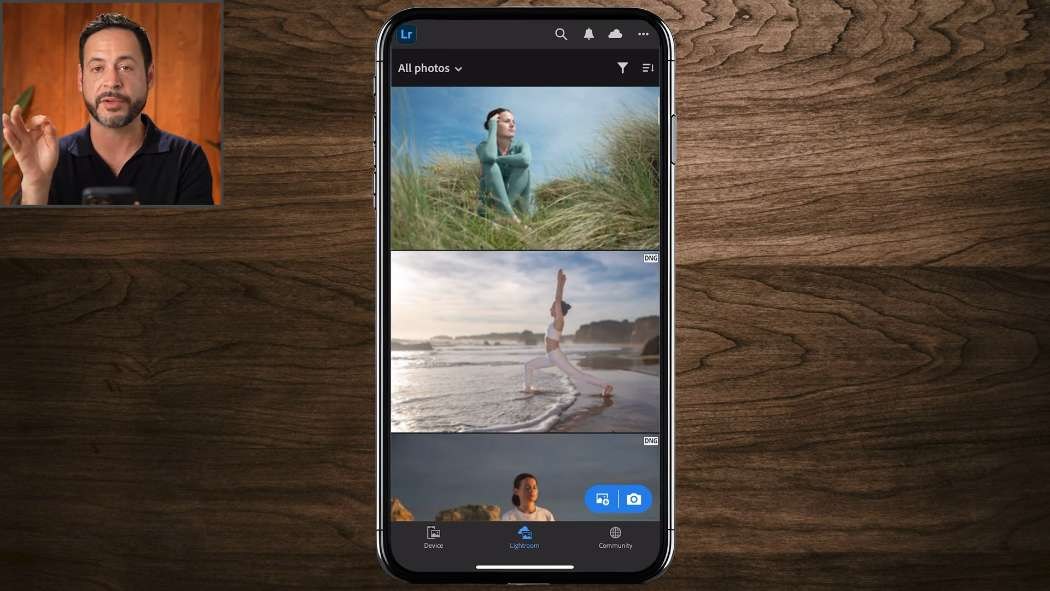
- Lightroom — your cloud library, with albums synced from every device.
- Device — photos stored on the phone itself.
- Community — trending edits from other photographers, which you can open and remix.
- Learn — interactive tutorials built into the app.
The Device tab trips people up. Photos sitting there are on your phone, not in the cloud, and edits you make to them do not sync anywhere. To bring one into the workflow, add it to your Lightroom library first.
Three Ways to Get Photos In
-
From your camera roll
Tap the add button and pick anything already on the phone — JPEG or RAW.
-
From a card reader
Connect a reader directly to your phone or tablet and import full RAW files straight off the card. No computer involved.
-
With the in-app camera
Lightroom’s own camera shoots RAW, so photos you take inside the app land in your library with all the latitude of a proper capture.
Culling From the Couch
Open a photo and tap the i icon and you get the full metadata: camera body, lens, focal length, aperture, shutter speed, capture date. Everything Classic shows you in the Metadata panel is here.
More useful is what you can do with it. Star ratings and pick or reject flags work on mobile exactly as they do on the desktop, and there is a gesture for it — press and hold on the image and drag up to flag it as a pick, drag down to reject. Because ratings sync, you can cull a shoot on your phone in the evening and sit down at your computer the next morning with the selects already made.
Actions: The Fastest Way to a Good Edit
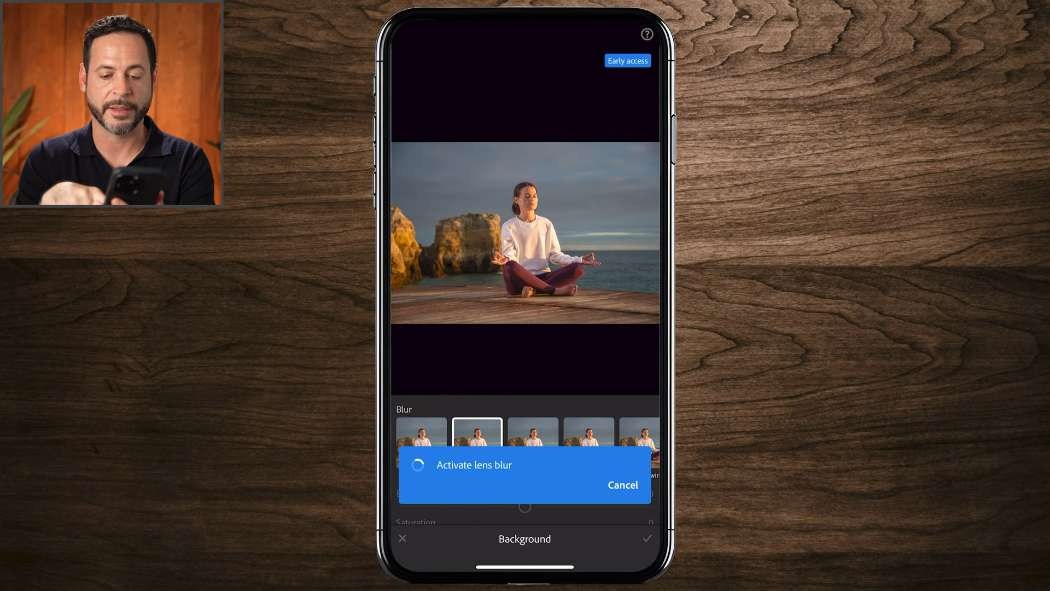
The Actions tab is the one worth learning first. Actions are AI-driven edits that handle the selection work for you — one tap runs the analysis and applies the adjustment.
- Auto balances exposure, contrast and colour across the whole frame.
- Make the subject pop finds your subject, masks it, and lifts it away from the background.
- Blur the background applies real Lens Blur to everything behind the subject — the same tool from Day 21, not a phone-camera filter.
- Sky actions detect the sky and treat it on its own.
The masks these create are left behind for you to adjust. Run an action, then open Masking and you will find the selections sitting there, fully editable. It is the manual process you learned on Days 5 and 6, done for you in a second.
Presets, and One Honest Warning
The Presets tab carries recommended presets, adaptive presets that target the portrait or the sky, and a Premium set. They work, and they are a quick way to try a direction.
But there is a real limitation compared to the desktop app: mobile presets have no strength slider. On the desktop you can dial a preset back to thirty percent and keep the parts you like. On mobile it is all or nothing, and a lot of these presets are heavy at full strength. If a preset is too much, your only option is undo.
That is why Actions are the better starting point on a phone. They tend to land closer to something usable, and everything they do stays adjustable afterwards.
The Full Editing Panel
Below Actions and Presets sit the same panels you use on the desktop, arranged as tabs rather than a long scroll: Light, Color, Effects, Detail, Optics, Color Grading and Lens Blur. The sliders are identical, because the processing engine is identical.
Masking
-
Open the Masking panel
Any masks created by an Action are already listed and ready to edit.
-
Tap the plus icon to add your own
Radial, linear, brush, subject, sky, background and object masks are all available.
-
Drag out from the centre
For a radial mask, tap and drag from the middle of the area you want to affect.
-
Set the feathering
Open the feather control and soften the edge until the transition is invisible.
-
Adjust Light inside the mask
Lift exposure, pull contrast, whatever the area needs — then tap the check mark to commit it.

Remove and Crop
The AI Remove tool works by painting over what you want gone — a stray line in a boardwalk, a person in the background — and letting Lightroom generate a replacement. Crop offers the usual ratios and a straightening control.
One thing to watch: after cropping an image that already has AI masks on it, Lightroom will tell you those selections need recalculating. Tap Update and it redraws them against the new framing.
Copying Edits and Sharing
Copy and paste works here too. Finish one photo, copy its edit settings, open the next and paste. On a set shot in consistent light that is most of the batch handled without touching a slider twice.
Exporting is under the share icon. You can send a finished JPEG straight into a message, save it back to your camera roll, or share the whole album. Since the originals are RAW files in the cloud, you always have the full-quality version to go back to.
Everything Syncs, Both Directions
Sit down at your computer and open Lightroom on the desktop. The edit you made on the phone is already there — and every mask, every slider, every step is still live and adjustable. Nothing was flattened on the way across.
That two-way sync is what makes the mobile app worth building into a real workflow rather than treating as a toy. Cull on the sofa, edit on the train, finish at the desk. Or the other way round.
Where Lightroom Mobile Fits
The strongest case is travel. A card reader, a phone or tablet, and a decent internet connection is a complete editing setup — RAW files off the card, edited properly, syncing to the cloud so they are backed up and waiting on your computer before you unpack.
It is also simply the fastest way to keep working when you are away from your desk. The app is close enough to a mirror of the desktop version that there is almost nothing new to learn. If you have followed this series, you already know how to use it.
Quick Reference: Menus and Settings
- Import photosLightroom tab > plus icon: from your device, Files or a connected camera or card
- Shoot RAW in the appCamera icon, DNG at the top
- Rate and flagi icon for stars and picks; press and hold, drag up for a pick, down for a reject
- Quick editActions: Auto, subject, background (Lens Blur), sky, retouch
- Add a maskMasking > plus icon > Radial Gradient, drag from the center, Feather, then Light
- Before and afterPress and hold on the image
- Save to your phoneShare icon > Save a Copy to Device
Many mobile presets have no strength slider; if one is too strong, tap undo and try an Action instead.
Free Downloads
Follow Along on the Same RAW File
Get the RAW file from the video, so you can import it into Lightroom Mobile, edit it on your phone and watch the edit sync to your computer. Free with a PHLEARN account.
Lightroom Mobile: Common Questions
What can Lightroom Mobile do?
It is the cloud-based Lightroom on your phone or tablet, with almost all the same editing tools. Photos you import on your computer sync to it, and edits you make on the phone sync back.
Why don’t my phone photos sync to Lightroom?
Photos in the Device tab are only on your phone. Tap the plus icon in the Lightroom tab to import them; then you can edit them and they sync to the cloud.
Can I import RAW files on my phone?
Yes. Use the add icon to bring in RAW or JPEG files from your device or Files. With a USB-C phone, like an iPhone 15 or newer, you can connect a camera or memory card and import straight from it.
How do I flag picks and rejects on my phone?
Tap the i icon to rate and flag the photo, or press and hold on the image and drag up for a pick or down for a reject. Ratings and flags sync to Lightroom on the desktop.
What are Actions in Lightroom Mobile?
One-tap AI edits on the full RAW file: Auto, make the subject pop, blur the background with Lens Blur, sky and skin retouching. They leave masks you can adjust later, and you may need to request access to them.
Can I change the strength of a preset on mobile?
Many mobile presets have no strength slider, and a lot of them are strong. If one is too much, tap undo. Aaron recommends starting with Actions instead.
How do I add a mask in Lightroom Mobile?
Open Masking and tap the plus icon, then pick a mask such as Radial Gradient and drag out from the middle. Set the feather, adjust Light inside the mask and tap the check mark.
How do I save an edited photo to my phone?
Tap the share icon and choose Save a Copy to Device. It saves a JPEG you can post or send, while the RAW stays in the cloud.
Why does Lightroom say AI settings need to be recomputed?
Changing the crop of a photo with AI masks means the selections need redrawing. Click Update and Lightroom finds the subject and background again in the background.
Is the sample file free?
Yes, with a free PHLEARN account. You get 1 sample RAW file to put through Lightroom Mobile and see the edit sync to your desktop.
Master Photoshop, Lightroom and Photography
Join PHLEARN PRO for $12.99 a month or $99.99 a year. Cancel anytime, with a 100% money-back guarantee.





