

Download Assets
This tutorial includes 1 PDF guide. Downloads are free with a PHLEARN account.
- Download the sample files from every free tutorial on PHLEARN
- New free tutorials published every week
- One free account: sign up once, then download anything
Free PDF Guide · 3 Pages
This Tutorial as a Step-by-Step PDF
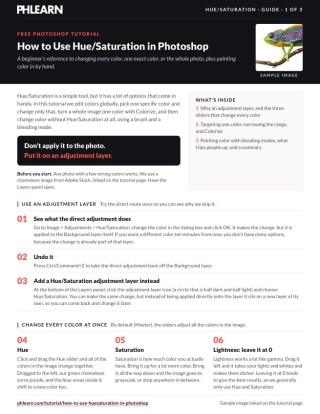
This guide walks through Hue/Saturation on an adjustment layer: the Hue, Saturation and Lightness sliders on Master, targeting one color from the dropdown such as Greens, using the eyedropper to pick the exact shade, and Colorize. Keep it next to your keyboard while you practice on your own photos.
description
Three sliders hide a surprising amount of range. This tutorial covers Hue/Saturation as an adjustment layer rather than a destructive edit, global shifts with Master, isolating one exact color with the eyedropper and the feathered range slider, tinting a whole photo with Colorize, and painting color in by hand on a layer set to Color blend mode.
Enjoying This Free Tutorial?
We publish a new free tutorial every week, each one with sample images and PSDs you can download and follow along with. Sign up and they land straight in your inbox, along with early word on sales, events and subscriber-only offers.

Hue/Saturation looks like a simple three-slider dialog, but it can adjust every color in an image globally, target one specific color range precisely, colorize an entire photo to a single tone, or work alongside a painted layer to change color exactly where it’s needed. This tutorial covers each of those approaches, starting with why an adjustment layer beats editing the background layer directly.
Using an Adjustment Layer Instead of Editing Directly
Applying Hue/Saturation through Image > Adjustments bakes the change permanently into the background layer, while an adjustment layer keeps the same change fully editable on its own separate layer.
-
Compare the Direct Adjustment Method
Go to Image > Adjustments > Hue/Saturation to see how a direct adjustment applies the change permanently onto the background layer.
-
Undo and Use an Adjustment Layer Instead
Press Cmd/Ctrl+Z to undo, then click the adjustment layer icon in the Layers panel and choose Hue/Saturation to make the same change on its own separate layer.
Why an Adjustment Layer Is the Better Choice
A direct adjustment through the Image menu permanently changes the pixels on the background layer, leaving no easy way to revisit or fine-tune that color decision later. An adjustment layer instead keeps the same Hue/Saturation change sitting on its own layer, fully editable at any point in the future without ever touching the original image data.
Adjusting Hue, Saturation, and Lightness Globally
With the Master channel selected, the three main sliders shift every color in the image at once, from hue and color intensity to overall brightness.
-
Drag the Hue Slider
Drag the Hue slider left or right to shift every color in the image around the color wheel, such as turning a green subject purple.
-
Drag the Saturation Slider
Drag the Saturation slider to increase color intensity, or bring it all the way down toward grayscale.
-
Leave Lightness Near Zero for Best Results
Leave the Lightness slider close to zero in most cases, since it works a lot like a gamma adjustment; dragging it to the left, for example, turns the whites and light tones darker.
Why the Eyedropper Beats Guessing a Color Channel
Manually choosing a preset channel like Greens and adjusting it can still end up affecting the wrong greens in an image, since real-world colors rarely match a preset category exactly. Clicking directly on the specific color that needs to change with the eyedropper instead sets the range precisely around that exact color, leaving visually similar but unrelated colors untouched.
Targeting a Specific Color Range With the Channel Dropdown
Switching from Master to a specific color channel, like Greens, restricts the Hue and Saturation sliders to affect only that range of colors instead of the entire image.
-
Choose a Color Channel From the Dropdown
Click the Master dropdown and choose a specific color, such as Greens, to restrict the adjustment to that range.
-
Use the Eyedropper to Target the Exact Color
Click the eyedropper icon and click directly on the specific color in the image that needs to change, such as green skin rather than a green background.
Fine-Tuning the Range With the Slider’s Feathered Edges
The color range slider at the bottom of the dialog can be narrowed and feathered by dragging its handles, restricting the adjustment to an even more precise slice of color.
-
Narrow the Selected Color Range
Drag the inner range markers on the color slider inward to narrow exactly which colors are affected.
-
Adjust the Feathering on Either Side
Drag the outer feathering markers to control how gradually the adjustment fades in and out at the edges of the selected range.
-
Boost Saturation Temporarily to Preview the Target Area
Raise saturation all the way up temporarily to clearly see exactly which pixels fall within the currently targeted range.
Changing One Targeted Color Into a Completely Different Color
Once a color range is precisely targeted and feathered, shifting the hue for just that range can transform it into an entirely different color while leaving the rest of the image untouched.
-
Target a Specific Color Like Orange
Use the eyedropper and range sliders to isolate a specific color, such as orange, precisely.
-
Shift the Hue to a New Color
Drag the Hue slider until the targeted orange shifts into a new color, such as red, while every other color in the image stays unaffected.
Why Colorize Works Well for Swapping One Overall Color
Trying to change something like a red shirt to green with the regular Hue slider alone can leave uneven results if the shirt has multiple shades of red in its shadows and highlights. Colorize instead forces the entire selected area to one consistent hue and saturation, which is exactly what’s needed when the goal is a clean, uniform color swap rather than a subtle shift.
Colorizing the Entire Image to One Consistent Tone
The Colorize checkbox overrides an image’s existing color variation entirely, tinting the whole thing to a single, adjustable hue and saturation.
-
Add Another Hue/Saturation Adjustment Layer
Add a new Hue/Saturation adjustment layer to colorize the image.
-
Check Colorize
Click the Colorize checkbox to tint the entire image to one uniform color.
-
Adjust Hue and Saturation for the Colorized Tone
Adjust the Hue and Saturation sliders to choose the exact tone the colorized image should take on.
-
Lower Opacity to Bring Back Some Original Variation
Reduce the colorize layer’s opacity to blend in some of the image’s original color variation alongside the new uniform tone.
Painting Color Directly With a Brush and Blend Mode
Painting on a new layer set to a color-based blend mode applies just the hue and saturation of the painted color, rather than sitting on top as an obviously separate flat layer of paint.
-
Create a New Layer and Paint With a Chosen Color
Press B for the Brush tool, choose a color, and paint directly onto a new layer over the area to be recolored.
-
Change the Blend Mode to Color
Change the new layer’s blend mode from Normal to Color, so the painted color affects the underlying image’s color rather than sitting on top as flat paint.
-
Experiment With Hue, Overlay, or Soft Light
Try alternate blend modes like Hue, Overlay, or Soft Light to see different ways the painted color can mix with the colors already in the image.
Why This Approach Works
Using an adjustment layer instead of a direct edit is what keeps every Hue/Saturation decision revisitable, whether that’s a global shift, a targeted color change, or a full colorize effect. Narrowing and feathering the targeted color range with the eyedropper and sliders is what makes it possible to change one specific color, like skin tone, without disturbing every other similar color in the image. Painting color with a blend mode like Color or Hue, rather than Normal, is what lets a hand-painted color genuinely affect the image’s existing tones instead of sitting on top as an obviously separate layer of paint. The chameleon photo used throughout this tutorial is available HERE for anyone who wants to follow along with the same image.
Final Thoughts
Hue/Saturation turns out to have a lot more depth than its three sliders first suggest, from global mood shifts to surgically precise single-color changes to full colorize effects. Once the targeting and feathering controls feel familiar, this same dialog becomes one of the most versatile color tools in Photoshop for both correcting and creatively transforming an image.
Quick Reference: Keys, Menus and Settings
- Undo a direct editImage > Adjustments > Hue/Saturation changes the layer; Cmd/Ctrl + Z to undo
- Adjustment layerHalf-dark circle at the bottom of the Layers panel > Hue/Saturation
- All colorsMaster: Hue, Saturation; Lightness at 0
- One colorMaster dropdown > Greens, or the eyedropper on the exact color
- Narrow the rangeDrag the range and feather markers on the bottom color bar; Saturation up to preview
- One overall colorNew Hue/Saturation layer, Colorize; lower Opacity for variation
- Paint a colorNew layer, B; blend mode Color, or Hue, Overlay, Soft Light
Free Downloads
Take the Guide With You
Get the PDF guide to Hue/Saturation as an adjustment layer: global sliders, targeting one color with the eyedropper and range slider, Colorize and painting in Color mode. Free with a PHLEARN account.
Hue/Saturation in Photoshop: Common Questions
Should I use Image > Adjustments or an adjustment layer?
Use the adjustment layer. Image > Adjustments > Hue/Saturation changes the background layer itself, while the adjustment layer keeps the change on its own layer so you can edit it later.
Where is the adjustment layer button?
At the bottom of the Layers panel: the circle that is half dark and half light. Click it and choose Hue/Saturation.
What do the Hue, Saturation and Lightness sliders do?
Hue moves every color around the color wheel, turning the green chameleon purple. Saturation sets how much color there is, down to grayscale. Lightness works a lot like gamma; leaving it at 0 usually gives the best results.
How do I change just one color?
Change the Master dropdown to a color range such as Greens, or click the eyedropper and click the exact color in the photo. Hue and Saturation then affect only that range.
Why are the wrong greens changing?
The Greens preset covers every green in the picture. Use the eyedropper on the green you actually want, here the skin rather than the leaves above.
How do I narrow the range even more?
Drag the range markers on the color bar at the bottom inward, along with the feather markers on each side. Push Saturation all the way up for a moment to see exactly which pixels are affected.
What does Colorize do?
It turns the whole image one color, which you set with Hue and Saturation. Lower the layer’s opacity to bring back some of the original color variation.
Why does my painted color look like flat paint?
The layer is still on Normal. Change its blend mode to Color so the paint changes the color underneath. Hue, Overlay and Soft Light give other mixes.
Is there a free download?
Yes, with a free PHLEARN account. You get 1 PDF guide to the Hue/Saturation options shown, from global sliders to Colorize and painting in Color mode.
Master Photoshop, Lightroom and Photography
Join PHLEARN PRO for $12.99 a month, or $99.99 a year (save 36%). Cancel anytime, with a 100% money-back guarantee.





