
Download Assets
This tutorial includes 2 sample images, 2 sample PSDs and 1 PDF guide. Downloads are free with a PHLEARN account.
- Download the sample images and PSDs from every free tutorial on PHLEARN
- New free tutorials published every week
- One free account — sign up once, then download anything
Free PDF Guide · 4 Pages
This Tutorial as a Step-by-Step PDF
The 4-page guide walks through Select Subject and a layer mask, Expand 30 pixels and an empty Generative Fill prompt to clear the background, Image > Apply Image and Convert to Smart Object, then Filter > Blur Gallery > Path Blur with Speed, extra paths and End Point Speed for the car. Keep it next to your keyboard.
description
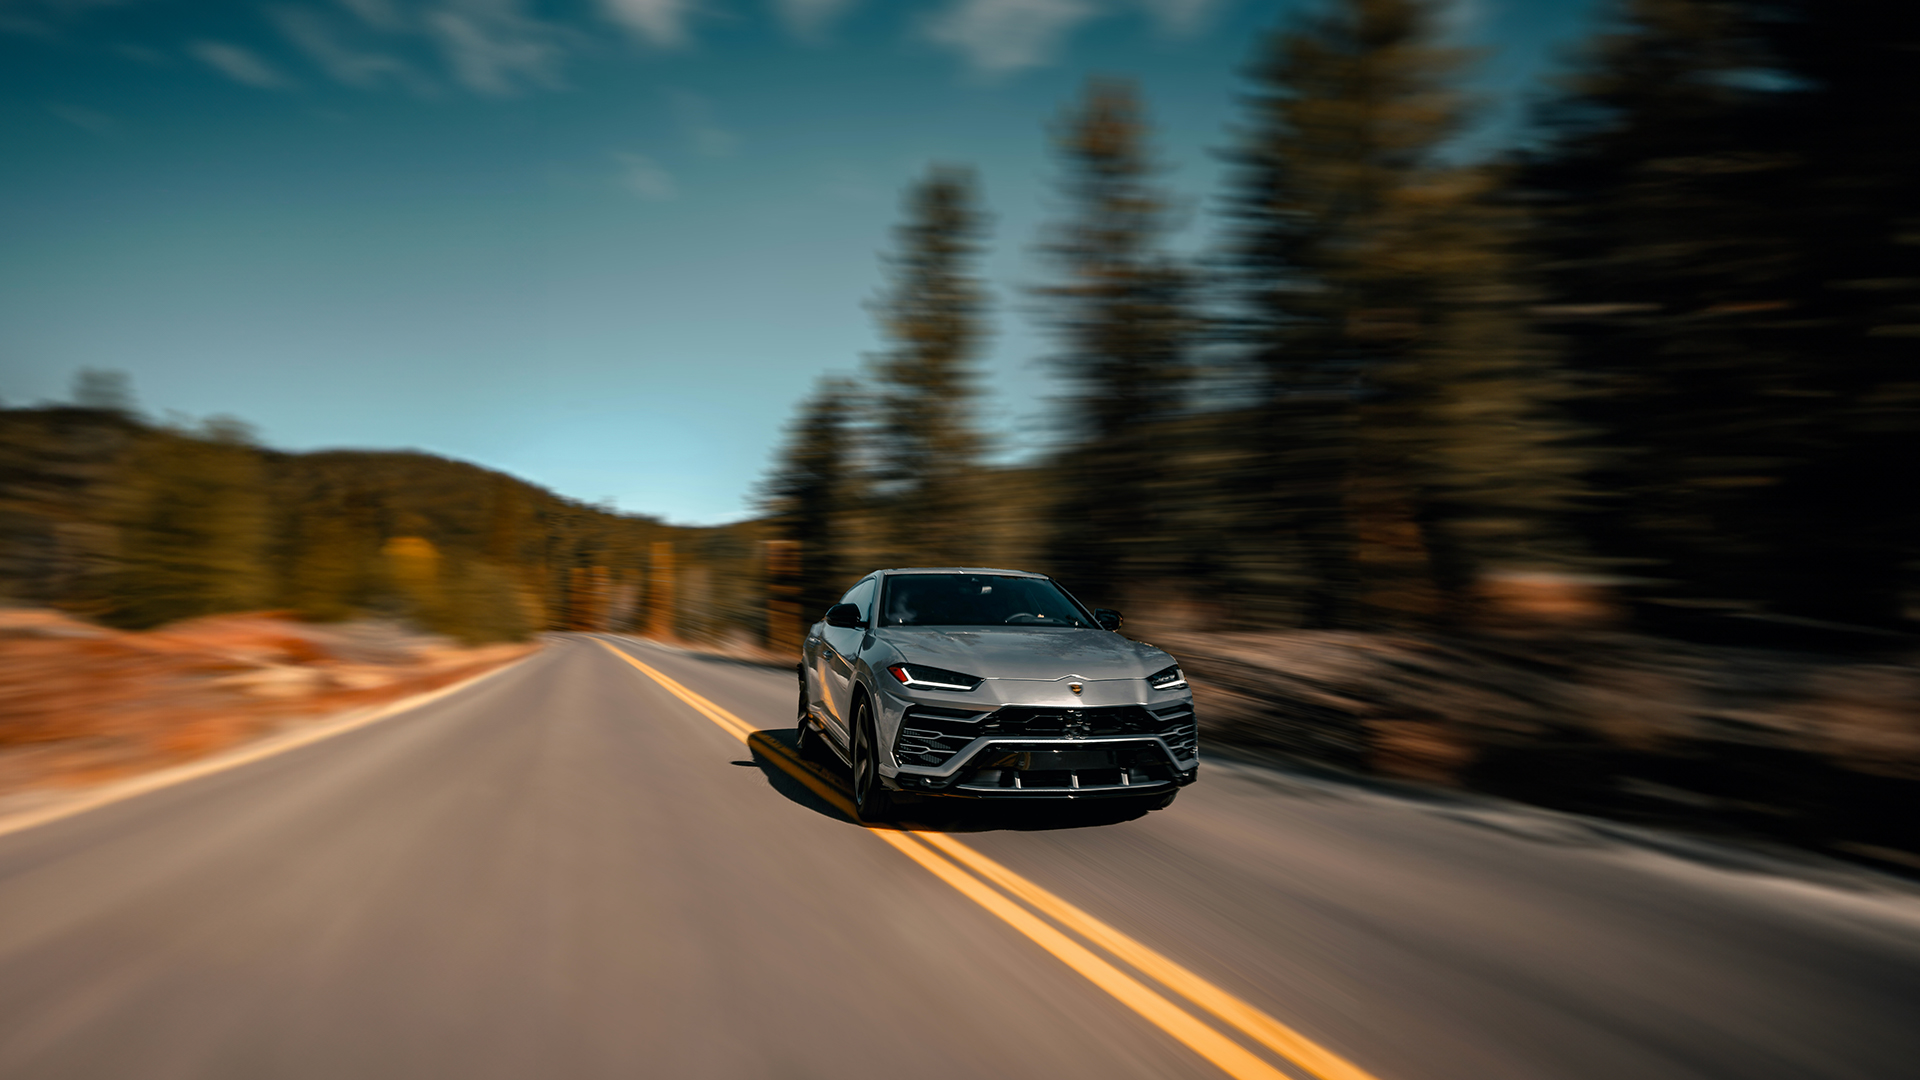
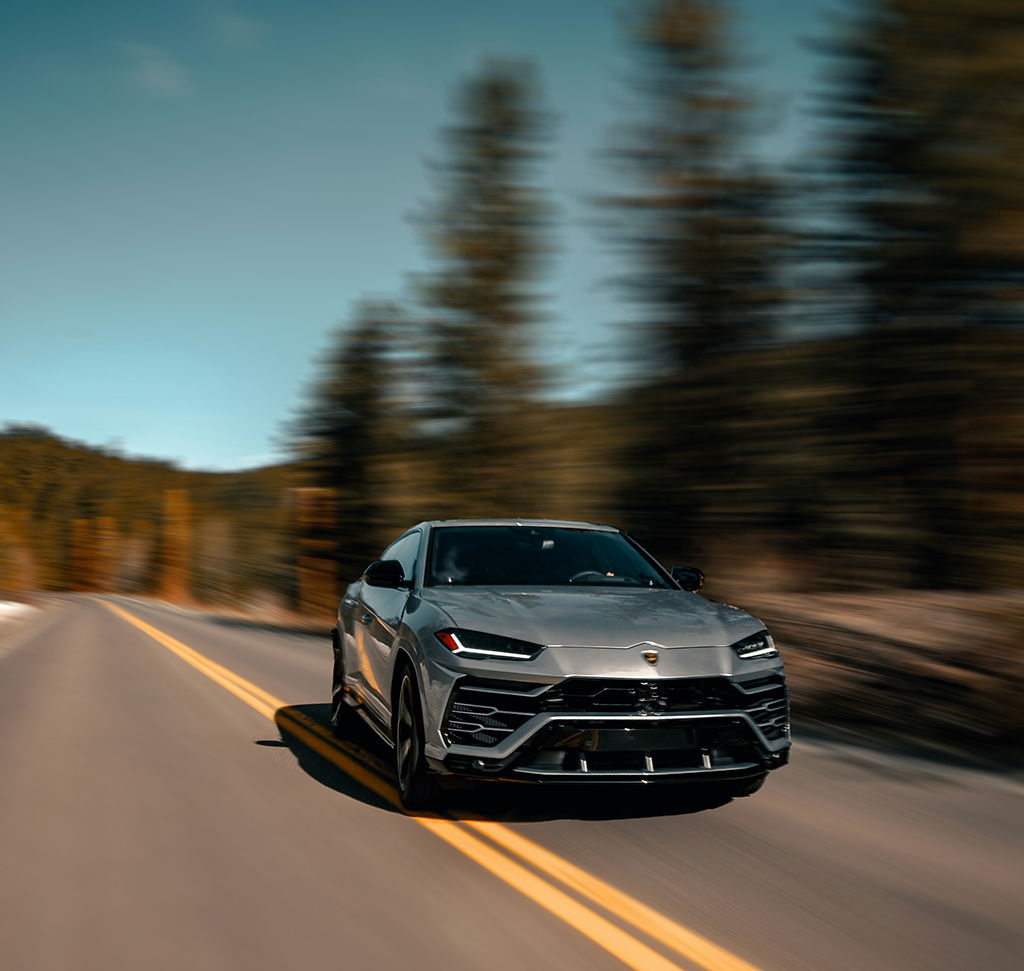
A speed effect in Photoshop works by separating the subject from its background, blurring the background along a path, and putting the sharp subject back on top. In this tutorial, we’ll guide you through the process of isolating your subject, replacing the background, and applying a customizable motion blur to simulate a zooming camera. Let’s jump into Photoshop!
Enjoying This Free Tutorial?
We publish a new free tutorial every week, each one with sample images and PSDs you can download and follow along with. Sign up and they land straight in your inbox, along with early word on sales, events and subscriber-only offers.
Image Source
How to Create a Speed Effect in Photoshop
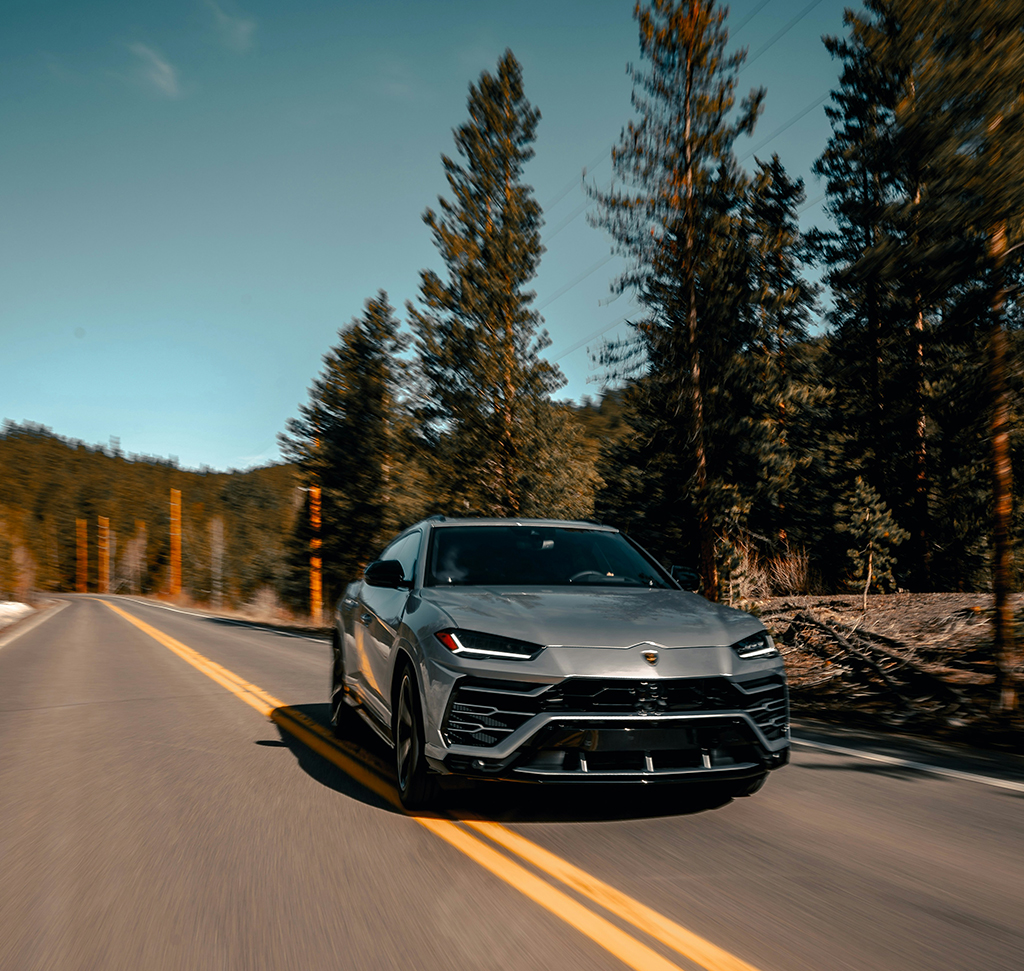
The speed effect is one of the most recognisable looks in sports and automotive photography: the subject frozen sharp while the world streaks past behind them. Shot in camera it takes a slow shutter and a well-practiced panning technique. Built in Photoshop it takes a selection, a clean background, and one filter.
The filter itself is easy. What separates a convincing result from an obvious one is the preparation underneath it, and specifically one step most people skip.
Isolate the Subject
-
Press F for full screen
Optional, but it gives you the whole frame without panel clutter.
-
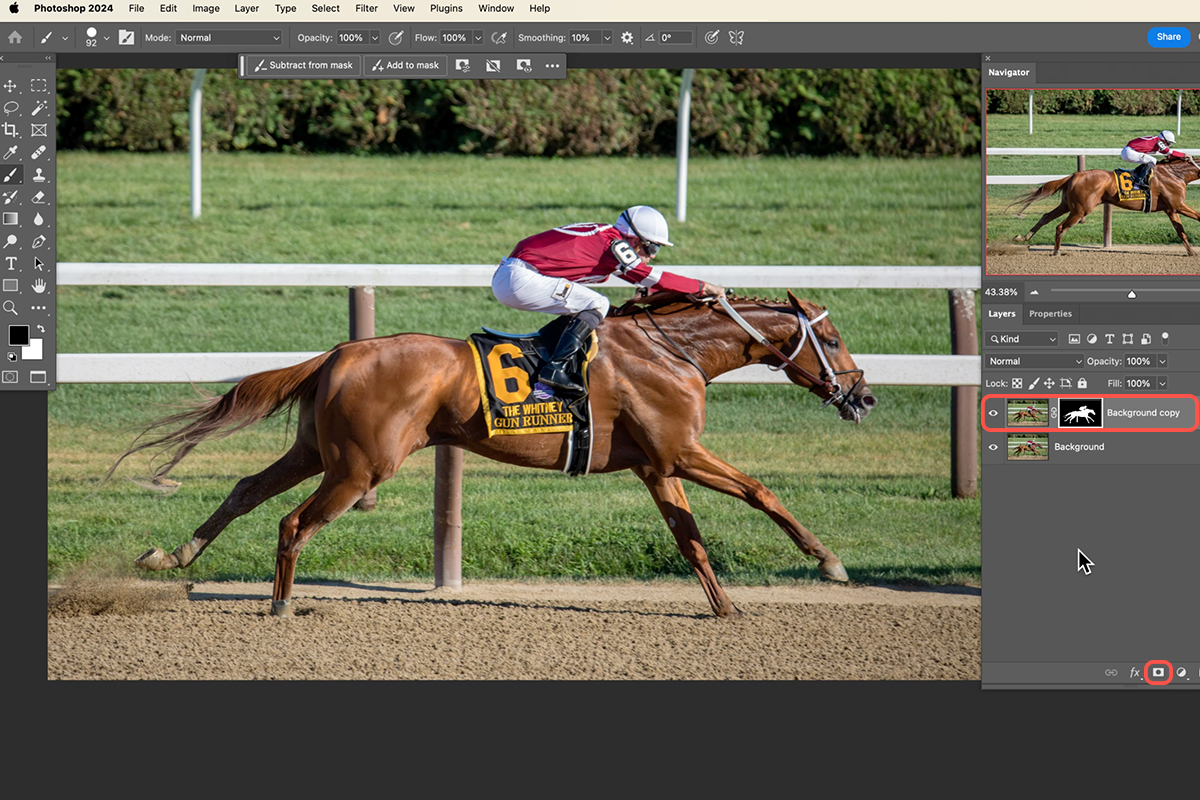
Run Select, then Subject
Photoshop identifies the subject automatically.
-
Duplicate the background layer
Drag it onto the new layer icon at the bottom of the Layers panel.
-
Apply the selection as a layer mask
Click the mask icon. Your subject now sits on its own layer, cut out from the background beneath.
-
Refine the mask with a brush
Press B and paint black to hide anything the automatic selection wrongly included, or white to bring back anything it clipped.
How good does the cutout need to be?
Better than you might expect. The blurred background will sit directly against the subject’s edge, so any error there is framed by motion and becomes conspicuous — a bump in the outline reads as a mistake rather than as speed.
Select Subject plus a bit of brushwork is fine for personal work and social posts. For anything professional, cut the subject out with the Pen Tool instead. It takes longer and it is the difference between an effect that holds up at full size and one that only works as a thumbnail.
Remove the Subject From the Background
This is the step people skip, and it is the reason most attempts at this effect look wrong.
If you blur the original background with the subject still in it, the subject’s own shape gets smeared along with everything else — so you end up with a sharp subject sitting in front of a blurred ghost of themselves. It shows as a halo of subject-colored streaks radiating out from the edges, and once you have seen it you cannot unsee it.
The fix is to give the blur a clean background to work with:
-
Select the background layer copy
The one underneath your masked subject.
-
Load the subject’s mask as a selection
Hold Ctrl or Cmd and click the layer mask thumbnail on your subject layer.
-
Expand the selection slightly
Select, then Modify, then Expand. A few pixels, so no fringe of the subject survives.
-
Run Generative Fill with an empty prompt
Type nothing. An empty prompt tells Photoshop to remove the subject and extend the background across the gap.
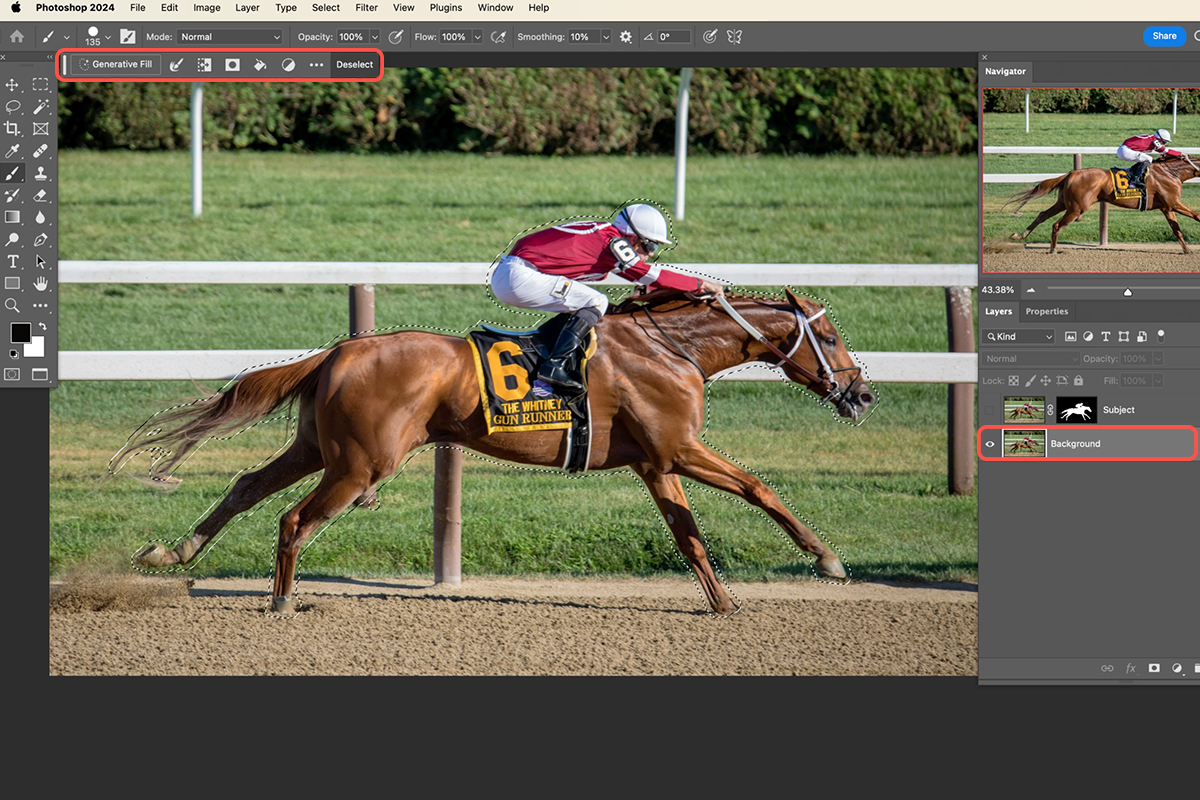
You now have a complete background with no subject in it at all. That is what you want to blur.
Consolidate and Convert
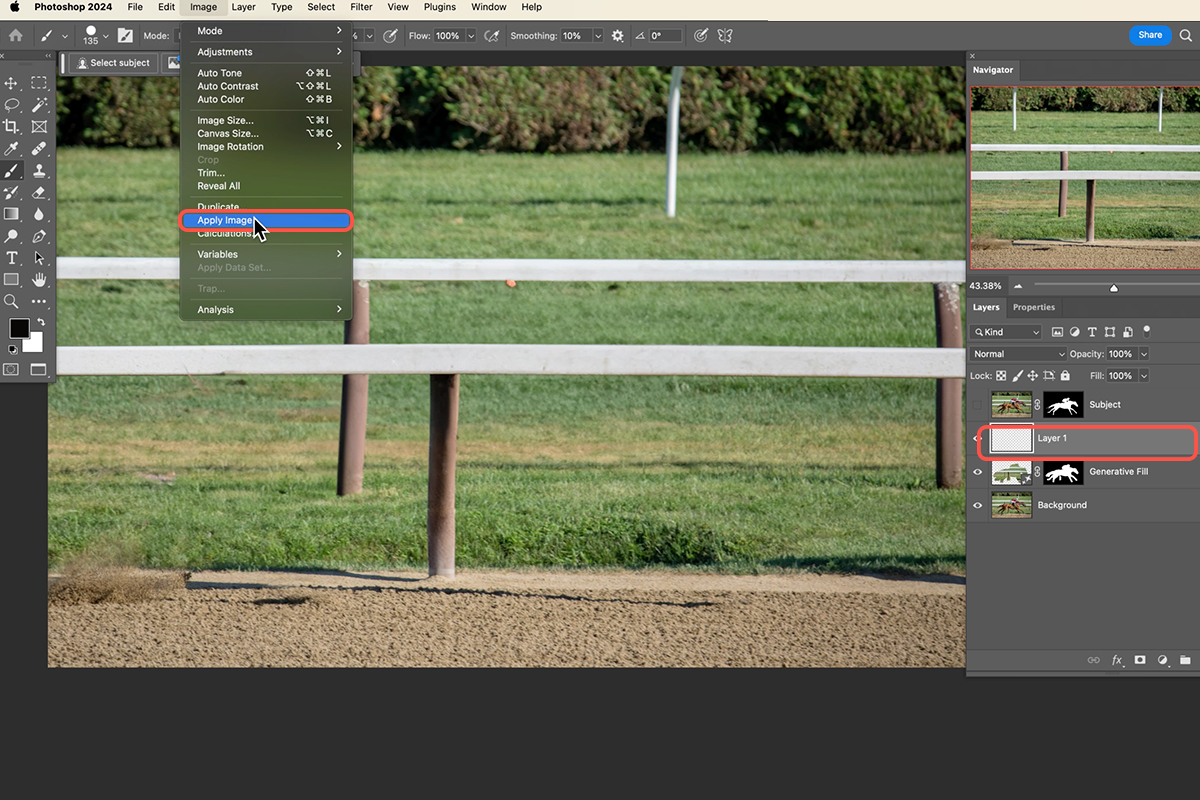
Create a new layer above the background and go to Image, then Apply Image. This flattens the current background composite — original plus generation — onto a single layer you can filter.
Then convert that layer to a Smart Object: Layer, then Smart Objects, then Convert to Smart Object.
Do not skip this. Path Blur has a lot of controls and you will want to adjust them after seeing the result in context. As a smart filter you can double-click and reopen the whole Blur Gallery with your settings intact. Applied directly, the only option is undo.
Applying Path Blur
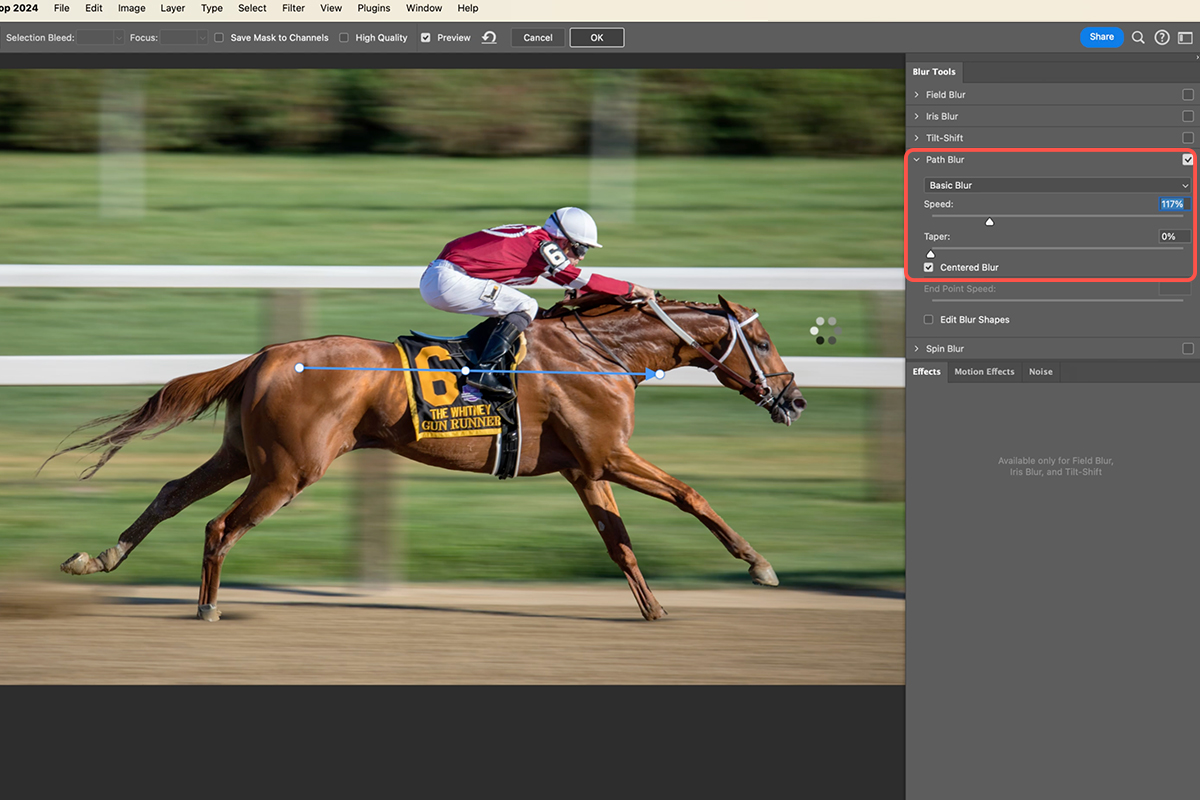
Go to Filter, then Blur Gallery, then Path Blur.
Photoshop places a default path across the image with an arrow showing the direction of motion. Drag its start and end points to match the direction your subject is traveling.
The controls that matter
Speed sets the overall intensity of the streaking. Higher values suggest faster movement, but push it too far and the background becomes an unreadable smear that gives the viewer no sense of place.
End Point Speed controls the blur at each end of the path independently. This is what lets the motion taper — less blur near the subject, more toward the frame edges — which is far more natural than a uniform streak.
Multiple paths can be added by clicking elsewhere in the image. This is how you handle a background that should not all move in one direction, like a road curving away or a track bending through the frame.
Matching the direction properly
The blur direction has to agree with how the subject is oriented. A runner facing right needs the background streaking horizontally, not diagonally. If the camera would have panned along a curve, use two or three paths that follow it rather than one straight line.
This is the difference between an effect that reads as a photograph taken at speed and one that reads as a filter applied afterward.
Finishing Touches
Two adjustments worth making once the blur is in place.
Leave a little blur near the subject. A completely sharp boundary between subject and streaking background can look cut out. Pulling the End Point Speed down on the path nearest the subject softens that transition.
Consider a slight blur on the subject’s extremities. In a real panned shot, a runner’s trailing foot or a wheel would not be perfectly sharp. Adding a small directional blur to those areas — masked in selectively — makes the whole thing more believable.
Why This Order Works
The whole technique comes down to a sequence: isolate the subject, remove them from the background, blur the clean background, put the subject back on top.
Each step exists to prevent a specific failure. The mask keeps the subject sharp. The generative fill prevents the ghost halo. The Smart Object keeps the blur adjustable. Skip any one and you get a result that is recognisably wrong in a way that is hard to diagnose afterward — which is why it is worth doing them in order rather than jumping straight to the filter.
Quick Reference: Keys, Menus and Settings
- Cut out the subjectSelect Subject, drag Background to the new layer icon, click the layer mask icon; B to tidy the mask
- Reselect, biggerCmd/Ctrl-click the mask, Select > Modify > Expand, 30 pixels
- Clear the backgroundHide the subject, click Background, Generative Fill with an empty prompt, Generate
- Merge and protectNew layer, Image > Apply Image (Merged, RGB), then Layer > Smart Objects > Convert to Smart Object
- Blur the backgroundFilter > Blur Gallery > Path Blur: drag the path’s ends, set Speed, OK
- Paint at an angleR for the Rotate View Tool while you tidy the mask
- More pathsClick, click, Esc to add one; Delete removes it; click an end for End Point Speed

Free Downloads
Follow Along on the Same Photos
Get the racehorse and car photos, their two finished PSDs with the Path Blur smart filters, and the 4-page PDF guide. Free with a PHLEARN account.
Creating a Speed Effect: Common Questions
How do I make the background look like it’s moving in Photoshop?
Put the subject on its own masked layer, remove it from the background with Generative Fill, then blur the clean background with Filter > Blur Gallery > Path Blur. The sharp subject sits on top.
Why remove the subject before blurring the background?
If the subject is still in the background, its shape gets smeared too and you get a blurred ghost of it around the edges. The blur should only ever see background.
How do I take the subject out of the background?
Cmd/Ctrl-click the layer mask to load it, then Select > Modify > Expand by 30 pixels. Hide the subject layer, click the Background layer, and run Generative Fill with an empty prompt.
What does Apply Image do in this effect?
On a new layer, Image > Apply Image with the default settings takes a snapshot of everything you see and puts it on that layer. Hide the subject first so only the clean background is copied.
Why convert to a Smart Object before Path Blur?
So you can change the blur at any time. Turn it off and on with its eye icon, or double-click Blur Gallery under the layer to reopen it and adjust the speed.
How do I set the direction of the motion blur?
Drag the start and end points of the blue arrow to match the direction of travel. The middle point bends the path into an arc; for the horse it stays straight, left to right.
Can I blur in more than one direction?
Yes. In Path Blur, click where a new path starts, click where it ends and press Escape. The car uses one path across the trees and one along the road; press Delete to remove a path.
How do I make the blur slow down toward one end?
Click an end point of the path and lower the End Point Speed slider, or drag the small handle on the point. Speed the other end up for a sense of acceleration.
How clean does the cutout need to be?
Select Subject and a little brushwork is fine for a quick job, and keep the car’s shadow in the mask. For professional work, trace the subject with the Pen Tool.
Are the sample files free?
Yes, with a free PHLEARN account. You get 2 sample images, 2 sample PSDs and 1 PDF guide: the racehorse and the car, their finished files and a 4-page step-by-step guide.
Master Photoshop, Lightroom and Photography
Join PHLEARN PRO for $12.99 a month or $99.99 a year. Cancel anytime, with a 100% money-back guarantee.





