

Download Assets
This tutorial includes 1 sample image, 1 sample PSD and 1 PDF guide. Downloads are free with a PHLEARN account.
- Download the sample images and PSDs from every free tutorial on PHLEARN
- New free tutorials published every week
- One free account — sign up once, then download anything
Free PDF Guide · 4 Pages
This Tutorial as a Step-by-Step PDF
The 4-page guide walks through removing the strings with an empty Generative Fill, Generative Expand on the Crop Tool, a clouds prompt, three Camera Raw masks with Exposure and Shadows up and Feather at 100, then the baby glow: Gaussian Blur on a Smart Object, Lighten and a split Blend If handle. Keep it next to your keyboard.
description
How to edit baby photos in Photoshop, start to finish: clear the rigging out of frame, extend the set, brighten the subject and build a soft glow that stays off the shadows.
Newborn and baby sessions produce a specific set of problems: props held up by rigging that ends up in frame, a small subject sitting underexposed against a bright set, and a finished look that wants to be softer and brighter than any ordinary portrait would tolerate.
This tutorial removes the rigging with Generative Fill, rebuilds the composition with Generative Expand, lifts the subject using Camera Raw’s masking inside Photoshop, then adds a soft glow built with Blend If so it stays out of the shadows and the face keeps its detail. Every stage stays editable.
Enjoying This Free Tutorial?
We publish a new free tutorial every week, each one with sample images and PSDs you can download and follow along with. Sign up and they land straight in your inbox, along with early word on sales, events and subscriber-only offers.
Image Source
Due to Adobe’s copyright limitations, we’re only able to offer a low-resolution preview image. Download the high-resolution image for FREE here.
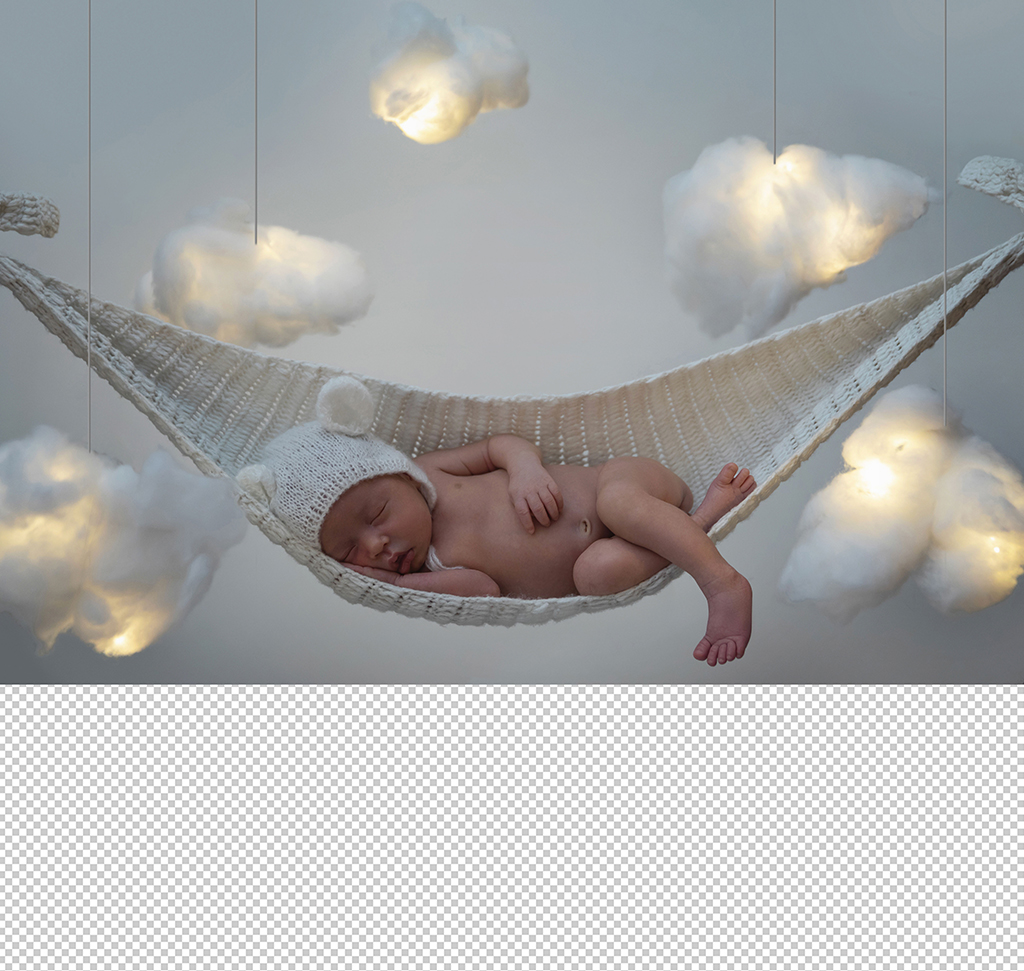

How to Edit Baby Photos in Photoshop
Newborn and baby sessions produce photographs with a specific set of problems. The set is usually built from props — hammocks, cloud shapes, backdrops — and the rigging that holds them up ends up in frame. The subject is often small in a large scene and underexposed relative to the background. And the finished look people want for these images is softer and brighter than you would ever apply to an ordinary portrait.
This tutorial works through all three: removing the rigging, rebuilding the composition, lifting the subject with Camera Raw, and finishing with a soft glow that is built to stay out of the shadows so the face keeps its detail. Everything stays editable to the end.
Clearing the Distractions
Start with whatever is holding the set together. Support strings are the usual culprit, and they are the easiest thing in the whole edit to remove.
-
Select Around the Rigging
Take the Marquee Tool (Keyboard Shortcut “M”) and drag a rough selection around the strings. It does not need to be tight — a loose box that contains them is enough.
-
Generative Fill With No Prompt
Click Generative Fill in the contextual task bar and click Generate, leaving the prompt box empty. An empty prompt tells Photoshop to remove rather than add, and it fills the area from the surrounding scene. The same approach handles support wires in product photography. If you want the comparison with the older removal tools, Generative Fill vs Clone Stamp vs Spot Healing Brush covers when each one wins.
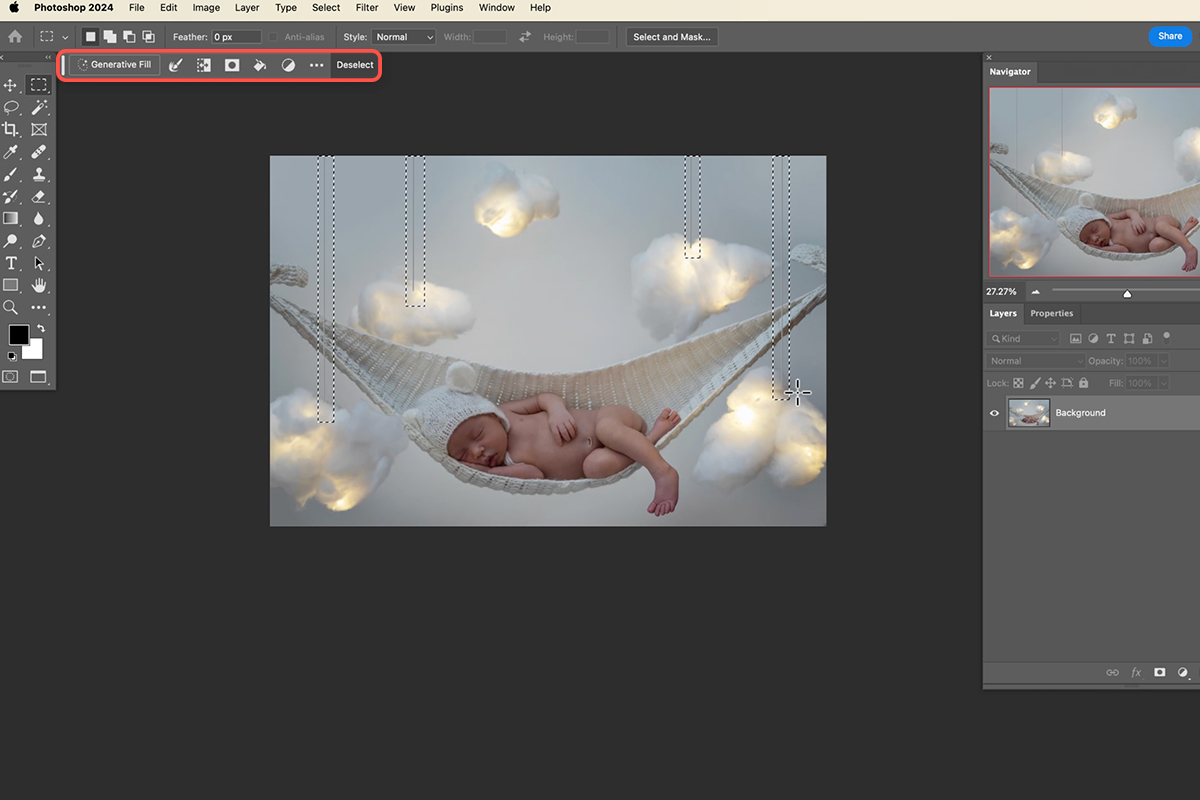
Expanding and Extending the Set
With the distractions gone, the composition itself can be improved. Two generative tools do the work — one adds canvas, the other adds content inside it.
-
Add Room With Generative Expand
Press C for the Crop Tool, and in the options bar set Fill to Generative Expand. Drag the bottom handle downward to add space beneath the subject, then confirm. Photoshop invents the new area rather than stretching what was there, which recentres the subject without recropping away detail. Generative Expand covers the tool on its own.
-
Fill Gaps With a Prompt
Where the scene looks sparse, make a Marquee selection, click Generative Fill and this time type what you want — clouds, for a cloud-prop set. Cycle the variations in the Properties panel until one sits naturally.
Why the New Clouds Match
Generative Fill does not invent in a vacuum — it reads the surrounding image and generates something consistent with it. Ask for clouds in a photograph that already contains cloud props lit a particular way, and what comes back tends to match that lighting and texture rather than looking like stock clouds dropped in. That is why prompting for something already present in the frame works far better than prompting for something foreign to it.
Brightening the Subject With Camera Raw
The subject is usually darker than the set. Rather than reaching for Curves, this uses the Camera Raw filter, which puts Lightroom’s entire masking system inside Photoshop — radial gradients, Select Subject, brush add and subtract, all of it.
-
Flatten a Copy Onto a New Layer
Add a new empty layer, then go to Image > Apply Image and click OK. That takes a snapshot of everything currently visible and puts it on the new layer, giving Camera Raw something to work on. A blank layer would give it nothing. Apply Image is worth knowing for its own sake.
-
Convert It to a Smart Object
Layer > Smart Objects > Convert to Smart Object, before you open any filter.
-
Open the Camera Raw Filter
Filter > Camera Raw Filter. Go straight to the masking panel.
-
Lift the Subject With a Radial Gradient
Add a radial gradient mask, drag it out from the center of the subject, and raise Exposure and Shadows. Make the mask noticeably larger than the area you want affected, and set Feather to 100.
-
Add a Second Mask on the Face
Create another radial gradient over the face alone and lift Exposure and Shadows again, more gently. Faces almost always want slightly more light than the body.
-
Refine With Select Subject
Add a third mask, choose Select Subject, and lift Exposure and Shadows across the whole subject. If it catches parts of the set, switch the mask to Subtract, pick the Brush, and paint those areas out — hold Alt/Option to add back in. Selecting subjects and refining edges goes further on getting that selection clean.
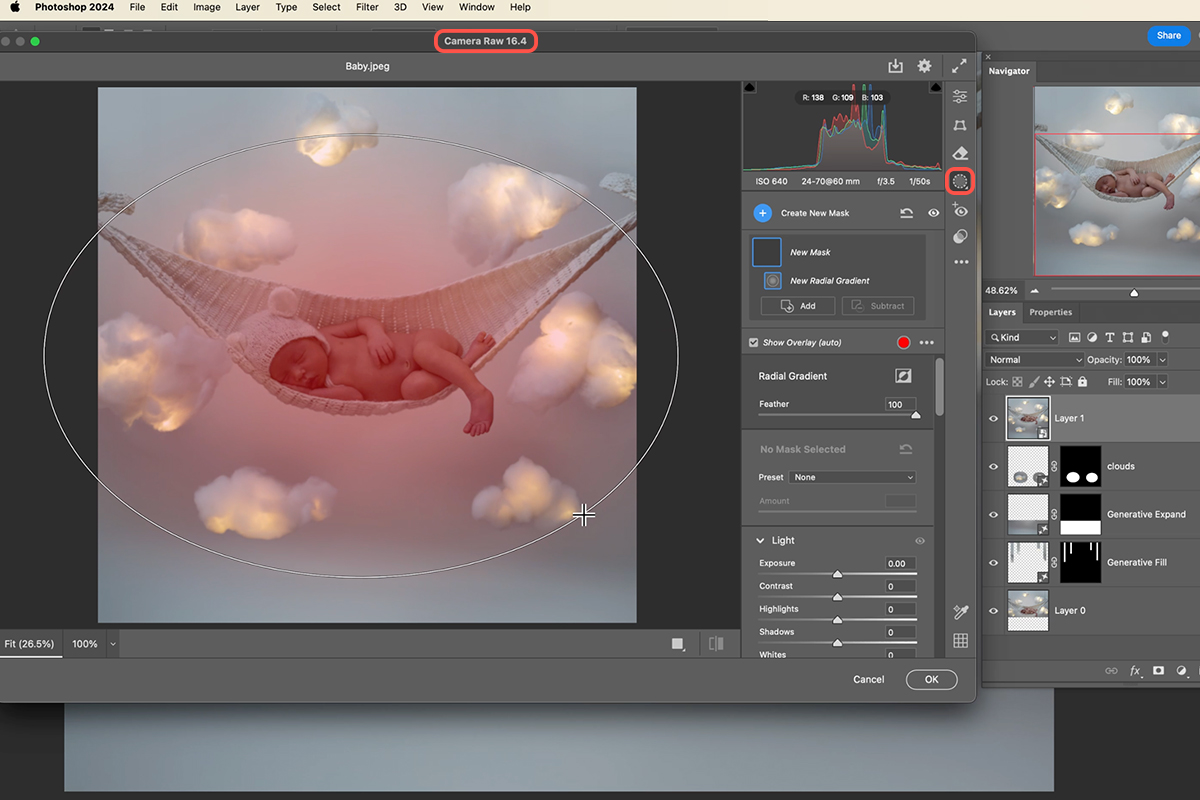
Convert to a Smart Object Before Any Filter
This is the habit worth building, and it applies to every filter in Photoshop, not just this one. Applied to a normal layer, a filter is baked in the moment you click OK. Applied to a Smart Object it becomes a smart filter you can reopen — double-click Camera Raw beneath the layer and every mask you made is still there, still adjustable, weeks later.
It also means you can toggle the whole correction off to compare. Smart objects covers the basics, and PRO members can go deeper in How to Use Smart Objects in Photoshop.
Feather Every Mask to 100
A hard-edged local adjustment on skin is immediately visible as a patch of different brightness. Feathering to 100 spreads the transition across the whole mask so the lift reads as light falling on the subject rather than as an edit applied to a region. Combine that with making the mask larger than the area you actually want changed, and the boundary disappears entirely.
Building the Baby Glow
This is the finishing effect, and it is worth being upfront that it is stylistic. It suits newborn work and would look overdone on most other portraits — it pushes the image slightly toward illustration.
-
Select and Duplicate the Subject
Go to Select > Subject, then press Cmd + J on Mac (Ctrl + J on PC) to copy just the subject onto its own layer. It does not matter if the selection grabs a little of the surrounding prop.
-
Make It a Smart Object
Layer > Smart Objects > Convert to Smart Object — same reason as before, and here it matters even more because you will want to retune the blur.
-
Apply Gaussian Blur
Filter > Blur > Gaussian Blur. Do not agonise over the radius; it stays adjustable.
-
Set the Blend Mode to Lighten
Change the layer’s blend mode from Normal to Lighten. The blurred copy now only brightens, producing a soft bloom — but it will look wrong until the next step.
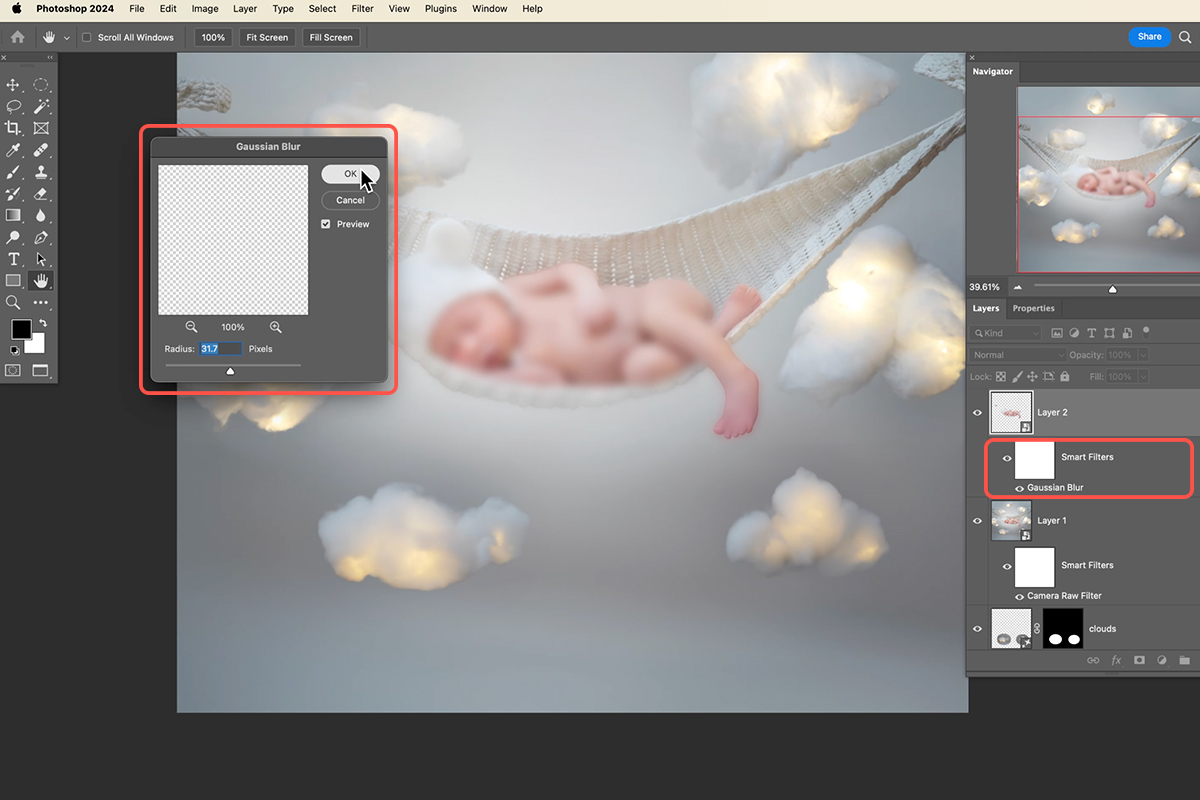
Keeping the Glow Out of the Shadows
Straight after applying it, the glow is everywhere — including the shadows, where it destroys the detail that makes a face read as a face. Eyelids are the giveaway. The fix is Blend If, and it takes about ten seconds.
-
Open Layer Style
Double-click the empty area of the blurred layer to open the Layer Style dialog, or use Layer > Layer Style > Blending Options. Find Blend If at the bottom.
-
Hide It Where the Layer Beneath Is Dark
On the Underlying Layer slider, hold Alt (Option) and drag the left handle apart to split it, then move it inward. The glow disappears from the shadows and survives only in the brighter areas. Splitting the handle is what makes the falloff gradual instead of a hard cutoff. Three Ways to Use Blend If in Photoshop covers the sliders properly.
-
Dial the Amount
Double-click Gaussian Blur under the layer to change the radius, or reopen Blend If to shift where the glow stops. Both stay live because the layer is a Smart Object.
Why the Shadows Break First
A blurred copy set to Lighten raises anything darker than itself. In the highlights that reads as bloom, which is what you want. In the shadows it lifts values that are carrying structural information — the line of an eyelid, the shadow under a lip — and those areas go flat and plastic. Restricting the effect by the underlying layer’s brightness targets exactly the parts that benefit and protects exactly the parts that do not. It is the difference between a glow and a smear.
Taking the Glow Across the Whole Image
The same idea can be applied to the entire photograph rather than just the subject, which suits dreamy, high-key sets particularly well.
-
Flatten a Fresh Copy
New layer, then Image > Apply Image again to snapshot everything visible.
-
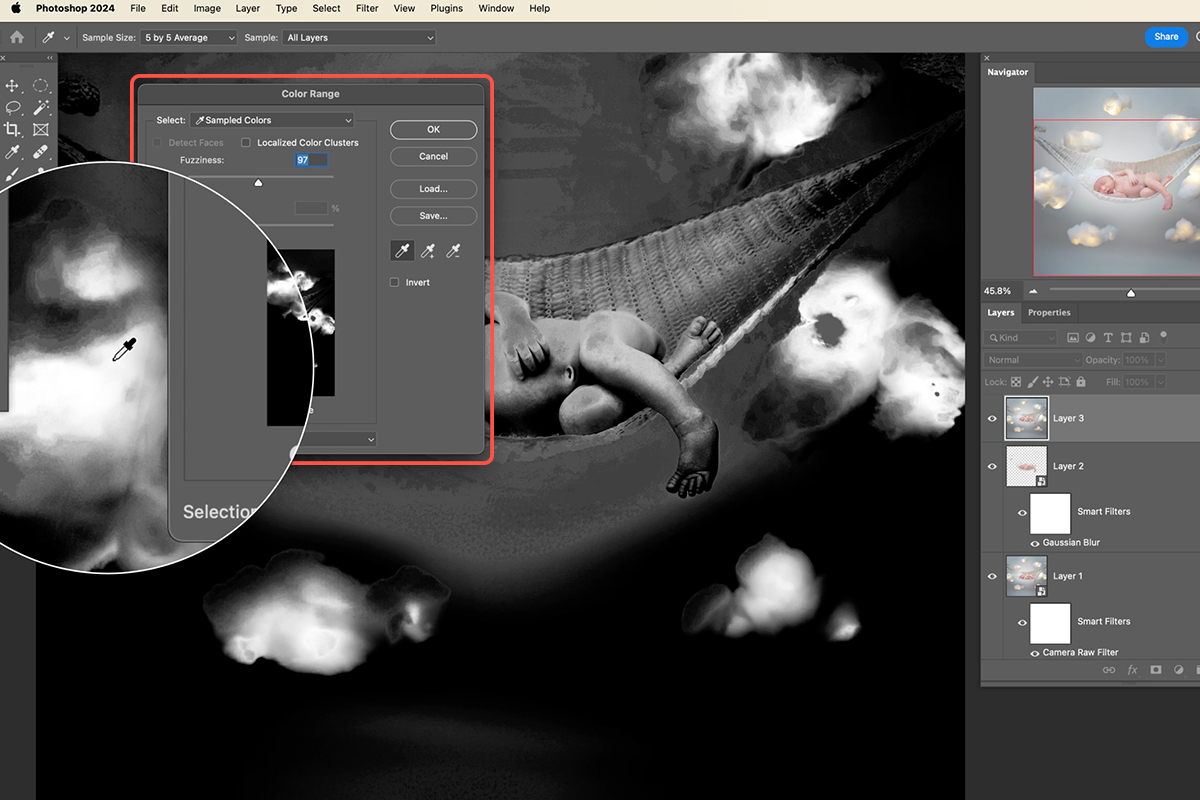
Select Only the Highlights
Go to Select > Color Range, use the eyedropper to sample the bright areas, adjust Fuzziness until the preview shows the highlights in white, and click OK.
-
Copy the Highlights to Their Own Layer
Press Cmd + J (Ctrl + J). You now have a layer containing only the light parts of the image.
-
Blur, Lighten, Blend If
Convert to a Smart Object, apply Gaussian Blur, set the blend mode to Lighten, and use the same Blend If treatment on the Underlying Layer slider.
-
Stack and Control It
Duplicate the layer for more intensity, group the results with Cmd/Ctrl + G, and add a layer mask to the group to paint the glow away from anywhere it is too strong — often the subject’s face, which already got its own treatment.
Where This Goes Wrong
The technical mistake is applying a filter before converting to a Smart Object. It works, it looks fine, and then an hour later you want the blur slightly weaker and there is no way back except undo history you no longer have. Convert first, every time.
The judgment mistake is overdoing the glow. Because it is applied through Lighten and restricted by Blend If, it is subtle enough that you keep pushing — and the point where it stops looking soft and starts looking like lost detail arrives quietly. Toggle the layer group off and on regularly.
If the skin has stopped having texture, you have gone past it. Retouching newborn skin covers the underlying skin work this effect sits on top of, and PRO members can see a full soft-portrait workflow in Soft Portrait Retouching.
Why the Glow Suits This Subject
Most portrait retouching aims at realism — you are trying to make the photograph look like what was there, only cleaner. Newborn photography is one of the few genres where the intended result is openly idealised. The sets are built rather than found, the lighting is soft by design, and the finished image is meant to feel like a memory rather than a document. A glow that would read as a mistake on an editorial portrait reads as intent here.
What makes it work technically is that it is restricted rather than global. A blur laid over everything flattens the image. A blur that only affects values brighter than a threshold you chose adds light where light already is, which is how bloom behaves optically. That is why the Blend If step is not a refinement — it is the entire reason the effect looks like light rather than like blur.
Keep It Editable
Every stage here stays live: generative edits sit on their own layers, the Camera Raw work is a reopenable smart filter, and both glow layers are Smart Objects whose blur you can retune at any point. Save the layered PSD rather than flattening, and a client asking for “a bit less of the soft look” is a thirty-second change instead of a re-edit.
Build it once on a single image and the sequence becomes routine: clear the rigging, expand the frame, lift the subject in Camera Raw, add the glow, restrict it with Blend If. The order matters more than the numbers — every value here depends on the photograph in front of you.
Quick Reference: Keys, Menus and Settings
- Remove the stringsM, a loose box around each string, Generative Fill, Generate with no prompt
- Add room belowC, Fill: Generative Expand, drag the bottom handle down, click the checkmark
- Set up for Camera RawNew layer, Image > Apply Image, then Layer > Smart Objects > Convert to Smart Object
- Brighten the babyFilter > Camera Raw Filter > Masking: Radial Gradient, Exposure and Shadows up, Feather 100; Select Subject, Subtract > Brush
- Build the glowSelect > Subject, Cmd/Ctrl + J, Smart Object, Filter > Blur > Gaussian Blur, blend mode Lighten
- Keep it off shadowsDouble-click the layer, Blend If: Underlying Layer, Alt/Option-click the dark handle to split it, drag right
- Glow everywhereApply Image, Select > Color Range on the lights, Cmd/Ctrl + J, same blur and Lighten; group and mask

Free Downloads
Follow Along on the Same Photo
Get the sleeping newborn on the hammock and cloud set, the finished layered PSD with the glow, and the 4-page PDF guide. Free with a PHLEARN account.
Editing Baby Photos: Common Questions
How do I remove the strings holding up the props?
Press M for the Marquee Tool and drag a loose box around each string. Click Generative Fill and Generate without typing anything, and Photoshop fills in what should be there.
The baby is too close to the edge of the frame. How do I add room?
Press C for the Crop Tool and make sure Fill says Generative Expand. Drag the bottom handle down until the baby sits in the center and click the checkmark.
How do I add more clouds that match the set?
Make a couple of Marquee selections, click Generative Fill and type “clouds”. It looks at the cloud props already in the photo, so the new ones fit.
Why use Apply Image before the Camera Raw Filter?
A blank layer gives Camera Raw nothing to work on. On a new layer, Image > Apply Image takes a snapshot of everything you see; then convert it to a Smart Object.
How do I brighten just the baby?
In the Camera Raw Filter, open Masking and drag a Radial Gradient out from the baby, then another on the face. Raise Exposure and Shadows, draw each mask a little larger than needed and keep Feather at 100.
My Select Subject mask brightened the hammock too. How do I fix it?
On that mask click Subtract > Brush and paint over the areas that are too bright. Hold Alt/Option to add back in.
Why convert to a Smart Object before every filter?
So you can change the filter at any time. Double-click Camera Raw Filter or Gaussian Blur under the layer and your masks and settings are still there.
How do I add a soft glow to baby skin?
Go to Select > Subject and press Cmd/Ctrl + J to copy the baby to a new layer. Convert it to a Smart Object, add Filter > Blur > Gaussian Blur and set the blend mode to Lighten.
Why does the glow look weird on the eyelids?
It shows in the shadows too. Double-click the layer and, under Blend If, Alt/Option-click the dark handle of the Underlying Layer slider to split it and drag right. The glow drops out of the darks and the detail comes back.
Are the sample files free?
Yes, with a free PHLEARN account. You get 1 sample image, 1 sample PSD and 1 PDF guide: the newborn photo, the finished layered file and a 4-page step-by-step guide.
Master Photoshop, Lightroom and Photography
Join PHLEARN PRO for $12.99 a month or $99.99 a year. Cancel anytime, with a 100% money-back guarantee.





