

Download Sample Images
Download Assets
This tutorial includes 2 sample images, 1 EPS vector file, 1 sample PSD and 1 PDF guide. Downloads are free with a PHLEARN account.
- Download the sample images and PSDs from every free tutorial on PHLEARN
- New free tutorials published every week
- One free account — sign up once, then download anything
Free PDF Guide · 3 Pages
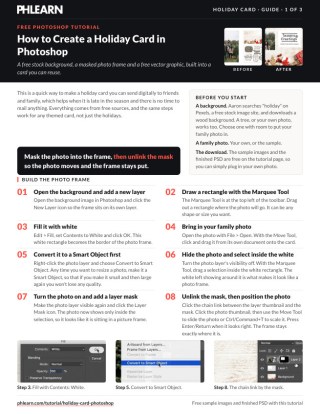
This Tutorial as a Step-by-Step PDF
The 3-page guide walks through the whole card: a white rectangle with Edit > Fill, the photo as a Smart Object masked inside it, the chain link unlinked so the photo moves inside the frame, a white banner, and lettering pulled from an EPS with Select > Color Range. Keep it next to your keyboard.
DESCRIPTION
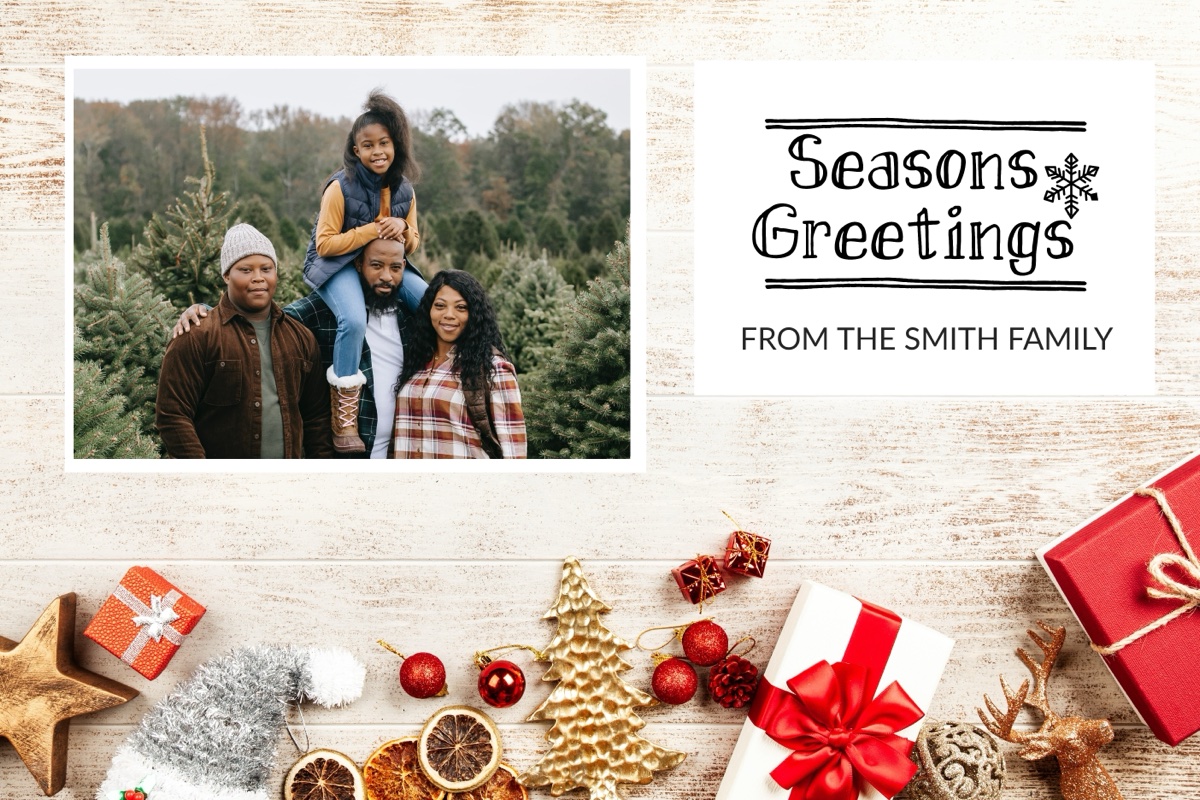
It’s the holiday season! And that means sharing special moments with friends and family no matter where they are in the world. Follow along and learn how to create your own holiday cards in Photoshop using free stock assets and some easy techniques.
The complete PSD is included in the download as well! Just plug in a photo of you and your family and your holiday card creation will be complete.
Enjoying This Free Tutorial?
We publish a new free tutorial every week, each one with sample images and PSDs you can download and follow along with. Sign up and they land straight in your inbox, along with early word on sales, events and subscriber-only offers.
A Card You Can Rebuild Every Year
The useful part of this isn’t the card — it’s that once you’ve built it as a template, next year’s version is a matter of swapping one photograph and editing one line of text.
Everything here uses free assets: a background from a stock photo site, a graphic from a free vector library, and three Photoshop techniques that are worth knowing well beyond December — a mask-based photo frame, unlinking a layer from its mask, and pulling flat artwork out of a background with Color Range.
Finding a Background
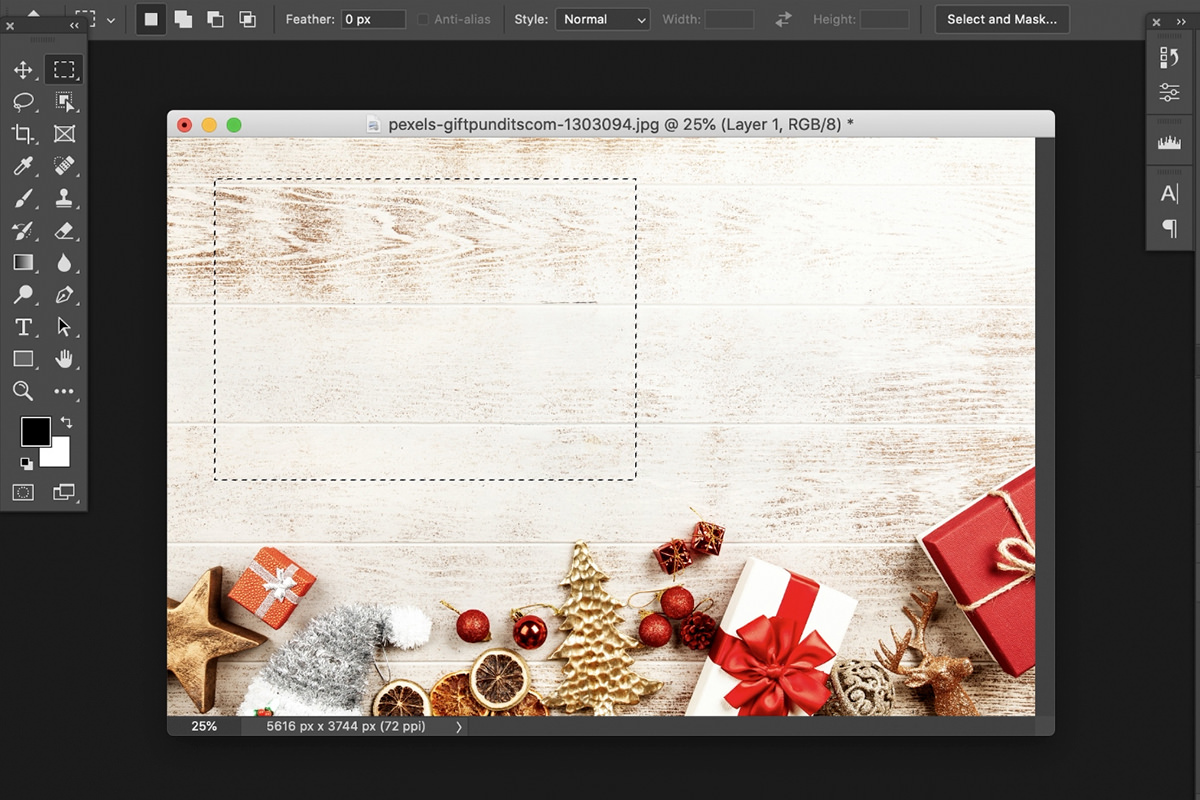
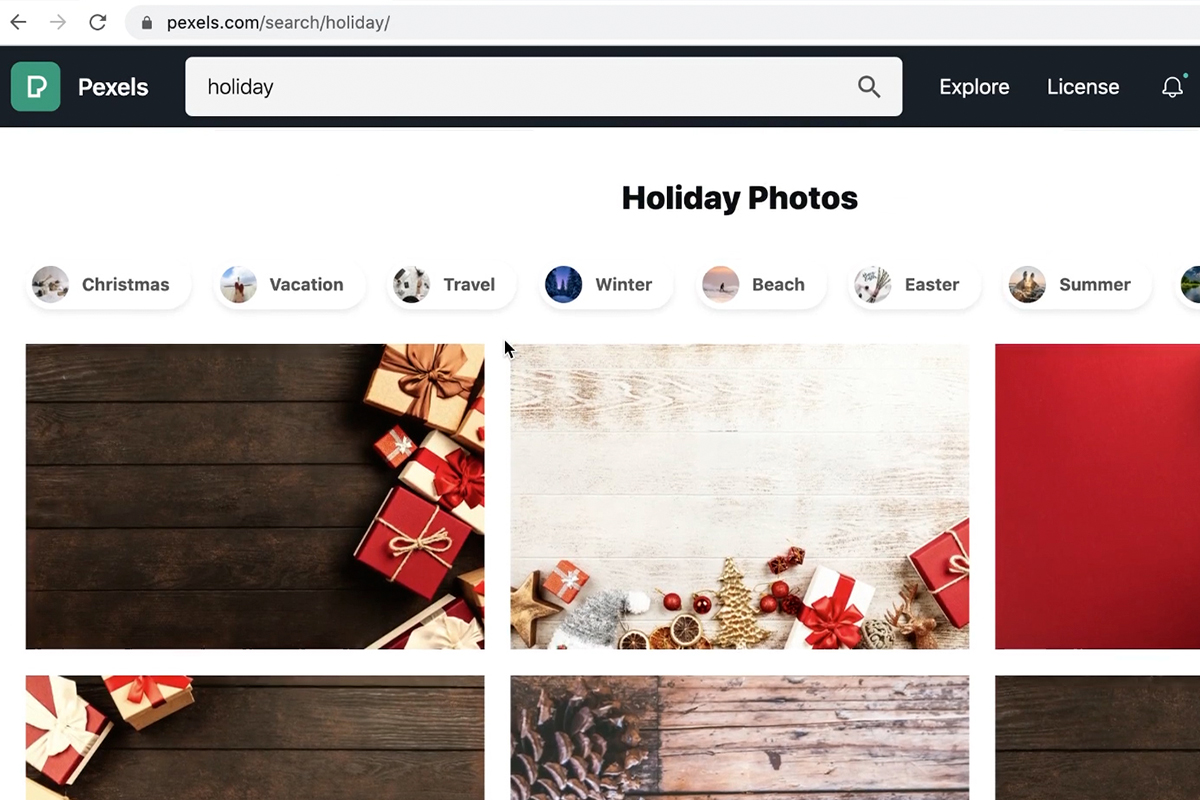
Pexels is a genuinely good free stock library. Search for the theme you want and look specifically for images with usable empty space — a flat-lay on a wooden surface, a plain area beside a tree. That empty area is where your photograph is going, so a beautiful image with no room in it is the wrong choice.
Your own photographs work just as well. The requirement is the same: somewhere for the frame to sit.
Building the Frame
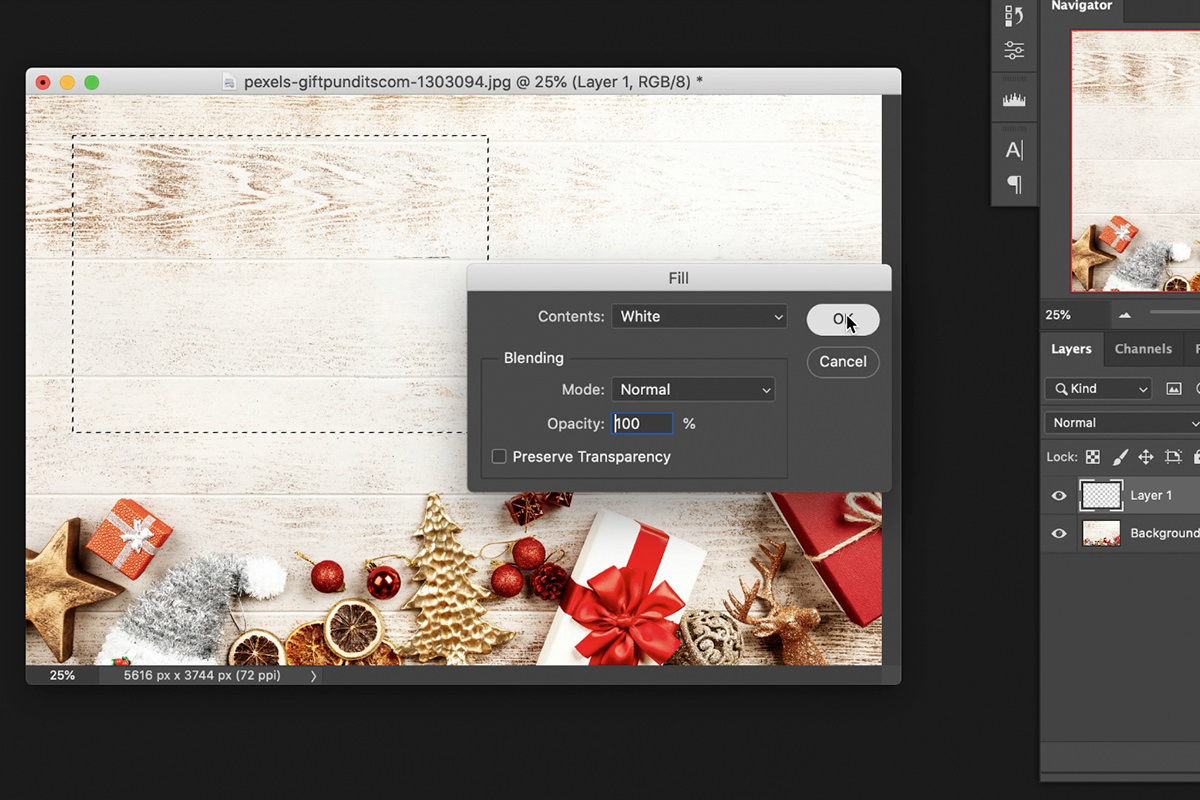
The frame is a white rectangle with your photo masked inside it, slightly smaller — which is what creates the white border that reads as a printed photograph.
-
Create a new layer
Keep it separate from the background.
-
Draw a rectangle with the Marquee tool
Any size — this is the outer edge of the frame.
-
Fill it with white
Edit › Fill, Contents: White.
Placing the Photograph Inside It
-
Open your photo and drag it across
Move tool, drag from one document tab to the other.
-
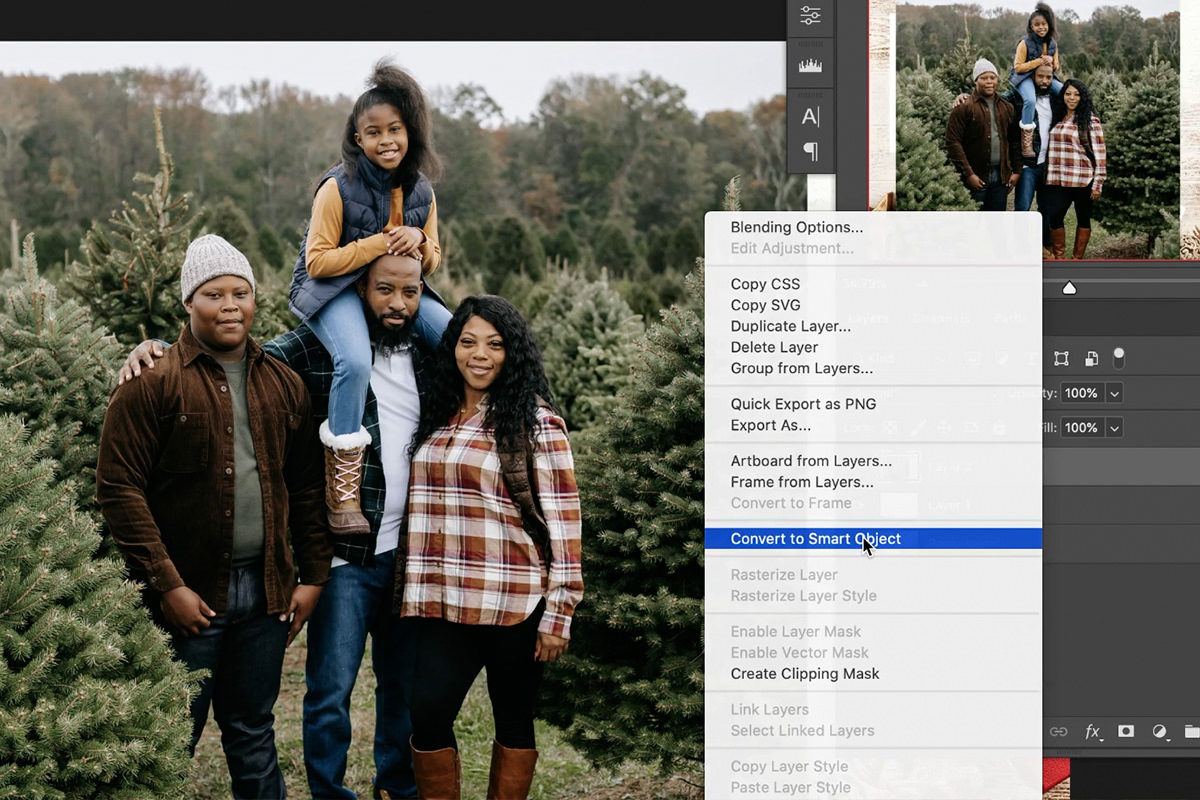
Convert it to a Smart Object first
Do this before resizing anything. Scale a normal layer down and Photoshop discards pixels permanently; scale it back up later and it’s soft. A Smart Object keeps the original data, so you can resize repeatedly with no loss. Aaron recommends it any time you resize a photo in Photoshop.
-
Hide the photo layer temporarily
So you can see the white rectangle underneath.
-
Marquee a slightly smaller rectangle inside the white one
The white left showing between the two is what makes it look like a photo frame.
-
Turn the photo back on and click the layer mask icon
The selection becomes a mask and the photo appears only inside the frame.
Unlinking the Mask — The Detail That Makes This Work
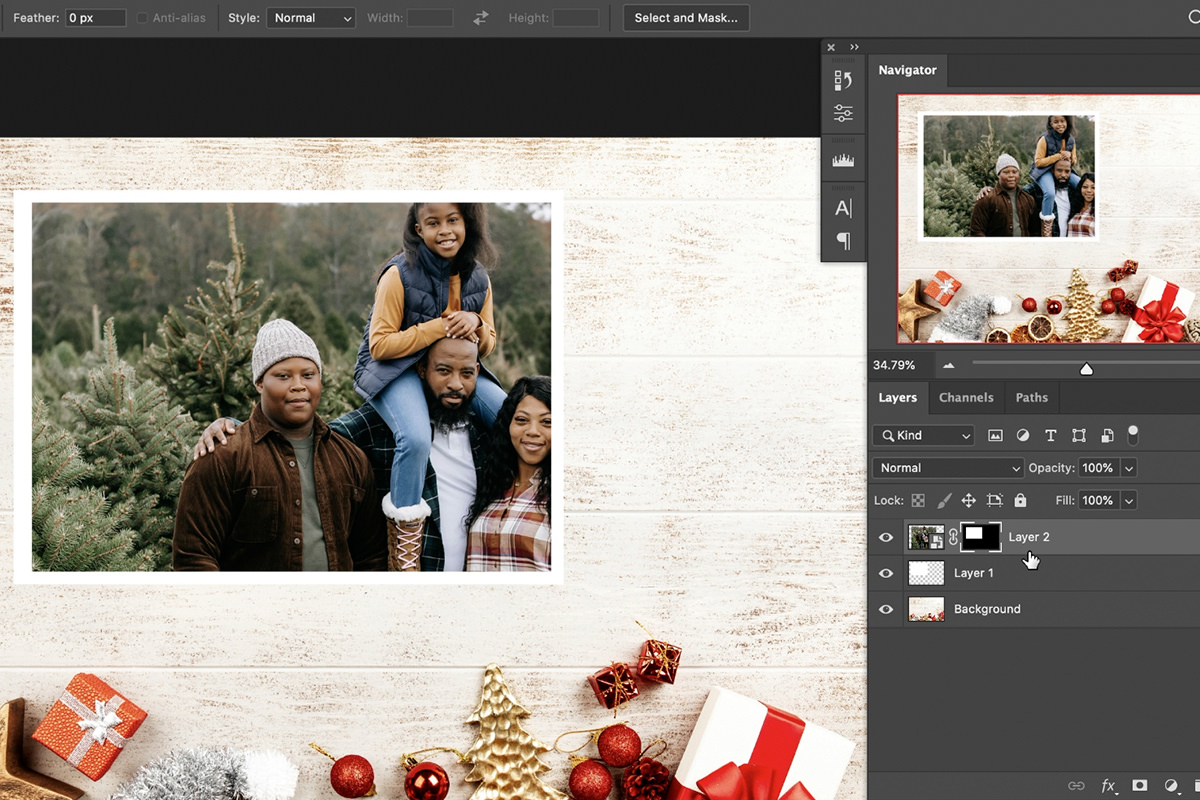
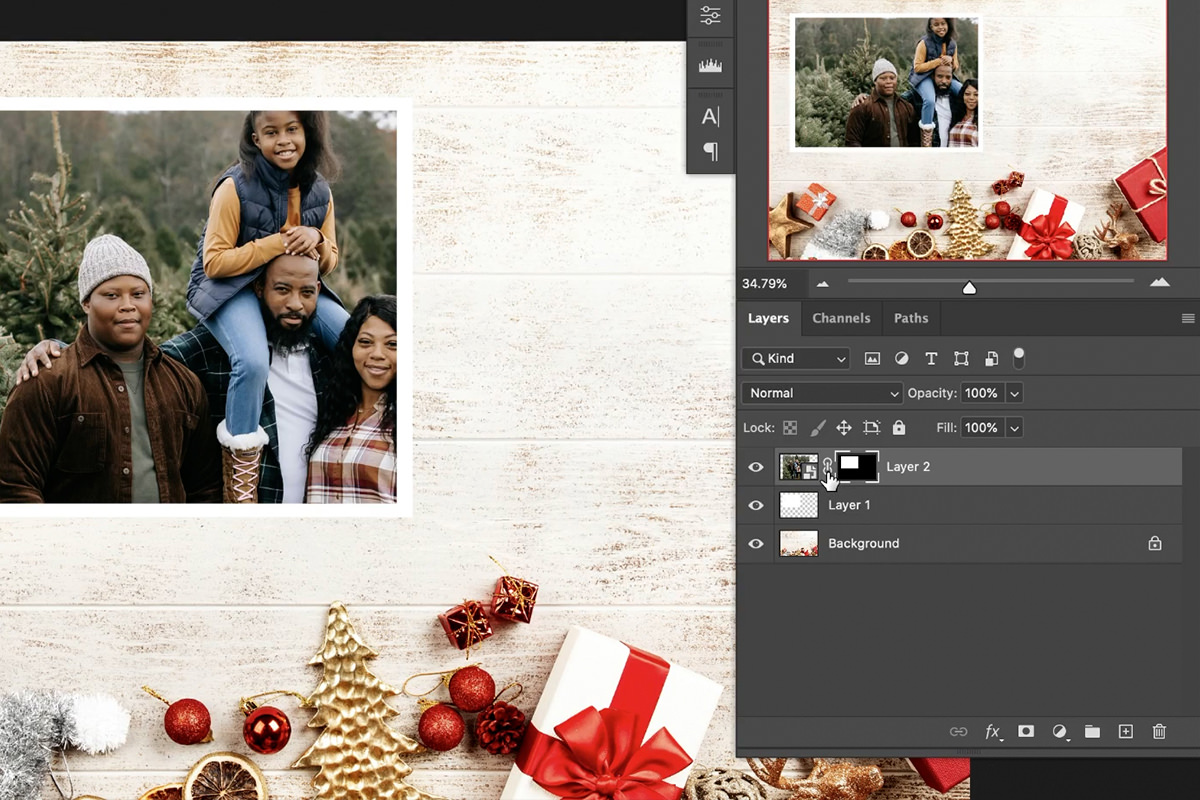
Try to reposition the photo now and the mask moves with it, so the frame slides across the card. Not what you want.
Between the layer thumbnail and the mask thumbnail there’s a small chain link icon. Click it and the link breaks. From then on, clicking the photo thumbnail lets you move and scale the image while the frame stays exactly where it is.
Now you can position the photograph inside the frame like cropping through a window — Cmd/Ctrl + T to scale, Move tool to slide it around, all without disturbing the layout. Press Enter when it looks right.
This one small icon is the difference between fighting the file and composing in it, and it applies anywhere you mask a photo into a shape.
Getting a Free Graphic and Extracting It
Add a white banner beside the photo, lined up with the top of the frame (new layer, marquee, fill with white), then find lettering to sit on it. Vecteezy has a large free library. Check the license on anything you download: the free license asks that you link to the original image, and a paid Pro account removes that requirement.
You’ll typically get an EPS file. Photoshop opens it — it asks to rasterize, which is fine — but everything arrives flattened onto one layer against a background, so you can’t simply move one phrase across.
Use Color Range to pull the artwork off its background
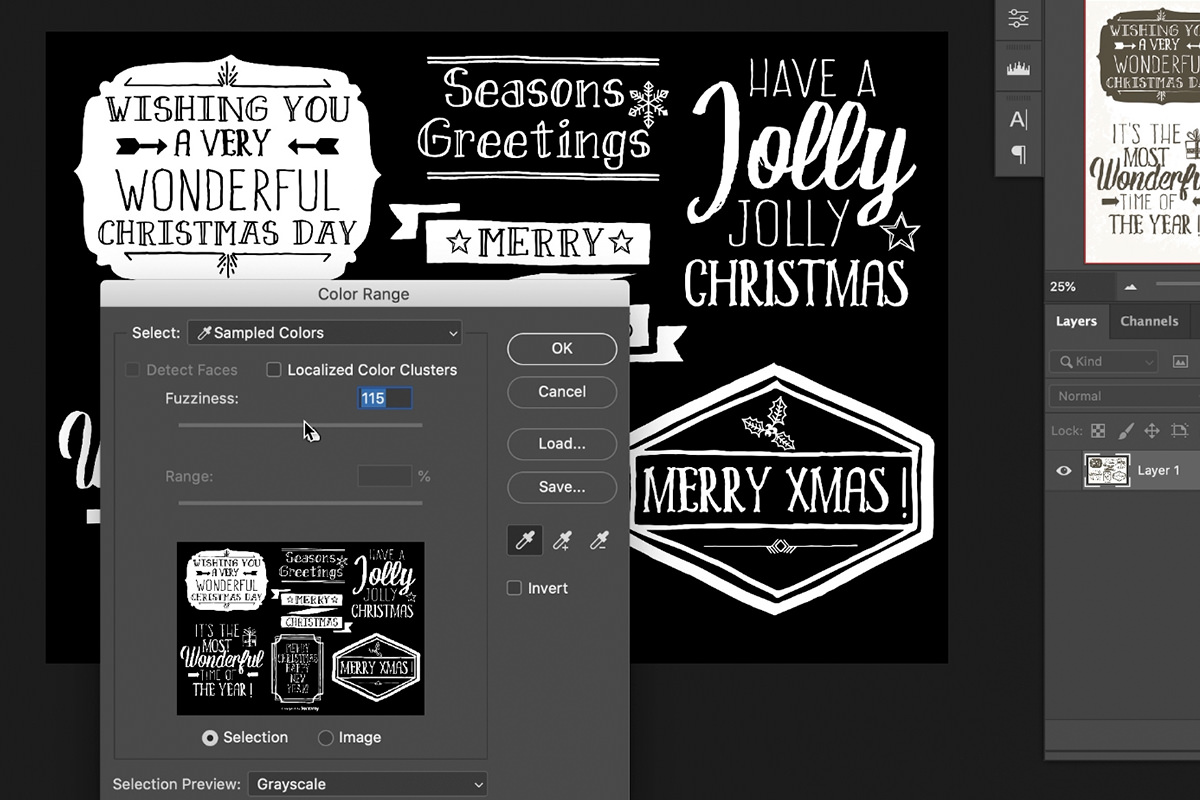
Because flat vector artwork is usually one solid color, Select › Color Range can select all of it at once.
-
Select › Color Range and click the artwork with the eyedropper
Everything sharing that color is selected across the whole document.
-
Adjust Fuzziness
Higher includes more nearby tones — useful for catching anti-aliased edges. Watch the preview and stop before it starts grabbing background.
-
Create a new layer and fill the selection
Edit › Fill with black, or any color you want the lettering to be.
-
Deselect and hide the original
Cmd/Ctrl + D. The artwork now sits on transparency, ready to move anywhere.
This is a broadly useful technique for any flat-color artwork — logos, line drawings, scanned lettering — not just holiday graphics.
Placing the Lettering and Finishing
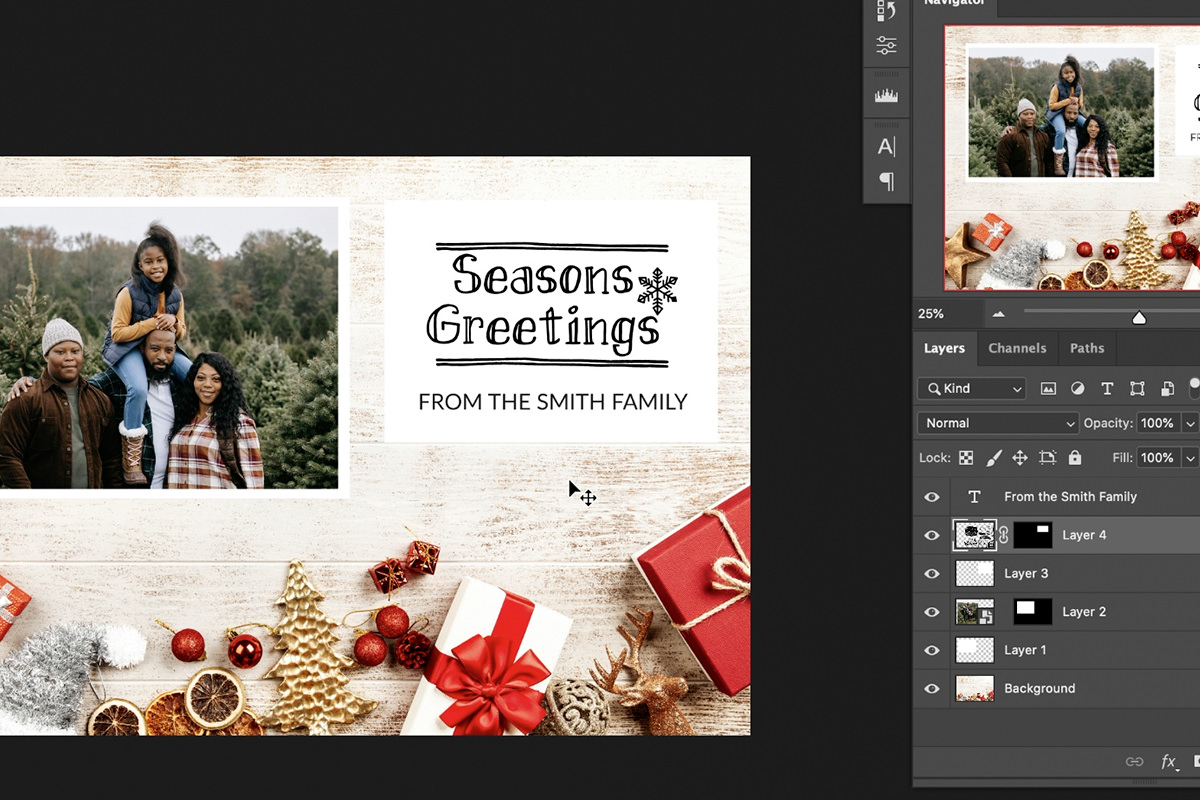
Drag the extracted artwork onto your card. If the file contains several phrases and you only want one, don’t erase the others — marquee the phrase you want and add a layer mask. Everything else is hidden but recoverable, so you can change your mind or reuse another phrase later.
Then add your own text with the Type tool for the family name or message. Aaron types “From the Smith Family”; word it however you want.
Save It as a Template
This is the part that pays off. Save the layered PSD before flattening anything.
Next year, open it, double-click the Smart Object to swap the photo (or replace its contents), edit the text line, and export. The frame, the masks, the graphic placement and the composition are all still there. Build it once, and every card after that is a quick swap.
Where This Goes Wrong
Resizing before converting to a Smart Object
Scale down then back up on a normal layer and the photo is permanently soft. Convert first, always.
Forgetting to unlink the mask
Move the photo and the frame goes with it. One click on the chain icon solves it.
An uneven white border
The gap between the outer rectangle and the inner selection is the border. Uneven gaps read as sloppy immediately.
Choosing a background with no empty space
A gorgeous image with nowhere to put a photograph is the wrong background.
Ignoring the license
The free Vecteezy license asks that you link to the original. Read the terms, especially if the card is going anywhere public.
Erasing instead of masking
Masking the unused lettering keeps every option open. Erasing throws it away.
Three Techniques Worth More Than the Card
A photo masked into a frame with an unlinked mask, a Smart Object that survives resizing, and Color Range pulling flat artwork off its background — those turn up constantly once you know them.
Build the card, then notice how often the same three moves solve something else entirely.
Quick Reference: Keys, Menus and Settings
- Draw the frameNew layer, Marquee tool rectangle, Edit > Fill, Contents: White
- Protect the photoRight-click the layer > Convert to Smart Object
- Mask it into the frameHide the photo, marquee inside the white, show it, click the Layer Mask icon
- Move the photo onlyClick the chain link, click the photo thumbnail, Move tool or Cmd/Ctrl + T, then Enter/Return
- Open the graphicFile > Open the EPS, OK on Rasterize EPS Format
- Extract the letteringSelect > Color Range, Fuzziness; new layer, Edit > Fill: Black; Cmd/Ctrl + D
- Keep one phraseRectangular Marquee around it, click the Layer Mask icon
No AI, no generative credits.
Free Downloads
Follow Along on the Same Photos
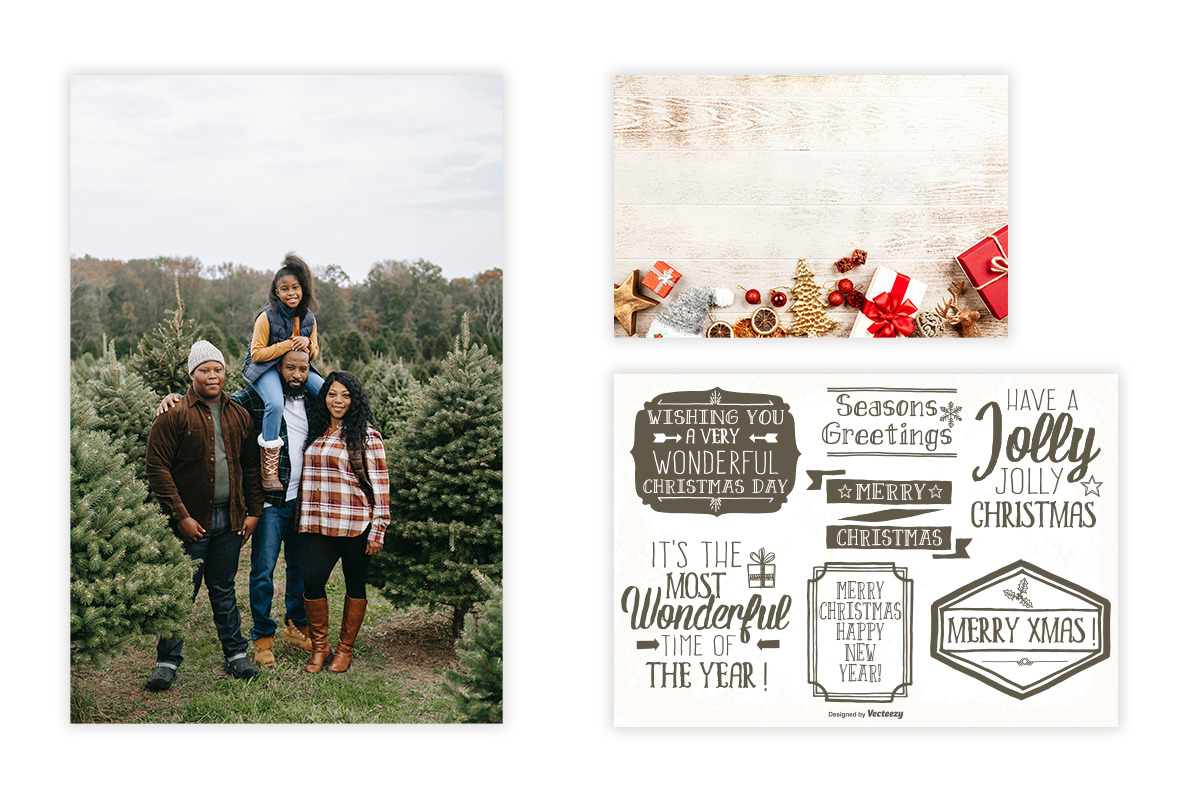
Get the two sample images, the EPS vector lettering, the finished card PSD and the 3-page PDF guide, then plug in your own photo. Free with a PHLEARN account.
Holiday Card in Photoshop: Common Questions
How do I make a photo frame for a card in Photoshop?
On a new layer, draw a rectangle with the Marquee tool and choose Edit > Fill with Contents set to White. Bring in the photo, hide it, marquee a slightly smaller area inside the white, then turn the photo back on and click the Layer Mask icon.
Why convert the photo to a Smart Object?
So you can resize it without losing quality. Make a regular layer small and then large again and it gets soft. Right-click the layer and choose Convert to Smart Object before you scale it.
How do I move the photo without moving the frame?
Click the chain link between the layer thumbnail and the mask to unlink them. Click the photo thumbnail, then use the Move tool or Cmd/Ctrl + T to scale, and press Enter. The frame stays where it is.
Where can I find a free background for a holiday card?
Aaron searches holiday on Pexels, a free stock image site, and picks a wood background. Your own photo works too. Choose one with empty space for the family photo.
Where do the free holiday graphics come from?
Vecteezy, a free vector site. The free license asks that you link to the original image; a Pro account removes that.
Can Photoshop open an EPS file?
Yes. Open it and click OK on Rasterize EPS Format. It opens as one flat image with its background, which is fine.
How do I separate lettering from its background?
Choose Select > Color Range and click the lettering with the eyedropper; adjust Fuzziness if needed. On a new layer, use Edit > Fill with Black, press Cmd/Ctrl + D and hide the original layer.
How do I use just one phrase from the graphic?
Drag a Rectangular Marquee around the phrase you want and click the Layer Mask icon. The other phrases are hidden, not erased, so you can switch later.
Can I reuse the card next year?
Yes. Keep the layered PSD, then swap the photo inside the Smart Object, edit the line of text and export. The finished PSD from the video is in the download.
Are the sample files free?
Yes, with a free PHLEARN account. You get 2 sample images, 1 EPS vector file, 1 sample PSD and 1 PDF guide: the photos, the lettering, the finished card and the 3-page step-by-step guide.
Master Photoshop, Lightroom and Photography
Join PHLEARN PRO for $12.99 a month or $99.99 a year. Cancel anytime, with a 100% money-back guarantee.





