

Shooting through glass or haze flattens a landscape and pushes the whole frame blue, but almost all of it comes back with one Curves layer. Learn how to read the histogram for the empty ends that cause flatness, reset your black and white points, add an S-curve for contrast, and use the on-image targeted tool to pull blue out of the mountains while leaving the sky alone.
We publish a new free tutorial every week, each one with sample images and PSDs you can download and follow along with. Sign up and they land straight in your inbox, along with early word on sales, events and subscriber-only offers.
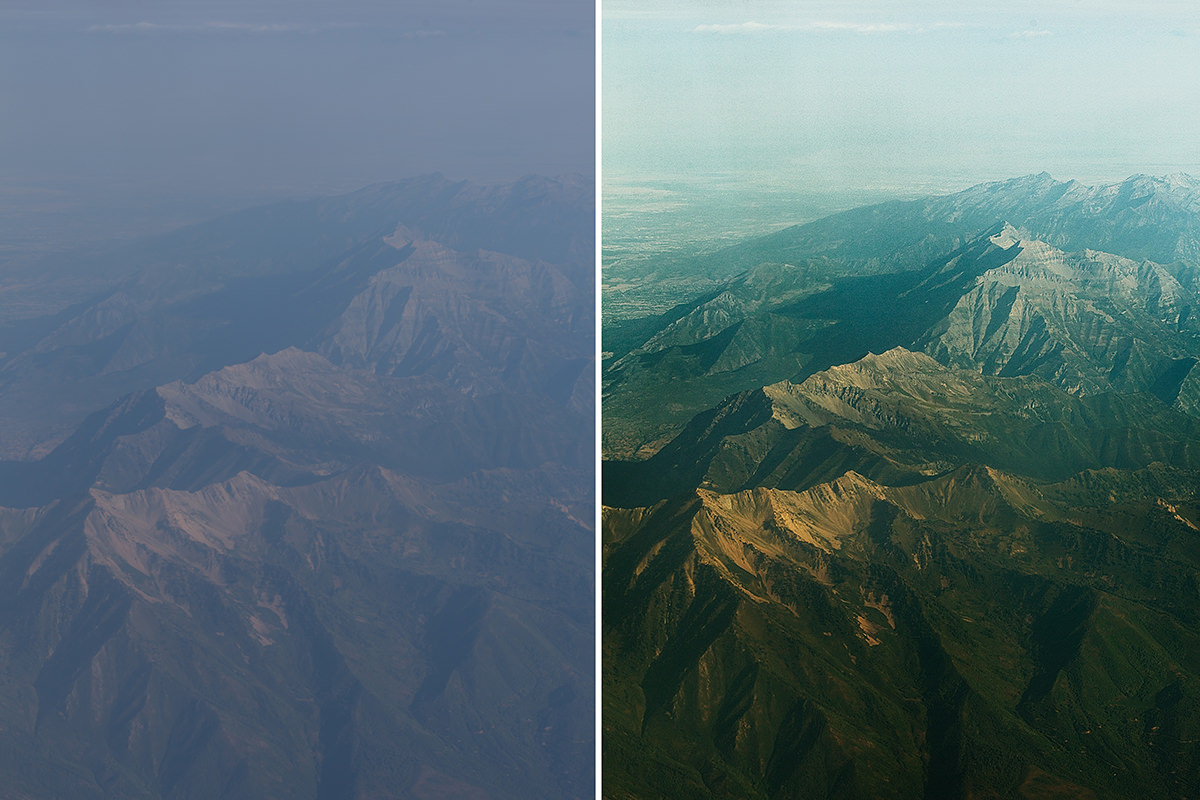
Easy Tips to Adjust the Colors of a Landscape
Shooting through an airplane window, or through any glass, or in any hazy conditions, strips a landscape photo of contrast and pushes everything toward a flat, bluish cast. The good news is that a single well-built Curves adjustment layer can undo almost all of that damage, restoring detail and color that looked lost in the original file.
Reading the Histogram Before Adjusting
Before making any moves, it helps to look at what the histogram is actually showing. A hazy or through-glass photo typically has almost no information at the very dark or very light ends, nothing near true black and nothing near true white, which is exactly why the image looks flat.
-
Add a Curves Adjustment Layer and Expand the Histogram
Add a Curves adjustment layer and expand the histogram panel to see the full spread of tones in your image. Look for empty space at the far left (shadows) and far right (highlights).
Why Flat Images Lack Contrast
When a histogram has no data reaching close to black or white, every tone in the image is compressed into the middle of the range. Nothing can look truly dark or truly bright, which is what reads visually as a flat, hazy, low-contrast photo.
Setting Your Black and White Points
The fix for that compressed histogram is to manually pull the black and white point sliders in toward where the actual data starts.
-
Pull In the Black Point Slider
In the RGB channel of your Curves panel, drag the black point slider in from the left until it reaches where your darkest tones actually begin. Everything to the left of that point becomes pure black.
-
Pull In the White Point Slider
Drag the white point slider in from the right in the same way, so your brightest existing tones become closer to true white.

Adding an S-Curve for Extra Contrast
Once the black and white points are set, an S-curve pushes the contrast further by deepening shadows and brightening highlights at the same time.
-
Pull the Lower-Middle of the Curve Down
Click a point in the lower-middle portion of the curve and drag it down slightly to deepen the shadows.
-
Pull the Upper-Middle of the Curve Up
Click a point in the upper-middle portion of the curve and drag it up slightly to brighten the highlights, forming a classic S shape.
What an S-Curve Does
An S-curve is the standard shape for adding contrast in Curves: it brightens what is already relatively bright and darkens what is already relatively dark, while leaving the true midtones mostly untouched. The steeper the S, the more dramatic the contrast increase.
Targeting Color With the On-Image Adjustment Tool
Haze and glass reflections often add an unwanted color cast, frequently too much blue, but that color is not always unwanted everywhere in the frame. A blue sky is fine; blue-tinted green mountains are not.
-
Select the Blue Channel
Switch to the Blue channel of your Curves layer.
-
Click and Drag Directly on the Image
Use the on-image targeted adjustment tool (the hand icon) to click directly on an area you want to change. Clicking on a mountain and dragging down removes blue from that darker tonal range, then clicking a lighter area and dragging up adds a little blue back into the lights. That makes an S-curve in the Blue channel and keeps the sky blue.
Why This Tool Adjusts by Tone, Not Location
The targeted adjustment tool does not know what a mountain or a sky is. It only reads the tonal value of the point you click and adjusts that same tonal range across the whole image. Clicking a darker area and dragging affects darker tones throughout the photo, which is why it is such an effective way to make localized-feeling adjustments without needing a selection.
Balancing With the Green and Red Channels
With the blue channel adjusted, the green and red channels can round out the color balance and add richness back into the vegetation and midtones.
-
Boost the Green Channel
Switch to the Green channel and pull the curve up to put a lot more green into the image overall.
-
Balance With the Red Channel
Switch to the Red channel and add red into the highlights while pulling red down slightly in the shadows, again using an S-curve shape within that single channel.
Making Fine, Localized Micro-Adjustments
Curves supports adding as many points as needed, which makes it possible to fine-tune very specific tonal ranges without disturbing the rest of the adjustment.
-
Click to Add Additional Points as Needed
Every click on the curve within a channel adds a new adjustable point, letting you fine-tune, for example, a small patch of sky separately from the rest of that channel’s tones.
-
Remove a Point If It Overcomplicates the Curve
If the curve becomes too jagged or contrasty from too many points, click a specific point and drag it off the graph entirely to delete it.
Watch for an Overly Jagged Curve
A curve with too many closely spaced points can start to look extreme or introduce banding and odd tonal jumps. If an adjustment starts looking wrong rather than better, that is usually a sign to simplify the curve rather than keep adding points.
Adding a Second Contrast Pass and Sharpening
With the main color correction finished, a light secondary contrast boost and some sharpening help compensate for the softness introduced by shooting through glass.
-
Add a Second Curves Layer for Contrast
Add another Curves adjustment layer, push the darks down and lights up slightly, then lower that layer’s opacity to taste.
-
Create a Stamp Visible, Desaturated Layer
Press Shift + Option + Command + E to stamp a flattened copy, then desaturate it so the sharpening pass affects only detail, not color.
-
Switch to Linear Light and Apply High Pass
Change that layer’s blending mode to Linear Light, then go to Filter > Other > High Pass and dial in a subtle amount, enough to add crispness without introducing harsh halos.
-
Add a Masked Linear Light Layer
Make another stamp visible layer, desaturate it with Shift + Command + U and set it to Linear Light without the High Pass, then lower its opacity for extra punch. Add a layer mask and, with the brush at about 20% flow, paint black wherever you don’t want that effect.
Why Shooting in RAW Helps This Process
A RAW file carries far more color and tonal information than a JPEG, which gives Curves much more room to work with when pulling apart compressed shadows and highlights. The same corrections attempted on a JPEG will generally allow for less aggressive adjustment before banding or artifacts appear.
Why This Approach Works
Almost everything here comes down to one idea: Curves lets you target specific tonal ranges within specific color channels, rather than applying a single blanket adjustment to the whole image. That is what makes it possible to remove unwanted blue from mountains while leaving a blue sky alone, or to add contrast and color richness without a single global slider wrecking the balance elsewhere in the frame. Working channel by channel, and point by point within each channel, gives far more precision than a simple Brightness/Contrast or Saturation adjustment ever could, which is exactly why Curves remains the tool of choice for salvaging a hazy or through-glass shot like this one.
Final Thoughts
None of these adjustments require more than a single Curves layer and a bit of channel-by-channel patience: fix your black and white points, add an S-curve for contrast, use the targeted tool to correct color exactly where it is needed, and finish with a light sharpening pass. The technique works just as well on any landscape shot dulled by haze, distance, or a pane of glass in between, and it is a good reminder of how much can be recovered from a RAW file with nothing more than Curves and Levels.
Quick Reference: Keys, Menus and Settings
- Read the histogramCurves adjustment layer; look for empty space at the dark and light ends
- Black and white pointsRGB channel: drag both end sliders in to where the data starts, then add an S-curve
- Color by channelBlue: hand tool, drag down on the mountains, up on the lights; Green up; Red up in the highlights, down in the shadows
- Remove a pointDrag it off the graph
- Stamp and desaturateShift + Alt/Option + Cmd/Ctrl + E, then Shift + Cmd/Ctrl + U
- SharpenLinear Light blend mode, Filter > Other > High Pass at a low amount; mask with the brush at 20% flow
- Before and afterAlt/Option-click the background layer’s eye icon
No AI, no generative credits.
Fixing Hazy Landscape Colors: Common Questions
Why does a photo taken through an airplane window look so flat?
Haze in the air and the panes of glass cut the contrast and add a blue cast. In the Curves histogram there’s no data near black or near white, so every tone sits in the middle.
How do I set the black and white points in Curves?
In the RGB channel, drag the black point slider in from the left to where the data starts, then drag the white point slider in from the right. Everything left of the black point turns black, so the darks get darker and the brights brighter.
What is an S-curve?
Pull a point in the lower part of the curve down and a point in the upper part up. It makes the brights a little brighter and the darks a little darker, which is how Curves adds contrast.
How do I take blue out of the mountains but keep a blue sky?
Go to the Blue channel, pick the on-image adjustment tool (the hand) and drag down on the mountains. Then click a lighter area and drag up to put a little blue back in the lights.
Does the hand tool know I clicked on a mountain?
No. It only knows how light or dark the spot is, and it changes that tone across the whole image. That’s why the darker mountains and the lighter sky can get different amounts of blue.
How do I delete a point on a curve?
Click the point and drag it off the graph. Do it when a curve with lots of micro adjustments gets so contrasty that the image starts to look weird.
Why add the extra contrast on a second Curves layer?
It keeps the color correction you already like untouched. If you don’t like the extra contrast, delete that layer or lower its opacity instead of reworking the first curve.
How do I sharpen a photo shot through glass?
Make a stamp visible layer with Shift + Alt/Option + Cmd/Ctrl + E, desaturate it, set it to Linear Light and run Filter > Other > High Pass at a low amount. Desaturating keeps the sharpening from changing the color.
Does shooting RAW help with this kind of fix?
Yes. This photo is a 16-bit file processed straight from RAW, so it holds a lot of color and light information. A JPEG may not take this much color adjustment.
Master Photoshop, Lightroom and Photography
Join PHLEARN PRO for $12.99 a month or $99.99 a year. Cancel anytime, with a 100% money-back guarantee.





