
Better than HDR – Master Luminosity Masks in Photoshop
-

-
Add to
favorites
-
DifficultyAdvanced
-
Length3.5 hours
-
Software
description
Have you ever tried taking a photo of a jaw-dropping landscape only to have the sky be washed out or the ground be dark and without detail. Until now, HDR was the only option to get details across highlights, midtones, and shadows, but it would often create exaggerated effects. Our cutting-edge Luminosity Mask technique in Photoshop will forever change the way you combine exposures!
In this tutorial, learn how to manually blend exposures using the power and flexibility of Luminosity Masks. Create selections based on light levels and then use those selections to paint detail back into your photos. Better yet, we have included a custom-made Photoshop Action that makes this powerful process faster and easier than ever!
THIS COURSE INCLUDES
- 11 Sample Images
- 2 Photoshop Actions
Share
Table of Contents
-
01 - Introduction to Luminosity Masks3:25m
-
02 - Luminosity Masks vs. HDR4:07m
-
01 - How to Exposure Bracket: Expand the Dynamic Range of a Camera4:18m
-
02 - How to Use Luminosity Masks with RAW and Smart Objects31:21m
-
03 - How to Use Our Custom Luminosity Mask Action9:29m
-
01 - How to Blend Multiple Exposures with Luminosity Masks35:41m
-
02 - How to Add Realistic Color with Luminosity Masks26:20m
-
03 - How to Recover Bright Skies in a Landscape Photo32:42m
-
04 - How to Blend Shutter Speeds of a Waterfall Landscape39:06m
-
05 - How to Blend Exposures and Color from Start to Finish22:07m
Course Downloads
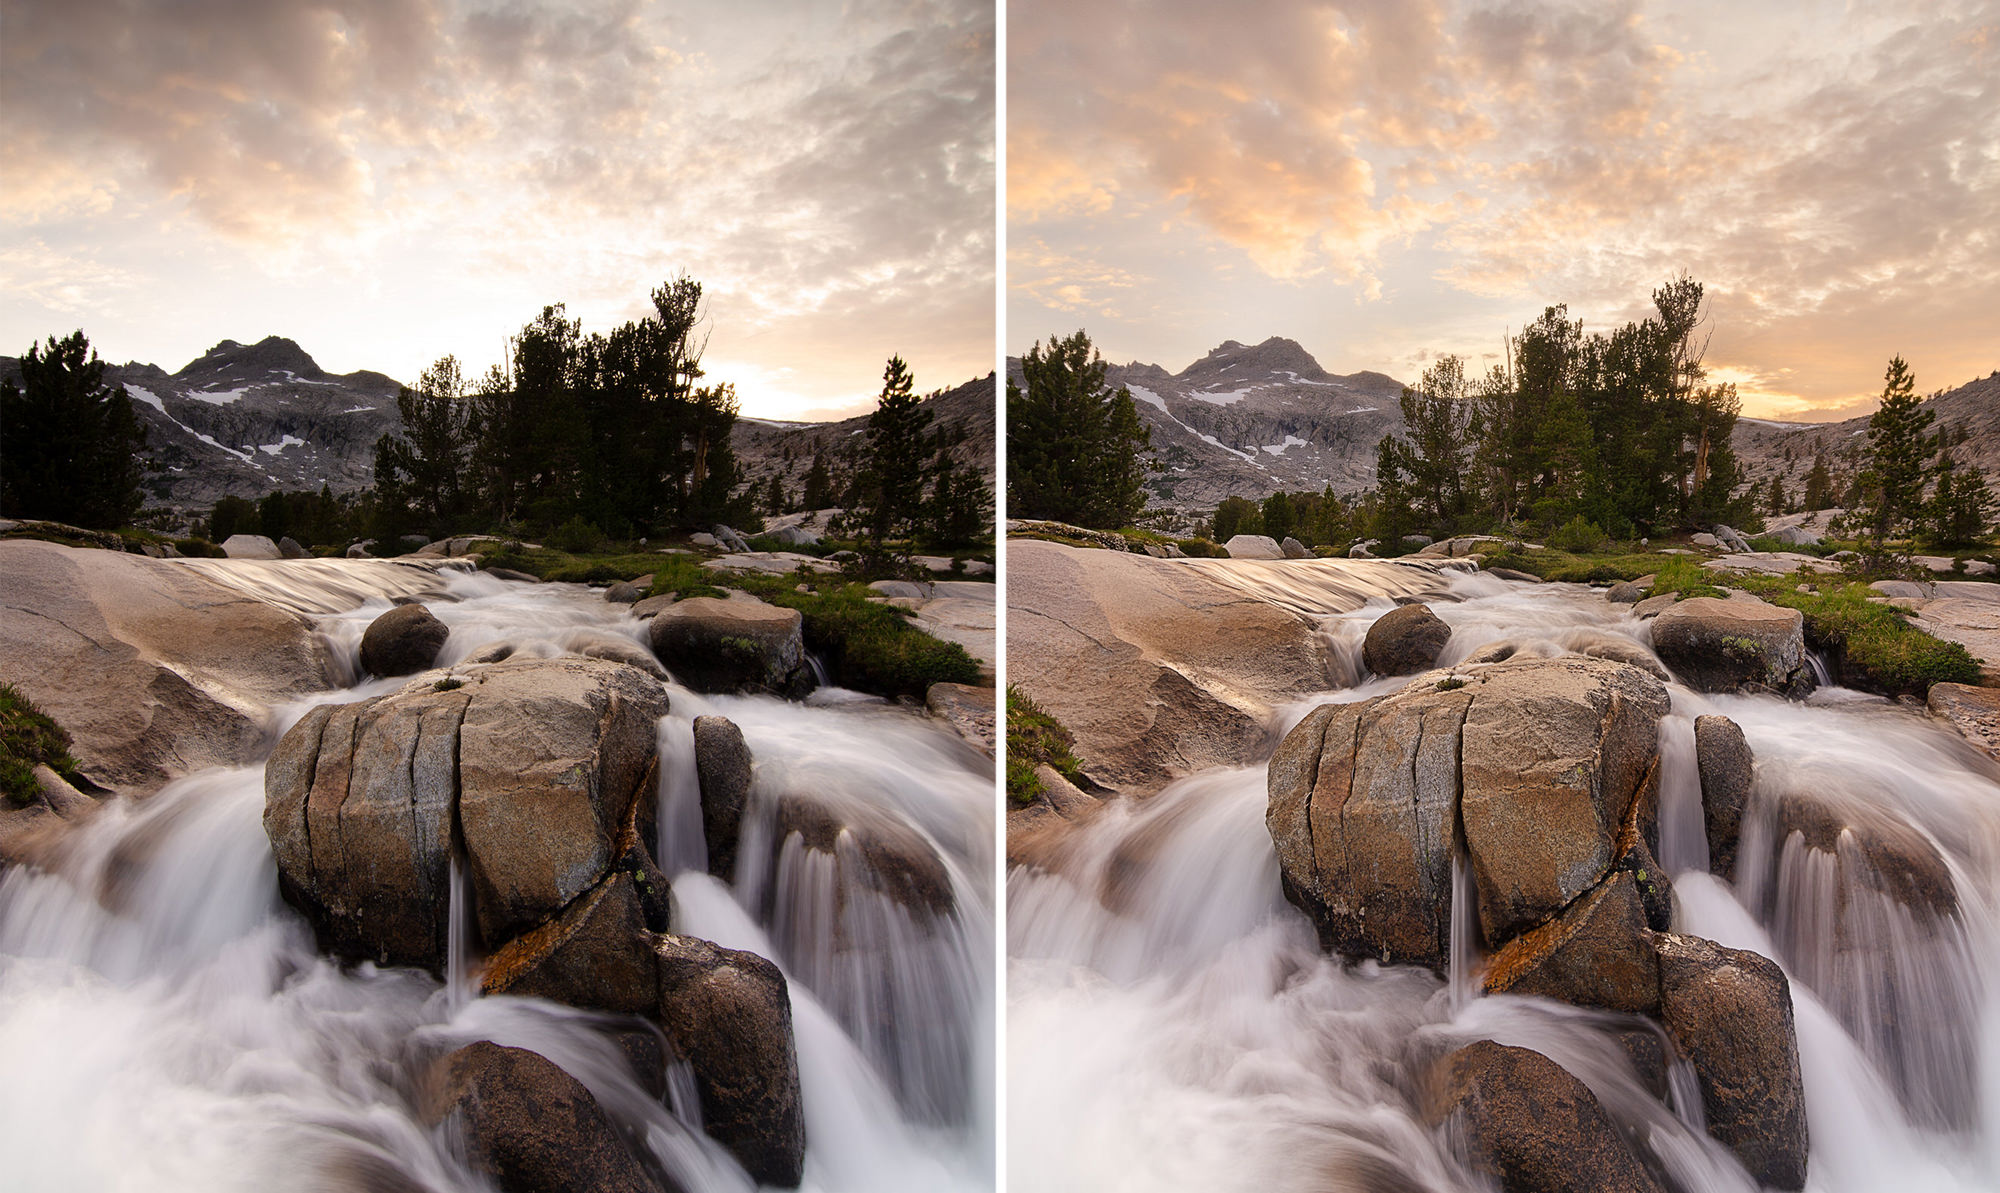
Bring Out Every Detail

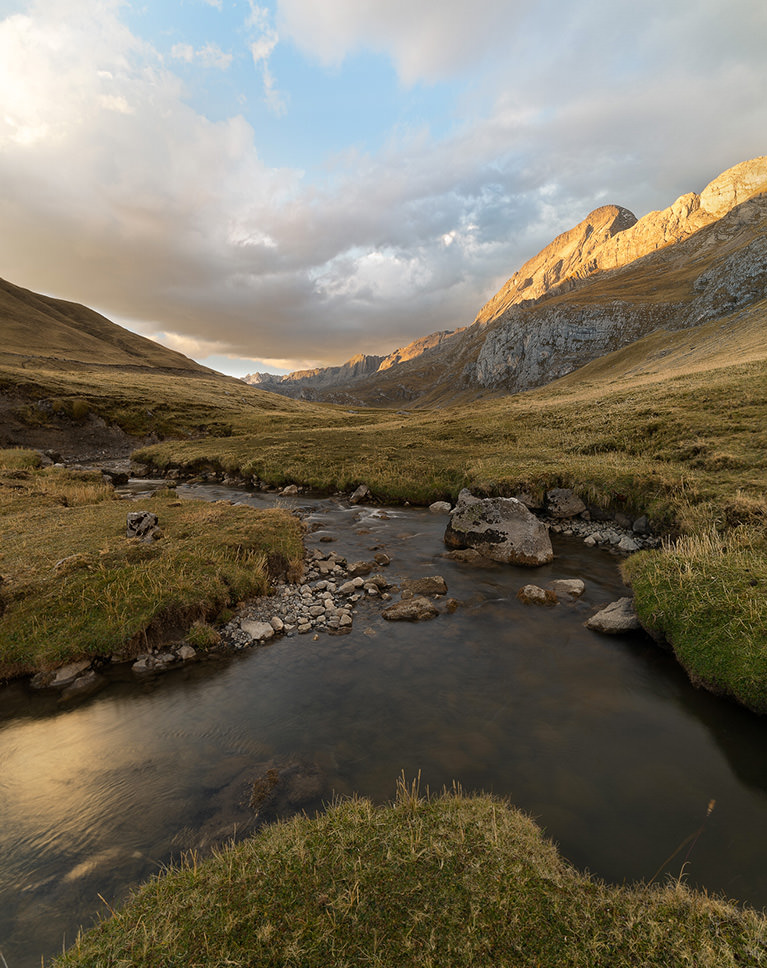
RECOVER HIGHLIGHTS & SHADOWS
ORIGINAL
What are Luminosity Masks?
An uncommon Photoshop term with a simple definition, Luminosity Masks are tools that you can use in Photoshop to show or hide areas of an image based on the brightness of that area. Have an area that’s too bright? You can make a selection of only the highlights and then use a mask to hide and replace those areas with a better exposure.
Luminosity Masks vs. HDR
HDR is an automated process performed by a piece of software such as Lightroom or your smartphone’s camera application. Luminosity Masks are Photoshop tools which let you manually blend exposures together. While both can create great images, Luminosity Masks give you the ability to customize and refine your image, often yielding more realistic results. It’s sort of like comparing SpaghettiOs to your Grandmother’s homemade pasta. SpaghettiOs are nice (and sometimes necessary) but we would much rather take the trip to Grandma’s.
Fix Underexposed & Overexposed Photos
In this tutorial, we show you how to combine multiple exposures to create one seamless final image. Luminosity Masks allow you to combine exposures to recover information from the brightest highlights to the darkest shadows. This will ensure that your photos fully capture the depth and detail in a scene. We even show you how you can take advantage of Luminosity Masks when you only have one photo available!
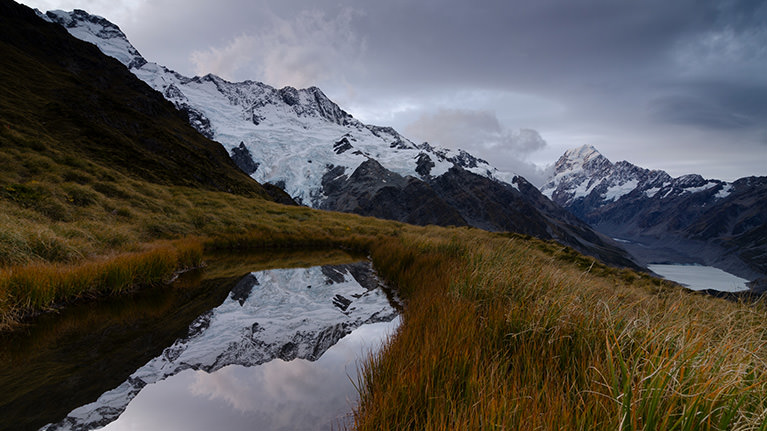
ENHANCE COLOR WITH LUMINOSITY MASKS
ORIGINAL
Working With RAW
When it comes to making adjustments to an image, nothing comes close to working with RAW files in Adobe Camera RAW. Editing RAW allows you to edit and sculpt the original information captured by your camera’s sensor. This means changes that will look ultra-realistic in the final image. For an in-depth look at RAW workflow, be sure to watch our tutorial How to Master Adobe Camera RAW in Photoshop!
Create Stunning Landscape Photos
Shooting outdoors comes with its own unique challenges. You are often shooting an area that has a large, bright light source (the sun and sky) against an area that is much darker (the ground). Luminosity Masks are a phenomenal tool to help make the most out of your landscape images, allowing you to capture all the details of the sky and landscape below.
Color Adjustments
Luminosity Masks are great at helping us blend exposures but they can also be a powerful tool for coloring our images. By combining accurate selections based off of light levels with the flexibility of RAW, we can make dynamic changes to the color in our images that are both stunning and realistic.
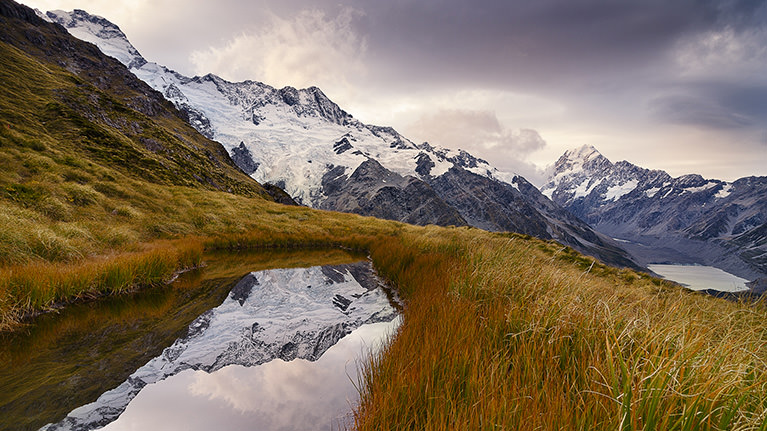
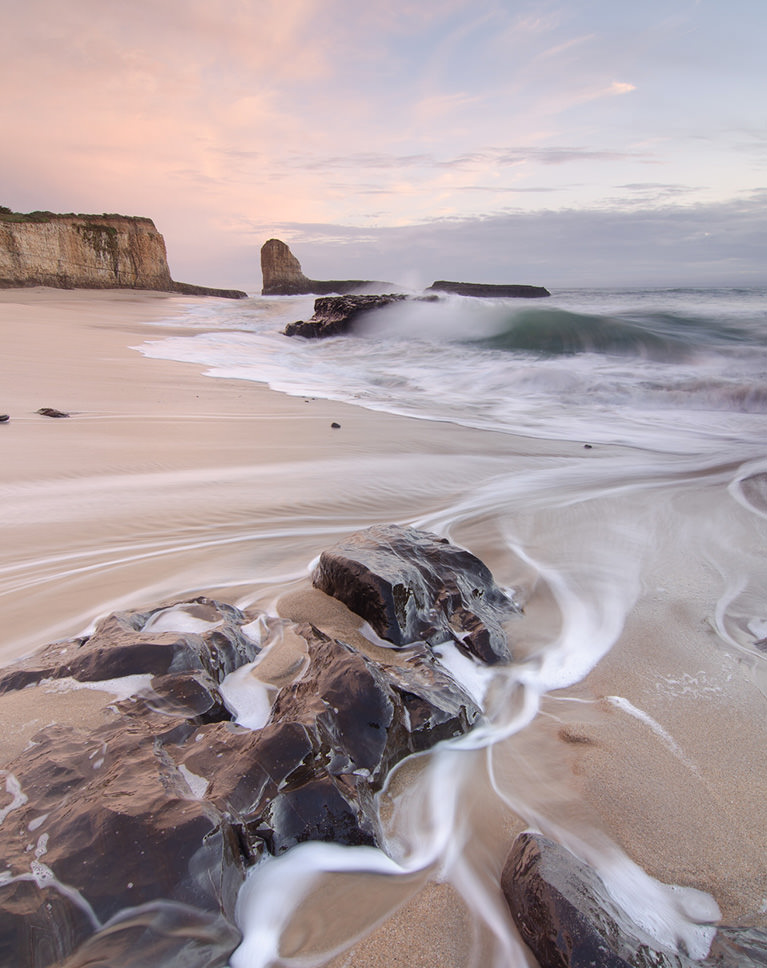
IMPROVE DYNAMIC RANGE
ORIGINAL
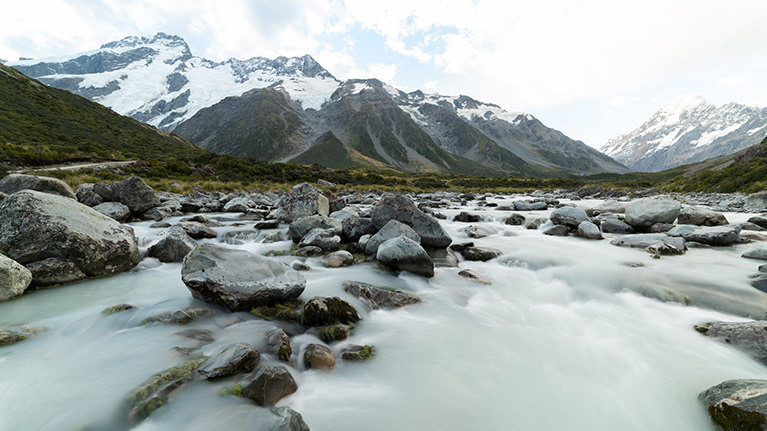
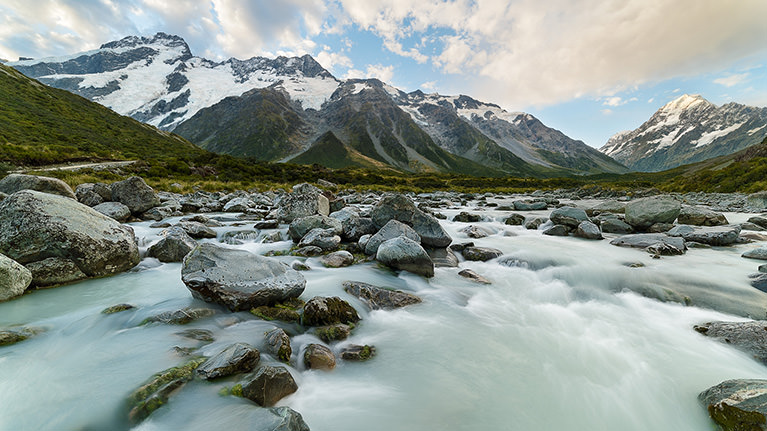
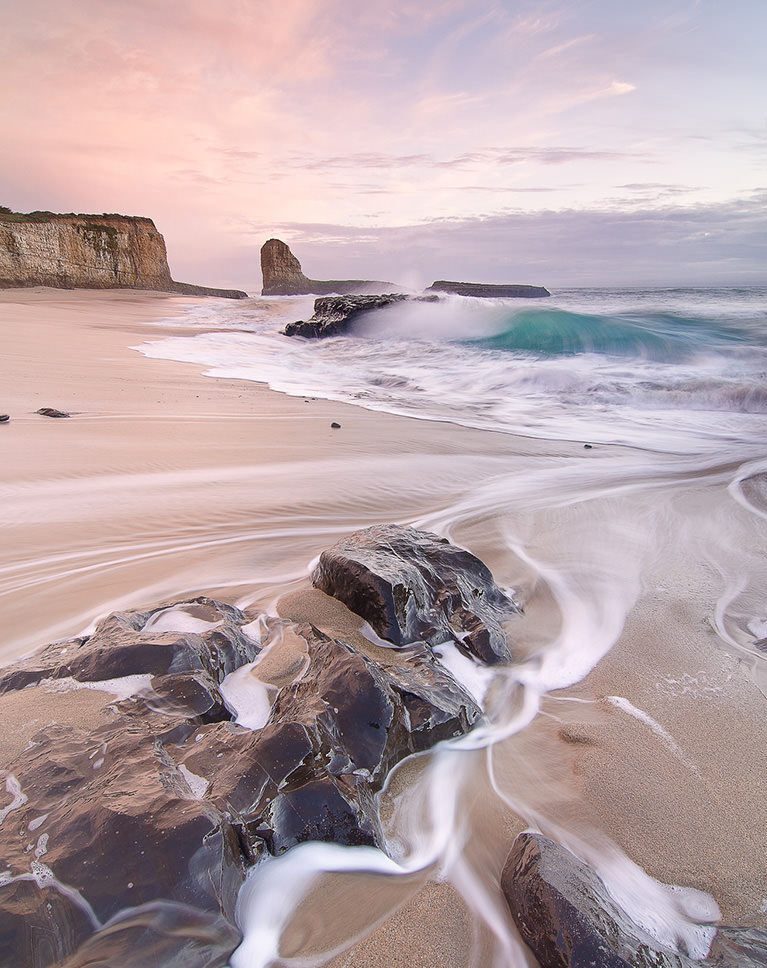
RECOVER SKY DETAIL
ORIGINAL
Beautiful, Dramatic Skies
It can be tough to capture a bright, beautiful sunset and dark, moody clouds while still expecting your camera to capture all of the color and details. In this tutorial, we walk you through several examples where we take a boring sky and transform it into something extraordinary by combining multiple exposures of the same scene.
Working With RAW
When it comes to making adjustments to an image, nothing comes close to working with RAW files in Adobe Camera RAW. Editing RAW allows you to edit and sculpt the original information captured by your camera’s sensor. This means changes that will look ultra-realistic in the final image. For an in-depth look at RAW workflow, be sure to watch our tutorial How to Master Adobe Camera RAW in Photoshop!
Included Photoshop Action
By now, we hope you’re impressed by the potential of Luminosity Masks. But what if we told you that you can harness the power of these incredible tools AND make it happens in half the time? We have created a custom Photoshop Action that can be used on any image to quickly and accurately create several selections based on light levels in the image.
Blend Multiple Images
Recover Lost Details
Learn how to blend multiple exposures to uncover hidden details in the highlight and shadows of an image.
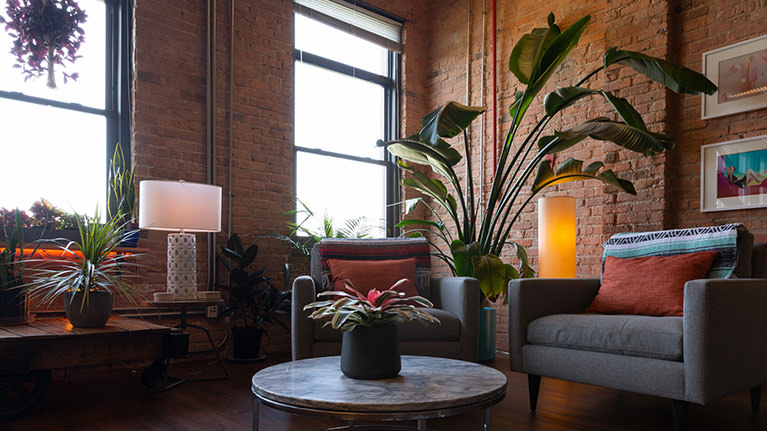
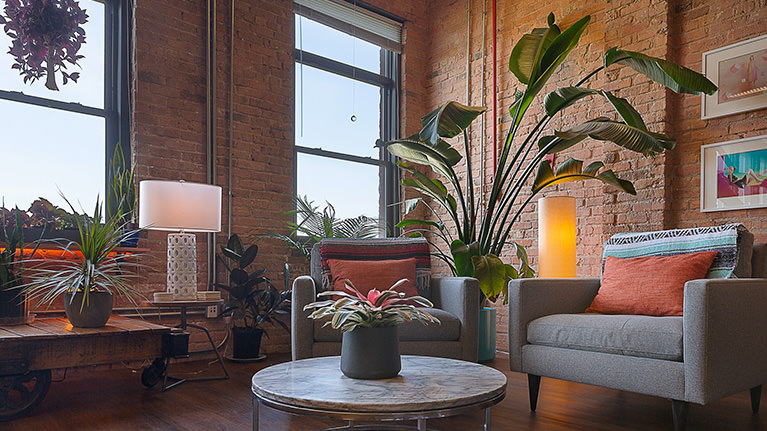
PERFECT FOR INTERIORS & ARCHITECTURE
ORIGINAL
Enhance Detail in Any Photo
While landscapes are a great use for Luminosity Masks, any photo can take advantage of this powerful tool. Shooting a portrait or other interiors against bright windows? You can use the techniques we teach to make sure your subject looks great while still bringing in some of the detail from outside.
Learn Photo Bracketing
Not only do we show you the post-production process for combining multiple exposures but we also provide essential tips and tricks for capturing all of the exposures you’ll need in-camera. Learn how to optimize your camera settings for photo bracketing and take properly exposed images for the highlights, midtones, and shadows.

Aaron Nace
PHLEARN Founder
Aaron Nace is a photographer, Photoshop artist and founder of PHLEARN. He is the #1 Photoshop instructor in the world with millions of YouTube subscribers.
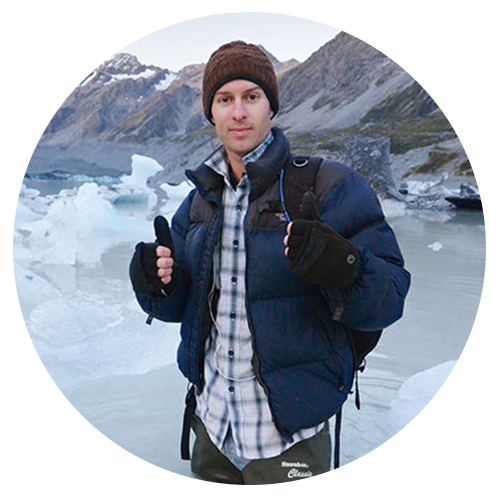
Joshua Cripps
Landscape Photographer/Educator – Featured Artist
Special thanks to Joshua Cripps for providing his incredible landscape photos in 16-bit RAW for download in this tutorial.
Not only is Joshua an acclaimed landscape photographer, he also teaches in person workshops and online tutorials.
View Joshua’s Portfolio


Reviews
New & Popular Tutorials


Training Site in
the World
Tutorials!
Ratings
and Counting
Subscribers
Ich glaube, mein Schwein pfeifft… AWESOME!
I was looking for a way to make some landscape images pop that were shot in very challenging light conditions. It took some time to understand the entire workflow but WOW does it make my images sing. So much more powerful than HDR.
I have read about luminosity masks before but felt it would be too challenging to master. After going through your tutorial, it made it much easier to understand and use them. You helped immensely by providing the download for creating the luminosity masks! This tutorial helped me feel more confident in trying this in the future.
What amazing work and instructions for me a novice. Now some of the dull photos I have ( lot) will become very useful and keep me busy for another 10 years. I’am 81 and very fortunate. On to the future.
This is by far one of the most useful techniques!! I incorporate this in almost all of my post production. Whether or not the image is great or just fair, luminosity masking always improves it. Sometimes just a little bit helps with color grading or a lot for those AEB Shots that need help. Thanks Aaron for making this course. All aspects of the course help in more ways than one. -Anthony Bucks County Pennsylvania.
It´s a great tutorial, i really love arons way of teaching. he´s always keeping me up with his humor. But i honsetly must say i don´t really confide in this technique, it´s creating halos along the edges…
Hi Aaron, did 30 days of photoshop with you a year ago and am learning so much on phlearn pro now This is mastery of light. |’Fiat Lux’ let their be light! Light bulbs going on everywhere!! ‘Fantastic” I love this so much”. “Really cool”
This is the best most easy to follow lecture on luminosity masking I have seen. It would be interesting to see the steps involved in the luminosity masking.
Great tutorial. In the past i saw people doing this on youtube, but did not understand it. Now I really understand this technique and it is beautiful. Very well explained by Aaron. Big thanks !!
Mind blown! Very complex concepts presented in an easy paced manner. I use LM for just about every image these days. I come back to rewatch videos when I get a chance to gain a more nuanced understanding. Aaron is a natural teacher & deserves a Nobel Prize for Photographic Arts. There, I said it!!
Fantastic Workshop! very helpful!!
I really enjoyed this tutorial. I wanted to give it a 4.5, that wasn’t an option. I think I understand the process much better than before. I’m not gonna say it’s crystal clear, but it’s getting there. I’m gonna have to go through the tutorial a few more times so I can get better notes on the individual processes involved so I can concentrate on the process as a whole. My learning style is such that I need to read the process and then see it in action to fully absorb it. Thanks for making all of these tutorials!!!
And thats when the term ‘attention to detail’ was invented.
very core
Great introduction to Luminosity Masks! Aaron is a fantastic instructor. I was looking for a technique to improve my Landscape Photography and Aaron made understanding Luminosity Masks simple and straight forward. I look forward to using the techniques I learned here. Thanks also for the PHLEARN actions! They are super helpful.
Things in the distance do not look sharper than the foreground in most cases, due to atmospheric issues.
I was already familiar with luminosity masks from a number of individual free tutorials, but never had such an in depth explanation and demonstration as offered by this course. What was new for me here is the use of luminosity masks to help with dodging and burning and color enhancements. The explanations are so clear and understandable. Thank you for this!
Great tutorial. My images are looking now much more better. Thank you:)
Another great tutorial. Aaron is an incredible teacher. For the first time I understood luminosity masks to the point I’m able to utilize them to make the changes I want in my images in a more refined manner. I was also afraid to use so many layers as smart objects and now I see that the amount of control you have is crazy and worth the size of the file. And I learned that I need to save the images as psb. After this tutorial I started using Cam Raw and PS to process my pictures instead of starting in LR and then going to PS. I also really like the fact that Aaron tells what he is thinking while he manipulates the images. It is really insightful to witness his creative process. Thank you, Aaron!
the concept of utilizing smart objects and ACR for enhancing images (contrast and dodge and burn and color) is absolutely brilliant and I loved it and learned quite a bit. Personally I am a lightroom user and rarely if ever use ACR. I can envision starting off in lightrooom classic do do lens adjustments, creating virtual copies for (bracketed type exposures) and then importing into photoshop as smart objects… and then switching over to ACR to tweak the exposures in order to refine the image and apply the luminosity effects via the layer masks . I think it would be a great add to include an integration with lightroom module for this course! Bravo, I will be telling all my camera buds about this!!!!
Hi Aaron First of all, thank you very much for this tutorial!! This is exactly what I was looking for for a long time! One suggestion, or perhaps 1 wish from my side ;). Would you use Luminosity Masks for Skin and Hair retouching/Blending with a modified background? This is especially a case if replacing or changing the background colour and exposure, while keeping the hair in tact and the skin with a realistic temperature and texture! What do you think? 😉 Would it be possible to add one more chapter with this? Greetings from Switzerland and thank you again! Daniel Ps. Thank you for the actions as well!!
Wow! So easy to follow and as the titles say it’s better Than HDR!!!
Nace by far is the best at what he does. This is just an amazing course and is explained in such detail that even I can understand what to. Just amazing, well worth the watch if you want your PS skills to improve. So many uses for this tutorial I cannot even tell you. Thanks man for a great job. Will be heading to the ACR tutorial to improve my skills there…
Mastering luminosity masks takes time and patience, but it really is worth the effort. Great video…leaned a lot.
This is the lesson that I’ve been dreaming about, but didn’t know what or how to ask the question. Aaron explains this in a way that I can easily follow along, he utilizes short cuts but never forgets to point out what he is doing(Thank you Phlearn). I’m very novice to Photoshop, and but after watching each video and playing back to take my own notes, the material just plain out makes sense. After a few practices, I no longer need the notes. I can’t believe what a difference this does for my photos! I only wish that I had learned this in the beginning of my Photoshop studies. Now it’s up to me to bring justice to all of my old photos. This lesson takes full advantage of the high dynamic range. He also explains in detail, how the sky affects the foreground. Prior to this lesson, I had unrealistic “Photoshopped photos.” Not anymore! This is so exciting, as it unleashes endless opportunities for Photography! Thank you!
Watch and (Ph)learn to add another valuable editing technique to your workflow. I’ve always had a difficult time understanding how luminosity masks work. I was getting no satisfaction from closing highlights, opening shadows, and trying to carefully brush in exposure +/- in LR. I headed over to my friendly neighborhood Phlearn to see if Mr. Nace had any thoughts (tutorials) on the subject and voila! The sections are well thought out explained in a manner that keeps the flow and pace of the instruction from becoming tiresome. I can always re-watch or rewind a section until I get it (which I’ve done many times).
… just a footnote to my review. I would find it enormously helpful to have a downloadable pdf of the basic workflow for these tutorials. A step by step guide of the basic processes would help me a lot; I find myself doing this for myself but I’m sure others would find this useful.
As always; clear, concise and engaging. I have been looking for a way to move beyond simple HDR merges with my multiple exposures and these tutorials have helped enormously. Quite simply, this is a game changer for me and a very significant step forward in my learning of landscape processing. Thank you!
This was an amazing class! So much thought and detail has been put into the class. I feel like I am well on my way to using luminosity masks in all the composites I put together. Thanks Aaron!
Hi Aaron, this course was a revelation for me and dramatically improved my landscape processing. I just want to share an experience! I submitted a landscape photo to the biggest Nature Photography competition on planet earth. To my delight, I was a chosen finalist and in line for major award. However, the “Technical Analyst” judged that it was “over processed”! I went to great lengths explaining I had used Luminosity Masking, the purest form of processing and even offered to send them the workflow to prove the case. I read all the rules (they even allow HDR) and I clearly didn’t break any. Of course, if you compare the RAW with the finished product they are poles apart. But that’s the power of Luminosity Masking, the ability to “Bring Out Every Detail”. It was a huge disappointment.
Merci pour ce tuto. Great experience and tools to improve my landscape photos.
Thanks Aaron for this great pro tutorial! This is one of my favorite pro tutorials that you made. I really love to work with luminosity masks on my images. I use it a lot to fix overexposed parts of my 360-images such as windows and also on my landscape images. Your actions are very powerful. I am glad that i decided to become a pro member. I will always support your channel. I showed this technique to some people and encouraged them to become a pro member also. All credits to you buddy.
Love the tutorial, when i play the luminosity masks it ask me each one why si that.? Thanks
Finally I understand Luminosity Masks! Thank you, Aaron. Great teacher, great workflow and so easy to understand, even for my little pea brain:) Highly recommended!
One of the most useful and practical tutorials on Phlearn. I’ve only just returned to Phlearn after a number of years away. I’ve been using Luminosity Masks for several of those years but always made adjustments using curves adjustment layers. Never thought to use smart objects. What a great technique. Thank you.
Incredibly useful, i come from an audio background so i see this as the final “mastering” stage of an image — getting the perfect color balance after you did the creative edits. Thank you!
Tons of informations! Thank you from Italy Aaron 🙂
Super explained, and very useful👍
I like this tutorial very much, thank you. But I have a question: this is not the 1st time when I repeat everything step by step with the same settings, but even at stage 1, when I just choose Light mask 1 in channels, I see huge difference in light between your and my result. Mine is always much darker, though I calibrate my laptop regularly, and when I compare two images of the the layers filled with white my layer looks more gray than yours. Can this be possibly corrected? Should I always keep the light of the screen at most? Thank you for the response, with best regards, Marina
Great tutorial…the secret of Channels….Thanks Aaron
Excellent tutorial, thank you. I believe the key to achieve beautiful realistic landscape images.
Hi sir you are awesome ..I learned Photoshop from you very welll
I think this tutorial is one of my favourite. It already helped me a lot in my work and added more depth into retouching process. Works perfectly on CS6.
Excellent website. Lots of useful information here. IrichPhotography Wedding Pre Wedding Post Wedding
What I like about Aaron, is that I feel that he tells us all the information that we need to know. Everything is comprehensive and easy to understand. He’s a great teacher!
A brilliant tutorial – comprehensive, well paced and perfectly explained. Well done and thank you, Aaron. This will enable me to lift my editing to a whole new level.
Such an amazing tutorial! So rich with information in a relatively short period of time! I found myself jumping in between the tutorials and my personal landscape photos within Photoshop to apply these techniques. A strait forward yet powerful elevator to my work!!
Great, thoughtful instruction and content, very helpful!
Great insightful tutorial.
Great tutorial. This has given me an excellent tool for my landscape photos, especially those with challenging dynamic range!
Fully understand now… these were foreign for so long. this will not only help my landscapes but color grading portraits! I’m curious. You guys have a tutorial for bringing back shadows and highlights on portraits but use the apply image way, or would you use the luminosity masks?
Amazing tutorial fully understand luminosity masks now
Really good PS action and detailed videos on how to use them. I have been looking for this type of process to work through some of my landscape images and I’m really looking forward to trying this out.
Awesome! Thank you!
Great tutorial! Appreciate learning the “why” as well as the “how.”
Aaron is amazing with what he can do to a photograph. This is a great learning on how to use luminosity masks for variety of different uses. I just loved this and learned so much. I have watched these video’s at least 5 times each and each time I pick up something new. I would recommend to everyone on how to use luminosity masks to your advantage. Great job Aaron, keep it up you are amazing.
Thank you so much for another great tutorial! I am constantly adding new skills to my Photoshop toolbox, and my work is constantly growing and improving. I recommend this tutorial — two thumbs way up!!
So very grateful for this site and the wisdom you all share with us – thank you!
I have strugled some time to understand luminosity masks. Now I totaly get it. I have the Lumenzia panel as well but realy did not understand how to use it. Thanks so much Aaron to open up a whole new world of editing my images. This is so cool. This tutorial alone made the whole subscription so worth it.
If you want to make your images stand out, you need this course. Easily one of the top 5 tutorials I’ve watched on PHLEARN. Thank you, Aaron, for the great tutorial and bringing Luminosity Masks to a level that even I could grasp and apply. Your actions are great too. I use your Luminosity actions and sharpen actions all the time. Again, this is a much watch tutorial for anyone who wants their image processing to jump a few levels.
This was a great intro to luminosity masks. I’ve owned the Kyper luminosity tools for some time but now I have some ideas for workflow and possibilities that I didn’t have before. Good stuff!
Mind BLOWN, not only dodge and burn but colour selection made so natural, a must for anyone looking to get more out of their landscapes, but is applicable to all photos where complex selections are required, without doubt most informative photoshop website on the planet
Hi Aaron and Phlearn. I loved this tutorial as I always struggle to make my landscape photos pop. I knew a little about the power of luminosity masking but was always confused by it, but now it all seems a lot lot more clearer to use. I admit I still get a bit befuddled about which particular mask to use but with more practise I will get it. A brilliant tutorial as always. Keep up the superb work.
Hey Aaron, awesome as usual! Aligning the Smart objects is tricky, I had some handheld rotation in some images which I try to align manually. So I opened them into Photoshop as layers and auto-aligned them. After which I converted each layer into a smart object. I did open them as dng files, I am quite certain I have the same information but would love your comments on this workflow. I will be reworking some of my favorite HDR enhanced images moving forward. Looking forward to your feedback, robbiek
Luminosity Masks = Α-W-E-S-O-M-E !!!!
This was the exact tutorial I was looking for. Almost worth the price of my annual membership by itself. The ability to replay and revisit certain chapters/sections is very helpful. Aaron is a real pro with PS and I always enjoy his teaching style. The only thing I would like to see is an additional PDF document that provides all of the Keyboard Commands / Shortcuts used in the exercises. Since I’m not in PS on a regular basis, this would be a really helpful aid. I can’t wait to see what else is in here.
Good Tutorial, but I wish that they focused more on Interior photos. The Landscapes are too similar. The Blending on those Pictures isn’t that difficult. The Light Difference on Interior Photos can be really tricky if you want those Bright Rooms with awesome view. Would we awesome if you could add a free Tutorial on this Topic or include it here. Thanks
Aaron, Another sensational course. When you explore a theme, you really know how to explore from end to end! I have a suggestion: I think it would be interesting to have the date on which the various lessons were recorded and the used version of Photoshop. The lessons are always valid, but some adjustments may be made by those who are watching, depending on the version of Photoshop.
Its good tutorial for beguiners. Aaron in videos explain how all luminosity mask stuff works and he does great job to doing it simple so everyone can fallow. He goes through most of the techniques what you would need to have a finished image. I highly recommend to those who whats to step up their landscape photography editing skills, from just lifting shadows in Lightroom : D Only downside of this tutorial is that Aaron- digital editor, not a landscape photographer, so his editing skills and workflow could be a bit different according landscape photography editing esthetics. Like i said, its for beguiners, so if you found that its not enough for you, there are plenty other way more advanced editing tutorials out there ; )
Wow!! Powerful tutorial!!! Thank you!!
The actions you shared with the world opened up for me a whole new way of easily selecting multiple parts of photos at once. The technique works really well with curves, Thanks.
Excellent tutorial on luminosity masking and sharpening! This was so illuminating! Ba dump dump! LOL
Thanks Aaron for taking up my suggestion on luminosity mask tutorial love really to see your take on it. Specially I am really happy for the trick how to have several RAW images as smart objects in one document. Have been looking for that feature for ages thanks so much you are the true photoshop ninja master.
I never thought of using luminosity masks to make a fabulous looking photograph even better. I now just have to take a fabulous looking photograph. Aaron, thank you. Your tuitions far surpass anyone else’s on the WWW.