
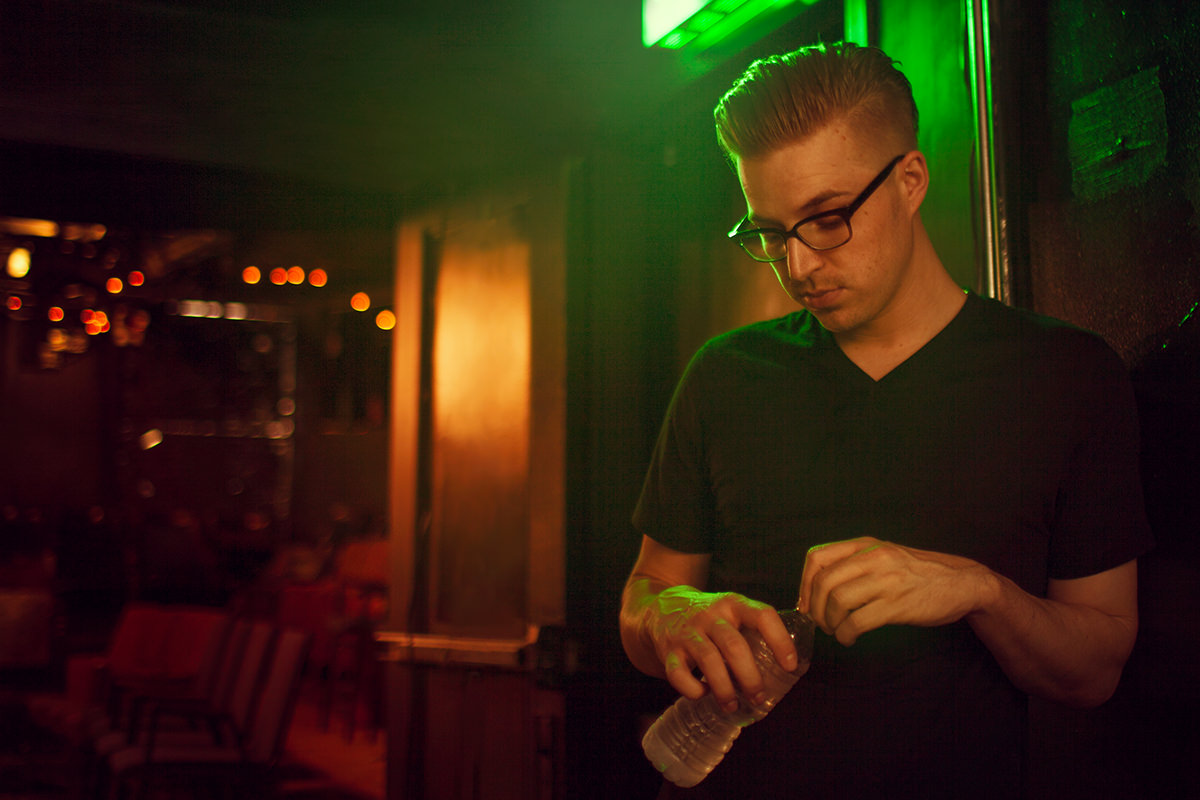

A gelled rim light had to sit camera left on this portrait shoot, which put its light stand in frame. This free Photoshop tutorial removes it with Clone Stamp set to Sample All Layers, finishes the blend with a low-flow soft brush, then uses a throwaway brightening layer to expose leftover seams before the color work begins: one masked Curves layer per job, plus Levels for overall channel balance.
We publish a new free tutorial every week, each one with sample images and PSDs you can download and follow along with. Sign up and they land straight in your inbox, along with early word on sales, events and subscriber-only offers.

Make Your Subject Stand Out in Photoshop With Curves Adjustment Layers
This tutorial walks through a real portrait retouch: removing a light stand that had to sit in frame during the shoot, then using curves and levels adjustment layers to pull the viewer’s eye back to the subject. The removal work leans on the Clone Stamp and Brush tools working together, and the color work shows how several curves layers, each doing one small job, add up to a much stronger final image than any single adjustment could on its own.
Planning the Removal: Why Clone Stamp for Large Out-of-Focus Areas
The shot used a green-gelled Einstein strobe with a 40-degree grid to extend the green glow already coming from an exit sign in the background, creating a rim light around the subject. Because the light had to come from the same angle as the exit sign, it couldn’t be moved off to camera left and out of frame, so its light stand ended up visible in the final composition and needed to be removed in post.
-
Set Clone Stamp to Sample All Layers
Create a new layer, select the Clone Stamp tool, and set its Sample option to All Layers so it pulls detail from the image below rather than the empty new layer. Choose a large, soft brush since the background here is heavily out of focus.
-
Sample and Paint Over the Light Stand
Hold Alt (Option on Mac) and click in the dark, out-of-focus area beside the stand to set a sample point, then paint directly over the stand and its visible halo. Because the background is soft and low on detail, this first pass removes most of the stand quickly.
Using Alt+Shift to Preview Your Clone Source
Once the tool moves into an area with more going on — like a door frame in the background — matching the sample point becomes more important, since a mismatched clone source shows up as an obvious smear rather than blending in.
-
Hold Alt/Option, Then Add Shift for a Live Preview
Click to set a sample point with Alt/Option, then move the cursor to where you want to paint and hold Shift as well. This shows a live overlay of exactly what will be cloned in before you click, so you can line it up with the surrounding door or wall detail rather than guessing. To keep the overlay on all the time, open Window > Clone Source and check Show Overlay; in the video it stays off and Alt/Option + Shift shows it only when needed.
-
Work From Both Sides of the Gap
Clone in from the left side first, then come back in from the right side to meet in the middle. Working from both directions makes it easier to keep the transition looking continuous rather than leaving one long uninterrupted smear.
Why Lowering Flow Helps Blend
A full-strength clone stamp pass often looks obviously retouched because it lays down too much uniform color and light at once, flattening the natural variation in the background. Lowering Flow to around 50–60% (a quick way is pressing Shift plus a number key, so Shift+5 sets Flow to 50%) lets you build up coverage gradually in thin layers, which keeps some of the underlying variation intact and reads as far more natural than one heavy pass.
Cleaning Up With the Brush Tool
Clone Stamp gets the stand out of the frame, but it rarely looks finished on its own — the result usually still reads as an obviously edited patch rather than a clean background.
-
Create a New Layer for Brush Cleanup
Add another new layer above your clone stamp work. Select the Brush tool, choose a very soft round brush by right-clicking and dragging Hardness down to 0%, and lower Flow to roughly 10–20%.
-
Sample and Paint in Small Passes
Hold Alt/Option to sample a nearby color directly from the image, then paint a small amount over the area you’re smoothing. Repeat this sample-then-paint cycle many times over the same region, constantly re-sampling as you move, to gradually blend the patched area into its surroundings.
Why the Brush Tool Works So Well on Out-of-Focus Backgrounds
A heavily out-of-focus background is really just soft color and light gradients with very little hard detail, which is exactly the kind of area a low-flow, soft-edged brush can rebuild convincingly. A more in-focus area, like a door handle with sharp edges, would need a smaller brush and much more careful sampling to hold onto that detail — but for a soft background, the brush tool alone can finish what the clone stamp started.
Grouping Layers and Checking Your Before and After
With the stand removed, it’s worth pausing to compare the fix against the original before moving into the creative color work, since that comparison is what confirms the removal reads as clean rather than obviously edited.
-
Group the Removal Layers
Shift-click each of the clone stamp and brush cleanup layers to select them together, then press Cmd/Ctrl+G to group them. Toggle the group’s visibility off and on to compare the original light stand against the cleaned-up result.
Building a Green Rim Light Glow
With the distracting light stand gone, the next step is adding a soft green glow around the exit sign, so the light that motivates the green rim light reads as a glowing source.
-
Paint a Glow on a New Layer
Create a new layer, select the Brush tool, hold Alt/Option to sample a darker green near the exit sign, and paint around the light at a low opacity such as 20%, then sample a lighter color and paint again to build up a soft glow.
-
Switch the Glow Layer to Lighten and Adjust Opacity
Change the glow layer’s blending mode from Normal to Lighten so the glow only affects the image where it’s brighter than what’s underneath, then lower the layer’s opacity until the glow looks like a natural extension of the existing light rather than an obvious paint-on effect.
Checking for Clone Stamp Artifacts Under the Glow
Brightening the image with the new glow can reveal small clone stamp seams from the earlier removal work that weren’t visible when that area was darker.
-
Temporarily Brighten the Area to Check for Artifacts
Hide the glow layer, add a Curves adjustment layer above your cleanup work, and push it brighter than you’d actually want — this is only to reveal any leftover hard edges from the earlier clone stamping, not a final adjustment.
-
Fix Artifacts With a Current and Below Clone Stamp Layer
Add a new layer directly beneath the temporary Curves layer, set the Clone Stamp’s Sample option to Current and Below, and use a soft brush to clone stamp away the hard edges revealed by the brightening — this sampling mode ensures the fix doesn’t pick up the brightened Curves layer itself.
-
Remove the Temporary Brightening and Restore the Glow
Delete the temporary Curves adjustment layer once the artifacts are cleaned up, then turn the rim light glow layer’s visibility back on.
Why Current and Below Sampling Matters
Clone Stamp’s default All Layers setting would sample the temporary brightening adjustment along with the image itself, baking that extra brightness into the fix and leaving the touched-up area mismatched once the temporary layer is removed. Current and Below only reads the layer you’re working on plus whatever sits beneath it, so the fix stays accurate to the actual image once the temporary brightening is gone.
Adding a Warm Tone and Directing Attention With Curves
With the removal and the rim light finished, the remaining work is entirely about color: bringing a complementary red into the green glow, then using several curves layers to darken distracting areas and brighten the subject.
-
Warm the Rim Light With a Masked Curves Layer
Add a Curves adjustment layer, raise the Red channel slightly and lower the Blue channel to shift toward an orange-red, invert the layer mask to hide the effect everywhere, then paint white with a brush directly over the rim light area to bring the warm tone in only where it’s wanted.
-
Darken the Background Away From the Subject
Add another Curves adjustment layer and pull it down to darken the areas around the subject, such as the visible theater space, so attention shifts away from the background.
-
Brighten and Recolor the Subject With a Masked Curves Layer
Add a Curves layer, pull it upward to brighten, invert the mask with Cmd/Ctrl+I so the effect is hidden by default, and paint white over the subject to bring the brightening in only there. Nudge the Red channel up and the Blue channel down slightly to add warmth, then lower overall Saturation a touch so the extra brightness doesn’t look washed out.
Why Skin Benefits From a Warmer, Orange-Leaning Tone
Human skin tone is inherently orange to some degree, varying only in how much of it is present, so pushing Red up and Blue down on a curves layer nudges brightened skin back toward a natural warmth rather than leaving it looking flat or artificially lit.
Fine-Tuning Color With Levels and Adding a Final Highlight
The last stage layers in a Levels adjustment for overall color balance and a targeted highlight to give the subject’s skin a bit more dimension.
-
Shift Color With a Levels Adjustment Layer
Add a Levels adjustment layer and work through the individual color channels: on the Red channel, pull some red into the shadows and cyan into the highlights; on the Blue channel, pull some blue into the shadows and yellow into the highlights, then on the Green channel, drag toward green for more of the exit-sign color or toward magenta for a more natural result, until the overall color feels right for the image.
-
Add a Highlight Using the Blend If Sliders
Create a new layer, paint white over the subject with a brush, then open that layer’s blending options and hold Alt/Option while dragging the Underlying Layer slider so the paint only shows where the layer beneath it is already lighter. Change the painted layer’s blending mode to Soft Light to turn it into a subtle highlight rather than a flat white patch.
-
Review Your Layers and Adjust to Taste
Toggle adjustment layers such as Hue/Saturation off and on to check whether they’re helping or working against the image, lower the opacity of any curves layer that feels too strong, and try a Color Balance adjustment on the midtones only if the color still isn’t quite right.
Why Turning Adjustment Layers Off and On Helps
It’s common to stack several adjustment layers during an edit and lose track of whether each one is still helping the image or actively working against an earlier decision. Periodically toggling each layer’s visibility off and back on, even late in the process, is a quick way to catch an adjustment that’s no longer earning its place before calling the edit finished.
Why This Approach Works
The removal and the color grade in this tutorial both rely on the same underlying idea: solving one small, specific problem per layer instead of trying to fix everything at once. Clone Stamp handles the broad, low-detail cleanup, a low-flow brush finishes the fine blending clone stamping can’t quite manage, and a temporary brightening layer exists purely to reveal leftover seams before being discarded. The color work follows the same logic — one curves layer darkens the background, another brightens and warms the subject through an inverted, hand-painted mask, and a levels adjustment handles overall channel balance, with each layer doing exactly one job and nothing more. Because every adjustment lives on its own layer with its own mask, the whole edit stays fully reversible: any single decision can be dialed back, masked out further, or turned off entirely without undoing the rest of the work.
Final Thoughts
This image is a good reminder that removal work and creative color grading are really two separate skills that happen to live in the same file. Getting comfortable holding Alt/Option and Shift together to preview a clone source, and knowing when Current and Below sampling is the safer choice, will save time on almost any retouch that involves a stray object in frame. On the color side, the habit of masking a curves layer to one area rather than applying it globally, and periodically toggling layers to check whether they’re still helping, is what keeps a multi-layer edit like this one under control instead of turning into an unpredictable stack of adjustments.
Quick Reference: Keys, Menus and Settings
- Clone the stand outClone Stamp S, Sample: All Layers, Alt/Option-click to sample
- Preview the sourceHold Alt/Option + Shift; or Window > Clone Source > Show Overlay
- FlowShift + 5 for 50%, Shift + 2 for 20%
- Brush cleanupNew layer Shift + Alt/Option + Cmd/Ctrl + N, Brush B, Hardness 0%, 10 to 20% flow
- Find seamsTemporary bright Curves layer; clone below it with Sample: Current and Below
- Direct attentionCurves down on the background; Curves up, Cmd/Ctrl + I, paint white on the subject
- HighlightWhite on a new layer, Blend If with Alt/Option to split the slider, Soft Light
No AI, no generative credits.
Removing a Light Stand and Using Curves: Common Questions
Why was the light stand in the shot at all?
The green-gelled strobe had to come from the same angle as the green exit sign it was copying. From camera left, out of frame, the rim light wouldn’t have matched, so the stand stayed in and came out in Photoshop.
What Clone Stamp settings work for a big out-of-focus area?
Work on a new layer with Sample set to All Layers and a large brush. Alt/Option-click the dark area beside the object and paint over it; the soft background hides most of the work.
How do I preview what the Clone Stamp will paint?
After sampling, hold Alt/Option and Shift together over the spot you want to paint to see an overlay. Window > Clone Source > Show Overlay keeps it on all the time if you prefer.
How do I change Flow quickly?
Hold Shift and press a number key: Shift + 5 sets Flow to 50%, Shift + 2 to 20%. A lower flow lays down less at once and blends better.
My clone stamping still looks patchy. What now?
On a new layer, use a soft brush (Hardness 0%) at 10 to 20% flow. Alt/Option-click to sample a nearby color, paint a little, and sample again, over and over, until the area blends.
How do Curves layers make the subject stand out?
One Curves layer pulled down darkens the background. Another pulled up, with its mask inverted by Cmd/Ctrl + I, is painted white over the subject only.
Brightening washed out my subject’s skin. How do I fix it?
In that Curves layer, raise the Red channel a little and lower the Blue channel a little to add orange; skin is naturally orange to some degree.
Do I need to add grain back over painted areas?
Usually not. If you do, fill a new layer with 50% gray, run Filter > Noise > Add Noise, set the layer to Soft Light and lower its opacity.
From the Magazine View all
Stories, interviews and guides for photographers, new every week.
 EditingLightCraft vs Lightroom: I Edited the Same RAW Files in BothThe free clone on the same RAW files: what matches, what breaks and who should switch.
 InspirationRare Historical Photos: 13 of the Rarest Pictures Ever TakenFrom the earliest surviving picture of a person to the last passenger pigeon: who took each one and why it survives.
 EditingArtCraft: Photoshop Cloned by AI in Two Weeks. Is It Legal?ArtCraft cloned Photoshop and Lightroom with AI and gave them away. Any good? Legal? Safe?
Master Photoshop, Lightroom and Photography
Join PHLEARN PRO for $12.99 a month, or $99.99 a year (save 36%). Cancel anytime, with a 100% money-back guarantee.





