
BEFORE
AFTER
Download Sample Images
Click the link below to download the sample images and follow along with this tutorial.
DownloadTutorial Description
Matching the light between two images is one of the keys to creating a realistic composite. Now what if we told you there was a secret tool hidden within Photoshop that will help you get the job done and with incredible results? Well, the secret’s out! Learn how to use a Threshold Adjustment Layer in combination with a Levels Adjustment Layer to realistically place a person into any new environment!
A Guide for Compositing
When placing a subject onto a new background, it can be tricky to get the lighting to be a perfect match. This technique works as a guide to make sure that the highlight and shadows levels are the same between the layer with your subject and the layer with the new background.
And it’s all thanks to Threshold Adjustment Layers.
Threshold Adjustment Layers
You may not have used Threshold Adjustment Layers before. Why? Well, because the effect looks pretty strange. While it may not look super useful on the surface, it’s indeed a powerful tool to measure highlights and shadows in an image.
The Threshold Adjustment Layer will convert an image into a high-contrast black and white photo. When you set the threshold amount, any pixels lighter than that number will read as pure white, and any pixels dark will read as pure black. This will allow you to clearly see the lightest and darkest areas of any picture.
In our example, we’ve placed the subject onto a new background. After applying the Threshold Adjustment Layer, you’ll notice that the sky turns to pure white as well as a large portion of the subject. For realistic lighting conditioning, the brightest light in an image should be the source of the light – everything else should fall into a darker range, even if just slightly.
Adjusting Levels
Now that we know that we need to bring down the highlights on our subject a bit, we can use a Levels Adjustment Layer clipped to our subject layer to make it happen. Simply add a new Levels Adjustment Layer on top of the subject layer, right click and select Create Clipping Mask, then lower the right-most slider.
You can make the Threshold Adjustment Layer visible as you do this to check your work. Ideally, only the sky will show areas of pure white (since that is the main light source). The subject’s skin and clothing should appear as pure black on the Threshold Adjustment Layer, but you don’t want to lower the Levels too much so that the light appears unnatural.
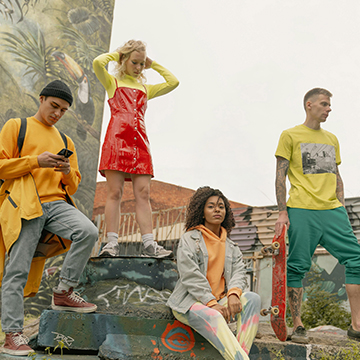
This is a powerful tool that can add more precision to your work. If you’re new to compositing, make sure that any images you plan on combining were taken in similar lighting situations. In our example, we used an image of a subject taken outdoors on a sunny day and a background taken outdoors on a sunny day. This made it much easier to bring the light levels into a similar, realistic range.