

Download Assets
This tutorial includes 5 sample images, 3 sample PSDs and 1 PDF guide. Downloads are free with a PHLEARN account.
- Download the sample images and PSDs from every free tutorial on PHLEARN
- New free tutorials published every week
- One free account — sign up once, then download anything
Free PDF Guide · 4 Pages
This Tutorial as a Step-by-Step PDF
Walks through Blend If in Layer Style > Blending Options: what each Current Layer and Underlying Layer handle hides, the Alt/Option split for a feathered edge, bokeh set to Screen, stars kept off the ground and the moon then masked with Select > Subject, and a Gradient Map that colors mostly the shadows. Keep it next to your keyboard.
description
Blend If hides part of a layer based on how bright or dark it already is, so you can drop one image into another without drawing a single mask. It lives in the Layer Style dialog, and two sliders do the work — one reading the layer you are on, the other reading the image beneath it.
This tutorial puts it to work three ways: laying bokeh over a portrait, compositing a star-filled sky behind a subject, and coloring an image with a Gradient Map that only touches the shadows. You will also learn the one modifier key that turns a hard cutout into a soft, believable falloff.
Enjoying This Free Tutorial?
We publish a new free tutorial every week, each one with sample images and PSDs you can download and follow along with. Sign up and they land straight in your inbox, along with early word on sales, events and subscriber-only offers.
Image Source
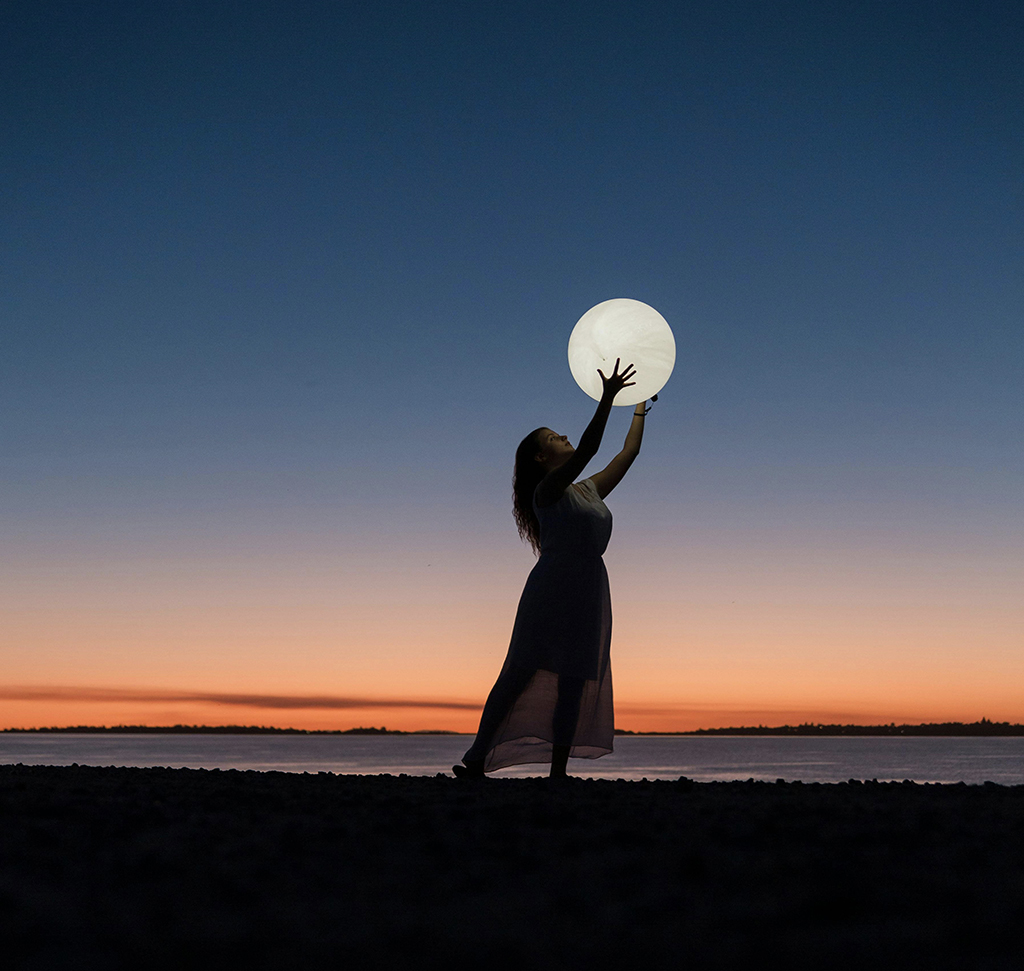
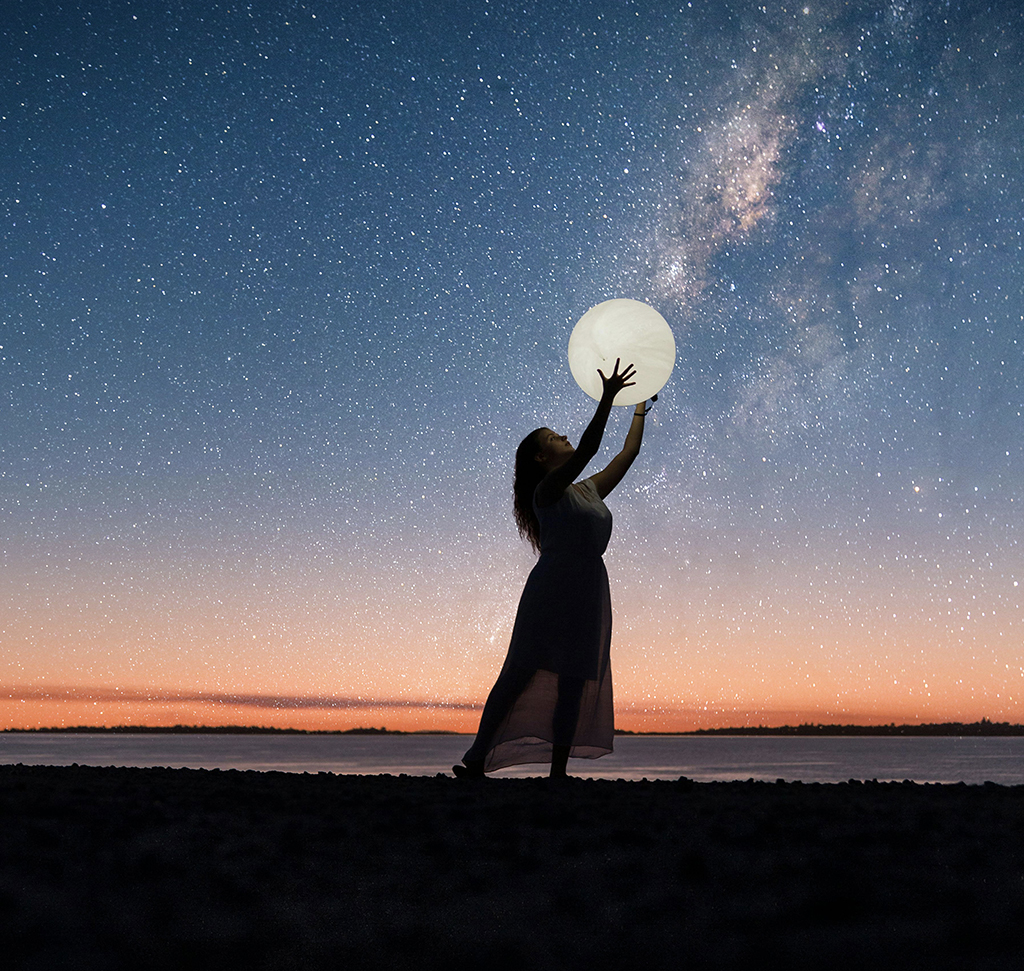
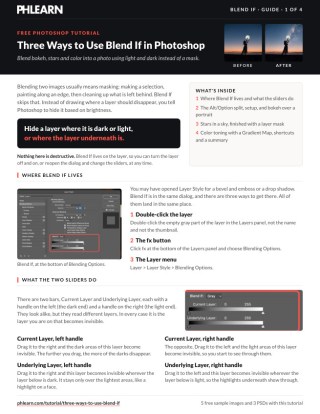
Three Ways to Use Blend If in Photoshop
Blending two images together usually means masking — making a selection, painting along an edge, then cleaning up the halo you left behind. Blend If skips all of it. Instead of drawing where a layer should disappear, you tell Photoshop to hide it based on brightness: make this layer invisible wherever it is dark, or wherever the layer underneath it is light. A bokeh texture or a star field can drop into a photo in about ten seconds, with transitions no brush could match by hand.
It lives in a panel most people only ever open to add a drop shadow, which is why so few photographers use it. This tutorial covers three jobs it does well: laying bokeh over a portrait, compositing a star-filled sky behind a subject, and coloring an image with a Gradient Map that only touches the shadows. The panel is identical in all three — the only thing that changes is what you put on the layer.
Getting Started
Every example starts the same way: two images, one stacked above the other in a single document. Nothing here is destructive, so you can turn any of it off at any point.
-
Open Both Images
Open the photo you are blending into and the texture you are blending on top — a bokeh frame, a star photo, whatever you are working with. They can be wildly different sizes; you will scale to fit in a moment.
-
Drag One Into the Other
Grab the Move Tool (Keyboard Shortcut “V”), then click and drag from one document into the other’s tab. Press F to cycle to full screen once it lands, which gives you room to work.
-
Scale It Into Position
Press Cmd + T on Mac (Ctrl + T on PC) for Free Transform, then drag the width and height fields in the options bar rather than pulling a corner handle — it is faster and keeps the proportions honest. Position it roughly; you will refine it after the blend is working.
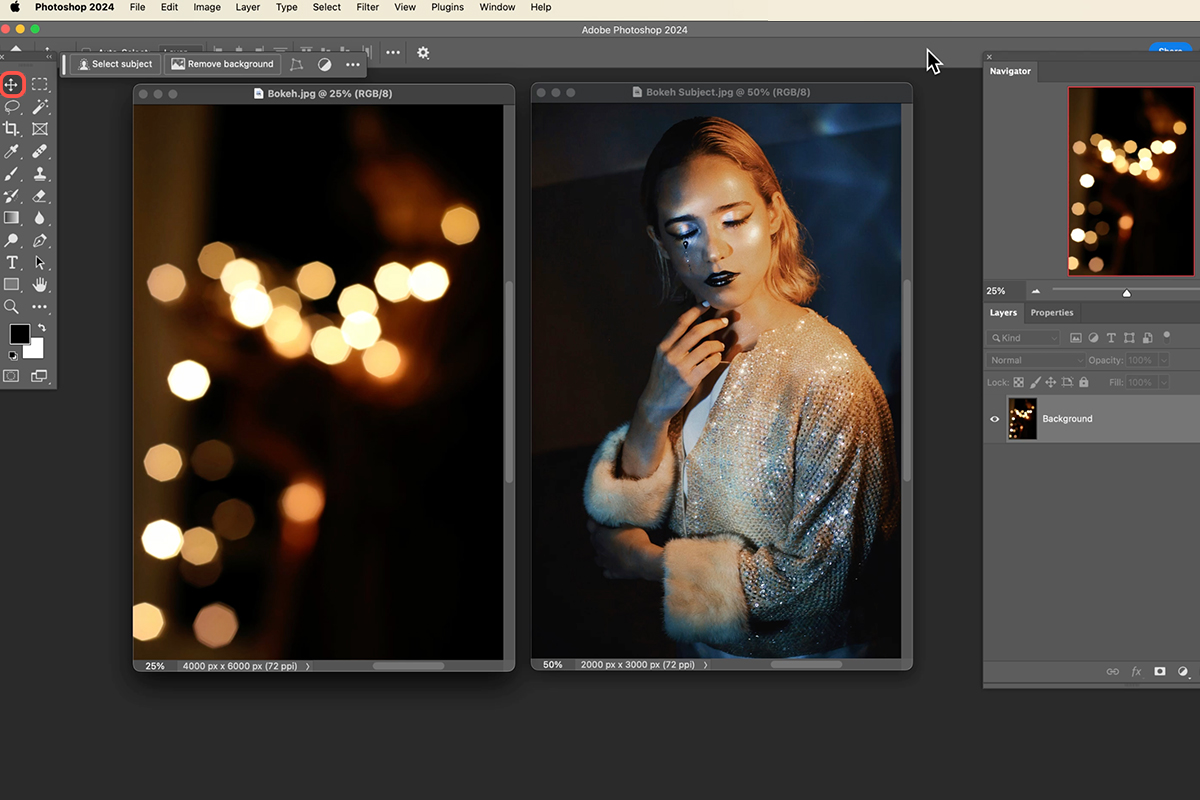
Where Blend If Actually Lives
Blend If is part of the Layer Style dialog, tucked under Blending Options beneath the effects everyone knows. There are three ways in, and they all land in the same place.
-
Open Layer Style
Double-click the empty gray area of the layer — not the name, not the thumbnail. You can also click the FX button at the bottom of the Layers panel and choose Blending Options, or go to Layer > Layer Style > Blending Options.
-
Find the Blend If Section
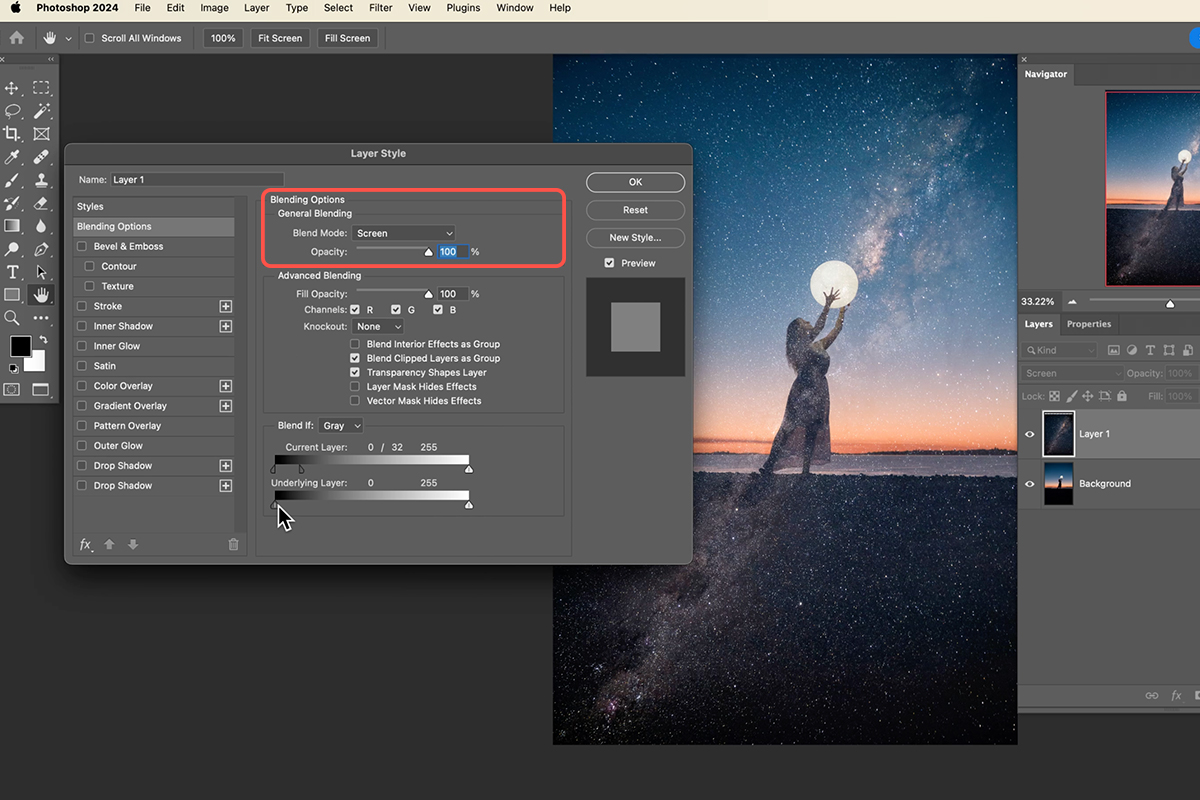
It sits at the bottom of the Blending Options panel: a channel dropdown set to Gray, and two gradient bars labeled This Layer and Underlying Layer, each running 0 to 255.

What the Two Sliders Actually Do
The two bars look alike and behave completely differently. Getting this distinction straight is most of the battle — once it clicks, the rest of Blend If is just dragging.
The Current Layer Slider
This one acts on the layer you are standing on. Drag the black handle at the left inward and the dark pixels of that layer vanish — push it further and more of the shadows disappear. Drag the white handle at the right inward and the bright pixels vanish instead. For a bokeh frame shot against a black background, that left handle alone removes the background entirely.
The Underlying Layer Slider
This one is the clever half. It hides your current layer based on what is beneath it. Pull the left handle in and your layer disappears wherever the image below is dark; pull the right handle in and it disappears wherever the image below is bright. That is how you keep a star field in the sky and off the ground without touching a brush — the ground is dark, so the stars simply stop existing there.
The One Key That Makes Blend If Look Real
Straight out of the box, Blend If produces a hard, crunchy edge. Every pixel above the threshold stays, every pixel below it goes, and the result looks cut out. The fix is a single modifier key, and it is the difference between a blend that convinces and one that obviously does not.
-
Split the Handle
Hold Alt on PC (Option on Mac) and drag one half of a slider handle. It separates into two triangles. Everything between them becomes a gradual falloff instead of a hard cutoff.
-
Widen the Gap Until the Edge Disappears
The further apart the two halves sit, the softer the transition. Watch the edges of your texture rather than the numbers — you are looking for the point where you can no longer tell where the blend begins.
Example One: Dropping Bokeh Over a Portrait
Bokeh frames are shot against near-black for exactly this reason: the background is the darkest thing in the file, so it is the first thing Blend If can remove.
-
Hide the Dark Background
On the Current Layer slider, drag the left handle inward. The black surrounding the light circles drops away and the highlights stay.
-
Feather the Falloff
Hold Alt/Option and split that handle, then spread the halves until the edges of each light circle go soft instead of clipped.
-
Switch to Screen
Change Blend Mode from Normal to Screen at the top of the same dialog. Screen drops black entirely and keeps only what is brighter than the layer beneath, which is exactly what light should do. Blend If and blending modes stack together, and this pairing is the one you will reach for most.
-
Reposition the Light
Press Cmd + T (Ctrl + T) again and move the texture so the brightest circles fall where light plausibly would — off to one side, catching an edge, not sitting flat across your subject’s face. For more on building the effect from scratch, see how to add bokeh to your images.
Example Two: Compositing Stars Into a Night Sky
This is where the Underlying Layer slider earns its place. A star photo dropped over a landscape covers everything — sky, horizon, ground, subject. Blend If sorts almost all of it out on brightness alone.
-
Bring the Star Photo In
Same as before: Move Tool, drag it across, scale it so the densest part of the star field sits where you want the most detail.
-
Drop the Black Sky
On the Current Layer slider, hold Alt/Option and split the left handle, then drag until the black between the stars falls away and only the points of light remain.
-
Set the Blend Mode to Screen
Again, Screen removes the remaining dark values and keeps the stars reading as light rather than as a flat photo laid on top.
-
Keep the Stars Out of the Ground
Now move to the Underlying Layer slider. Split the left handle and drag it in — the star layer disappears wherever the image below is dark, which removes it from the ground and the foreground in one movement.
-
Protect the Brightest Areas
If stars are crawling across a moon or a bright horizon, split the right handle of the Underlying Layer slider and pull it in. That clears them out of the lightest values without affecting anything else.
When Blend If Needs Help From a Layer Mask
Blend If works on brightness, so it cannot tell a dark jacket from a dark hillside. When something mid-toned needs protecting — a subject standing against the sky, water catching reflections — finish with a mask. Choose Select > Subject, then Alt/Option-click the layer mask icon to load that selection as a black mask, hiding the stars over your subject immediately. Paint with the Brush Tool (Keyboard Shortcut “B”) in black to clean up anything left. If masks are new to you, start with how to use layer masks in Photoshop, and selecting subjects and refining edges covers getting that initial selection clean.
Example Three: Coloring With a Gradient Map
The first two examples blend a photo into a photo. This one blends an adjustment, and it is the use most people never think of. A Gradient Map remaps every tone in your image to a color ramp, which is a powerful way to color grade and a heavy-handed one — it hits highlights and shadows equally hard. Blend If gives you control over which of those it is allowed to touch.
-
Add the Gradient Map
Go to Layer > New Adjustment Layer > Gradient Map and click OK. Like any adjustment layer, it sits above your image and changes nothing permanently.
-
Choose a Ramp
Click the gradient in the Properties panel and browse the presets. Photoshop ships with plenty worth using — the purple sets are a good starting point for a cool, faded look.
-
Reverse It If It Looks Inverted
If your shadows come back bright and your highlights dark, the ramp is simply running the wrong way. Tick Reverse in the Properties panel and it corrects instantly.
-
Open Blending Options on the Adjustment Layer
Double-click the gray area of the Gradient Map layer, exactly as you did for the photo layers. Blend If is available here too.
-
Color the Shadows Only
On the Underlying Layer slider, split the right handle and drag it in. The Gradient Map now fades out across the bright parts of your image and stays strongest in the shadows — rich color in the darks, clean highlights, which is most of what people mean by a faded or cinematic grade. Lower the layer opacity if it still feels heavy; these effects almost always read better understated. How to Color Tone Using Gradient Maps goes deeper on choosing ramps and protecting skin tones.
Why the Effect Survives a Gradient Swap
Because you applied Blend If to the layer rather than to a particular gradient, the falloff belongs to the layer itself. Double-click the Gradient Map thumbnail, click through every preset in the list, and each one arrives already restricted to the shadows. You set the rule once and then audition looks freely, which makes this a genuinely fast way to try a dozen grades on one image.
What Trips People Up
Nearly every disappointing Blend If result comes from one of three things. The first is forgetting Alt/Option — an unsplit slider gives a hard threshold, and hard thresholds look like cutouts. The second is working on the wrong slider: if you are trying to remove a layer’s own black background you want Current Layer, and if you are trying to keep it out of dark areas of the photo beneath you want Underlying Layer. Reaching for the wrong one produces a result that seems almost right and never quite gets there.
The third is expecting too much of it. Blend If reads luminosity and nothing else, so it cannot distinguish objects that happen to share a brightness. Push it hard enough to remove one and it will eat the other. When that happens, stop dragging and add a mask.
Why Not Just Paint a Mask Instead?
Because Blend If evaluates every pixel continuously and re-evaluates whenever the layer moves. Transform the star field and the blend recalculates for its new position; a painted mask would need repainting. It is also entirely non-destructive and lives in a dialog you can reopen and adjust months later. Masks are better at deliberate, object-shaped decisions — the two solve different problems, and most strong composites use both. PHLEARN PRO members can go much deeper in How to Create a Composite in Photoshop, and How to Use Blending Modes in Photoshop covers the mode-by-mode reasoning behind pairings like Screen.
What Makes Blend If Look Seamless
A hand-painted mask has an edge because someone drew one. Blend If has no edge at all — it has a falloff calculated per pixel from values already present in the file. When you split those handles you are describing a range rather than a boundary, and ranges do not produce the telltale outline that makes a composite read as fake. That is why a star field blended this way sits in the sky instead of on top of it, and why bokeh dropped over a portrait looks like light in the room rather than a texture pasted over a face.
It also compounds. Blend If narrows down where a layer appears, the blend mode decides how those surviving pixels interact, and a mask handles whatever brightness alone cannot separate. Each does one job cleanly, and together they cover almost every blending problem you are likely to meet.
Make Blend If Part of Your Workflow
The fastest way to internalise this is to stop treating it as a compositing trick. Any time you catch yourself about to mask something based on how bright or dark it is — knocking a sky out from behind branches, keeping a texture off someone’s skin, restricting a grade to the shadows — open Layer Style first and try two slider drags. It will not always be the answer, but it takes ten seconds to find out, and when it works it saves the whole masking job.
Then try it somewhere unexpected. Adding realistic clouds with Blend If uses the same two sliders on an entirely different problem, and once you have used it on a photo layer, an adjustment layer and a texture, you will start spotting the brightness-based decisions in your own editing that you have been making by hand all along.
Quick Reference: Keys, Menus and Settings
- Bring in the textureV, drag from one image into the other; F for full screen
- Resize itCmd/Ctrl + T, then drag the W or H label in the options bar
- Open Blend IfDouble-click the gray part of the layer, or fx > Blending Options, or Layer > Layer Style > Blending Options
- Feather the blendAlt/Option-drag a handle to split it
- Bokeh and starsCurrent Layer left handle, Blend Mode: Screen; for stars, Underlying Layer left (ground) and right (moon)
- Mask the subjectSelect > Subject, Alt/Option-click the layer mask icon; B and paint black
- Color the shadowsLayer > New Adjustment Layer > Gradient Map (Reverse if inverted), then split the right Underlying Layer handle
Free Downloads
Follow Along on the Same Photos
Get the 5 sample images, the 3 finished PSDs (one per example) and the 4-page PDF guide for the bokeh, stars and gradient map blends. Free with a PHLEARN account.
Blend If in Photoshop: Common Questions
What does Blend If do in Photoshop?
It hides a layer based on brightness instead of a painted mask. You can make a layer invisible where it is dark or light, or where the layer underneath is dark or light.
Where do I find Blend If?
At the bottom of Blending Options in the Layer Style dialog. Double-click the empty gray part of the layer, click fx > Blending Options, or go to Layer > Layer Style > Blending Options.
What is the difference between the two Blend If sliders?
The Current Layer bar hides the layer you are on where that layer is dark or light. The Underlying Layer bar hides the same layer where the layer below it is dark or light.
Why does Blend If leave rough, choppy edges?
The handle has not been split. Hold Alt/Option and drag a handle to break it into two halves; the range between them becomes a smooth feather instead of a hard cutoff.
How do I put a bokeh texture over a portrait?
Drag the bokeh photo in with the Move Tool, open Blending Options and split the left Current Layer handle to drop the dark background. Set Blend Mode to Screen, then move it off the subject’s face with Cmd/Ctrl + T.
How do I keep stars in the sky and off the ground?
On the Underlying Layer bar, Alt/Option-split the left handle and drag it in. The stars disappear where the image below is dark. Split the right handle to clear them off a bright moon.
Do I still need a layer mask with Blend If?
Sometimes. Blend If only reads light and dark, so it cannot separate things that share a brightness. In the video, Select > Subject and an Alt/Option-click on the layer mask icon hide the stars over the subject, then the Brush paints out the rest.
Can I use Blend If on an adjustment layer?
Yes. Add Layer > New Adjustment Layer > Gradient Map, open its Blending Options and split the right Underlying Layer handle. The color fades out of the highlights and stays mostly in the shadows.
Why does my gradient map look inverted?
The gradient is running the wrong way. Check Reverse in the Properties panel and it corrects right away.
Are the sample files free?
Yes, with a free PHLEARN account. You get 5 sample images, 3 sample PSDs and 1 PDF guide: the photos and finished files for the bokeh, stars and gradient map examples, plus the step-by-step guide.
Master Photoshop, Lightroom and Photography
Join PHLEARN PRO for $12.99 a month or $99.99 a year. Cancel anytime, with a 100% money-back guarantee.





