Course Downloads
Description
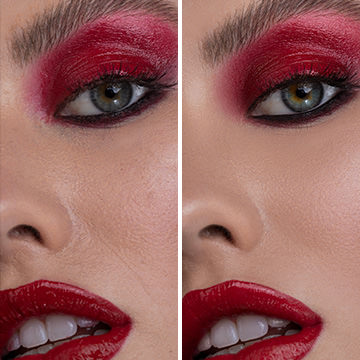
Need it brighter? Need it Darker? Need some blues in the shadows? Levels to the rescue!
In this tutorial, learn to use Levels to adjust exposure and color in a photo.
Share


What are Levels?
The Photoshop Levels tool is one of those go-to tools that you could and probably should be using to edit every image. The problem is that most people do not know how to use it properly.
The Photoshop Levels Tool
The Levels tool adjusts color balance, tone and exposure. There are other Photoshop tools that can perform these functions, but the great thing about the Levels tool is that once you get the hang of using it, the adjustments can happen all in one place and much faster than with other methods. It is also a great way to be able to see all these changes at once and how they complement one another.
Functions of the Levels Tool
When you pull up the Levels window, you will see a histogram with a moveable diagonal line on the right side of your editing screen. The line goes from 0 to 255, and you can get a ton of information just based on the shape of your histogram. For the purposes of using this tool, however, you do not have to know all of it. Basically, 0=black, and 255=white. You can tell if your image is under-exposed if your histogram is heaviest on the 0 side (left) and over-exposed if it is heavier on the 255 (right) side. In other words, highlights and shadows. The very middle of the histogram is everything in between or what are called mid-tones.
Adjusting the Levels Tool
Before adjusting your levels, check your image out to see what corrections it might need. Does it have an unwanted color cast? Is it over-exposed so much that you can’t make out details? Under-exposed?
Popular Uses for the Levels Tool
You do not have to be an expert on color balance to benefit from this tool. The tool is designed to be foolproof, so if you are tinkering with the sliders and you accidentally ruin your image, you can just click “Cancel” and start over. None of the changes will be saved until you specifically approve them. So, feel free to just tinker with the tool as you brighten your shadows, accentuate your highlights, and adjust your mid-tones. It is also common to use the tool to adjust contrast for added detail.
Additional Tips
As you become comfortable with this tool, you might want to use it alongside your other color tools, such as Curves and Hue/Saturation. If you have specific areas that you want to emphasize on an image, you can also use your Dodge and Burn tools to lighten and darken the pixels of your choosing.
To learn more about the versatile Levels tool and just how to use it for your images, check out our informative tutorial video.


Reviews
New & Popular Tutorials


Training Site in
the World
Tutorials!
Ratings
and Counting
Subscribers
Very brief, and concise
I guess, I can tell that I’m quite advanced with Photoshop, steering my way into mastery. Yet I was looking for information to clarify some things with levels adj layer, I was a bit sceptical about this tutorial as this is about Photoshop basics ( and I’m mr. advanced 😉 ) and surprise surprise I found them here. “You can’t build up to the master level, if you lack in the fundamentals/basics” – me, probably someone already said it though 😉 Recommended