The Ultimate Guide to Retouching
-

-
Add to
favorites
-
DifficultyMedium
-
Length9.75 hours
-
Software
DESCRIPTION
Retouching is in high-demand. Learn the skills professional skills required to take images to the next level. From dodging and burning and frequency separation to sharpening and exporting, this tutorial will show you everything you need to know.
THIS COURSE INCLUDES
- 26 Sample Images
- 5 Photoshop Brushes
- 1 Photoshop Action
Share
Table of Contents
-
01 - Lightroom & Retouching47s
-
02 - Import & Basic Adjustments6:18m
-
03 - Correct Exposure8:57m
-
04 - Color Correction8:28m
-
05 - Export6:11m
-
01 - Introduction to Facial Features42s
-
02 - How to Retouch, Sharpen, and Color Eyes in Photoshop34:16m
-
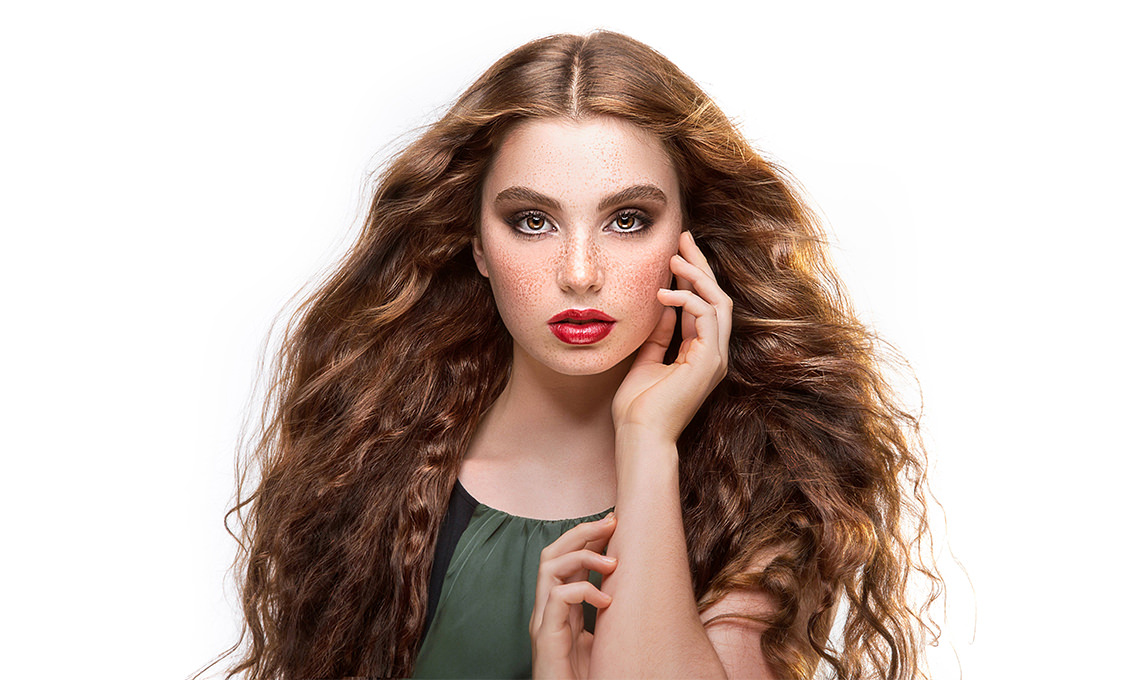
03 - How to Retouch Hair in Photoshop (Part I)18:06m
-
04 - How to Retouch Hair in Photoshop (Part II)18:17m
-
05 - How to Retouch Hair in Photoshop (Part III)12:45m
-
06 - How to Retouch, Whiten and Straighten Teeth in Photoshop11:51m
-
07 - How to Retouch Lips and Define Lipstick in Photoshop14:45m
-
08 - How to Retouch, Straighten, and Color Correct Noses in Photoshop8:27m
-
09 - Skin: How to Approach Retouching Skin in Photoshop26s
-
10 - How to Remove Blemishes from Skin in Photoshop18:05m
-
01 - Repair Highlights & Shadows8:36m
-
02 - The Frequency Separation Method12:58m
-
03 - Smooth Skin with Sample & Paint19:10m
-
04 - Dodging & Burning15:26m
-
01 - Introduction24s
-
02 - Reshape Hair & Blemish Removal23:30m
-
03 - Frequency Separation18:58m
-
04 - Coloring Hair & Skin Tones22:40m
-
05 - Eyes17:07m
-
06 - Finishing Touches15:02m
-
01 - Introduction42s
-
02 - Facial Hair & Facial Features21:00m
-
03 - Frequency Separation27:08m
-
04 - Matching Skin Tones10:53m
-
05 - Eyes, Eyebrows, and Lips15:01m
-
06 - Finishing Touches26:24m
-
01 - Introduction38s
-
02 - Planning & Blemish Removal8:03m
-
03 - Frequency Separation & Adding Hair Volume23:06m
-
04 - Hair Retouching22:30m
-
05 - Retouching Eyes, Eyebrows & Lips16:44m
-
06 - Dodge and Burn, Sharpening & Color Tone25:11m
-
07 - Adding Makeup41:27m
-
08 - Thank You!29s
Course Downloads
Professional Retouching Starts Here.
From memory card to finished work
The whole process just got easier. Tools,tips, and video clips explain the way as you are guided from Lightroom to Photoshop to a finished product.
Full RAW Support
With 26 straight-out-of-camera RAW images included, you’ll be able to retouch in 16-bit for the full experience. The capability of this collection makes nothing impossible.
Teach a Photographer to Phish…
Benefit from a large collection of custom tools made by the experts at the Phlearn studio. They are just what you’ll need to jump-start your journey to becoming a retouching artist.
2 Frequency Separation
Frequency Separation is a revolutionary retouching technique that allows you to separate skin texture from skin color—and edit each separately. Learn from the #1 resource for Frequency Separation, while using custom actions created precisely for skin retouching. Smooth skin underneath pores with ease.
Sharpen
Learn how to sharpen different areas of your images to draw attention to where it’s needed. Sometimes, the most subtle details can be most impactful.
Dodge and Burn like a Pro
Achieve ultimate depth in both highlights and shadows as you learn multiple dodge and burn techniques. The actions included in this product make it easier than ever before to secure the look you want.
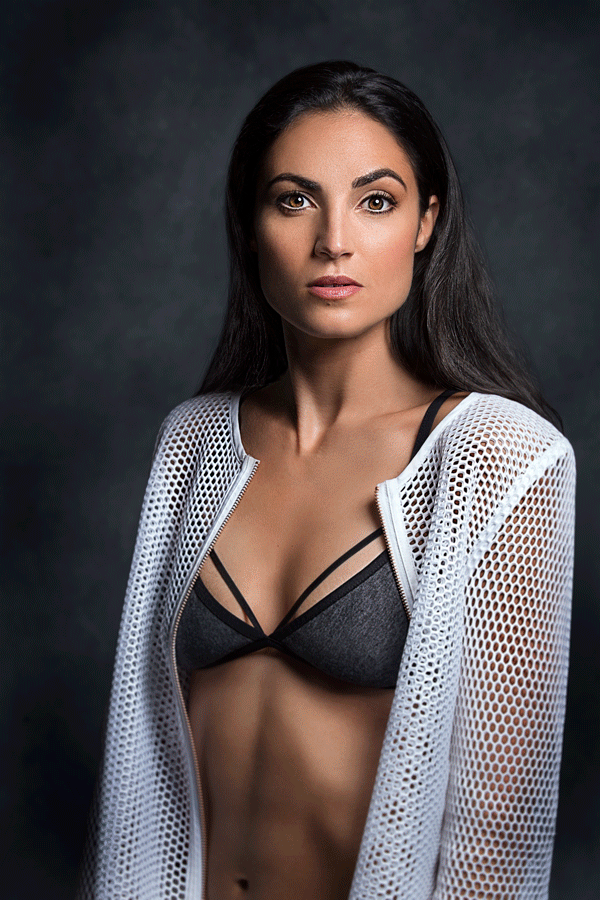
Match Skin Tones
Ordinarily, your subject’s face, hands, and body are nowhere near the same color. Learn how to fix this often overlooked misfortune of mismatched skin tones.
2 Skin Smoothing Techniques
To provide you with options and flexibility in your work, we offer two separate methods of skin editing.

Photoshop Actions & Brushes
Save valuable time with our exclusive PHLEARN Photoshop Actions and Brushes! These included tools make the retouching process faster than ever before.

Create your own unique style.
Great retouching is a combination of countless techniques. Learning each technique in depth allows you to retouch to your individual taste as an artist. There is no one way to master retouching. That’s why we provide you with a wide range to choose from. Build a knowledge base powerful enough to support your creative vision.
Blemish Removal
Discover how to mask unwanted blemishes on skin through the use of the spot healing brush.
Apply Makeup in Photoshop
Magically apply makeup on skin with custom brush tools.
What is frequency separation?
Frequency separation is a retouching technique that places skin texture on one layer and skin color on another. It allows you to smooth skin while maintaining skin texture


Reviews
New & Popular Tutorials


Training Site in
the World
Tutorials!
Ratings
and Counting
Subscribers
Awesome course
I have just finished studying a full 27 of Aaron’s incredible tutorials (123 hours of videos), and cannot recommend more highly buying the PRO subscription. My whole life I was ugly, born without skin, eyes, or a nose. I have now edited some selfies which I took using an old Nokia flip phone. Using the techniques taught by Aaron in this retouching tutorial, I have posted said retouched images on instagram and now my inbox is full of model agencies looking to hire me. Life changing Aaron. Seriously this retouch tutorial is a gem. Dope techniques.
Can I use these tutorials with other software such as « Affinity Photo » for instance ?
“the after is just something else” – Aaron Nace Geez, every next tutorial I watch is even better than previous one, how is this even possible ?! Witchcraft ! 😉 Ps. For guys missing 3 complete retouches, those are included just look on the list on the website, there is some bug with the player itself that it doesn’t continue on it, so you have to play them manually 🙂
Loving the tutorial. Learned a ton!! But yes, i am missing the three final edit examples as well. Are they somewhere else on the page?
I love this class SO much – but where did the three examples go!?
So much essential information… blows my mind! Alldaron
This is the most complete and detailed retouching tutorial i have ever seen yet on the market. Every part is well explained in all Details.
Super.Every thing is perfect to learn.I got amazing knowledge and skills.Thank you Aron.
Aaron, I have recommended your tutorials to so many other people who are in the photography and graphic design industry!! I have been scratching to learn Photoshop and completely terrified of it for a year aaaand it wasn’t until I found PHLEARN that I felt like Photoshop was obtainable. You are a fantastic teacher and I love your goofiness 🙂 Keep doing what your doing, you make a difference in peoples lives.
I want to write specifically about the retouch paint. I love it and my results are fantastic. I had to keep looking at the image to see the differences and because of the instruction, I did a beautiful job. I am so thankful for the training I am getting here.
Wow! As always, a fantastic tutorial! Thank you for all the great tips, especially the “Sample and Paint” method of skin smoothing. Keep pumping out these videos, they’re truly invaluable!
HI, I bought this when it first came out and went through it. Noticed at the time that there was a delay with the video and sound. I’ve started going through it again and it’s reminded me of the issue. Did you fix that? It feels like no one is mentioning it below but I’m missing how Aaron is editing some things because of this video delay. I do love all your tutorials and this retouching one as well though!
Thanks for any help.
Thank you for buying the Ultimate Guide! That’s something we can look into to see if there is a quick fix. Sorry about that!
Dear Aaron
Very nice tutorial. This is my first time editing, I must say I learned volumes. Keep up the great work!
Most of our tutorials will not work in CS3. Sorry.
Dear Aaron,
Thanks a lot for this superb and cool tutorial. I am sending my result.
All the best,
Jiří
Hey Aaron, great tutorial, but why don’t you just open the 16-bit raw files directly from Lr into Ps, but manually export to TIFF and then re-import the latter into Lr? Is there any point in doing so?
I love this tutorial, I cannot say enough good things about it. If you put in the time to follow along you will be doing this tutorial for days. I am impressed with both the quality and entertainment that Aaron puts into his work. Thank you so much!
This is an image I did using the knowledge I learned in this tutorial. Keep in mind i just started learning all about photography and retouching in January 2016. These are my baby steps!
Mr. Aaron Nace.. You are the best retoucher in the planet.. because this is the best and amazing retouching tutorials.. actually this is useful one every Photographers and Photo Editors.. I wish you to successful life.. and release again like this tutorials.. one thing I have a request to you.. I wanna to learn “How to edit, retouch, and paint damaged, unclear, scrach and old black and white photos” like this ultimate guide.. please I think you will accept my this requeasting.. I am waiting that.. Thank You very much Aaron nace..
I love your technics!
That pack was really helpful!
This is my first retouch with your ideas….U are gourgeous!
Thank you guys!
Great tutorial. Thanks.
Thanks for a great tutorial. I’ve followed phlearn for a long time and I’ve basically learned all my photoshop skills from you Aaron. This guide has got all I wanted to take my portraits to the next level!
Have watched this now and I can only say good things about it. The fact it ships with samples of many skin tones is exactly what I wanted, this will be an ever present reference tool that I’m sure will be used over and over. Great work Aaron!
Finished the full course and I have to say it was great fun, I’ve learned a ton of great stuff. This will be a great source of reference for me, nice work Phlearn.
Here’s my last edits.
Very Good Tutorial! A couple of the techniques were very useful for a current project I had going at the time…thank you. This is the first tutorial of Aaron’s I’ve gone through and really enjoyed it and would definitely recommend it. Teaching style was great – very approachable.
Constructive criticism — some uses of the techniques shown seem a bit heavy handed in my opinion and may lead people to do the same. Ie; pushing the mouth and nose too freely on a portrait which basically changes the character of a persons bone structure. – better in my opinion to use tonal changes along the edges forms to be more subtle about “improving” features etc. and keep the liquifying on a face to a very minimum. This is all subjective of course and is probably good to get the point of a technique across, but unless we are doing an illustration, fashion or otherwise, I believe we have an obligation to portray people as they are while still doing our work of idealizing and cleaning up images.
Look forward to going through other tutorials I’ve already downloaded.
Nice tutorial, I learned quite a lot from your lessons. Thanks for sharing your knowledge!
Here is a retouch I did in almost one hour with a jpeg from Internet.
Cheers!
Just awesome, here’s my 2nd full edit.
Superb tutorial loving it so far, here’s my first full edit.
Great work Aaron!
Well organized tutorials with easy to follow steps. I really like how the program is sectioned into multiple areas of the retouch process from hair to eyes, to make-up and so on so you can choose what you want to master or revisit on demand. I’ve used a number of other programs by other teachers but Aarons has been the most effective for me by far.
A great tutorial. I was aware of many of the methods used, but not in the depth and quality as shown in this tutorial. Well worth the money!
But I have one question: Why use a TIFF file? I use a Photoshop 16 bit PSD file format which can be created by Lightroom CC ‘edit in PhotoshopCC’ with exactly the same finished result. What advantage is there to using a TIFF file format?
One of the things I appreciate more about Phlearn’s tutorials is that the hours of the video are almost all worth watching, and there are not 50 hours to watch with the same all things going on like some other guide i purchased from other sites.
The guide is wonderful and explaining many techniques.
The one thing I’m not totally satisfied of is that in my opinion when retouching the images, Aaron doesn’t get enough close to the skin, and when I try what he does it seems to me that my skin looks too much fake, and I can’t tell the same about the images on the video coz it doesn’t get zoomed enough, and I bet it’s a bit of the same over there!
anyway, cool! 🙂 thanx!
This was a great tutorial! Thank you very much! I made a black and white after the retouch tutorial. Here’s the result. I didn’t fix the hair because liked as it was .
Aaron can make the most dull thing fun!
Best 8 hours of my life.
Totally worth the money for us cheap bastards.
Aaron… Simply an Idol… I was working on a project while watching this tutorial, looking how to don’t lose the details while working on the exposure. The answer was in the next section of the tutorial… Amazing, you read my thoughts.
Thank you! Thank you! Thank you! 1st-time Phlearner, here, and this is exactly what I needed. There were a lot of extra steps in retouching I haven’t been needing to do and so many little steps I missed before watching this tutorial. I love how organized everything is.
This was a great tutorial! Thanks!
It did wonders for some of my other work already in the first week.
If you think you already know frequency separation, and you’re all ‘Yada-yada” about it, you’re just missing out. This isn’t basic. The things that are taught here are not intuitive. You’re simply NOT going to figure them out on your own. I’ve watched a lot of Photoshop videos. I’ve watched a ton of Phlearn videos before buying this. All you need to do is go look at a bunch of other Youtube videos for the same technique that Aaron teaches, and you’ll be saying to yourself, “Uh, that’s not iiiiiiiit.” Don’t learn halfway techniques. Aaron simply does it better, and does a better job of making it completely logical.
Week one out of the course was a success.
I had a wedding that I found out from the groom (a meteorologist, actually) that it was going to pour down rain, ALL DAY, and after I dug myself out of the fetal position an hour later, I devised a plan to make a glamour shoot with some arctic white paper, softboxes, and flashes. I HAD to give the bride something that worked well. Then I bought this course, and during the week of the Honeymoon, I cranked the whole course. I was bound and determined to make sure that a downpour wedding wasn’t a dud.
Popped the bride pics. Hit the skin right. Colored it up nicely. She was excited.
She understood that there was no way to get the verdant look in a rainstorm. So we did what we could. And that was make a ‘fashion’ session. The pictures really, really classed up with the retouching. It made a difference.
Thanks Aaron and team – This was a great tutorial, and so much to practice with.. I have a lot of work ahead of me 🙂 when it comes to providing the full retouch you cover a large scope..
So much fun! I loved following along and I loved learning! And this tutorial offers SO much to learn! The variety of examples that Aaron offers is a wonderful way of enhancing the tutorial. It probably took him many days & hours to shoot this but the three complete edits that he offers really add depth to the presentation. The models where beautiful of course though it might have been fun to show the method on a more textured face too, eg. faces hardened by outdoor exposure or one with many wrinkles. I’m so glad that I purchased this. I tried it on one of the other photos included in the package and I’m so happy with the result, even if it took me all day yesterday. It’s so much fun playing with Lia’s(?) hair. And Aaron is always so cheery! Even when demonstrating some of the longer processes. I’m always amazed that he can keep finding something to say during the long minutes of using the healing tools but he succeeds in keeping it interesting. This was worth every penny!
These are really great classes. I’m a pretty slow learner when it comes to computer programs and technology in general so I knew when I bought photoshop I would also need classes to learn it. I love that I was able to download and practice on the same photos they were using. Being a former teacher, I know that that is one of the best ways to learn anything. You have to follow along and do it yourself. This is the only online course I know of that offers that. Definitely a good investment
I tried on my own image, and stylized it at the end! Aaron you’re so amazing for all that you do for us!
I am a huge fan of PHLEARN! For everyone that says that this is too expensive, suck it up. If you want the information, pay for it. If you don’t want to pay for it go to Phlearns’ YouTube channel, all of information is right there for the taking, FOR FREE. I would suggest buying this PRO tutorial though because it has 3x the instructional videos then many of the other PRO tutorials. Not only that, you are getting 26 images that you can practice all your new skills on! I would pay for this all over again.
What I really like about this PRO tutorial is that videos are broken up so that if you want to review specific information later on you can easily get to an instructional video on that exact topic. IE: eyes, dynamic range, blemish removal, hair. Then Aaron walks you through not one, three…HELLO! THREE! complete portrait edits.
Again, it is really annoying to see that people think this is pricey, you’re hitting the How-To Jackpot with this PRO Tutorial. Thanks Aaron and your awesome team for putting something together thats well thought out and complete in information! Ya’ll are awesome!
Final words of encouragement for the Phlearn Team: continue doing creative tutorials too! I love all the tutorials where you guys let your imaginations run! It’s so fun to see an idea transform into an awesome final image. Plus it is really encouraging to see all that’s possible. Some of my favorites: Fashion Trip, Levitation, A Dark Force, Liquid Portrait, Best Friends, Rise of the Humboldt…who am I kidding? I seriously love them ALL!
There are lots of free tutorials that go over this stuff, but none are as in depth, and none that have all the information in one place. Good job Phlearn!
Cool !
no need to learn on own confusion 😀 and long time ,,
hopefully I can get a tutorial from here , soon ,
would have to set aside funds first
Hey Arron,
Almost finished the Ultimate Guide to Retouching, it’s amazing! I am currently on the makeup tutorial, just a note, please don’t use red on anyone eyes. Use purple or plum (it brings out greens like the red does)
– Alyson (Professional Makeup Artist)
Hi phlearn
I really love your tutorials and honestly you made me fall in love with Photoshop
I wanted to download the Ultimate Guide to Retouching but it’s so expensive for me 🙁 :'(
From Tunisia … Thank you for inspiring me !
I just do not know what to say, I am only partway through the course and have learned so much already.
Thanks for the You-Tube videos, that is how I got to know of your work and I really must say you do awesome work.
Thank you.
So much informations, It’s insane!
Hi Rini, the tutorial can only be downloaded. There was a part missing to the tutorial that we recently re-uploaded. All the content is now available in the download 😀
fantastic, love this package, however I like a few others seem to missing part 1 from complete 3, is there a place to go to re-download just this zip file?
I have checked and its just missing from the zip thanks in advance, keep up the awesome work Phlearn!!!
Hi Chris, we are so sorry that you are missing part 1. Try re-downloading the tutorial. It should be there now.
Fantastic!!! I love this tutorial
Just superb! Masses of information and resources all laid out logically. Each lesson is easy to follow with Aarons’ usual friendly style helping him to get across his huge depth of knowledge.
Haven’t finished going through this, but what I’ve watched so far has been a great start! Been watching the free episodes for a long time, but this is my first purchased one, and not regretting it.
Normally I’d wait to review till after I’ve finished the whole series, but I wanted to leave a comment for those asking about the missing file. I have no idea if they’ve fixed the main download yet, I would assume so, but wanted to share that I got an email today with a link to download a new zip that contained the previously missing file.
Hi Daryl, the product has been updated. Please try to download it again for the missing section.
Just took my retouching skills to a new level. Brought this last week, and already had dome amazing results on my own work as well as the included images. I am beyond unpressed. Here is my version.
I’m missing Part 1 of Complete Edit 3 too. It’s the part that shows the liquifying etc. Complete Edits 1 and 2 have their Part 1.
Otherwise it’s a brilliant tutorial. Very happy.
Fantastic. Learned a ton. Still practicing the techniques. Havin’ fun.
Hi!
I do not see the Complete Edit 3 (Part I) file. I re-download the full zip is not per file.
Thank you.
Hi!
I really want to purchase this course but I have one question , can I download the videos and practice files one at a time or is it a whole huge package that I have to download together because my net connection isn’t strong enough to allow me to download one big zip file.
Purchased… 🙂 Its Awesome.. Deserve each penny….
Thanks you so much for your all effort Phlearn
Got mine today. Thanks guys. Can’t wait to try it out.
This tutorial made me fall in love with Photoshop. It was so much easier to understand compared to some of the stuff i looked at on Lynda, which were great but too in depth for a newcomer to PS
and OMG i missed an A in AAron´s name. sorry for that damn 🙂
OK, so i usually starts like – just watching, then taking notes then actually trying. My Notes have already like milion pages and the actual trying is a bit hard as i never really did any retouching yet, mostly composing/design stuff. I have to say I´m starting from scratch, i have a loads to learn but I love every second of the tutorial. Everything is clear and desciptive and (not lastly) enjoyable. Lots of tutorials have good idea but their boringness makes it not possible to watch. I have lots of tutorials from PHLEARN and I really can´t wait for more and more and more to come. I have long way ahead to become at least good but with PHLEARN tuts I´m enjoying the ride. Thank you Aron and your team for the great way of expanding my skills!!!!
Hi, I have the same question, I’d like purchase to see something new as I have almost all of your pros which are great and fun! What did you say is new in this one? Thanks!
I have purchased all the other retouching pro tutorials on phlearn. Is this tutorial additive or redundant? More specifically, should I purchase this even if I have all the other retouching tutorials?
Hi Esther!
It’s a combination of some of our past retouching tutorials but a more updated version and we show how you how to work in Lightroom and in Photoshop. You can purchase The URG and see how you like it but if you feel it’s something that you already know, we’d be happy to give you a refund 🙂
OK, first off I think the Phlearn tutorials are the best photoshop tutorials I have come across on the internet. I have done quite a number of the free tutorials and the pro tutorial that comes free when you sign up to the newsletter.
So this is the first one that I have paid for and I am not disappointed.
I would like to see something about colour and brightness correction for my monitor screen. Anything one does in either Lightroom or Photoshop remains entirely subjective if it is going to appear different on someone else’s screen or when it goes to print. Maybe you can do something on this please Aaron?
Otherwise I am a totally satisfied customer. Very reasonable price for a quality product.
This looks great.
Question; I’m a CS6 user. Will this tutorial and actions work with CS6?
Hi Johnny!
Thank you! This tutorial will work for CS6. We hope that helps! For future questions, instead of leaving a review, please email us at info@phlearn.com 🙂
Brilliant!