Course Downloads
How to Use the Healing Brush Tool in Photoshop
-
Add to
favorites
-
DifficultyEasy
-
Videos1
-
Software
Description
Got a Boo Boo? We’ll make it feel all better with the Healing Brush Tool.
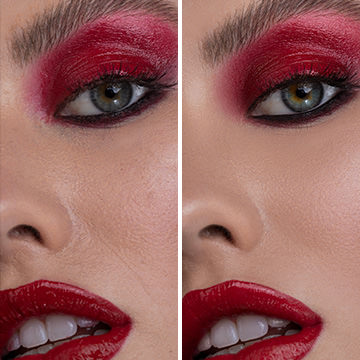
In this tutorial, learn to quickly remove blemishes from portraits with the all powerful Healing Brush Tool.
THIS COURSE INCLUDES
- 1 Sample Image
Share
What is the Healing Brush
One of the first tools included with Photoshop was the Clone Stamp tool. The tool was one of the most versatile and useful in the Photoshop toolbox, and it has since spawned a host of similar tools that work on the same principle but accomplish slightly different tasks. One specialized version of the Clone Stamp tool is the Healing Brush. Here is an overview of the Healing Brush, along with a breakdown of what it does, what it’s used for and when you want to use it.
How the Healing Brush Tool Works
Like the Clone Stamp tool, the Healing Brush takes pixels around the area you select and “clones” them so that you can apply them to another part of the image. The Clone Stamp tool is generally the best tool for replacing large areas of pixels, such as if you want to replace a person standing behind the main subject in a beach photo. The Healing Brush, however, is better for smaller, finer work such as removing scars, large tattoos or a stray strand of hair blowing across someone’s face, particularly when you want the finished look to blend in smoothly and seamlessly with the original background.
The Clone Stamp tool will replace an exact arrangement of pixels, but the Healing Brush is a much more elegant and intuitive tool. This tool actually analyzes the area around your selection to match hue, balance, saturation and tone. This creates a smooth and seamless “patch.”
When to Use This Tool
In modern vernacular, when someone talks about a model or public figure being “photoshopped,” what they are often talking about is the use of the Healing Brush to remove wrinkles, cellulite, freckles, spots and other unsightly blemishes or signs of aging. If you are a little too heavy with the tool, it can leave you with a smooth, almost airbrushed look that doesn’t appear at all natural but does look good on magazine covers. For much finer-detail work, such as removing spots or blemishes from someone’s face, you can also use the Spot Healing Brush.
Enhancing faces and skin is not the only use for the Healing Brush. If you have a wide, scenic, panoramic picture with an ugly dead tree or car marring the view, you can remove it with the Healing Brush. This tool is best for detail work, however, due to the way it analyzes adjacent pixels to fix a small spot. To fix a larger section, you should use a different tool like the Patch tool. When you use the Patch and Healing Brush tools together, you can come up with a far smoother and more seamless look than you would with Clone Stamp alone.
For more tips, trick and helpful Photoshop hints, check out our wide selection of video tutorials!
Reviews
There are no reviews yet.
New & Popular Tutorials
Training Site in
the World
Tutorials!
Ratings
and Counting
Subscribers


