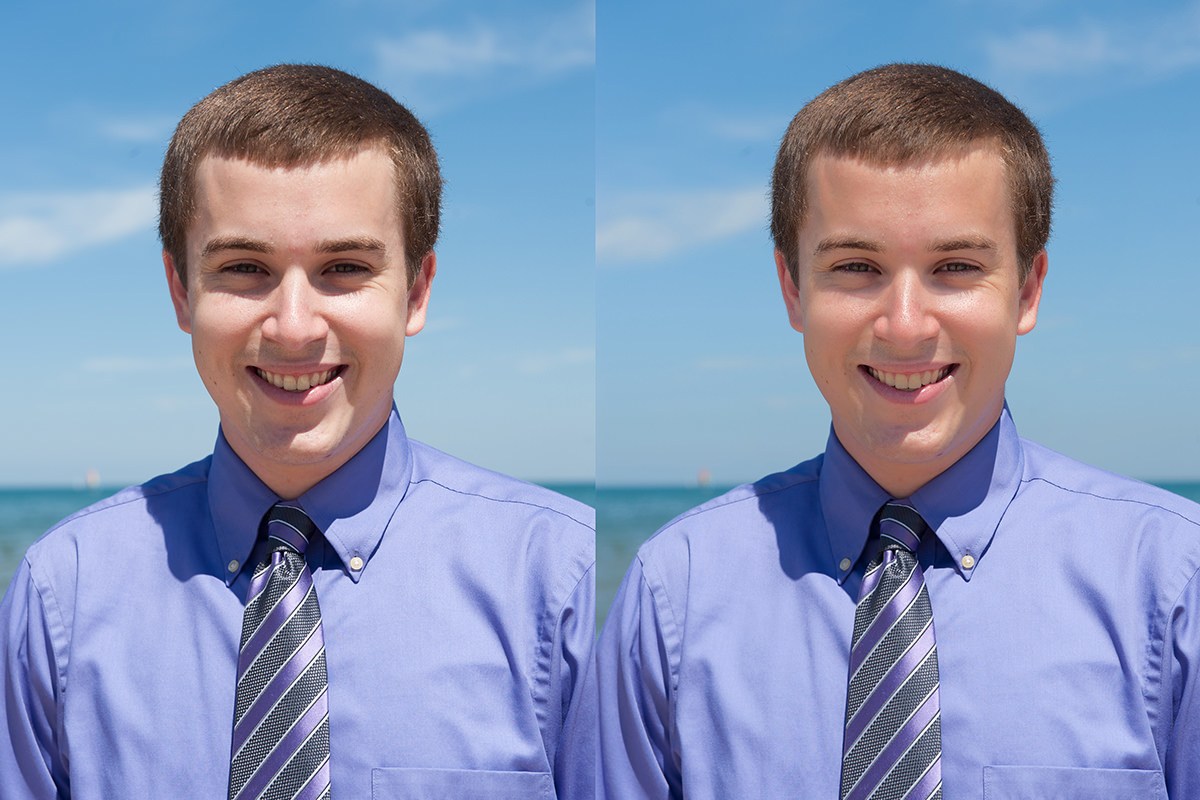

description
Dark shadows under the eyes from harsh outdoor sunlight are one of those problems that seem like they’d need to be lightened directly, but that approach usually looks unnatural. A more reliable fix works from both directions at once — darkening the surrounding highlights while lightening the shadows — which brings the whole area back toward an even, natural-looking skin tone without ever manually painting over the hard edge of the shadow itself.
Enjoying This Free Tutorial?
We publish a new free tutorial every week, each one with sample images and PSDs you can download and follow along with. Sign up and they land straight in your inbox, along with early word on sales, events and subscriber-only offers.
Removing Shadows Underneath Eyes
Dark shadows under the eyes from harsh outdoor sunlight are one of those problems that seem like they’d need to be lightened directly, but that approach usually looks unnatural. A more reliable fix works from both directions at once — darkening the surrounding highlights while lightening the shadows — which brings the whole area back toward an even, natural-looking skin tone without ever manually painting over the hard edge of the shadow itself.
Getting Started: Why You Can’t Just Paint the Shadow Away
The obvious first instinct — grabbing a brush and painting directly over the dark line under the eye — runs into a real limitation almost immediately.
-
Recognize the Limits of Manual Painting
Understand that painting out a hard shadow line by hand is limited by your own painting skill, and even a decent attempt tends to look obviously retouched rather than naturally even.
Why Your Mind Catches an Uneven Fix
The human eye is very good at noticing when only part of a consistent lighting pattern has been altered. If a hard shadow line is painted away in one spot but a similar hard shadow remains visible elsewhere on the face, like at the eyes, the mismatch reads as obviously wrong even to someone who couldn’t say exactly why. This is why an even, global correction to the tonal range works better than spot-painting a single shadow.
Selecting and Darkening the Highlights
-
Add a Curves Adjustment Layer
Add a Curves adjustment layer above your image.
-
Select Color Range on the Highlights
Go to Select > Color Range, click on a highlight area of the face, and click OK so the selection loads into the layer mask.
-
Increase Fuzziness to Capture More
Raise the Fuzziness slider in the Color Range dialog to select a bit more than just the brightest highlights before confirming.
-
Darken the Highlights with Curves
Click the middle of the curve and drag it down slightly to darken the selected highlight areas, being careful not to push it too far.
Why Darken the Highlights Instead of Only Lightening Shadows
It seems counterintuitive to darken anything when the actual complaint is a shadow that’s too dark, but bringing the highlights partway down and the shadows partway up meets in the middle for a far more natural result than pushing the shadows up on their own. Going only halfway in each direction, rather than fully correcting either range, is what keeps the fix from looking artificial.
Selecting and Lightening the Shadows
-
Add a Second Curves Adjustment Layer
Add another Curves adjustment layer.
-
Select Color Range on the Shadows
Go to Select > Color Range again, this time clicking on a dark shadow area — the resulting mask preview should look essentially inverted from the highlight selection made earlier.
-
Lighten the Shadows with Curves
Click the middle of the curve and drag it up slightly to lighten the selected shadow areas.
Protecting Areas That Should Stay Dark
Lightening shadows across the whole photo can accidentally affect areas where a shadow is actually doing something useful, like giving a chin or hairline its natural depth.
-
Paint Black to Protect the Chin Shadow
On the shadow-lightening layer’s mask, paint black over the shadow beneath the chin so it keeps its natural depth rather than looking pressed flat.
-
Paint Black to Protect Hair
Similarly, paint black over dark hair areas that should stay dark, since white on a mask makes an area visible and black makes it invisible.
-
Compare Before and After
Hold Alt (Option on Mac) and click a layer mask thumbnail to preview it directly, and toggle the adjustment layers off and on to compare the result against the original.
Softening Hard Shadow Lines
If a hard shadow line still bothers you after the main correction, a light, low-opacity touch-up can help without looking obviously painted.
-
Sample and Paint Over the Line
Grab the Brush tool, hold Alt (Option on Mac) to sample nearby skin color, and paint lightly over the hardest part of the shadow line.
-
Lower the Opacity of the Touch-Up
Reduce the layer’s opacity to around 50% or lower so the touch-up softens the line without fully erasing it or overpowering the rest of the image.
Why Lower Opacity When Softening a Line
Fully painting out a hard shadow line risks the same mismatch problem described earlier — erasing one hard edge while a similar one remains elsewhere on the face. Lowering the opacity keeps some of the original line intact, which reads as more consistent with the rest of the photo’s lighting than a line that vanishes completely.
Brightening the Eyes
-
Add a Curves Layer and Brighten
Add one more Curves adjustment layer and drag the curve up to brighten overall.
-
Invert the Layer Mask
Press Ctrl + I (Cmd + I on Mac) to invert the mask to black, hiding the brightening everywhere.
-
Paint White to Brighten Just the Eyes
Paint white on the mask directly over the eyes to bring a bit of brightness back specifically there.
-
Lower the Opacity to Keep It Subtle
Lower the layer’s opacity slightly so the eye brightening reads as subtle rather than overdone.
Common Mistakes to Avoid
Trying to fix under-eye shadows by lightening them alone, without also darkening the surrounding highlights, tends to look flatter and less natural than meeting in the middle. It’s also easy to forget to protect shadows that are supposed to stay dark, like under the chin or in the hair, when applying a broad lightening adjustment. And fully painting out a hard shadow line, rather than softening it at reduced opacity, risks creating a visible mismatch with similar shadows left untouched elsewhere on the face.
More Free Photoshop Retouching Tutorials
If this under-eye shadow technique was helpful, these free tutorials cover related retouching approaches:
- Curves vs Levels in Photoshop: What the Difference Actually Is
- Eliminate Dark Circles and Brighten Eyes in Photoshop
- How to Remove Marks on Skin in Photoshop
Why This Approach Works
The reason working from both directions at once beats a single, direct fix comes down to how the eye reads consistency across a face. Darkening highlights while lightening shadows moves both extremes toward the middle, so the overall tonal range compresses evenly rather than looking like one isolated area was artificially brightened while everything around it stayed the same. Using Color Range to select highlights and shadows separately, rather than trying to paint a manual selection, means the correction naturally follows the actual light and shadow pattern already present in the photo instead of an approximated hand-drawn shape. And protecting specific areas — a chin’s natural shadow, the darkness of hair — with black on the mask keeps the correction from accidentally flattening details that were never actually part of the problem. Even the low-opacity touch-up for a stubborn hard line follows this same principle: a partial correction that respects the rest of the photo’s existing lighting looks more believable than a complete one that doesn’t.
Final Thoughts
Under-eye shadows from harsh sunlight are extremely common, and the instinct to just lighten them directly is understandable but usually produces a flatter, less convincing result than working the highlights and shadows together. Once you’re comfortable using Color Range to isolate each tonal range and nudging both toward each other with Curves, this same even-out technique applies to plenty of other uneven-lighting situations beyond just eyes.
New Free Tutorials View All »











Enjoying This Free Tutorial? Go Further with PRO.
Unlock Full Sample Files, PSDs, and Hundreds of Masterclasses!

Download full project assets, original PSDs, and RAW images for every lesson
Unlimited access to our complete library of PRO Photoshop & Lightroom courses
Instant 4K Ultra HD streaming on all devices, anytime, anywhere
Full access to our entire library of Photoshop Actions, Presets, and LUTs
Flexible monthly and annual membership plans
Cancel anytime with zero hassle or commitments