

description
Unlock the secrets of advanced selection tools in Photoshop and learn how to cut people out of tricky backgrounds.
Free Selection Series
- Replace a Sky with Simple Selection Tools
- Add Logos & Graphics to a Photo with Advanced Selection Tools
- Refine Selections with Select & Mask (This Episode!)
Enjoying This Free Tutorial?
We publish a new free tutorial every week, each one with sample images and PSDs you can download and follow along with. Sign up and they land straight in your inbox, along with early word on sales, events and subscriber-only offers.
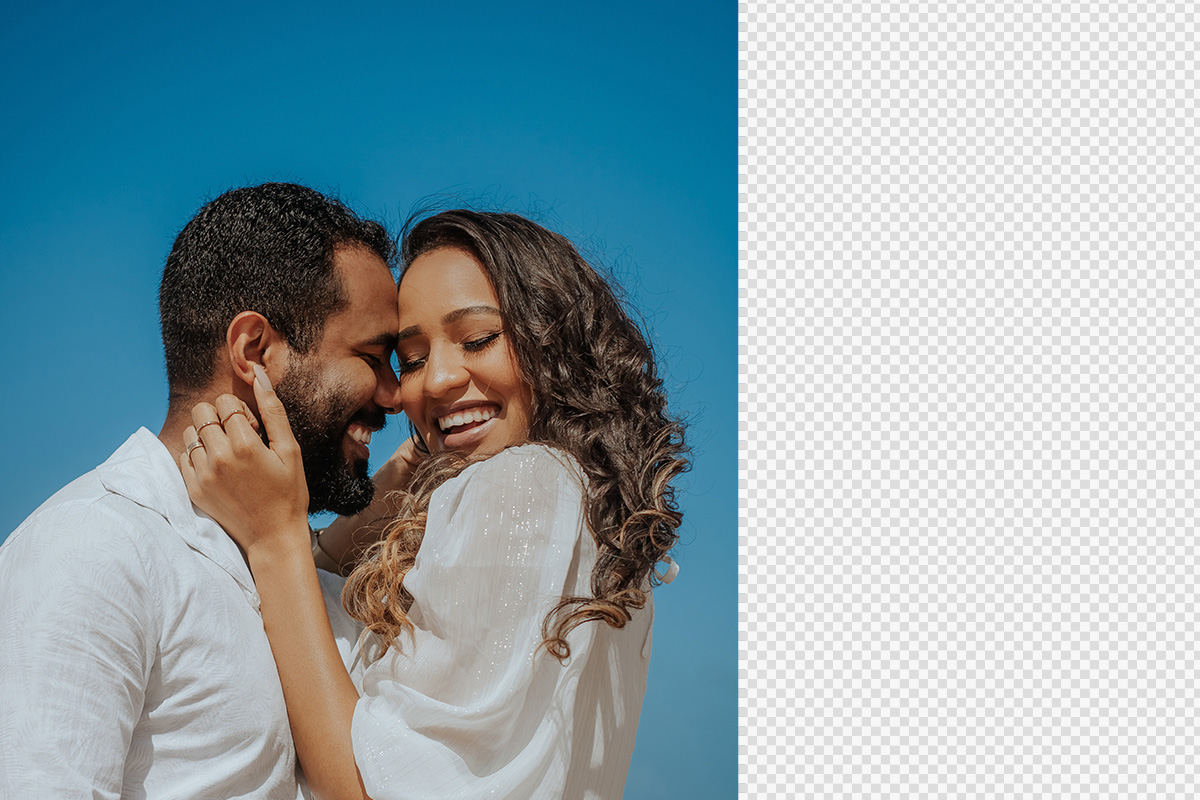

How to Refine Selections with Select and Mask in Photoshop
This final entry in the selections series ties everything together on one real project: extending a background, cutting out two subjects with hair intact, and building a wedding invitation graphic that sits believably behind them. Select and Mask is the centerpiece — the tool built specifically for cleaning up a rough selection into something genuinely usable, including notoriously tricky detail like hair.
Extending the Background with Content-Aware Fill
Before any subject work happens, the background itself often needs more room, which selections combined with Content-Aware Fill can generate rather than requiring a wider original photo.
-
Crop to Reveal More Canvas
Press C for the Crop tool and drag out beyond the current image edge to add blank canvas space where the background needs to extend.
-
Select the New Empty Area
Use the Rectangular Marquee tool to select the newly added blank area.
-
Run Content-Aware Fill and Refine the Sample
Go to Edit > Content-Aware Fill. In the preview, paint away any part of the highlighted sampling area you don’t want included, like a subject’s hair, so the fill pulls from clean background only.
-
Output to a New Layer
Set the output to a new layer so the extended background stays independent and can be toggled on or off at any time.
Why Output to a New Layer Instead of the Original
Keeping the Content-Aware Fill result on its own new layer, rather than applying it directly onto the original background, means the extension can be hidden, adjusted, or redone at any point without touching the original photo underneath it — a small habit that pays off the moment you want to compare the extended and original versions side by side.
Making an Initial Cutout of Your Subjects
With more background space to work with, the subjects need to be cut out and moved onto their own layer, using the automatic tools covered earlier in this series as a starting point.
-
Select Your Subjects with the Object Selection Tool
Choose the Object Selection tool, confirm Object Finder is active, and click each subject — holding Shift to add a second person to the same selection.
-
Load the Selection into a Layer Mask
With your subjects selected, click the layer mask icon to load that selection directly into a mask on their layer.
-
Duplicate for a Separate Background Layer
Duplicate the subjects layer, then fill its layer mask entirely with white to create a full, unmasked background layer to work with separately.
Refining Hair and Edges with Select and Mask
An automatic selection is rarely perfect right out of the gate, especially around hair, which is exactly the problem Select and Mask’s Refine Edge tool is designed to solve.
-
Open Select and Mask on Your Layer Mask
Click on your subject’s layer mask, then go to Select and Mask to open the dedicated refinement workspace.
-
Use the Refine Edge Tool Directly on Hair
Select the Refine Edge tool and paint directly over hair strands. The tool automatically distinguishes hair detail from the background, producing a far more natural edge than the original automatic selection.
-
Use a Brush Sized to the Detail You’re Refining
Choose a brush size roughly matching the scale of the detail being refined — a smaller brush for fine hair strands works better than a large, imprecise one.
-
Apply the Refinement Back to Your Layer Mask
Set the output to update your existing layer mask directly, so the refinement becomes a permanent part of your subject’s cutout.
Why Refine Edge Works So Well on Hair
Refine Edge analyzes fine, high-frequency detail like individual hair strands against the background behind them, rather than treating the whole area as one uniform edge the way a basic selection tool would. It performs best against simpler, more uniform backgrounds, since there’s less conflicting detail for it to have to distinguish from the hair itself.
Rounding Corners with Feathering and Smoothing
Select and Mask isn’t limited to organic subjects like hair — the same global refinement sliders can reshape a hard-edged graphic like a rectangular invitation into a softened, rounded one.
-
Turn a Layer into a Selection and Open Select and Mask
Hold Ctrl/Cmd and click a layer’s thumbnail to select its shape, click the layer mask icon, then open Select and Mask on that new mask.
-
Raise Smoothing and Feathering
In the Global Refinements panel, raise Smoothing to round out sharp corners and raise Feathering to soften the edge.
-
Add Contrast Back for Crispness
Raise Contrast slightly afterward to sharpen the now-softened edge back up, avoiding an overly blurry result.
-
Shift the Edge and Output to the Mask
Use Shift Edge to move the boundary in or out as needed, then set the output to update the existing layer mask directly.
The Select Menu and Select and Mask Overlap
Many of the same operations available inside Select and Mask — expanding, contracting, feathering — are also accessible individually through Select > Modify, without opening the full workspace. Select and Mask is generally the better choice for a full refinement pass with live preview, while the Select menu’s individual commands are quicker for a single, specific adjustment like expanding a selection by an exact pixel amount.
Modifying Selections Through the Select Menu
Beyond Select and Mask, Photoshop’s Select menu includes its own set of selection-modifying tools useful for effects like adding a clean stroke around a shape.
-
Turn a Shape into a Selection
Hold Ctrl/Cmd and click a layer mask’s thumbnail to load its exact shape as a selection.
-
Expand the Selection
Go to Select > Modify > Expand and enter a pixel amount (10 pixels, for example) to grow the selection outward evenly.
-
Fill the Expanded Ring and Invert as Needed
Create a new layer, invert the selection with Select > Inverse, fill with your stroke color, then invert and expand again before deleting the inner area — leaving a clean, evenly sized stroke ring around your original shape.
Editing Selections as Pixels with Quick Mask Mode
Quick Mask mode turns an active selection into a temporary, paintable, and filterable set of pixels — a genuinely different way of thinking about what a selection can be.
-
Enter Quick Mask Mode
With a selection active, press Q to enter Quick Mask mode, turning your selection into an editable, semi-transparent overlay.
-
Paint or Apply Filters to the Mask
Paint directly with the Brush tool to add to the selection, or apply a filter like Gaussian Blur to soften the selection’s edge as if it were a real pixel layer.
-
Exit Quick Mask to Return to a Selection
Press Q again to convert your edits back into a normal active selection, ready to be loaded into a new adjustment layer’s mask.
-
Draw Directly in Quick Mask for Custom Shapes
Enter Quick Mask mode on a blank new layer and paint any custom shape freehand — a signature, for instance — then exit Quick Mask and use that selection with a solid color fill layer to turn the drawing into a finished graphic.
A Blurred Selection Behind an Adjustment Layer
Blurring a selection in Quick Mask mode before loading it into a Curves adjustment layer’s mask produces a soft, gradual glow rather than a hard-edged brightness change — a simple way to add a subtle lighting effect behind a graphic using nothing but selection tools and a blur filter.
Common Mistakes to Avoid
The most common mistake is expecting Select and Mask’s Refine Edge tool to work equally well on any background — it performs best against simpler, more uniform backgrounds, and a busy or textured background behind hair can still need manual touch-up afterward. It’s also easy to forget that Quick Mask mode is temporary and needs to be exited (pressing Q again) before the edits you made actually take effect as a usable selection.
More Free Photoshop Selection Tutorials
For more on selections and cutting out subjects in Photoshop, these free tutorials are worth checking out next:
- How to Use the Object Selection Tool in Photoshop
- How to Use Cloud Processing with Select Subject in Photoshop
- How to Select Subjects and Refine Edges in Photoshop
Why This Approach Works
Select and Mask exists because a raw selection, however it was made, is rarely the finished product — hair needs edge-aware refinement that a basic Lasso or Magic Wand selection can’t provide, and a hard geometric shape sometimes needs the opposite treatment, softened and rounded rather than sharpened. Running both very different jobs through the same tool works because Select and Mask’s global refinements (feathering, smoothing, contrast, edge shift) are really just controls over how a boundary transitions from selected to unselected, which applies just as well to a strand of hair as it does to the corner of a rectangle. Quick Mask mode extends that same idea one step further, treating a selection as literal pixels you can paint or filter directly, which is what makes an effect like a soft glow behind a graphic possible using nothing beyond tools already covered across this series. Put together with the automatic cutout tools from the previous episode, like selecting subjects and refining edges, this closes the loop from a rough automatic selection to a polished, presentation-ready composite.
Final Thoughts
Across this three-part series, the pattern has been consistent: simple tools for building a rough selection, advanced tools for speeding up subject cutouts, and Select and Mask for turning either of those into something genuinely clean. Treat Select and Mask as the step you almost always run before calling a selection finished, whether the subject is a person’s hair or a hard-edged graphic, and Quick Mask mode as the tool to reach for whenever you want to edit a selection as if it were a real, paintable layer.
New Free Tutorials View All »











Enjoying This Free Tutorial? Go Further with PRO.
Unlock Full Sample Files, PSDs, and Hundreds of Masterclasses!

Download full project assets, original PSDs, and RAW images for every lesson
Unlimited access to our complete library of PRO Photoshop & Lightroom courses
Instant 4K Ultra HD streaming on all devices, anytime, anywhere
Full access to our entire library of Photoshop Actions, Presets, and LUTs
Flexible monthly and annual membership plans
Cancel anytime with zero hassle or commitments