
Download Sample Images
Download Assets
This tutorial includes 6 sample images and 1 PDF guide. Downloads are free with a PHLEARN account.
- Free sample files with every tutorial on PHLEARN
- New tutorials published every week
- Unlimited downloads with your free PHLEARN account
Free PDF Guide · 4 Pages
This Tutorial as a Step-by-Step PDF
The guide walks through all five tools on the sample images: Select > Subject with a Lasso cleanup, Select > Color Range with a Hue/Saturation layer, Select and Mask with Refine Edge and Output To: Layer Mask, the Pen Tool set to Path, and a duplicated Red channel with Levels. Keep it next to your keyboard.
description
Selections help us cut out people and objects from their backgrounds, combine multiple images together, and make careful edits to particular things an image. But it can be tricky to make an accurate selection without the right tools.
Learn how to use some of the most powerful selection tools in Photoshop like Select Color Range, the Pen Tool, Channels, and more!
Enjoying This Free Tutorial?
We publish a new free tutorial every week, each one with sample images and PSDs you can download and follow along with. Sign up and they land straight in your inbox, along with early word on sales, events and subscriber-only offers.
Artist Credit
Images sourced from Pexels.
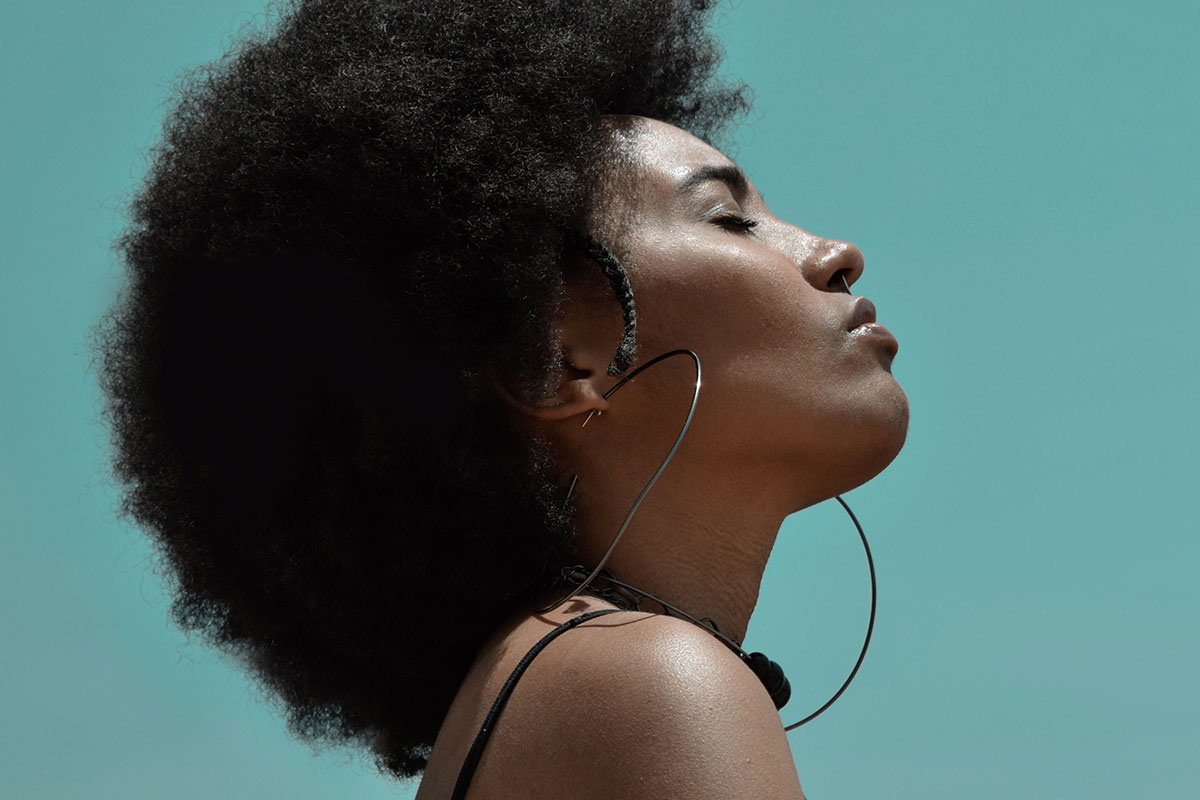
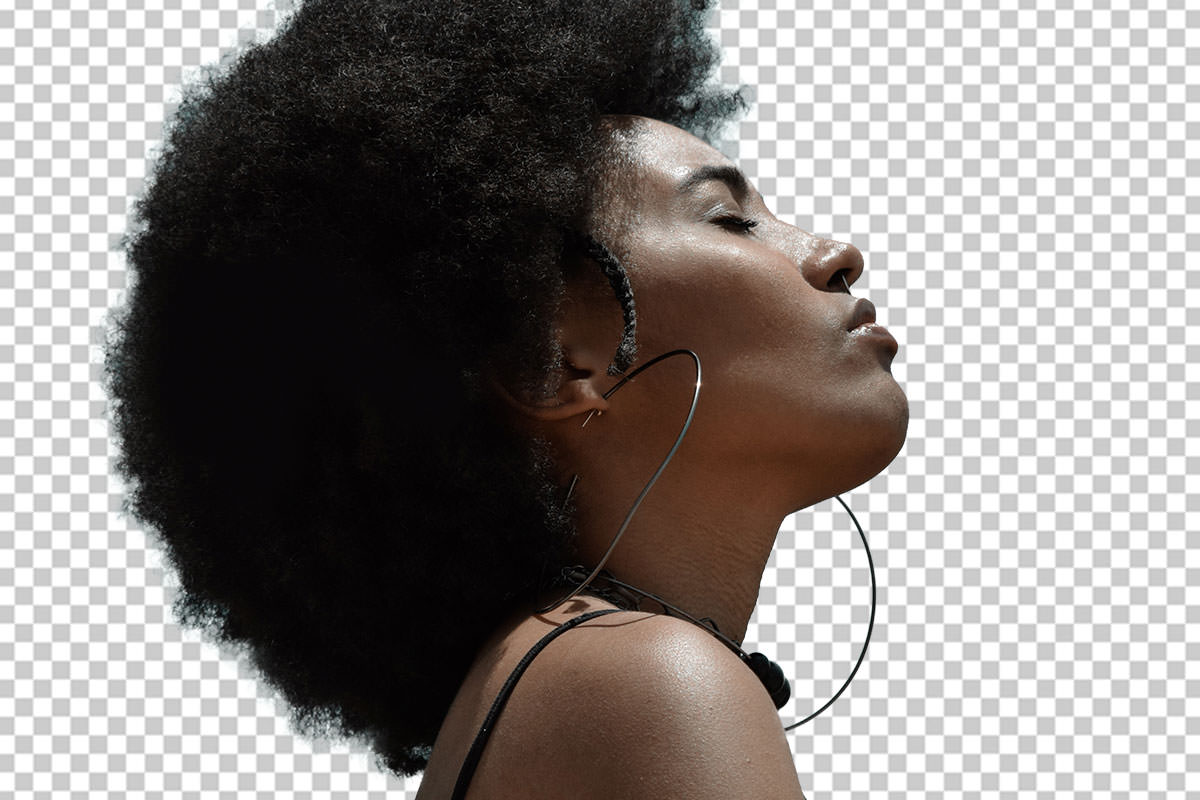
The 5 Most Powerful Selection Tools in Photoshop
Almost everything in Photoshop starts with a selection. Changing a color, replacing a background, brightening one area and not another — all of it depends on telling Photoshop which pixels you mean. Get the selection right and the edit is easy. Get it wrong and no amount of skill afterward will save it.
Photoshop has more selection tools than anyone needs, and most people default to whichever one they learned first. These five cover essentially every situation, and the useful skill is not mastering all of them equally — it is recognizing which one a given image calls for.
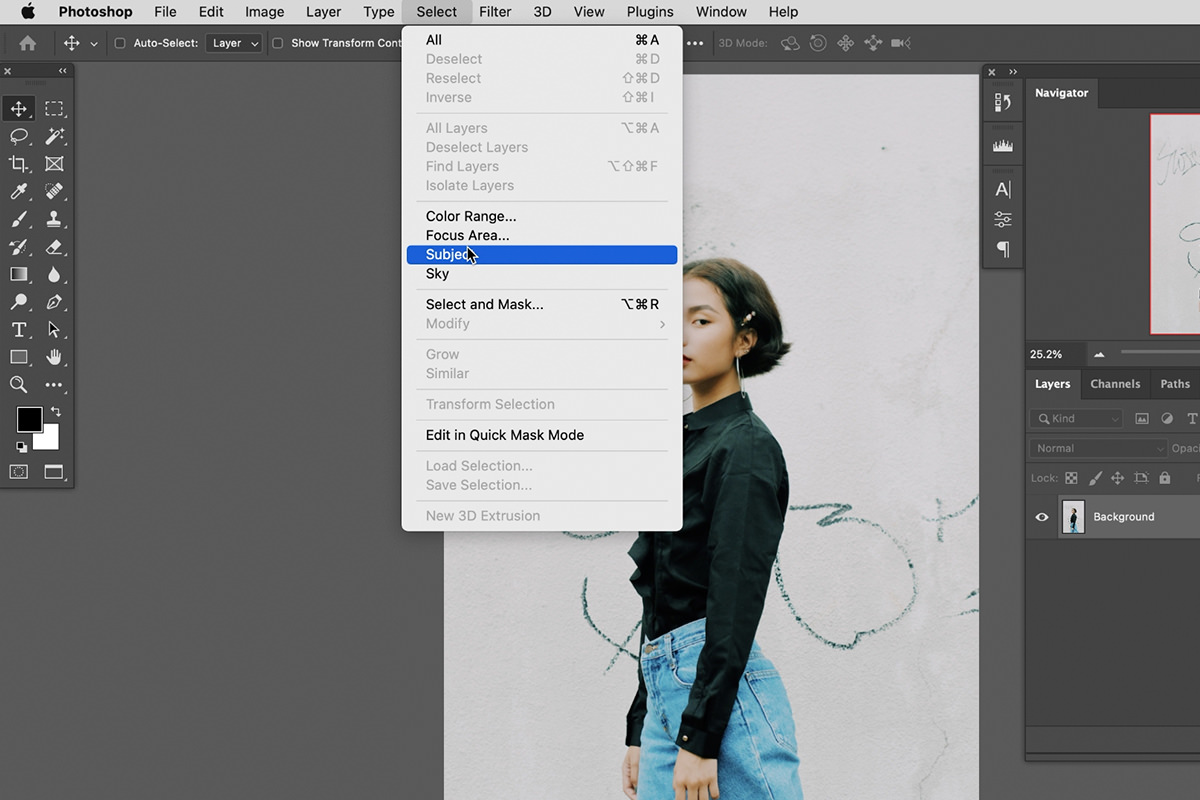
1. Select Subject
Go to Select, then Subject. Photoshop analyzes the image, decides what the main subject is, and selects it. There are no settings to configure.
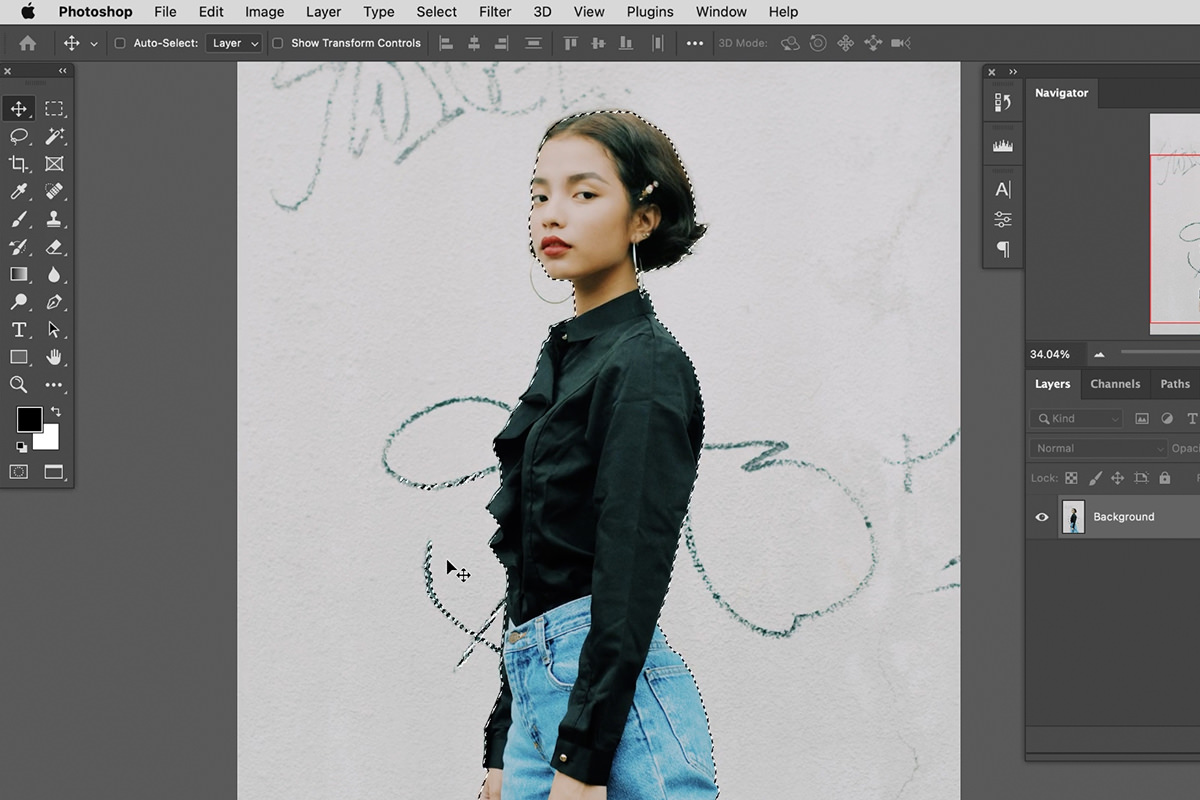
This should be your first move on almost any image with a clear subject. It takes one click, it is often surprisingly good — including on hair — and even when it is imperfect it gives you a base to refine rather than a blank canvas.
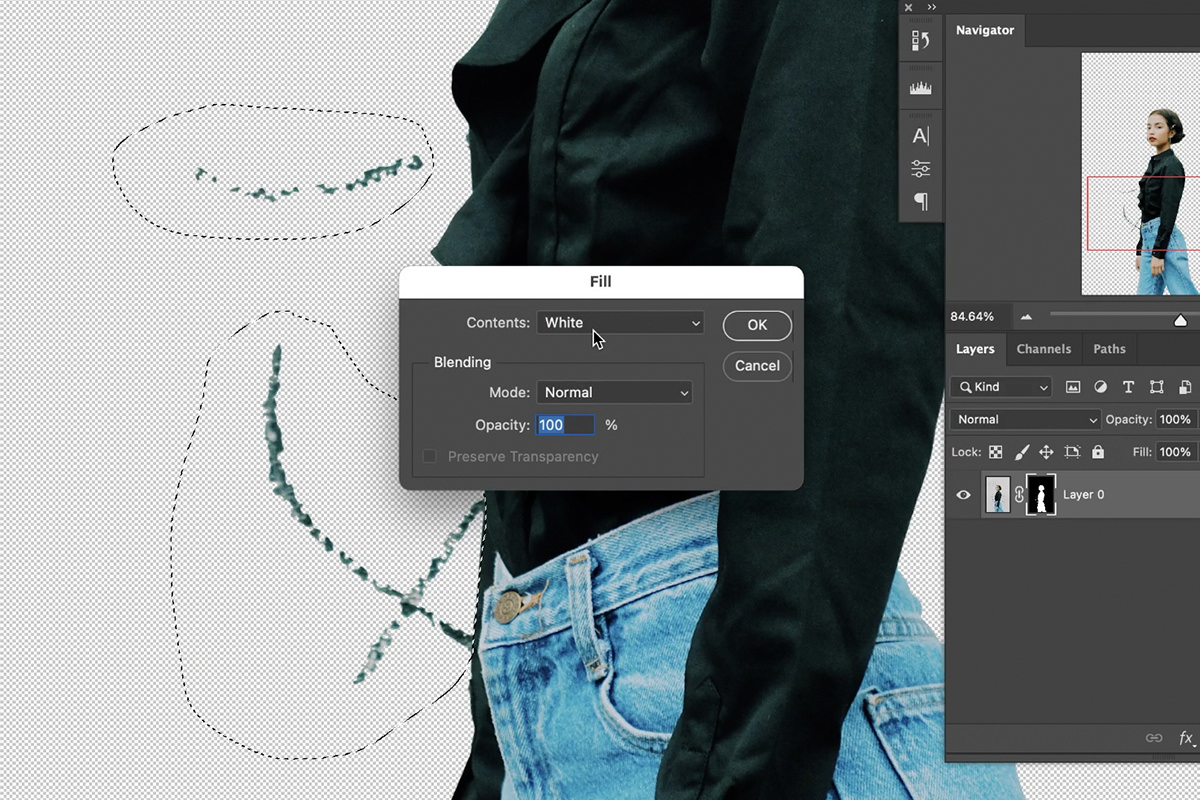
Where it falls down
It sometimes decides a background element belongs to the subject, particularly when something overlaps or matches in tone. The fix is not to abandon the selection but to correct it. Click the layer mask icon to cut the subject out, then draw around a leftover area with the Lasso Tool and hold Shift to add the others to the same selection. With the layer mask active, go to Edit, then Fill, and fill with black. Black on a mask hides those areas, leaving the subject on a blank background.
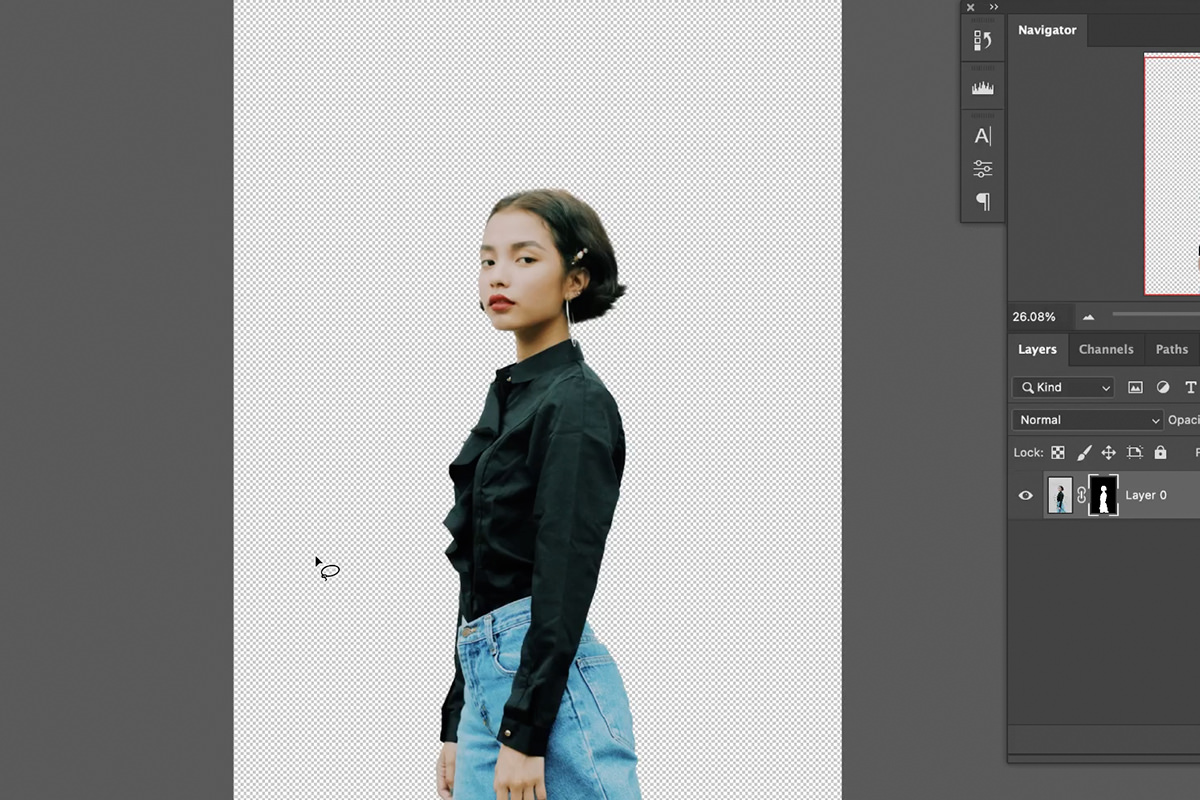
Treat Select Subject as a starting point rather than a finished answer, and it earns its place at the top of this list. Because the cleanup happens on the mask, you can keep refining it at any time.
Device or cloud
Recent versions of Photoshop offer a choice of where Select Subject does its thinking — on your machine, which is faster, or in the cloud, which is slower but generally produces more detailed results, particularly around hair. If you see that option in the options bar, the cloud setting is usually worth the extra few seconds on a portrait. If you do not see it, your version simply runs the one method.
2. Color Range
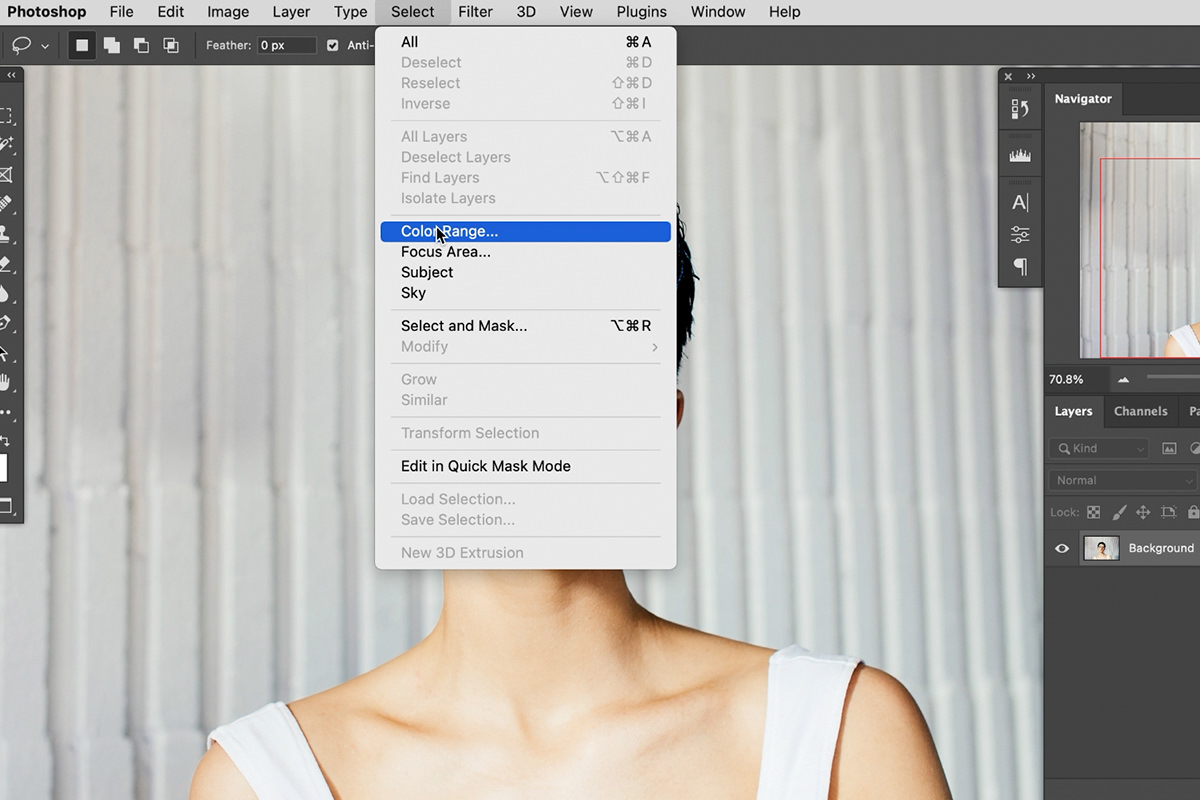
Found under Select, then Color Range. Instead of selecting a region, this selects a color wherever it appears in the image. Click a color with the eyedropper and Photoshop finds every similar pixel across the whole frame.
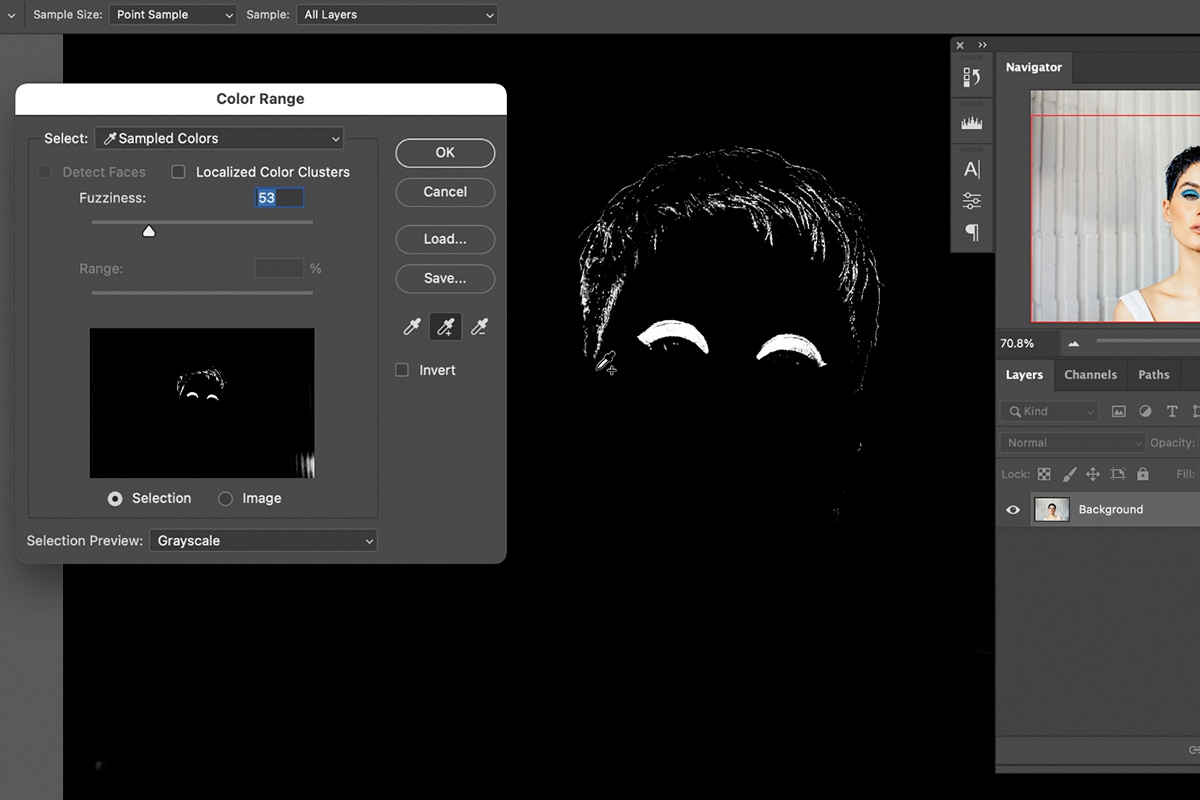
Fuzziness is the control that matters
Fuzziness determines how far from your sampled color the selection reaches. Low values catch only near-identical pixels; high values spread outward into related tones. The preview in the dialog shows the selection as white against black, so you can watch it grow as you drag.
The plus and minus eyedroppers let you add or remove additional colors, which is how you handle anything that is not perfectly uniform.
The preview modes are underused
The Selection Preview dropdown at the bottom shows the result on the actual image — Grayscale, Black Matte, White Matte, or Quick Mask. Switching between them tells you far more about the quality of a selection than the small thumbnail does, and it is the difference between guessing and knowing.
The Select dropdown does more than sampled colors
The dropdown at the top of the dialog defaults to Sampled Colors, but the other entries are genuinely useful and almost nobody scrolls through them. Skin Tones selects skin across the whole image in one step, and pairs with the Detect Faces checkbox to keep the selection focused on people rather than every warm-toned object in frame. Highlights, Midtones and Shadows select by brightness range instead of hue, which is a fast way to grab just the bright areas of an image for a tonal adjustment.
There is also a Range slider that appears with the tonal options, narrowing how wide a band of brightness counts. Between those and Fuzziness, you can isolate a surprisingly specific set of pixels without drawing anything at all.
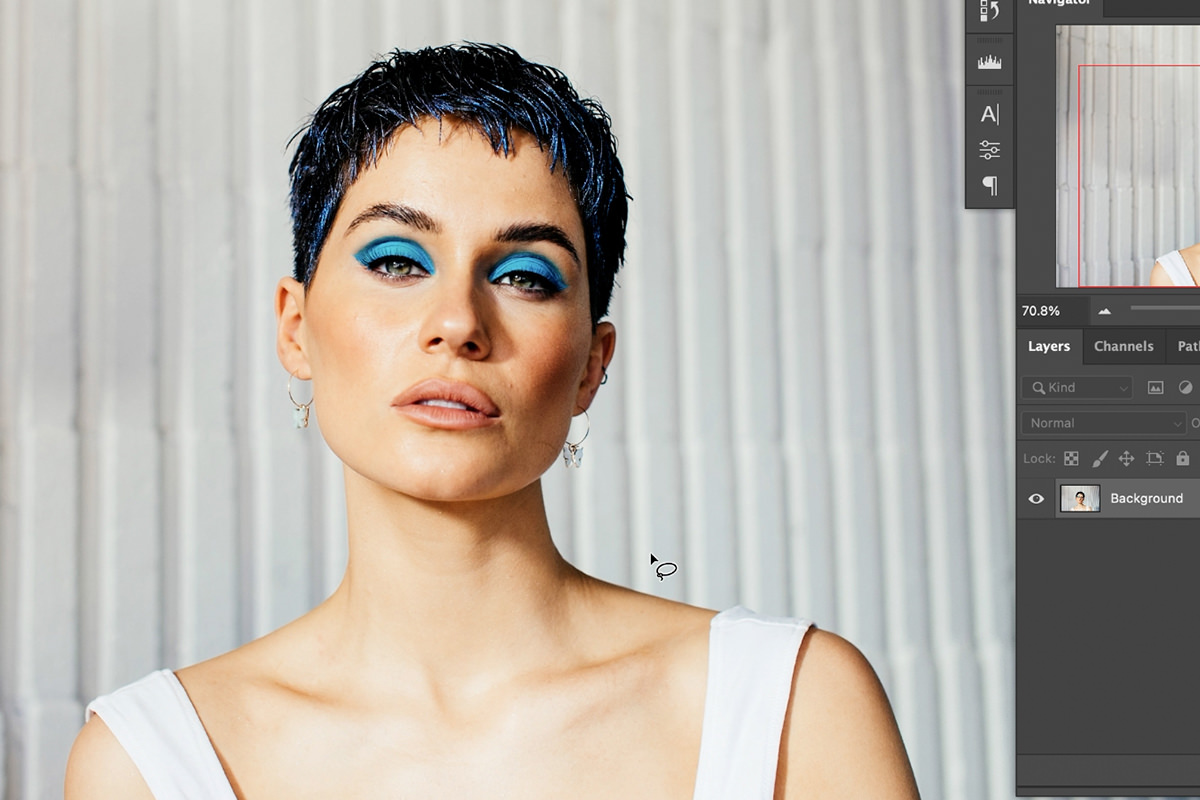
Color Range is the right choice for changing a specific color (makeup, clothing, a painted wall, a sky) and for isolating anything defined by its color rather than its outline. It struggles when the color you want is also present elsewhere in the image, which is worth checking before you commit.
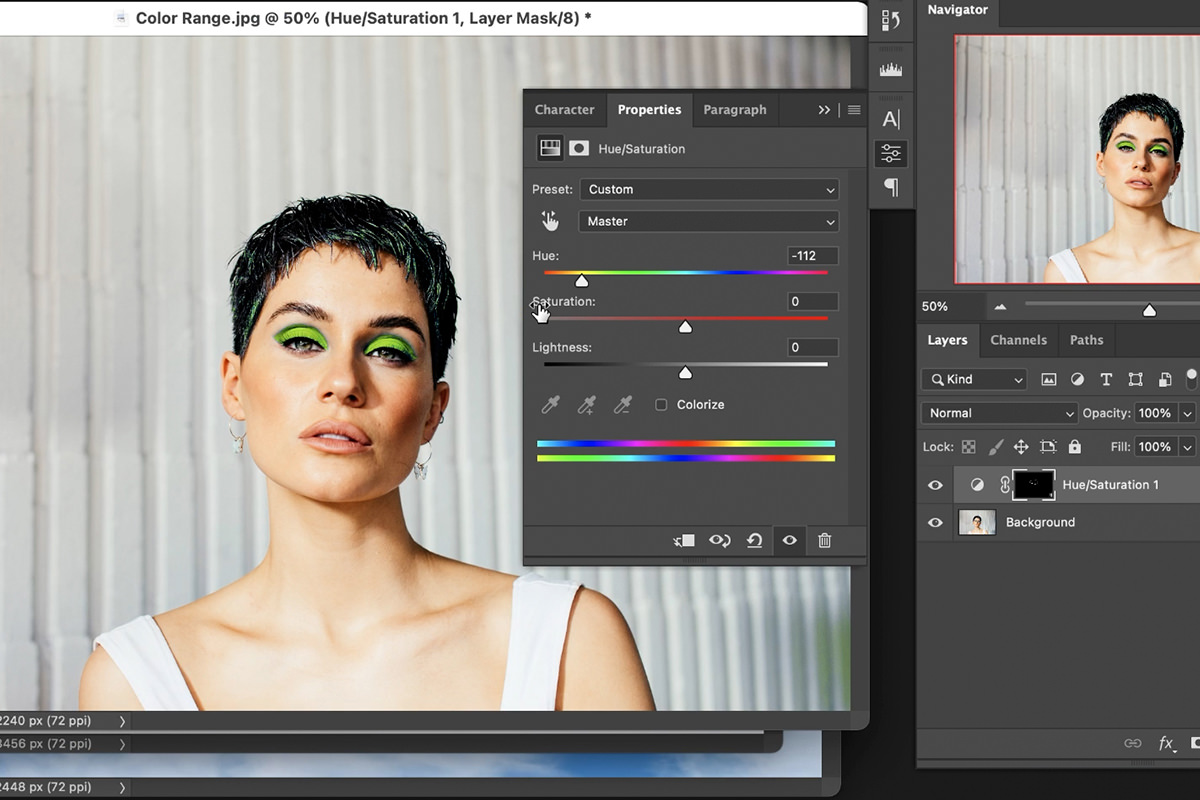
To change the color, click OK and add a Hue/Saturation adjustment layer. Because the selection is active, it loads straight into the adjustment layer’s mask, so dragging the Hue slider left or right recolors only what you selected. In the tutorial, that turns her blue eye makeup a new color in seconds.

3. Select and Mask
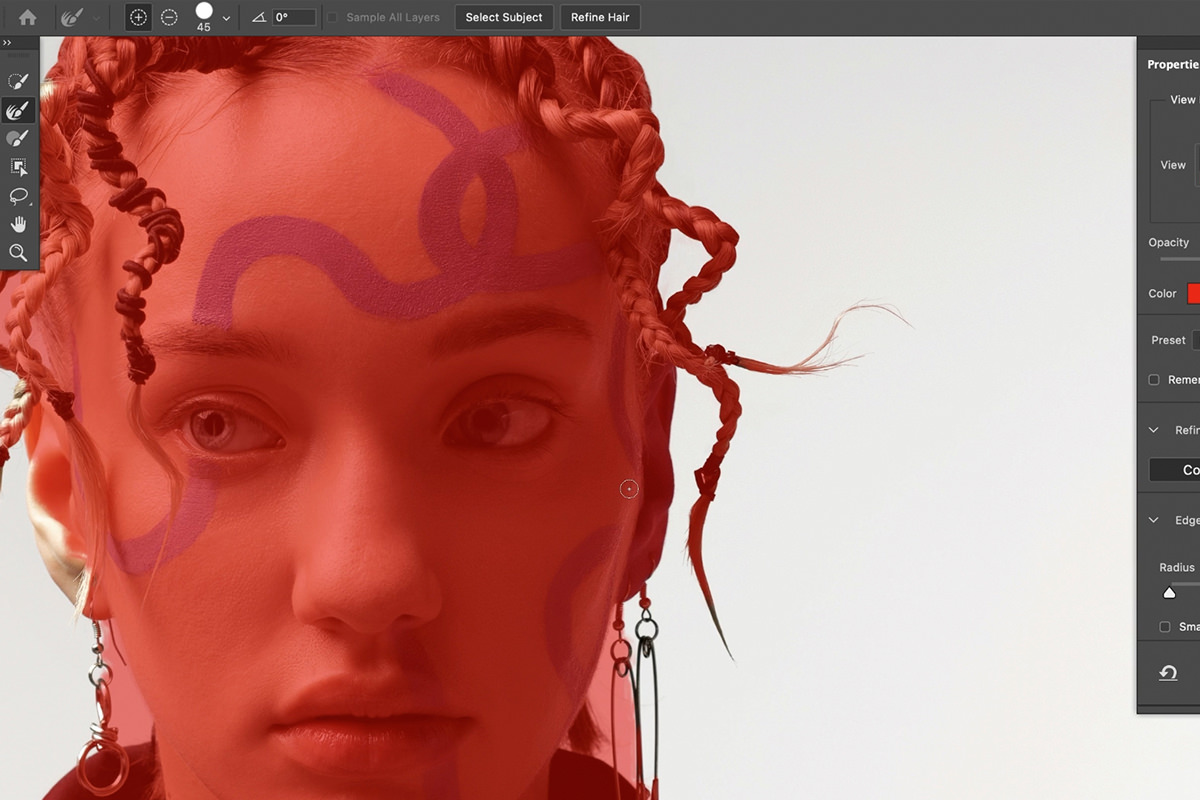
Select and Mask is a dedicated workspace for building and refining a selection, and it is where difficult edges get solved. You don’t need a selection first: go to Select, then Select and Mask, and paint the area you want with the tool at the top left of its toolbar. As you paint, it learns what you want selected and what you don’t.

Set the view mode first
Overlay is the most useful view for most work — it shows the unselected area as a red tint, so you can see exactly what is in and out against the real image. On Layers and Black and White are worth switching to when you want to judge edge quality specifically.
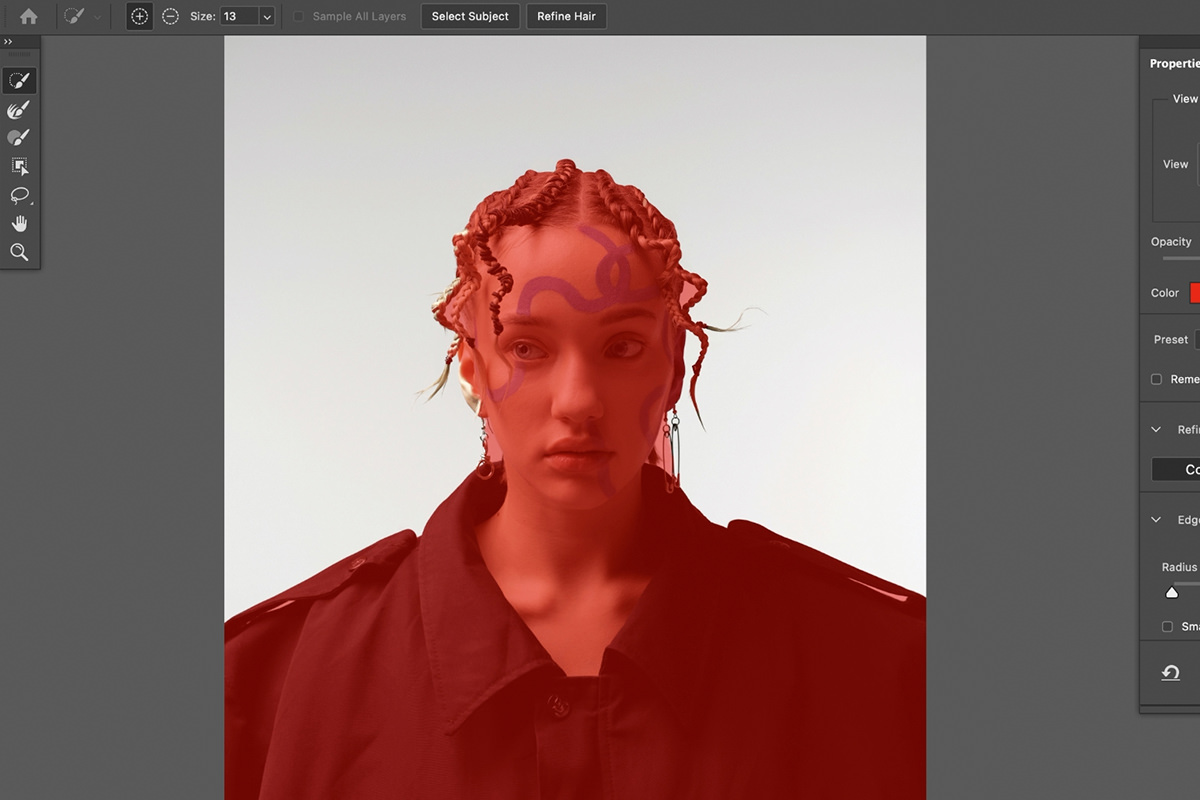
The Refine Edge Brush
This is the reason the workspace exists. Paint it over hair, fur, or any soft transitional edge and Photoshop analyzes the area and works out what is subject and what is background at a level of detail no manual selection could match.
The trick is to paint over the transition zone itself — the region containing both hair and background — rather than over solid areas. Solid regions are already handled; the brush is for the ambiguous edge.
The regular brush, and the shortcuts
Alongside it is an ordinary brush that adds to the selection, with Alt or Option to subtract — use this for straightforward areas the automatic pass got wrong.
Three shortcuts make the workspace usable: the square bracket keys resize the brush, spacebar plus drag pans the canvas while zoomed in, and Alt or Option reverses whichever brush you are holding.
Global Refinements
Above the output settings sit four sliders that apply to the whole selection, and they are worth understanding rather than nudging at random.
Smooth rounds off jagged edges — useful after a rough automatic selection, but it will also round off genuine fine detail, so use it sparingly on hair. Feather softens the entire edge uniformly; a value of half a pixel to two pixels often helps a cutout sit naturally against a new background. Contrast does the opposite of Feather, hardening a soft edge, and is occasionally the fix for a selection that came out mushy. Shift Edge moves the whole boundary inward or outward, and pulling it in slightly is the standard remedy for a cutout carrying a thin halo of its old background.
Decontaminate Colors
A checkbox in the output section that removes color fringing left over from the original background — the green tint on hair cut out from grass, for instance. It works well, with one catch: enabling it forces the output to a new layer with a mask rather than a mask on your existing layer, because it has to alter actual pixel colors to do its job.
Output settings
At the bottom, choose what you get: a selection, a new layer with a layer mask, or a layer mask applied to the current layer. Choosing a mask rather than a plain selection is almost always right, because it stays editable afterward.
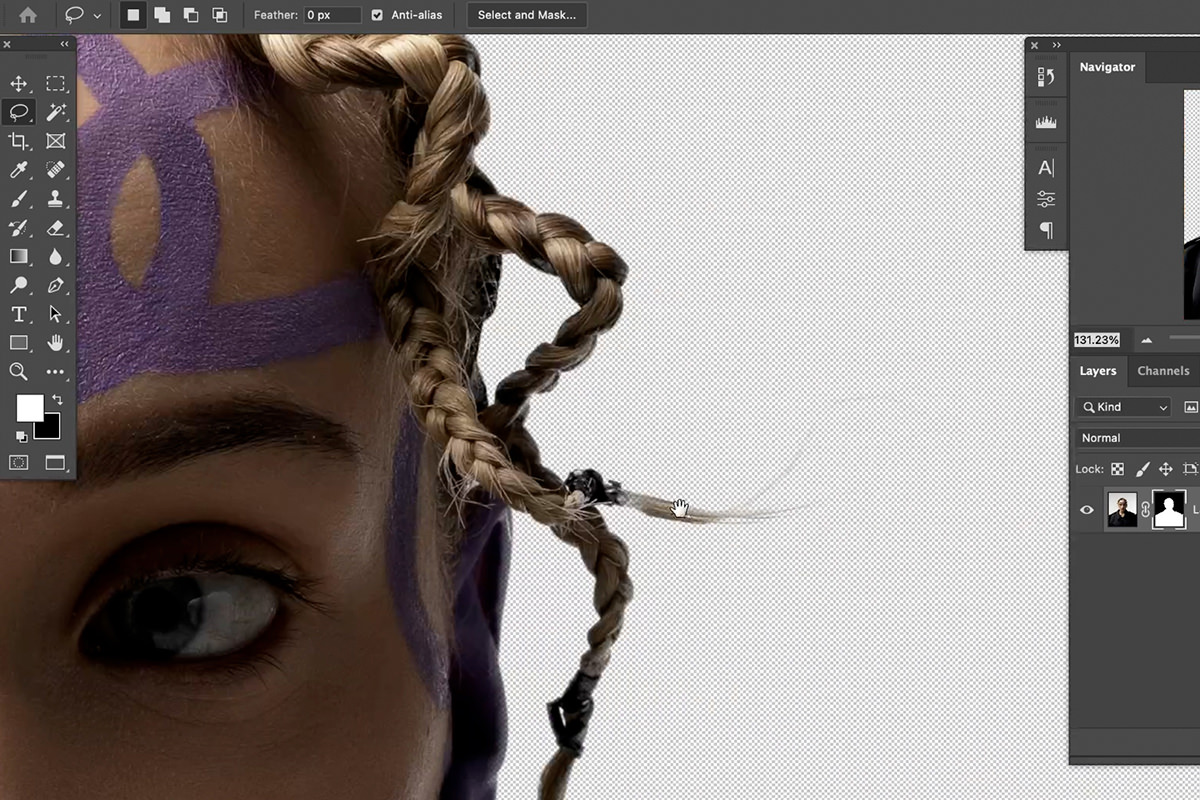
In the tutorial, the Layer Mask output comes out the opposite of what we want, so click the layer mask and press Ctrl or Cmd + I to invert it. The earrings were missed, too. Hold Shift and click the mask to disable it, go to Select, then Color Range, click the earrings and raise Fuzziness, then click OK. Press B for the Brush Tool, make white the foreground color and paint over the earrings on the mask; the selection keeps the paint inside them.
4. The Pen Tool
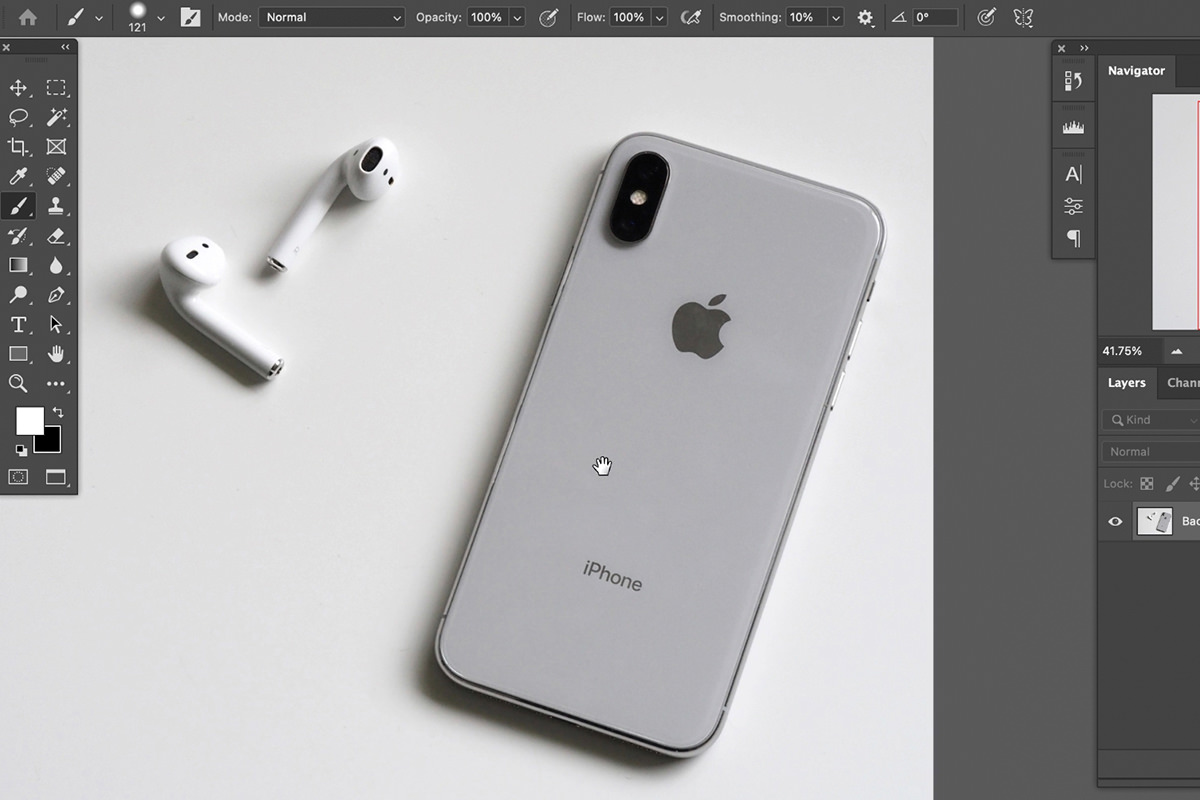
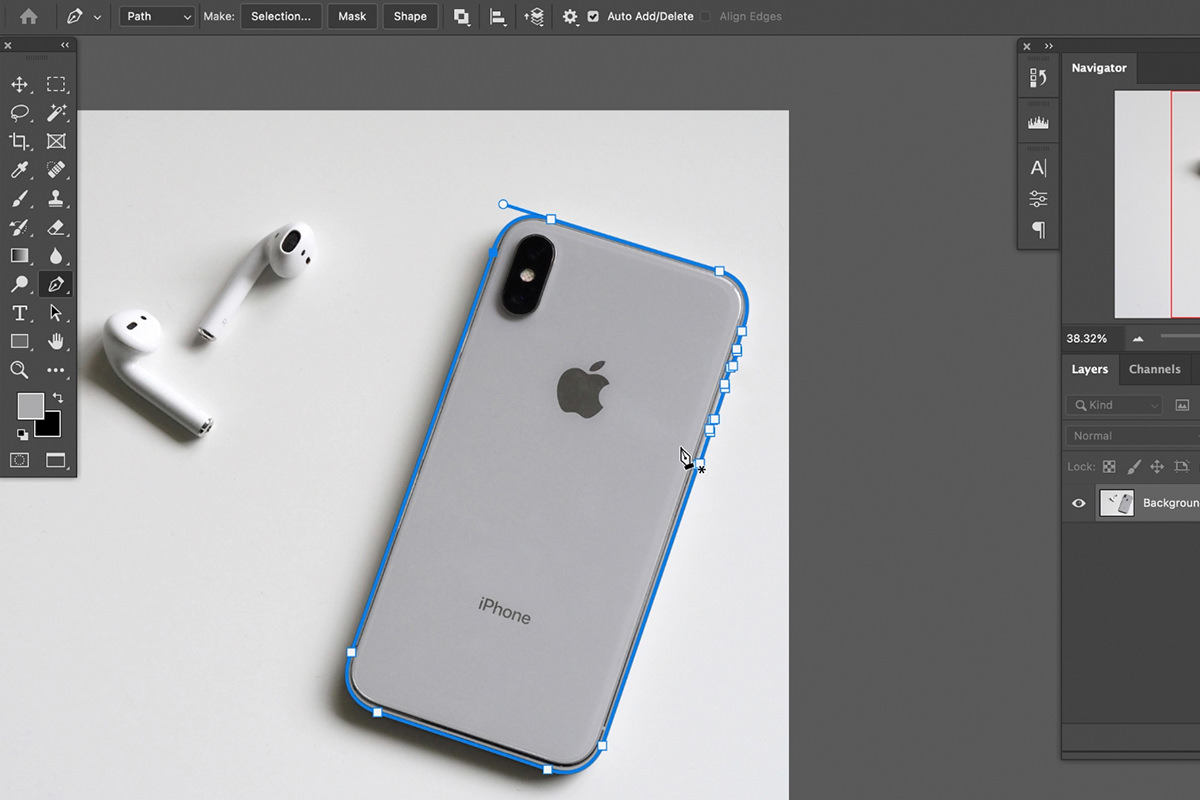
The Pen Tool is entirely manual — you trace the outline yourself — and on the right image nothing beats it.
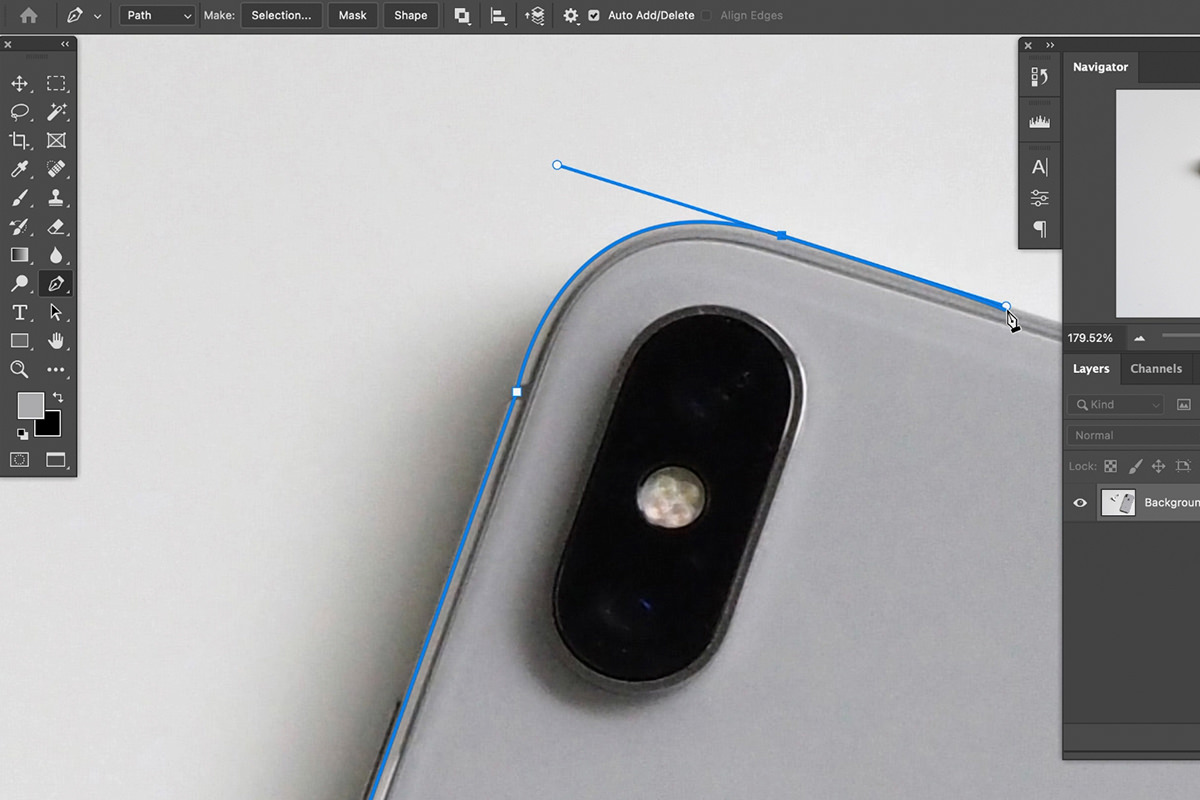
Press P and make sure the mode dropdown in the options bar is set to Path, not Shape. In the gear menu, turn on Rubber Band so you can preview each curve before committing, and set the path thickness to 3 pixels so you can actually see it.
How it works
Click once to place a point and create a straight segment. Click and drag to pull out handles and create a curve. That is the entire tool.
Two shortcuts handle everything else. Hold Alt or Option to break a handle and create a sharp corner, or to convert an existing point between corner and curve. Hold Ctrl or Cmd to temporarily switch to the Direct Selection Tool so you can move any point or handle you have already placed — including points from several clicks ago.
Turning the path into a selection
Right-click and choose Make Selection. Set the feather radius before clicking OK — 0 pixels for a genuinely hard edge, or a small value if the subject has slight softness.
Save the path
A path you have just drawn appears in the Paths panel as Work Path, which is temporary — start another path and it can be replaced. Double-click it and give it a name to make it permanent. It then travels with the file, so weeks later you can reload that exact selection instead of tracing the object again. On product work, where the same item comes back for a second edit, this alone justifies the time the Pen Tool takes.
Use the Pen Tool for manufactured objects with defined edges: products, phones, cars, buildings, anything geometric. Do not use it for hair, fur, fabric texture or foliage — a hand-drawn path on a soft edge produces a result that is precise and obviously fake. On those subjects the automatic tools genuinely do better.
5. Channels
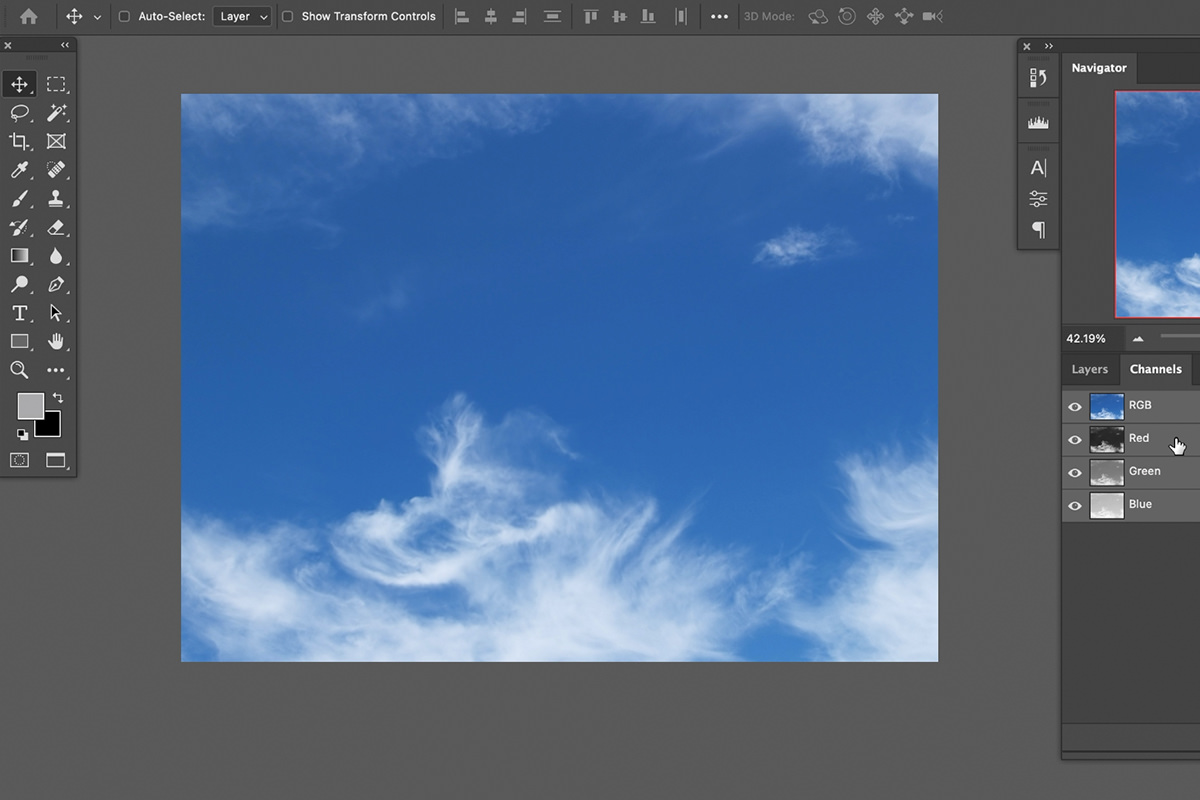
Channels is the most advanced of the five and the one that solves problems the others cannot. It works by exploiting contrast that already exists in the image’s color data.
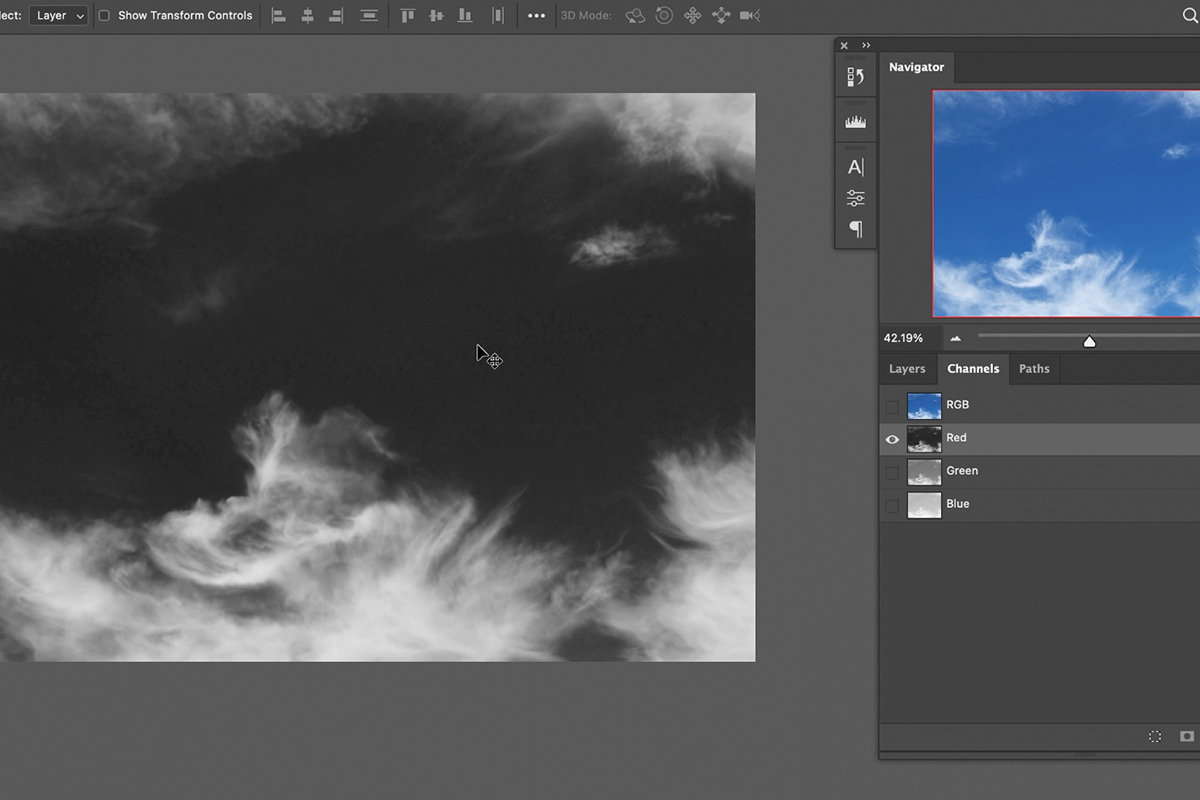
Open Window, then Channels, and click through Red, Green and Blue in turn. You are looking for the channel where your subject separates most strongly from its background in brightness. For white clouds in a blue sky, that is the Red channel: there is not much red in a blue sky, so the sky goes dark while the clouds stay white.
-
Duplicate the channel you chose
Drag it onto the new channel icon. This is not optional: editing an original color channel changes the colors in your image.
-
Press Ctrl or Cmd + L for Levels and add contrast
Drag the black point to the right to make the darks a little darker. You are not making it look good, only making the separation between what you want and what you don’t a little stronger.
-
Load the channel as a selection
Hold Ctrl or Cmd and click the channel thumbnail. This always selects the light areas, so use Select, then Inverse if you wanted the dark ones.
-
Return to the Layers panel and apply it
Add a layer mask, or paint white on an existing mask with the selection active. Press Ctrl or Cmd + D to deselect when finished.
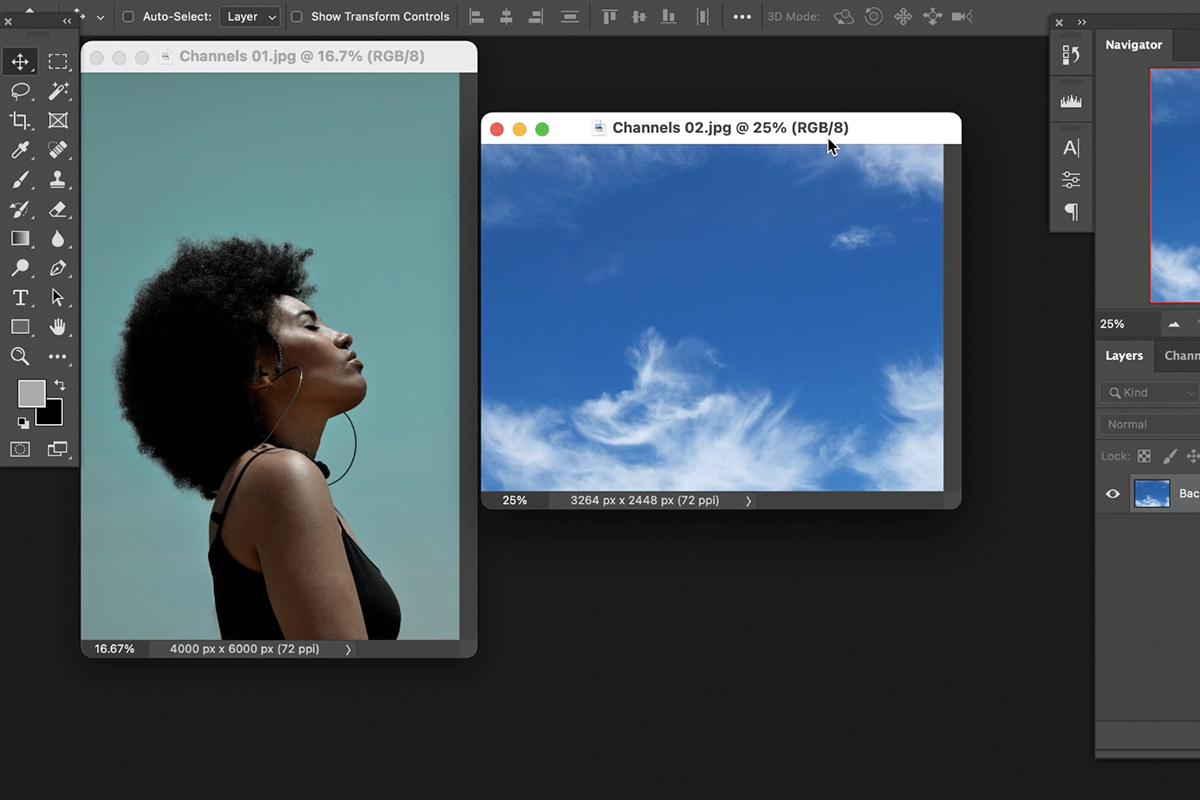
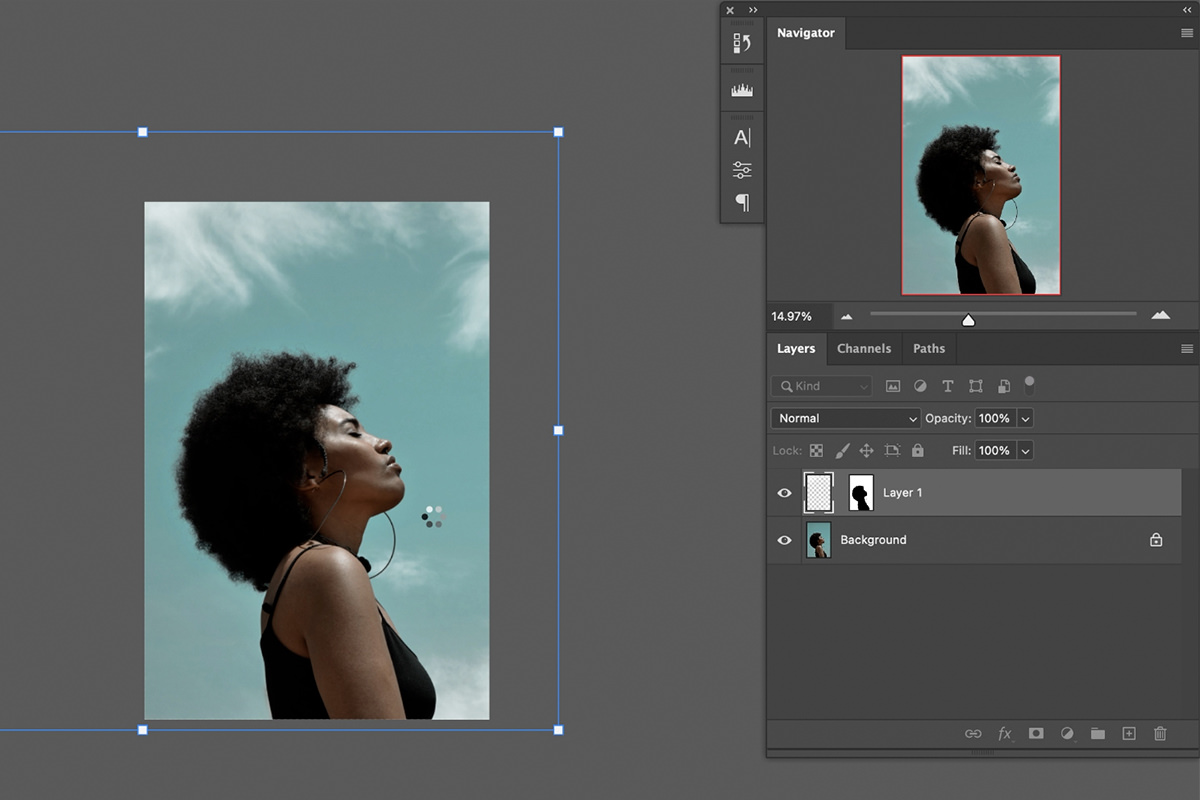
In the tutorial, the clouds go onto their own layer: create a new layer, go to Edit, then Fill, and fill it with white, because clouds are white. Deselect, drag the layer into the portrait with the Move Tool, make it bigger with Ctrl or Cmd + T and right-click to Flip Vertical. To keep the clouds behind her, hide them, click the Background, run Select, then Subject, and add that mask to the cloud layer. Invert it with Ctrl or Cmd + I, then unlink the layer from its mask so the clouds move freely and stay behind the subject.
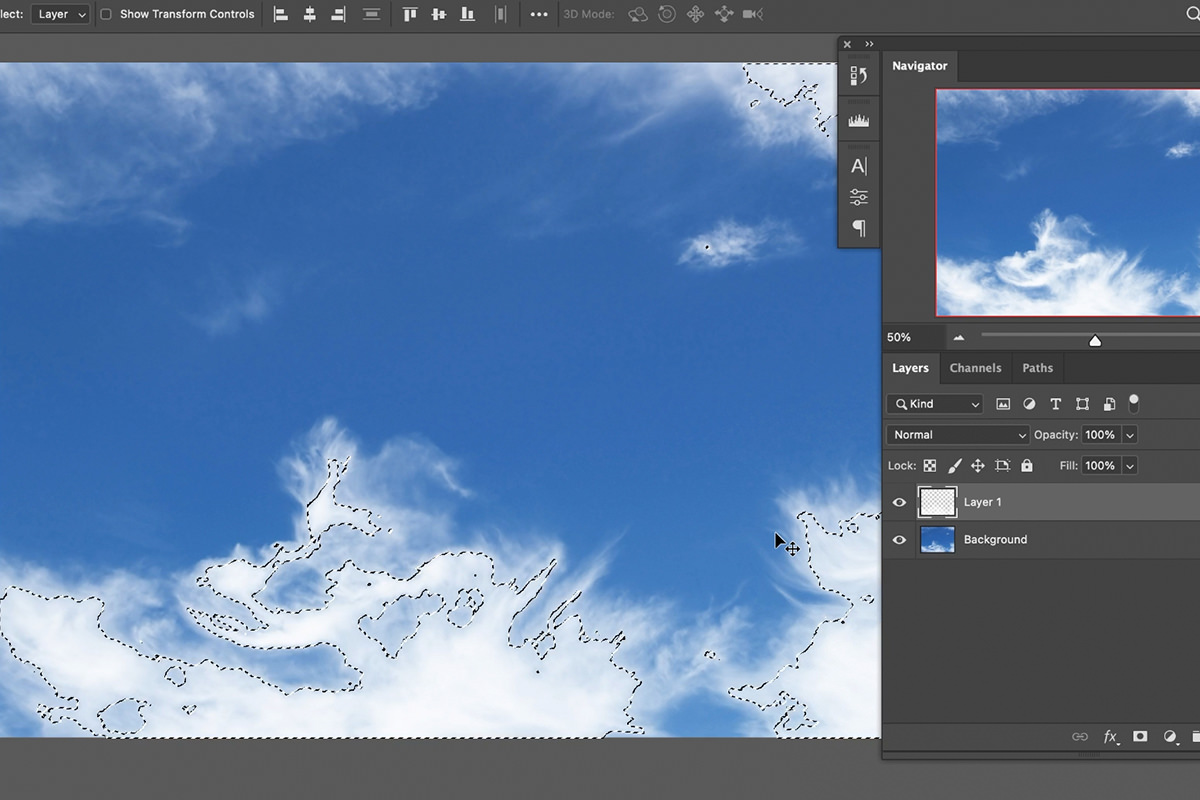
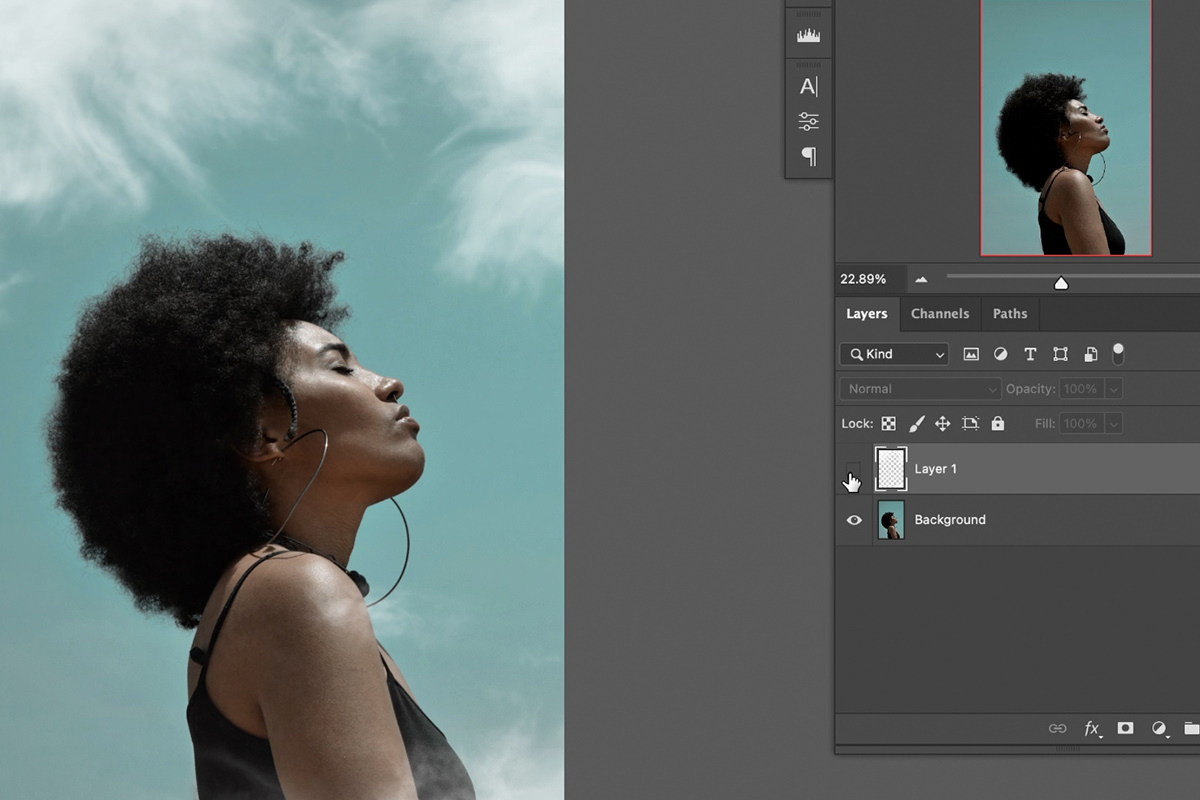
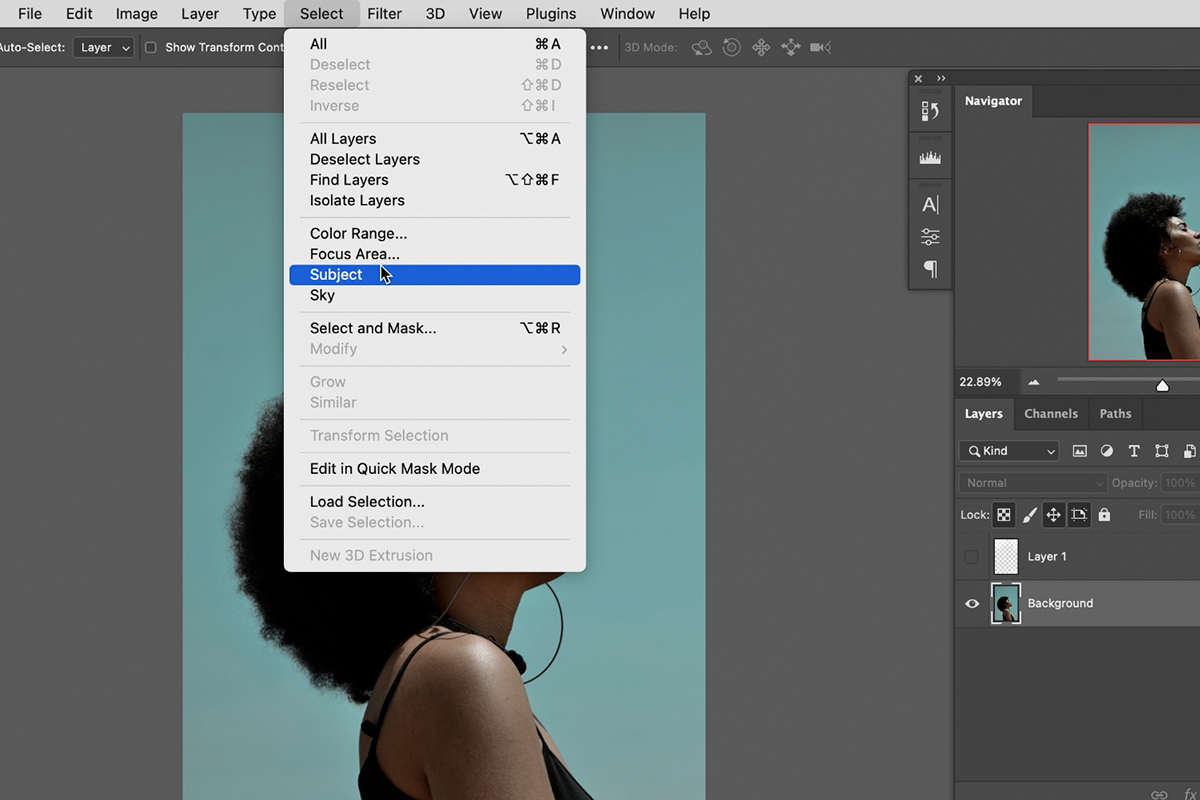
Channels is the answer for soft-edged subjects with good tonal separation: hair against a bright background, smoke, clouds, glass, water spray. Because the selection comes from luminance rather than an edge-detection guess, it captures partial transparency correctly — something no outline-based tool can do.
What About the Quick Selection and Object Selection Tools?
Two tools did not make the list, and it is worth saying why rather than leaving them unmentioned.
The Object Selection Tool lets you draw a rough box or lasso around one object and have Photoshop find its edges within that area. It is genuinely good, and it is the right choice when an image contains several subjects and you want one of them — something Select Subject cannot do, since it decides for you. Think of it as Select Subject with a pointing finger.
The Quick Selection Tool works by painting: drag over an area and the selection grows outward to what Photoshop judges to be similar. It was the standard approach for years and it still works, but Select Subject followed by Select and Mask now reaches a better result faster in most cases. Where it still earns its place is on images with no clear subject at all — a wall, a patch of sky, a stretch of ground — where there is nothing for the automatic tools to recognize.
Neither is a bad tool. They are just narrower versions of jobs the five above do better, which is why they are worth knowing about rather than reaching for first.
Which One Should You Use?
The short version:
Hard-edged manufactured object — Pen Tool. Nothing else gives that clean an edge.
A person or clear subject — Select Subject first, then Select and Mask for the hair.
Something defined by its color — Color Range.
Soft or partially transparent edges with tonal contrast — Channels.
Anything difficult — start automatic, then refine. Almost never start from nothing.
The habit that matters more than the tool
Whichever tool you use, turn the selection into a layer mask rather than deleting pixels. A mask can be painted on, inverted, blurred and refined indefinitely; a deleted background is gone. Every one of these five tools outputs to a mask, and taking that option every time is the single most useful habit in this entire subject.
It is also worth combining them freely. A single cutout might use Select Subject for the body, Select and Mask for the hair, and Channels for a few flyaway strands. There is no rule saying you have to pick one, and the best results usually come from using each tool for the part of the image it handles best.
Quick Reference: Keys, Menus and Settings
- Select SubjectSelect > Subject, then the layer mask icon; Lasso with Shift to add areas, Edit > Fill: Black on the mask
- Color RangeSelect > Color Range, Selection Preview: Grayscale, Fuzziness, plus eyedropper; then a Hue/Saturation layer
- Select and MaskSelect > Select and Mask, View: Overlay, Refine Edge; [ and ] resize; Output To: Layer Mask
- Fix the maskCmd/Ctrl + I inverts it; Shift-click the mask to disable it
- Pen ToolPath, Rubber Band, Thickness 3 px; Alt/Option-drag a handle; Cmd/Ctrl-drag a point
- Path to selectionRight-click > Make Selection, Feather Radius: 0
- ChannelsWindow > Channels, duplicate Red, Cmd/Ctrl + L, Cmd/Ctrl-click the copy; Cmd/Ctrl + D deselects
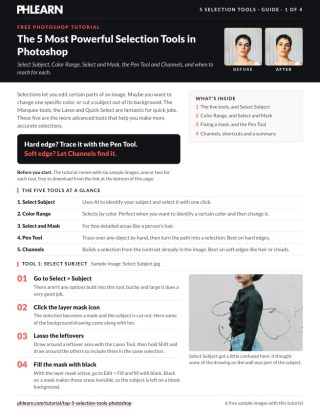
Free Downloads
Follow Along on the Same Photos
Get the six sample images, one or two for each selection tool, and the 4-page PDF guide that walks through all five. Free with a PHLEARN account.
Photoshop Selection Tools: Common Questions
Which selection tool should I use?
It depends on the edge. Use Select Subject for a person, Color Range for one color, Select and Mask for hair, the Pen Tool for hard-edged objects and Channels for soft edges like clouds or hair.
Select Subject grabbed part of the background. How do I fix it?
Click the layer mask icon, then draw around the leftovers with the Lasso Tool, holding Shift to add each area. With the mask active, go to Edit > Fill and fill with black to hide them.
How do I change one color in a photo?
Go to Select > Color Range, click the color and set the Fuzziness, then click OK. Add a Hue/Saturation adjustment layer; the selection loads into its mask, so dragging the Hue slider recolors only that area.
What does Fuzziness do in Color Range?
It sets how many similar colors are included. Less keeps just the colors you clicked, more spreads to related colors. Switch Selection Preview to Grayscale to watch it: white is selected.
How do I select hair in Photoshop?
Go to Select > Select and Mask, set View to Overlay and paint the subject with the top-left tool. Then paint the edges with Refine Edge; to add stray hair, start inside the selection and paint out.
Why does my mask show the background instead of the subject?
The mask came out inverted. Click the layer mask and press Cmd/Ctrl + I. It happens twice in this tutorial, after Select and Mask and on the cloud layer.
Select and Mask missed the earrings. Can I add them afterward?
Yes. Shift-click the mask to disable it, select the earrings with Select > Color Range, then press B and paint white on the mask. The selection keeps the paint inside the earrings.
What Pen Tool settings work best?
Set the Pen Tool to Path, turn on Rubber Band to preview the next segment and set the path Thickness to 3 px. Click for straight lines, click and drag for curves, and hold Alt/Option to change direction.
How do I select clouds with channels?
Open Window > Channels and pick the channel with the most contrast, here Red. Duplicate it, press Cmd/Ctrl + L to make the darks a little darker, then Cmd/Ctrl-click the copy to select the light clouds.
Are the sample files free?
Yes, with a free PHLEARN account. You get 6 sample images and 1 PDF guide: one or two photos for each tool, plus the step-by-step guide to all five.
Master Photoshop, Lightroom and Photography
Join PHLEARN PRO for $12.99 a month or $99.99 a year. Cancel anytime, with a 100% money-back guarantee.





